UltraHD Rolling Cabinet (Model No. 20205) - Seville Classics, Inc.
UltraHD Rolling Cabinet (Model No. 20205) - Seville Classics, Inc.
UltraHD Rolling Cabinet (Model No. 20205) - Seville Classics, Inc.

Create successful ePaper yourself
Turn your PDF publications into a flip-book with our unique Google optimized e-Paper software.
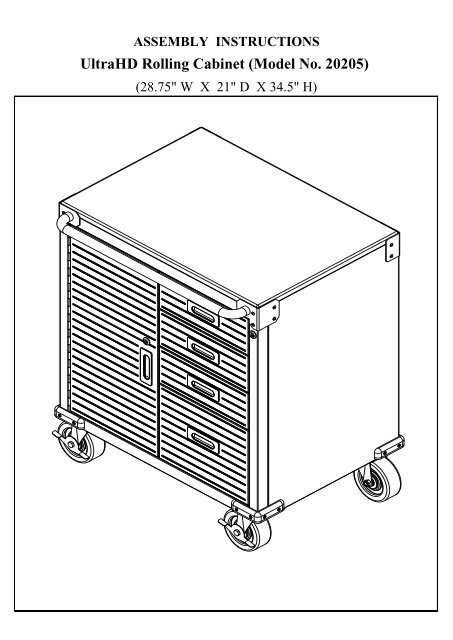
ASSEMBLY INSTRUCTIONS<br />
<strong>UltraHD</strong> <strong>Rolling</strong> <strong>Cabinet</strong> (<strong>Model</strong> <strong>No</strong>. <strong>20205</strong>)<br />
(28.75" W X 21" D X 34.5" H)
(pg 1 of 19)
(pg 2 of 19)<br />
Small Drawer Assembly<br />
Large Drawer Assembly
(pg 3 of 19)<br />
PARTS LIST<br />
Please check the parts carefully according to the parts list. If you are missing any parts, please<br />
contact our customer service department (please refer to page 16 of 19).<br />
(#1) BOTTOM PANEL x 1 PC (#2) FRONT FRAME x 1 PC<br />
(#3) RIGHT PANEL x 1 PC<br />
(#4) LEFT PANEL x 1 PC<br />
(#5) MIDDLE PANEL x 1 PC (#6) BOTTOM BACK PANEL x 1 PC<br />
(#7) UPPER BACK PANEL x 1 PC (#8) DOOR x 1 PC
PARTS LIST<br />
Please check the parts carefully according to the parts list. If you are missing any parts, please<br />
contact our customer service department (please refer to page 16 of 19).<br />
(#9) MIDDLE SHELF x 1 PC (#10) MAPLE WOOD TOP x 1 PC<br />
(#11) PUSH BAR x 1 PC<br />
(pg 4 of 19)<br />
(#12-1) SMALL DRAWER FRONT PANEL x 3 PCS<br />
(#12-2) SMALL DRAWER LEFT PANEL x 3 PCS (#12-3) SMALL DRAWER RIGHT PANEL x 3 PCS<br />
(#12-4) SMALL DRAWER BACK PANEL x 3 PCS (#12-5) DRAWER BASE PANEL x 4 PCS
PARTS LIST<br />
(pg 5 of 19)<br />
Please check the parts carefully according to the parts list. If you are missing any parts, please<br />
contact our customer service department (please refer to page 16 of 19).<br />
(#13-1) LARGE DRAWER FRONT PANEL x 1 PC (#13-2) LARGE DRAWER LEFT PANEL x 1 PC<br />
(#13-3) LARGE DRAWER RIGHT PANEL x 1 PC<br />
(#13-4) LARGE DRAWER BACK PANEL x 1PC<br />
(#14) SWIVEL WHEEL WITH BRAKE x 2 PCS (#15) SWIVEL WHEEL W/O BRAKE x 2 PCS<br />
(#16) DRAWER MAT x 4 PCS (#17) BUMPER x 4 PCS
PARTS LIST<br />
Please check the parts carefully according to the parts list. If you are missing any parts, please<br />
contact our customer service department (please refer to page 16 of 19).<br />
(#22) DOOR / DRAWER KEY x 2 STRINGS (#23) HOOK x 4 PCS<br />
(#24) PHILLIPS SCREWDRIVER x 1PC (#25) SCREW D (M8 x 18) x 16 PCS<br />
(pg 6 of 16)<br />
(#18) RIGHT BACK CORNER PROTECTOR x 1 PC (#19) LEFT BACK CORNER PROTECTOR x 1 PC<br />
(#20) SCREW A (M4 x 8) x 58 PCS (#21) SCREW B (M4 x 8) x 79 PCS
(pg 7of 19)<br />
PARTS LIST<br />
Please check the parts carefully according to the parts list. If you are missing any parts, please<br />
contact our customer service department (please refer to page 16 of 19).<br />
(#26) SCREW C (M4 x 18) x 16 PCS (#27) WASHER x 4 PCS
Back<br />
Back<br />
Back<br />
<strong>UltraHD</strong> <strong>Rolling</strong> <strong>Cabinet</strong> (<strong>Model</strong> <strong>No</strong>. <strong>20205</strong>)<br />
Front<br />
Front<br />
Front<br />
Step 1. Open the package, remove and place all parts to the side. Then<br />
open the package of the Maple Wood Top (#10).<br />
<strong>No</strong>te: The Maple Wood Top is packed within an inner<br />
cardboard box.<br />
Step 2.<br />
(pg 8 of 19)<br />
Install Front Frame (#2).<br />
Locate the Front Frame (#2) and attach to the "Front" of the<br />
Maple Wood Top (#10) using Screw Driver (#24) and Screw A<br />
(#20).<br />
<strong>No</strong>te: The screw holes have some tolerance so make sure that<br />
the top and sides of the Front Frame are flushed with the Maple<br />
Wood Top – this may save time by avoiding having to make<br />
slight adjustments later.<br />
Step 3. Install the Left Panel (#4).<br />
Attach the Left Panel (#4) to Front Frame (#2) and Maple Wood<br />
Top (#10). Make sure the “Top” of the Left Panel (#4) is on the<br />
Maple Wood Top (#10) and the screw holes are lined up to the<br />
Front Frame (#2). Use Screw Driver (#24) and Screw A (#20)<br />
with Washer (#27) to tighten the Left Panel (#4) to the Front<br />
Frame (#2) and then to the Maple Wood Top (#10).
(pg 9 of 19)<br />
Front<br />
Back<br />
Front<br />
Front<br />
<strong>UltraHD</strong> <strong>Rolling</strong> <strong>Cabinet</strong> (<strong>Model</strong> <strong>No</strong>. <strong>20205</strong>)<br />
Back<br />
Back<br />
Front<br />
Back<br />
Step 4. Install the Right Panel (#3).<br />
Attach the Right Panel (#3) to Front Frame (#2). Make sure<br />
the “Top” of the Right Panel (#3) is on the Maple Wood Top<br />
(#10). Use Screw Driver (#24) and Screw A (#20) to tighten<br />
the Right Panel (#3) to the Front Frame (#2) and then to the<br />
Maple Wood Top (#10).<br />
Step 5.<br />
Step 6.<br />
Install the Upper Back Panel (#7) and Bottom Back Panel<br />
(#6).<br />
a. Attach the Upper Back Panel (#7) between the Left Panel<br />
(#4) and Right Panel (#3). Make sure the “Top” of the Upper<br />
Back Panel (#7) is on the Maple Wood Top (#10) as the<br />
sticker indicates. Line up the screw holes and use Screw A<br />
(#20) to tighten up the Upper Back Panel to the Maple Wood<br />
Top (#10), Left Panel (#4) and Right Panel (#3).<br />
b. Attach Bottom Back Panel (#6) between the Left Panel<br />
(#4) and Right Panel (#3). Make sure the “Top” of the Bottom<br />
Back Panel (#6) is to the Upper Back Panel (#7) as the<br />
sticker indicates. Line up the screw holes and use Screw A<br />
(#20) to tighten the Bottom Back Panel (#6) to the Upper<br />
Back Panel (#7), Left Panel (#4) and Right Panel (#3).<br />
Install the Middle Panel (#5).<br />
Attach the Middle Panel (#5) into the cabinets as drawing<br />
above. Make sure the “Top” of the Middle Panel (#5) is to the<br />
Maple Wood Top (#10) as the sticker indicates. Use Screw A<br />
(#20) to tighten the Middle Panel (#5) to the Bottom Back<br />
Panel (#6), Upper Back Panel (#7) and Front Frame (#2).
Front<br />
Front<br />
Back<br />
Back<br />
Back<br />
<strong>UltraHD</strong> <strong>Rolling</strong> <strong>Cabinet</strong> (<strong>Model</strong> <strong>No</strong>. <strong>20205</strong>)<br />
Front<br />
Step 7. Install the Bottom Panel (#1).<br />
Attach the Bottom Panel (#1) to the Left Panel (#4), Right<br />
Panel (#3), Front Frame (#2) and Bottom Back Panel (#6).<br />
Line up the screw holes and use Screw A (#20) to tighten.<br />
Step 8. Install Wheels (#14 and #15).<br />
Attach Wheels (#14 and #15) to the Bottom Panel (#1) and<br />
surrounding frame. Make sure the Swivel Wheels with Brake<br />
are installed at the front side. Use Screw D (#25) to tighten<br />
them.<br />
Step 9.<br />
Step 10.<br />
(pg 10 of 19)<br />
Install Bumpers (#17).<br />
Attach Bumpers (#17) to the bottom four corners of the<br />
cabinet. Use Screw C (#26) to tighten them.<br />
Install Corner Protectors (#18 and #19) and Push Bar<br />
(#11).<br />
Attach the Right Back Corner Protector (#18) and Left Back<br />
Corner Protector (#19) to the back side of the cabinet. Use<br />
Screw A (#20) to tighten them. Then attach the Push Bar<br />
(#11) to the front side of the cabinet. Use Screw A (#20) to<br />
tighten it.
(pg 11 of 19)<br />
<strong>UltraHD</strong> <strong>Rolling</strong> <strong>Cabinet</strong> (<strong>Model</strong> <strong>No</strong>. <strong>20205</strong>)<br />
Step 11. Install Small Drawer Side Panels (#12-2 and #12-3).<br />
Fit and attach Small Drawer Side Panels (#12-2 and #12-3)<br />
one at a time into the back of the Small Drawer Front Panel<br />
(#12-1). Make sure the Drawer Side Panels are placed in<br />
all the way making contact with the rear of the Small<br />
Drawer Front Panel (#12-1). Line up the screw holes and<br />
use Screw B (#21) to tighten them.<br />
Step 12. Install Small Drawer Base Panel (#12-5).<br />
From above, fit and attach Small Drawer Base Panel (#12-<br />
5) between the two sides and into the back of the Small<br />
Drawer Front Panel (#12-1). Use Screw B (#21) to tighten.<br />
<strong>No</strong>te: Do not fully tighten any one screw until all screws are<br />
partially screwed in.<br />
Step 13.<br />
Install Small Drawer Back Panel (#12-4).<br />
Attach the Small Drawer Back Panel (#12-4) to the rest of<br />
the assembled drawer. Use Screw B (#21) to tighten. Once<br />
you have the first Small Drawer assembled, repeat Steps<br />
11-13 to assemble the other two Small Drawers. Once<br />
completed, you should have three Small Drawers.
<strong>UltraHD</strong> <strong>Rolling</strong> <strong>Cabinet</strong> (<strong>Model</strong> <strong>No</strong>. <strong>20205</strong>)<br />
(pg 12 of 19)<br />
Assemble and Install Large Drawer the same way.<br />
Repeat Steps 11-13 using Large Drawer Left Panel (#13-2), Large<br />
Drawer Right Panel (#13-3), Large Drawer Front Panel (#13-1),<br />
Large Drawer Back Panel (#13-4) and Drawer Base Panel (#12-5)<br />
to assemble the Large Drawer. Once assembled, you should have<br />
one Large Drawer.
(pg 13 of 19)<br />
<strong>UltraHD</strong> <strong>Rolling</strong> <strong>Cabinet</strong> (<strong>Model</strong> <strong>No</strong>. <strong>20205</strong>)<br />
WARNING:ball bearing track must be pulled<br />
out all the way to stay in the front of slider<br />
Step 14.<br />
Install four Drawers into cabinet.<br />
To insert Drawers, pull out the drawer tracks and inner<br />
ball bearing tracks as far as possible. Then fit the<br />
tracks attached to the Drawer to the inside of the track<br />
attached to the Right Panel (#3) and Middle Panel (#5).<br />
Use the same way to install all four Drawers. Next, slide<br />
the four Drawers (three small and one large) one at a<br />
time into the unit.<br />
After sliding in the four Drawers, place the Drawer Mats<br />
(#16) inside the Drawers.<br />
Step 15. Install the Middle Shelf (#9).<br />
a. Decide the height for each Middle Shelf (#9), place<br />
the Hooks (#23) into the hook slot and push down.<br />
<strong>No</strong>te: The Middle Shelf has 4 Hooks at four corners for<br />
support. Place the 4 Hooks at the four corners and<br />
make sure they are the same height.<br />
b. Place the Middle Shelf (#9) into the cabinet and push<br />
down onto the Hooks (#23).
<strong>UltraHD</strong> <strong>Rolling</strong> <strong>Cabinet</strong> (<strong>Model</strong> <strong>No</strong>. <strong>20205</strong>)<br />
(pg 14 of 19)<br />
Step 16. Install the Door (#8)<br />
Attach the Door (#8) to the unit using Screw B (#21) to<br />
tighten.<br />
<strong>No</strong>te: The screw holes on the door hinge have tolerance,<br />
enabling the door to be adjusted and centered in the door<br />
frame.<br />
How to pull the drawer out of the unit.<br />
To pull the drawers out of the unit, pull the black plastic<br />
clip on the right side of the drawer up, then push on the<br />
black plastic clip on the left side of the drawer down. <strong>No</strong>w<br />
you can pull the drawer out.<br />
[!] For SAFTEY: Only open one drawer at a<br />
time. 40lbs. maximum loading for each<br />
drawer.
Stack Assembly Instruction<br />
(pg 15 of 19)<br />
*<strong>No</strong>te 1: Recommended for 2 people to Stack one set <strong>Rolling</strong> <strong>Cabinet</strong> on top of the bottom set .<br />
*<strong>No</strong>te 2: Determine which unit will be the bottom and the top.<br />
Step 17 :<br />
Step 18:<br />
Step 19:<br />
Pull the four drawers out of the bottom unit. Use Screwdriver<br />
(#24) to remove all screws in order to remove the Maple<br />
Wood Top (#10).<br />
Use Screwdriver (#24) to remove four Bumpers (#17) and<br />
Wheels (#14 and #15) of the top unit you want to stack.<br />
Stack the top unit onto the bottom unit. Use Screw D (#25) to<br />
tighten as picture shown to left.<br />
<strong>No</strong>te: Before you stack the top unit, make sure the drawers<br />
and cabinet door are locked.<br />
When assembled, place drawers into the bottom drawer.
<strong>Seville</strong> <strong>Classics</strong>, <strong>Inc</strong>.<br />
19401 South Harborgate Way<br />
Torrance, CA 90501<br />
USA<br />
(pg 16 of 19)<br />
*If you are missing any parts, have any questions, or need additional assistance in assembly,<br />
please contact our bilingual (English and Spanish) customer service department at:<br />
Telephone: (800) 323-5565 within USA<br />
Hours: 9:00am - 4:30pm (Pacific Standard Time)<br />
Fax: (310) 533-3899<br />
E-mail: support@sevilleclassics.com<br />
Website & Online Store: www.sevilleclassics.com<br />
***Please visit our website or call and inquire about our additional <strong>UltraHD</strong> Line***
(pg 17 of 19)<br />
<strong>UltraHD</strong> Line<br />
Item# 20256<br />
<strong>UltraHD</strong> Work Center<br />
Item# 20206<br />
<strong>UltraHD</strong> Workbench
<strong>UltraHD</strong> Line<br />
Item# 20224<br />
Steel Pegboard Set<br />
(pg 18 of 19)<br />
Item# 20242<br />
<strong>UltraHD</strong> <strong>Rolling</strong> Workbench
(pg 19 of 19)<br />
<strong>UltraHD</strong> Line<br />
Item# 16234<br />
<strong>UltraHD</strong> <strong>Rolling</strong> <strong>Cabinet</strong><br />
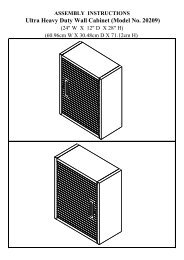
Item# 20209<br />
<strong>UltraHD</strong> Wall <strong>Cabinet</strong>