

How to create chisel effects in CorelDRAW 11: Part 1 By Steve Bain ...
How to create chisel effects in CorelDRAW 11: Part 1 By Steve Bain ...
How to create chisel effects in CorelDRAW 11: Part 1 By Steve Bain ...

Create successful ePaper yourself
Turn your PDF publications into a flip-book with our unique Google optimized e-Paper software.
<strong>How</strong> <strong>to</strong> <strong>create</strong> <strong>chisel</strong> <strong>effects</strong> <strong>in</strong> <strong>CorelDRAW</strong> <strong>11</strong>: <strong>Part</strong> 1<br />
<strong>By</strong> <strong>Steve</strong> Ba<strong>in</strong><br />
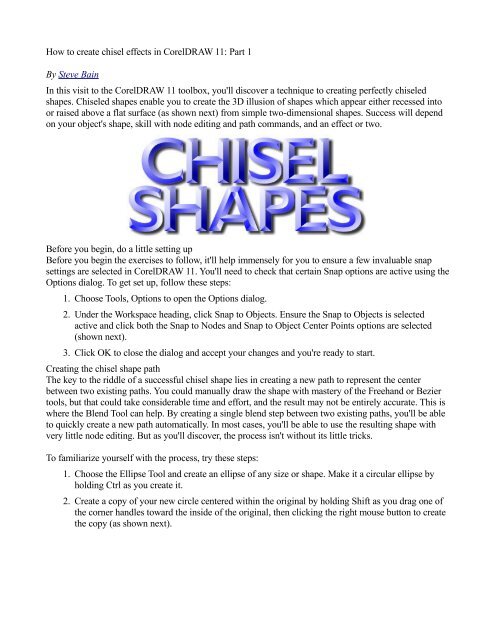
In this visit <strong>to</strong> the <strong>CorelDRAW</strong> <strong>11</strong> <strong>to</strong>olbox, you'll discover a technique <strong>to</strong> creat<strong>in</strong>g perfectly <strong>chisel</strong>ed<br />
shapes. Chiseled shapes enable you <strong>to</strong> <strong>create</strong> the 3D illusion of shapes which appear either recessed <strong>in</strong><strong>to</strong><br />
or raised above a flat surface (as shown next) from simple two-dimensional shapes. Success will depend<br />
on your object's shape, skill with node edit<strong>in</strong>g and path commands, and an effect or two.<br />
Before you beg<strong>in</strong>, do a little sett<strong>in</strong>g up<br />
Before you beg<strong>in</strong> the exercises <strong>to</strong> follow, it'll help immensely for you <strong>to</strong> ensure a few <strong>in</strong>valuable snap<br />
sett<strong>in</strong>gs are selected <strong>in</strong> <strong>CorelDRAW</strong> <strong>11</strong>. You'll need <strong>to</strong> check that certa<strong>in</strong> Snap options are active us<strong>in</strong>g the<br />
Options dialog. To get set up, follow these steps:<br />
1. Choose Tools, Options <strong>to</strong> open the Options dialog.<br />
2. Under the Workspace head<strong>in</strong>g, click Snap <strong>to</strong> Objects. Ensure the Snap <strong>to</strong> Objects is selected<br />
active and click both the Snap <strong>to</strong> Nodes and Snap <strong>to</strong> Object Center Po<strong>in</strong>ts options are selected<br />
(shown next).<br />
3. Click OK <strong>to</strong> close the dialog and accept your changes and you're ready <strong>to</strong> start.<br />
Creat<strong>in</strong>g the <strong>chisel</strong> shape path<br />
The key <strong>to</strong> the riddle of a successful <strong>chisel</strong> shape lies <strong>in</strong> creat<strong>in</strong>g a new path <strong>to</strong> represent the center<br />
between two exist<strong>in</strong>g paths. You could manually draw the shape with mastery of the Freehand or Bezier<br />
<strong>to</strong>ols, but that could take considerable time and effort, and the result may not be entirely accurate. This is<br />
where the Blend Tool can help. <strong>By</strong> creat<strong>in</strong>g a s<strong>in</strong>gle blend step between two exist<strong>in</strong>g paths, you'll be able<br />
<strong>to</strong> quickly <strong>create</strong> a new path au<strong>to</strong>matically. In most cases, you'll be able <strong>to</strong> use the result<strong>in</strong>g shape with<br />
very little node edit<strong>in</strong>g. But as you'll discover, the process isn't without its little tricks.<br />
To familiarize yourself with the process, try these steps:<br />
1. Choose the Ellipse Tool and <strong>create</strong> an ellipse of any size or shape. Make it a circular ellipse by<br />
hold<strong>in</strong>g Ctrl as you <strong>create</strong> it.<br />
2. Create a copy of your new circle centered with<strong>in</strong> the orig<strong>in</strong>al by hold<strong>in</strong>g Shift as you drag one of<br />
the corner handles <strong>to</strong>ward the <strong>in</strong>side of the orig<strong>in</strong>al, then click<strong>in</strong>g the right mouse but<strong>to</strong>n <strong>to</strong> <strong>create</strong><br />
the copy (as shown next).
3. Choose the Pick Tool (press Spacebar), select the two circles, and convert them both <strong>to</strong> curves<br />
(Ctrl+Q).<br />
4. Choose the Interactive Blend Tool and click-drag from the edge of one circle <strong>to</strong> the other <strong>to</strong> <strong>create</strong><br />
a default blend effect. Us<strong>in</strong>g Property Bar options, set the Number of Steps option <strong>to</strong> 1. This will<br />
<strong>create</strong> the <strong>chisel</strong> path (shown next).<br />
5. Us<strong>in</strong>g the Pick Tool, right-click the blend object and choose Break Blend Group Apart <strong>to</strong> break<br />
the l<strong>in</strong>k between the orig<strong>in</strong>al circles and the blend.<br />
6. Select only the blend object and press the "+" key on your numeric keyboard <strong>to</strong> <strong>create</strong> a copy<br />
superimposed over the orig<strong>in</strong>al. With the copy still selected, hold Shift, click the outer circle and<br />
comb<strong>in</strong>e the two paths <strong>to</strong> make a compound path (Ctrl+L). Send the new object <strong>to</strong> the back (Shift<br />
+PageDown).<br />
7. Click <strong>to</strong> select the orig<strong>in</strong>al blend object and hold Shift while click<strong>in</strong>g the <strong>in</strong>nermost circle <strong>to</strong> select<br />
both objects. Comb<strong>in</strong>e them <strong>in</strong><strong>to</strong> a s<strong>in</strong>gle compound object (Ctrl+L). You now have two separate<br />
compound paths.<br />
8. Select both objects and fill them with any color (Red for example), and choose the Interactive Fill<br />
Tool (G). Us<strong>in</strong>g Property Bar options, choose Radial from the Type menu <strong>to</strong> fill both with a<br />
default red-<strong>to</strong>-white radial fill.<br />
9. Offset the centers of each radial fill. Drag the white marker on the outer object <strong>to</strong> the upper-left<br />
and the white marker of the <strong>in</strong>ner object <strong>to</strong> the lower-right. This will enable you <strong>to</strong> simulate basic<br />
shad<strong>in</strong>g (as shown next). Remove any outl<strong>in</strong>e properties from the objects and you're done.
In the circle example, you were able <strong>to</strong> <strong>create</strong> the <strong>chisel</strong> effect us<strong>in</strong>g a series of unbroken circular paths.<br />
But, if the shape you're attempt<strong>in</strong>g <strong>to</strong> apply this effect <strong>to</strong> feature corners, the process becomes slightly<br />
more <strong>in</strong>volved and requires the blend step process as well as node edit<strong>in</strong>g. This is where the effect really<br />
takes off though. Let's take a simple square as an example:<br />
1. Us<strong>in</strong>g the Rectangle Tool, <strong>create</strong> a square shape (hold Ctrl <strong>to</strong> constra<strong>in</strong>). As you did with the<br />
circle, <strong>create</strong> a smaller copy <strong>in</strong>side the orig<strong>in</strong>al by dragg<strong>in</strong>g a corner handle <strong>in</strong>ward while hold<strong>in</strong>g<br />
the Shift key and click<strong>in</strong>g the right mouse but<strong>to</strong>n <strong>to</strong> make the copy (as shown next). Select both<br />
objects and convert them <strong>to</strong> curves (Ctrl+L).<br />
2. Us<strong>in</strong>g the Blend Tool, <strong>create</strong> a s<strong>in</strong>gle blend object by dragg<strong>in</strong>g from one shape <strong>to</strong> the other<br />
(shown next). Then, us<strong>in</strong>g the Pick Tool, right-click the blend object and choose Break Blend<br />
Group Apart from the popup menu. This will represent the <strong>chisel</strong> path.<br />
3. Select only the blend shape and press numeric "+" <strong>to</strong> make a copy. Hold Shift and click <strong>to</strong> select<br />
the outer square and Comb<strong>in</strong>e the two shapes (Ctrl+L).<br />
4. With your shape still selected, choose the Shape Tool (F10) and click any node on the shape.<br />
Then, us<strong>in</strong>g Property Bar options, click the Select All Nodes and the Break Curve but<strong>to</strong>ns (shown<br />
next), <strong>to</strong> select and unjo<strong>in</strong> all the nodes at once. Then separate all the l<strong>in</strong>es <strong>in</strong> the shape us<strong>in</strong>g the<br />
Break Apart command (Ctrl+K). This process essentially reduces the shapes <strong>to</strong> l<strong>in</strong>es.
5. Next, we'll jo<strong>in</strong> each pair of l<strong>in</strong>es represent<strong>in</strong>g the sides of the shape. Us<strong>in</strong>g the Pick Tool and<br />
while hold<strong>in</strong>g the Shift key click <strong>to</strong> select the first pair of l<strong>in</strong>es and Comb<strong>in</strong>e them (Ctrl+L). Then,<br />
choose the Shape Tool and choose the node pair at one end and click the Extend Curve <strong>to</strong> Close<br />
but<strong>to</strong>n <strong>in</strong> the Property Bar (shown next). This will add a straight l<strong>in</strong>e between the two nodes.<br />
Repeat this operation for the node pairs at the opposite end. Once you are complete, the shape will<br />
be a closed curve.<br />
6. Repeat the above step for each pair of l<strong>in</strong>es, first comb<strong>in</strong><strong>in</strong>g them and then jo<strong>in</strong><strong>in</strong>g the node pairs.<br />
In the example shown next, all sides of the outer shape have been comb<strong>in</strong>ed <strong>in</strong><strong>to</strong> closed curves.
7. You'll also need <strong>to</strong> repeat this process for the <strong>in</strong>ner shapes. Click <strong>to</strong> select the orig<strong>in</strong>al blend path<br />
object and comb<strong>in</strong>e it with the <strong>in</strong>nermost square. Then select and break apart all curve nodes and<br />
break apart the entire arrangement. Choose each l<strong>in</strong>e pair and comb<strong>in</strong>e them, and close each end<br />
us<strong>in</strong>g the Extend Curve <strong>to</strong> Close but<strong>to</strong>n. The result will be eight closed shapes. Although we<br />
haven't yet explored the shad<strong>in</strong>g aspects of the <strong>chisel</strong> effect (which we'll do <strong>in</strong> part 2 of this<br />
article), the example shown next demonstrates the f<strong>in</strong>al result with various colors and shades<br />
applied <strong>to</strong> each side.<br />
Variations on the <strong>chisel</strong><br />
You may not always need <strong>to</strong> <strong>create</strong> a negative and a positive shape for the <strong>chisel</strong> effect. In some<br />
<strong>in</strong>stances, you might simply need <strong>to</strong> <strong>create</strong> the effect of a complete shape carved on<strong>to</strong> (or <strong>in</strong><strong>to</strong>) a surface.<br />
In this exercise, there is no need for the blend step, but there is certa<strong>in</strong>ly more emphasis on node edit<strong>in</strong>g<br />
and draw<strong>in</strong>g. Let's take a simple polygon as the example and <strong>create</strong> a <strong>chisel</strong>ed star shape:<br />
1. To beg<strong>in</strong>, choose the Polygon Tool (Y) and <strong>create</strong> a default symmetrical polygon shape by hold<strong>in</strong>g<br />
Ctrl <strong>to</strong> constra<strong>in</strong> the shape as you drag. Us<strong>in</strong>g Property Bar options set the Number of Po<strong>in</strong>ts<br />
option <strong>to</strong> 5. If needed, <strong>in</strong>crease the depth of the star spikes by hold<strong>in</strong>g Ctrl and dragg<strong>in</strong>g any of<br />
the shape nodes <strong>to</strong>ward or away from the center of the shape (as shown next).<br />
2. You'll also need <strong>to</strong> <strong>create</strong> an object <strong>to</strong> use as a snapp<strong>in</strong>g guide. For this, choose the Ellipse Tool<br />
(F7) and <strong>create</strong> a circular ellipse (hold Ctrl) slightly smaller than the <strong>in</strong>ner area of the star. Select<br />
both shapes and press E and then C <strong>to</strong> center the two objects vertically and horizontally with each<br />
other (as shown next).
3. Us<strong>in</strong>g the Pick Tool, select the star and convert it <strong>to</strong> curves (Ctrl+Q). Then choose the Shape Tool<br />
and hold Ctrl+Shift while click<strong>in</strong>g any node <strong>to</strong> quickly select all nodes compos<strong>in</strong>g the shape.<br />
Us<strong>in</strong>g Property Bar options click the Break Curve but<strong>to</strong>n and then press Ctrl+K <strong>to</strong> break apart the<br />
l<strong>in</strong>es <strong>in</strong> the shape.<br />
4. In this next step your node-snapp<strong>in</strong>g sett<strong>in</strong>gs will be really pay off. Click <strong>to</strong> select one of the<br />
orig<strong>in</strong>al star l<strong>in</strong>es <strong>to</strong> select it and choose the Bezier Tool. Notice the nodes at either end are<br />
visible. Click any node and then click the dead center of the circle <strong>to</strong> add a straight l<strong>in</strong>e. Then,<br />
click the rema<strong>in</strong><strong>in</strong>g node on the opposite end of the orig<strong>in</strong>al l<strong>in</strong>e <strong>to</strong> close the shape (as shown<br />
next). This will <strong>create</strong> a s<strong>in</strong>gle <strong>chisel</strong> side.<br />
5. Repeat this process for each of the 9 rema<strong>in</strong><strong>in</strong>g l<strong>in</strong>es which composed the orig<strong>in</strong>al star. To do this<br />
quickly, press the Spacebar <strong>to</strong> <strong>to</strong>ggle your <strong>to</strong>ol state between the Bezier and Pick <strong>to</strong>ols us<strong>in</strong>g the<br />
Pick Tool for select<strong>in</strong>g and the Bezier Tool for draw<strong>in</strong>g. Once all 10 l<strong>in</strong>es have been completed,<br />
the effect needs only <strong>to</strong> be colored or shaded (as shown next). Once you are f<strong>in</strong>ished, be sure <strong>to</strong><br />
select and delete the circle shape and remove any outl<strong>in</strong>e properties from the star <strong>chisel</strong> shapes.<br />
So far, we've only explored creat<strong>in</strong>g and <strong>chisel</strong><strong>in</strong>g basic shapes, but there's much more <strong>to</strong> perfect<strong>in</strong>g this<br />
effect. In part 2, we'll look at techniques for apply<strong>in</strong>g color and shad<strong>in</strong>g <strong>to</strong> the shapes and see how the<br />
<strong>chisel</strong> effect can be applied <strong>to</strong> other more complex shapes such as text, l<strong>in</strong>es, and other useful shapes.