


You also want an ePaper? Increase the reach of your titles
YUMPU automatically turns print PDFs into web optimized ePapers that Google loves.
Some time ago, fresh out of<br />
school, I practiced architecture<br />
for several years. I discovered<br />
early on that I had to make<br />
too many compromises to practice<br />
my trade. Now I own and run a<br />
small custom woodworking business,<br />
and I'm often awarded jobs<br />
that demand we make things in<br />
limited production quantities. It's<br />
not unusual to get an order for two<br />
or three dozen large doors or to do<br />
a kitchen requiring 50 to 60 cabinet<br />
doors. For these jobs, I'd be lost<br />
without my mortiser.<br />
I use a manual, foot-operated<br />
hollow-chisel mortise machine.<br />
There have been times when I<br />
would have appreciated the brute<br />
strength and speed of a pneumaticoperated<br />
chain or oscillating mortiser.<br />
But the one I use will produce<br />
a square-bottomed, square-ended<br />
mortise. It's easy to set up for angled<br />
or canted mortises, and it's the<br />
only type that will make a single<br />
square hole, like those in windowsash<br />
bars and louvered doors.<br />
With a little ingenuity and some<br />
jig making, the hollow-chisel mortise<br />
machine will handle any angle<br />
or curve. I've used mine for cabinet<br />
face frames, chairs and benches,<br />
curved windows, lock sets, miniature<br />
fretwork and 10-ft.-high by<br />
-in.-thick doors. I could cut mortises by hand or use either a<br />
drill-press attachment or one of the benchtop mortisers that have<br />
come onto the market in the past few years (see the photos at<br />
right). Neither of those would do the job as quickly or as accurately,<br />
but they are options.<br />
How the tool works<br />
The cutting tool consists of a square hollow tube with a relief, or<br />
emptying slot, cut out of one face (sometimes two slots on opposing<br />
faces). The tool is internally flared and sharpened at one<br />
end and turned down at the other end to fit into a collet (see the<br />
<strong>Using</strong><br />
a <strong>Hollow</strong>-<strong>Chisel</strong><br />
<strong>Mortiser</strong><br />
One man's techniques for<br />
a machine vital to his craft<br />
by John W. West<br />
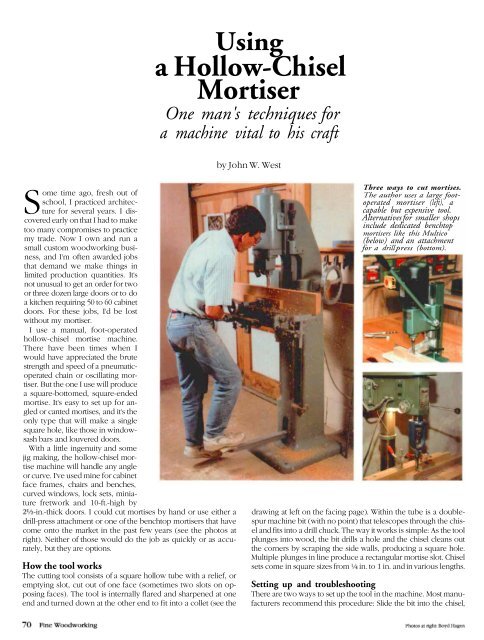
Three ways to cut mortises.<br />
The author uses a large footoperated<br />
mortiser (left), a<br />
capable but expensive tool.<br />
Alternatives for smaller shops<br />
include dedicated benchtop<br />
mortisers like this Multico<br />
(below) and an attachment<br />
for a drill press (bottom).<br />
drawing at left on the facing page). Within the tube is a doublespur<br />
machine bit (with no point) that telescopes through the chisel<br />
and fits into a drill chuck. The way it works is simple: As the tool<br />
plunges into wood, the bit drills a hole and the chisel cleans out<br />
the corners by scraping the side walls, producing a square hole.<br />
Multiple plunges in line produce a rectangular mortise slot. <strong>Chisel</strong><br />
sets come in square sizes from in. to 1 in. and in various lengths.<br />
Setting up and troubleshooting<br />
There are two ways to set up the tool in the machine. Most manufacturers<br />
recommend this procedure: Slide the bit into the chisel,
install both through the collet and<br />
place a -in. spacer ( in. for sizes<br />
in. and larger) between the chisel<br />
shoulder and the collet. Push the bit<br />
tight to the bottom of the chisel tube,<br />
and tighten the bit in the drill chuck.<br />
Then remove the spacer, push the<br />
chisel shoulder tight to the collet and<br />
tighten the collet clamp. This method<br />
provides the recommended clearance<br />
between the bit tip and the chisel tip,<br />
which prevents heat buildup from too<br />
much friction.<br />
I prefer another method: Install the<br />
bit and the chisel assembly through<br />
the collet, push the chisel shoulder<br />
tight to the collet and tighten the collet<br />
clamp. Push the bit into the drill chuck,<br />
and sight the bit tip and chisel tip, adjusting<br />
the bit up or down until the<br />
straight cutting edge—not the spurs—<br />
of the bit is in line with the pointed<br />
corners of the chisel (see the top right<br />
drawing on this page). Tighten the bit<br />
in the drill chuck. I like this method<br />
because it's easier for me to get the<br />
cutting edge in line with the chisel<br />
points. And even though I risk more<br />
heat buildup, I'm convinced I get less<br />
wear on the tool.<br />
A mortise chisel and bit<br />
When I have to cut mortises in. or<br />
larger into hardwoods like ash or<br />
white oak, I set up the tool a little differently.<br />
I keep the bit's Cutting edge as<br />
much as in. below the corners of<br />
the chisel. This produces a little less resistance<br />
in the plunge. Under too<br />
much stress, tips will snap off. However,<br />
I have found that the incidence of<br />
tip breakage is the same for either<br />
method and is very rare. Allowing the<br />
bit to stick out much more than in.<br />
from the chisel tip may cause it to begin<br />
oscillating within the hollow shaft,<br />
causing scoring and damage to the interior<br />
of the chisel.<br />
Bits do rub against the inner wall of<br />
the chisel during normal operation.<br />
Older, much-used bits occasionally<br />
will begin oscillating, but they will<br />
stop when the plunge is started. This<br />
doesn't seem to affect performance,<br />
until the oscillating becomes so severe the bit tip wanders when<br />
the plunge is started. The only cure for that is to buy a new chisel.<br />
Another serious problem can occur when the chisel overheats<br />
(see the photo above). This happens most frequently with smaller<br />
tools ( in. to in.) when mortising deeply into resinous wood<br />
like cherry or sugar pine. Hot debris collects in the flutes of the machine<br />
bit between the chisel tip and relief slot. If the material is not<br />
forced out the emptying slot with the next plunge, enough heat<br />
and pressure can build up to split the chisel. This usually happens<br />
on the weaker relief slot face at the thinner tip area (see the bottom<br />
right drawing). Plunging quickly helps prevent the problem.<br />
Overheating can be a problem,<br />
especially with smaller<br />
bits and resinous woods,<br />
when chips get clogged<br />
inside the chisel. The faster<br />
you plunge, the less likely this<br />
is to happen.<br />
The cutting edges<br />
When setting up his machine,<br />
the author takes pains to align the<br />
cutting edge of the bit with points<br />
of the chisel. Notice that the<br />
spurs of the bit make the first<br />
contact with the wood.<br />
A chisel gone bad<br />
The heat and pressure of clogged<br />
debris may cause the steel to<br />
crack, usually on the weaker relief<br />
side of the chisel.<br />
When installing the tool into the machine, place the relief slot (as<br />
you face the machine) 90° to the right. The waste empties away<br />
from the direction of the plunging and away from the operator<br />
(hot debris can hurt). The weakest axis of the chisel is captured between<br />
the side walls of the mortise, decreasing chisel flex. Plastic<br />
drafting triangles work well for squaring up chisel to fence, as<br />
shown in the photo on p. 72, or setting the chisel on an angle.<br />
Plan your joints first<br />
You must allow for the seasonal movement of a rail when laying<br />
out mortise-and-tenon joints. A wide rail locked tightly between
oth ends of a mortise will be<br />
forced to cup when expanding in<br />
high humidity. This may create a<br />
bulge or even a split in the stile<br />
around the mortise area. I've seen<br />
stiles split out at the ends because<br />
the rails were locked in too tightly.<br />
It is best to accommodate movement<br />
so that as the rails expand,<br />
they'll move toward the inner part<br />
of the frame, as shown in the center<br />
drawing below. This is especially<br />
important for inset cabinet doors,<br />
so they won't bind.<br />
I've always been dead set against<br />
gluing opposing grains. The joints<br />
break down after many years of service.<br />
I've never glued a mortiseand-tenon<br />
joint in a large interior or<br />
exterior door because I know it will<br />
last a lifetime. But narrow rails, depending on the species, won't<br />
move too much, so I glue these joints. (I prefer white glue; it has<br />
some elasticity when dry.) I usually pin the joint in some fashion.<br />
Mark the joints precisely<br />
After I've processed and sized the materials, I pair up the stiles,<br />
mark their faces and mark the faces of the rail stock. Machining of<br />
all the parts should be done with the faces against a fence, table or<br />
other fixed platform so that all parts are indexed from the face surface.<br />
This ensures that the relationship between the mortise and<br />
tenon will be the same on all pieces.<br />
Establish and mark where mortise slots and haunch cuts begin<br />
and end. <strong>Using</strong> a sample piece, make a mortise to the desired depth<br />
(about in. deeper than the tenon length) in its approximate location<br />
front to back. Use scrap from the materials being used.<br />
Next make a tenon (with or without a cope) to the desired<br />
length, position it front to back on the rail (tenons are rarely centered<br />
on the stock) and thickness to fit the mortise. Then fine-tune<br />
the front-to-back position on the mortise machine so that the fit is<br />
flush on the face, or whatever position is desired. Remember that<br />
when you assemble frames with a coped and molded stile and rail,<br />
most copes will have a tendency to pull the tenon toward the face<br />
as the frame is clamped up, as shown in the bottom right drawing.<br />
Making the plunge<br />
Plunging methods vary depending on the size and type of mortise<br />
and the material used. Facing the machine, I make the first plunge<br />
Plan the joint for movement<br />
Seasonal expansion of rail<br />
will cause this door to bind.<br />
Seasonal movement won't<br />
affect fit of this door.<br />
Set the chisel square to the<br />
fence or at whatever angle the job<br />
demands. The author likes small<br />
plastic drafting triangles for this<br />
task because they're light and true.<br />
at the left end of the mortise. If I need to make a really deep mortise—too<br />
much work for the first plunge—I'll go as deep as possible,<br />
move to the right one-half the chisel width and plunge just<br />
short of the first hole's depth.<br />
I return to the first hole and plunge deeper, repeating this process<br />
until the first hole is to the desired depth. I move to the right end of<br />
the mortise and make a full-depth plunge (or repeat the above<br />
process in reverse). Then, starting from the right and working to<br />
the left, I plunge one-half to three-quarters the width of the chisel<br />
with each overlapping plunge, until I reach the first hole on the left.<br />
I re-plunge in line from left to right. This cleans off the side walls<br />
and the bottom of the mortise. It's a little dangerous to drag the<br />
chisel across the bottom of the mortise to clean it; snagging may<br />
snap the bit tip, bend the chisel or both. But I do use this process<br />
for cleaning a tenon haunch, which isn't as deep.<br />
When the mortise slot is six or more times (my own rule of<br />
thumb) longer than the chisel size, I will make one or more midway<br />
holes between the left and right ends. This keeps the tool cutting<br />
straight on long mortises, especially when the edge of the<br />
mortise is close to the face of the stock. On very long mortises (for<br />
large door bottom rails, for example), I will split the tenon and<br />
make two mortise slots.<br />
Cut haunches cleaner—On most frame-and-panel doors, a<br />
groove is cut in the rails and stiles to hold the panel. If this groove<br />
is the same width as the tenon, it can serve as the cut for the<br />
haunch. If not, a haunch cut must be made with the mortise ma-<br />
Shape affects the fit<br />
Coped rails tend to move toward the front face<br />
under clamp pressure. To avoid this problem,<br />
snugly fit the tenon to the mortise.
To limit depth, use a block.<br />
Instead of resetting the machine<br />
for the shallow haunch, the<br />
author inserts a block of wood<br />
as a spacer (upper right).<br />
chine. When the machine is set up for the regular mortise, a stop<br />
controls the depth of the mortise. A second stop will serve to cut<br />
the desired haunch depth. Rather than reset the machine stop, I<br />
use a block of wood (see the photo at left) as a spacer to save time<br />
and trouble.<br />
After the mortise is made, I plunge the haunch, working toward<br />
the end of the stile. Re-plunge the haunch from the outside back<br />
toward the mortise. Then, with the chisel pressed to the bottom of<br />
the slot, I slowly scrape the bottom of the slot clean with a side-toside<br />
motion of the chisel. This produces a clean haunch cut, which<br />
may be visible at the end of a frame or top of a cabinet door.<br />
Frames with no panels have joints that show—When making<br />
frames that have no panels, such as a cabinet face frame, a tight<br />
joint is required at the intersection of the mortise and tenon because<br />
the joint is not hidden inside a panel groove. Before cutting<br />
the mortise, I score the ends of the slot with a hand chisel the same<br />
width as the mortise. That helps prevent chipping.<br />
I've noticed that the bit has a tendency to leave a slightly ragged<br />
edge as it plunges. I also use the chisel to shave back the tenon<br />
slightly, so it will go into the mortise easily but draw up tightly at<br />
assembly. Also, when the bit is exiting from the end plunge, it will<br />
sometimes snag on the edge and lift up some material with it. To<br />
keep that from happening, I exert slight pressure on the stock,<br />
with the wheel that controls the left-to-right movement of the<br />
table, keeping the chisel away from the edge of the mortise.<br />
Large mortises need more passes—If you have to make a wide<br />
mortise and don't have a big enough chisel, make two separate<br />
mortise slots, leaving in. or so of material in between. Go back<br />
and plunge out the middle. This is time-consuming. But if you<br />
overlap the first slot, the chisel will flex into it and produce a tapered<br />
mortise, and you'll have to taper all your tenons. In some<br />
cases, this routine may be your only choice because you'd have to<br />
be Godzilla to push a 1-in. chisel into a piece of hard maple.<br />
Cut sash bars on both sides—If I have to make a through mortise<br />
for sash bars, I'll plunge from both sides to keep the mortise<br />
tracking straighter vertically and to eliminate tearout, which seems<br />
to occur even when I use a back-up piece.<br />
Cut for lock sets before assembly—If I'm making a batch of<br />
passage doors or a lot of cabinet doors that require full-mortise
locks, I'll mortise all the stiles for the hardware before the doors<br />
go together. It's easier and more accurate than using a hand drill<br />
and chisels later on.<br />
The benchtop versions<br />
I don't use a drill-press mortiser, but I did try a few of the benchtop<br />
mortisers to see how the smaller machines compared to industrial-grade<br />
mortisers. Without going into a full-fledged tool<br />
review, I should say that I was skeptical of these machines before<br />
I got my hands on them. But I was surprised to learn how well a little<br />
-hp motor with a hand-lever driven, pinion-geared plunger<br />
Sharpening<br />
hollow<br />
chisels<br />
by John Lively<br />
You probably can get by with a<br />
slightly dull blade on your tablesaw<br />
or a less-than-exquisitely<br />
sharp slotting bit in your<br />
router. But if you're punching<br />
out mortises in oak or cherry<br />
with a hollow chisel, very<br />
sharp is a required condition.<br />
A dull hollow chisel just won't<br />
work. It takes lots of muscle to<br />
force a dull bit into the cut,<br />
and once buried in the stock,<br />
the bit sticks there. This is why<br />
you'll find more hollow-chisel<br />
mortising rigs in storage than<br />
in actual use.<br />
But if you keep your hollow<br />
chisels really sharp all the<br />
time, they'll cut crisply with<br />
minimal effort and back out of<br />
the hole with ease. With the<br />
right tools, sharpening hollow<br />
chisels can be an uncomplicated,<br />
uncluttered, quick affair.<br />
Hone the outsides first: All<br />
four outside faces of the hollow<br />
chisel should be honed before<br />
you tackle the cutting<br />
edges of the tool. There are<br />
two reasons: First, you get<br />
sharper cutting edges, and<br />
second, you reduce binding in<br />
the cut. Honing polishes all<br />
those grinding scars, which act<br />
like treads on a tire, and reduces<br />
friction during cutting<br />
and withdrawal.<br />
For honing the sides, I clamp<br />
the hollow chisel in my vise<br />
and use a medium-india slip<br />
stone (see the top photo at<br />
right). You could hone them<br />
on a benchstone just as you<br />
would the back of an ordinary<br />
chisel. Make sure you get a<br />
nicely polished surface on<br />
all four faces of the chisel—<br />
smooth and slick.<br />
could cut a fine mortise. The design is similar to the industrialgrade<br />
versions, but the devil is in the details. Driving the plunge<br />
by hand is more cumbersome and tiring, and the benchtop versions<br />
don't offer the same conveniences of table movement. The<br />
hold-down mechanisms are not nearly as strong and somewhat<br />
difficult and time-consuming to adjust.<br />
If you're not in the market for a large mortise machine, I think<br />
you may be better off using a router. Unless, of course, you just<br />
want a new toy to play with.<br />
John West owns Cope and Mould Millwork Co. in Danbury, Conn.<br />
First, hone the chisel. Use a<br />
small slip stone to hone all four<br />
outside faces of the hollow chisel<br />
until smooth and polished.<br />
Then ream the inside bevel.<br />
interchangeable pilots fit different<br />
chisels. After selecting the<br />
correct pilot and mounting the<br />
reamer in a brace, gently grind<br />
the inside bevel. Any burrs may<br />
be removed with a slip stone.<br />
Then go after the bevel:<br />
Now that you've honed the<br />
four faces of the chisel, how<br />
do you get into the hollow of<br />
the tool to sharpen those<br />
bevels? Without the correct<br />
tool, that can be a big problem.<br />
A look through the stack<br />
of woodworking catalogs teetering<br />
on the back of your<br />
commode will reveal that almost<br />
every mail-order supplier<br />
offers hollow chisels. But few<br />
offer the simple little device<br />
you need to sharpen them.<br />
This thing is a reamer, basically.<br />
Its body is a fluted conical<br />
cutter (sort of like a countersink).<br />
The reamer has a tapered<br />
square shaft on one end for<br />
chucking into a bit brace and a<br />
hole in the pointy end for accepting<br />
interchangeable pilots<br />
(see the photo at left). You insert<br />
the correct pilot into the<br />
reamer, insert the pilot into the<br />
hollow chisel and crank away<br />
gingerly (see the bottom photo)<br />
to remove enough tool steel<br />
to establish clean, sharp interior<br />
bevels. Return briefly to<br />
your stone to hone off any<br />
burrs, and you're finished.<br />
I use a Clico reamer, which<br />
is available through Garrett<br />
Wade Co. (161 Avenue of the<br />
Americas, New York, NY,<br />
10013; 800-221-2942). Wherever<br />
you buy one, make sure<br />
you ask whether the pilots fit<br />
into the bits you own. The Clico<br />
reamer that Garrett Wade<br />
sells, for instance, fits Clico's<br />
English chisels but may need a<br />
masking tape bushing to fit<br />
Taiwanese chisels.<br />
John Lively is the editor-inchief<br />
of The Taunton Press.
