FM 21-76 US ARMY SURVIVAL MANUAL - AR15.com
FM 21-76 US ARMY SURVIVAL MANUAL - AR15.com
FM 21-76 US ARMY SURVIVAL MANUAL - AR15.com

You also want an ePaper? Increase the reach of your titles
YUMPU automatically turns print PDFs into web optimized ePapers that Google loves.
<strong>FM</strong> <strong>21</strong>-<strong>76</strong> <strong>US</strong> <strong>ARMY</strong> <strong>SURVIVAL</strong> <strong>MANUAL</strong> Reprinted as permitted by U.S. Department of the Army<br />
• Tie the other ends of these ropes at about knee height to two trees 2 to 3 meters apart and<br />
stretch the poncho tight.<br />
• Draw one side of the poncho tight and secure it to the ground pushing sharpened sticks through<br />
the grommets.<br />
• Follow the same procedure on the other side.<br />
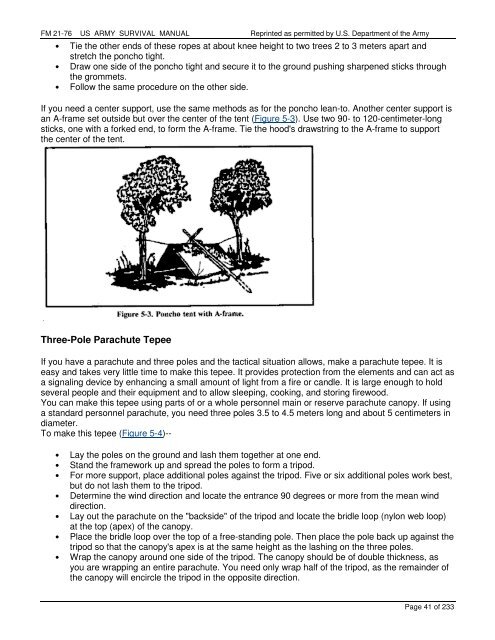
If you need a center support, use the same methods as for the poncho lean-to. Another center support is<br />
an A-frame set outside but over the center of the tent (Figure 5-3). Use two 90- to 120-centimeter-long<br />
sticks, one with a forked end, to form the A-frame. Tie the hood's drawstring to the A-frame to support<br />
the center of the tent.<br />
Three-Pole Parachute Tepee<br />
If you have a parachute and three poles and the tactical situation allows, make a parachute tepee. It is<br />
easy and takes very little time to make this tepee. It provides protection from the elements and can act as<br />
a signaling device by enhancing a small amount of light from a fire or candle. It is large enough to hold<br />
several people and their equipment and to allow sleeping, cooking, and storing firewood.<br />
You can make this tepee using parts of or a whole personnel main or reserve parachute canopy. If using<br />
a standard personnel parachute, you need three poles 3.5 to 4.5 meters long and about 5 centimeters in<br />
diameter.<br />
To make this tepee (Figure 5-4)--<br />
• Lay the poles on the ground and lash them together at one end.<br />
• Stand the framework up and spread the poles to form a tripod.<br />
• For more support, place additional poles against the tripod. Five or six additional poles work best,<br />
but do not lash them to the tripod.<br />
• Determine the wind direction and locate the entrance 90 degrees or more from the mean wind<br />
direction.<br />
• Lay out the parachute on the "backside" of the tripod and locate the bridle loop (nylon web loop)<br />
at the top (apex) of the canopy.<br />
• Place the bridle loop over the top of a free-standing pole. Then place the pole back up against the<br />
tripod so that the canopy's apex is at the same height as the lashing on the three poles.<br />
• Wrap the canopy around one side of the tripod. The canopy should be of double thickness, as<br />
you are wrapping an entire parachute. You need only wrap half of the tripod, as the remainder of<br />
the canopy will encircle the tripod in the opposite direction.<br />
Page 41 of 233