pHScan 3 / 3+ - Eutech
pHScan 3 / 3+ - Eutech
pHScan 3 / 3+ - Eutech

Create successful ePaper yourself
Turn your PDF publications into a flip-book with our unique Google optimized e-Paper software.
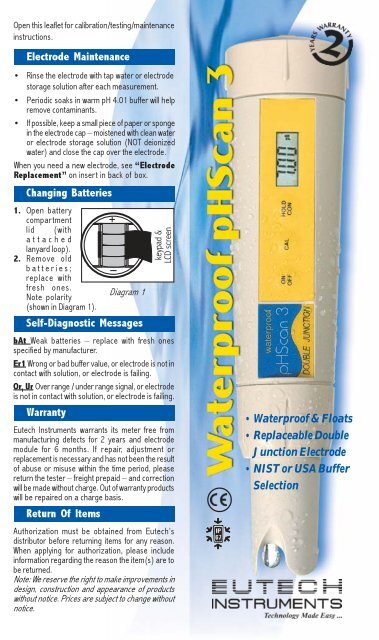
Open this leaflet for calibration/testing/maintenance<br />
instructions.<br />
Electrode Maintenance<br />
• Rinse the electrode with tap water or electrode<br />
storage solution after each measurement.<br />
• Periodic soaks in warm pH 4.01 buffer will help<br />
remove contaminants.<br />
• If possible, keep a small piece of paper or sponge<br />
in the electrode cap – moistened with clean water<br />
or electrode storage solution (NOT deionized<br />
water) and close the cap over the electrode.<br />
When you need a new electrode, see “Electrode<br />
Replacement” on insert in back of box.<br />
Changing Batteries<br />
1. Open battery<br />
compartment<br />
lid (with<br />
attached<br />
lanyard loop).<br />
2. Remove old<br />
batteries;<br />
replace with<br />
fresh ones.<br />
Diagram 1<br />
Note polarity<br />
(shown in Diagram 1).<br />
Self-Diagnostic Messages<br />
bAt Weak batteries – replace with fresh ones<br />
specified by manufacturer.<br />
Er1 Wrong or bad buffer value, or electrode is not in<br />
contact with solution, or electrode is failing.<br />
Or, Ur Over range / under range signal, or electrode<br />
is not in contact with solution, or electrode is failing.<br />
Warranty<br />
<strong>Eutech</strong> Instruments warrants its meter free from<br />
manufacturing defects for 2 years and electrode<br />
module for 6 months. If repair, adjustment or<br />
replacement is necessary and has not been the result<br />
of abuse or misuse within the time period, please<br />
return the tester – freight prepaid – and correction<br />
will be made without charge. Out of warranty products<br />
will be repaired on a charge basis.<br />
Return Of Items<br />
+<br />
Authorization must be obtained from <strong>Eutech</strong>’s<br />
distributor before returning items for any reason.<br />
When applying for authorization, please include<br />
information regarding the reason the item(s) are to<br />
be returned.<br />
Note: We reserve the right to make improvements in<br />
design, construction and appearance of products<br />
without notice. Prices are subject to change without<br />
notice.<br />
• Waterproof & Floats<br />
• Replaceable Double<br />
Junction Electrode<br />
• NIST or USA Buffer<br />
Selection
WP <strong>pHScan</strong> 3 Instructions<br />
Before You Begin<br />
Remove electrode cap. To condition electrode,<br />
immerse electrode in electrode solution, buffer<br />
or tap water for at least 30 minutes. DO NOT use<br />
deionized water<br />
Calibration<br />
Calibration should be done regularly, typically<br />
everyday that the tester is used. You can calibrate<br />
at up to three points (pH 4.01, 7.00 and 10.01<br />
or 4.01, 6.86 and 9.18).<br />
1. Press ON/OFF button to switch unit on.<br />
2. Dip electrode about 2 to 3 cm into pH buffer<br />
solution.<br />
3. Press CAL button to enter Calibrate (CAL)<br />
mode. ‘CAL’ flashes on the display. Then, a<br />
pH value close to the pH buffer value will<br />
flash repeatedly.<br />
To abort calibration, press CAL again to<br />
resume measuring mode.<br />
4. After about 2 minutes when the<br />
reading has stabilized, press the<br />
HOLD/CON button to confirm<br />
calibration. The display will show ‘CO’<br />
and then switch to the buffer value<br />
reading.<br />
5. Repeat with other buffers if<br />
necessary. Rinse electrode in tap<br />
water before dipping into next buffer.<br />
Insufficient sampling time. If<br />
the tester does not have a long<br />
enough exposure to the buffer, a stable<br />
calibration point will not be reached.<br />
Wait for about 2 minutes when the<br />
reading has stabilized, press the<br />
HOLD/CON.<br />
Failure to re-hydrate the<br />
electrode. A dry electrode will give<br />
fluctuating readings while it<br />
re-hydrates in a buffer, causing error.<br />
Buffer Set Selection<br />
To choose USA (4.01, 7.00, 10.01) or NIST (4.01,<br />
6.86, 9.18) buffers.<br />
1. With tester off, hold HOLD/CON key while<br />
pressing and releasing ON/OFF key.<br />
2. The display will show “bUF” flashing.<br />
3. Press HOLD/CON key. The display will show<br />
either “USA” or “NST”.<br />
4. Press CAL key to toggle between USA and NIST<br />
buffer sets.<br />
5. Press HOLD/CON key to confirm.<br />
pH Testing<br />
1. Remove cap from the electrode and press the<br />
ON/OFF button to switch tester on.<br />
2. Dip the electrode about 2 to 3 cm into the test<br />
solution. Stir once and let the reading stabilize.<br />
3. Note the pH or press HOLD/CON button to freeze<br />
the reading. Press HOLD/CON again to release<br />
the reading.<br />
4. Press ON/OFF to turn off tester. If you do not<br />
press a button for 8.5 minutes the tester will<br />
automatically shut off to conserve batteries.<br />
Reset To Factory Default<br />
You can reset calibration data to factory default<br />
settings. This is extremely useful when you want to<br />
take a new set of pH measurements or when using<br />
a new replacement electrode.<br />
1. With tester off, hold CAL key while pressing ON/<br />
OFF key.<br />
2. The display will show “rSt” flashing.<br />
3. Press HOLD/CON key to confirm. The display<br />
will flash “YES” for 2 seconds and the tester will<br />
go back to measurement mode.<br />
4. To exit without confirmation, press CAL key. The<br />
display will flash “NO” for 2 seconds and the<br />
tester will go back to measurement mode.<br />
68X247746 11/00 Rev 0
Open this leaflet for calibration/testing/maintenance<br />
instructions.<br />
Electrode Maintenance<br />
• Rinse the electrode with tap water or electrode<br />
storage solution after each measurement.<br />
• Periodic soaks in warm pH 4.01 buffer will<br />
help remove contaminants.<br />
• If possible, keep a small piece of paper or sponge<br />
in the electrode cap – moistened with clean water<br />
or electrode storage solution (NOT deionized<br />
water) and close the cap over the electrode.<br />
When you need a new electrode, see “Electrode<br />
Replacement” on insert in back of box.<br />
Changing Batteries<br />
1. Open battery<br />
compartment<br />
lid(with<br />
attached<br />
lanyard loop).<br />
2. Remove old<br />
batteries;<br />
replace<br />
with fresh Diagram 1<br />
ones. Note<br />
polarity (shown in Diagram 1)<br />
Self-Diagnostic Messages<br />
bAt Weak batteries – replace with fresh ones<br />
specified by manufacturer.<br />
Er1 Wrong or bad buffer value, or electrode is not in<br />
contact with solution, or electrode is failing.<br />
Or, Ur Over range / under range signal, or electrode<br />
is not in contact with solution, or electrode is failing.<br />
Warranty<br />
<strong>Eutech</strong> Instruments warrants its meter free from<br />
manufacturing defects for 2 years and electrode<br />
module for 6 months. If repair, adjustment or<br />
replacement is necessary and has not been the result<br />
of abuse or misuse within the time period, please<br />
return the tester – freight prepaid – and correction<br />
will be made without charge. Out of warranty products<br />
will be repaired on a charge basis.<br />
Return Of Items<br />
+<br />
Authorization must be obtained from <strong>Eutech</strong>’s<br />
distributor before returning items for any reason.<br />
When applying for authorization, please include<br />
information regarding the reason the item(s) are to<br />
be returned.<br />
Note: We reserve the right to make improvements in<br />
design, construction and appearance of products<br />
without notice. Prices are subject to change without<br />
notice.<br />
• Waterproof & F loats<br />
• Replaceable Double<br />
Junction Electrode<br />
• Temperature Display<br />
• NIST or USA Buffer<br />
Selection
WP <strong>pHScan</strong> <strong>3+</strong> Instructions<br />
Before You Begin<br />
Remove electrode cap. To condition electrode,<br />
immerse electrode in electrode solution, buffer<br />
or tap water for at least 30 minutes. DO NOT use<br />
deionized water<br />
Calibration<br />
Calibration should be done regularly, typically<br />
everyday that the tester is used. You can calibrate<br />
at up to three points (pH 4.01, 7.00 and 10.01<br />
or 4.01, 6.86 and 9.18).<br />
1. Press ON/OFF button to switch unit on.<br />
2. Dip electrode about 2 to 3 cm into pH buffer<br />
solution.<br />
3. Press CAL button to enter Calibrate (CAL)<br />
mode. ‘CAL’ flashes on the display. Then, a<br />
pH value close to the pH buffer value will<br />
flash repeatedly.<br />
To abort calibration, press CAL again to<br />
resume measuring mode.<br />
4. After about 2 minutes when the<br />
reading has stabilized, press the HOLD/<br />
CON button to confirm calibration. The<br />
display will show ‘CO’ and then switch<br />
to the buffer value reading.<br />
5. Repeat with other buffers if<br />
necessary. Rinse electrode in tap<br />
water before dipping into next buffer.<br />
Insufficient sampling time. If<br />
the tester does not have a long<br />
enough exposure to the buffer, a<br />
stable calibration point will not be<br />
reached. Wait for about 2 minutes<br />
when the reading has stabilized,<br />
press the HOLD/CON.<br />
Buffer Set Selection<br />
To choose USA (4.01, 7.00, 10.01)<br />
or NIST (4.01, 6.86, 9.18) buffers.<br />
1. With tester off, hold HOLD/CON key<br />
while pressing and releasing ON/OFF<br />
key.<br />
2. The display will show “bUF” flashing.<br />
3. Press HOLD/CON key. The display<br />
will show either “USA” or “NST”.<br />
4. Press CAL key to toggle between USA and NIST<br />
buffer sets.<br />
5. Press HOLD/CON key to confirm.<br />
pH Testing<br />
1. Remove cap from the electrode and press the<br />
ON/OFF button to switch tester on.<br />
2. Dip the electrode about 2 to 3 cm into the test<br />
solution. Stir once and let the reading stabilize.<br />
3. Note the pH or press HOLD/CON button to freeze<br />
the reading. Press HOLD/CON again to release<br />
the reading.<br />
4. Press ON/OFF to turn off tester. If you do not<br />
press a button for 8.5 minutes the tester will<br />
automatically shut off to conserve batteries.<br />
Reset To Factory Default<br />
You can reset calibration data to factory default<br />
settings. This is extremely useful if you want to take<br />
a new set of pH measurements or using a new<br />
replacement electrode.<br />
1. With tester off, hold CAL key while pressing ON/<br />
OFF key.<br />
2. The display will show “rSt” flashing.<br />
3. Press HOLD/CON key to confirm. The display<br />
will flash “YES” for 2 seconds and the tester will<br />
go back to measurement mode.<br />
4. To exit without confirmation, press CAL key. The<br />
display will flash “NO” for 2 seconds and the<br />
tester will go back to measurement mode.<br />
Temperature Display<br />
The feature is extremely useful for you to note the<br />
temperature of sample you are measuring.<br />
1. With tester on, press HOLD/CON key. The display<br />
will show “HO” momentarily.<br />
2. Press CAL key.<br />
3. Temperature value is displayed in °C for 5<br />
seconds.<br />
4. The tester will automatically go back to pH<br />
measurement mode.<br />
68X247747 11/00 Rev 0
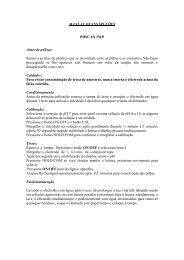
Twist-off<br />
Battery<br />
Compartment<br />
Replaceable<br />
Sensor<br />
Temperature<br />
Display<br />
• All push-button calibration<br />
• Displays measured units for clarity<br />
• Fast, stable, repeatable readings<br />
• Available through authorized distributors<br />
SPECIFICATIONS<br />
Tester <strong>pHScan</strong> 3 <strong>pHScan</strong> <strong>3+</strong><br />
pH Range 0.00 to 15.00 pH<br />
Resolution 0.01 pH<br />
Accuracy ±0.02 pH<br />
Calibration USA (pH 4.01, 7.00, 10.01) or<br />
Buffer option NIST (pH 4.01, 6.86, 9.18)<br />
Calibration Up to 3 points<br />
points (USA or NIST)<br />
Temperature<br />
Range<br />
- 0.0 to 50.0 °C<br />
Resolution - 0.1 °C<br />
Accuracy - ±1.0 °C<br />
ATC 32 to 122 °F / 0 to 50 °C<br />
Operating Temp 32 to 122 °F / 0 to 50 °C<br />
Special On/Off; HOLD; CA (Calibrate);<br />
Functions CO (Confirm display); auto-buffer<br />
recognition; auto-shutoff after<br />
8.5 min. non-use.<br />
Power Battery Four X 1.5V (Type: A76, LR 44 or<br />
V136A); > 150 hrs continuous use<br />
Dimension; Tester: 16.5 cm x 3.8 cm; 90 g<br />
Weight Boxed: 22 cm x 6 cm x 5 cm; 170g<br />
Manufactured By:<br />
<strong>Eutech</strong> Instruments Pte Ltd<br />
Blk 55, Ayer Rajah Crescent,<br />
#04-14/24, Singapore 139949<br />
Tel: (65)778 6876 Fax: (65)773 0836<br />
E-Mail: marketing@eutechinst.com<br />
Web-Site: http://www.eutechinst.com<br />
Made in Singapore<br />
68X247824 11/00 Rev 0<br />
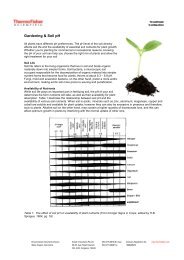
(Picture A)<br />
REMOVE THE OLD ELECTRODE<br />
A<br />
(Picture B)<br />
REPLACE THE ELECTRODE<br />
B<br />
Electrode Replacement<br />
You can replace the electrode module at<br />
the fraction of the cost of a new tester.<br />
When the tester fails to calibrate, gives<br />
fluctuating readings in buffers,shows<br />
error messages ‘Er1’, ‘Or’ or ‘Ur’ in a<br />
buffer, and the procedures in the<br />
Maintenance section do not help, you<br />
need to change the electrode.<br />
1. With dry hands, grip the ribbed tester<br />
collar with electrode facing you. Twist<br />
the collar counter clockwise (see picture<br />
A). Save the ribbed tester collar and<br />
O-ring for later use.<br />
2. Pull the old electrode module away from<br />
the tester.<br />
3. Align the four tabs on the new module<br />
so that they match the four slots on the<br />
tester (see picture B).<br />
4. Gently push the module onto the slots<br />
to sit it in position. Push the smaller<br />
O-ring fully onto the new electrode<br />
module. Push the collar over the module<br />
and thread it into place by firmly twisting<br />
clockwise.<br />
Applications<br />
Water quality testing • Pools • Spas<br />
• Aquariums • Aquaculture • Hydroponics<br />
• Ecology studies • Water and wastewater<br />
treatment • Boilers • Steam generators<br />
• Car washes • Sanitation plants<br />
• Labs • and more!