pHScan 3 / 3+ - Eutech
pHScan 3 / 3+ - Eutech
pHScan 3 / 3+ - Eutech
Create successful ePaper yourself
Turn your PDF publications into a flip-book with our unique Google optimized e-Paper software.
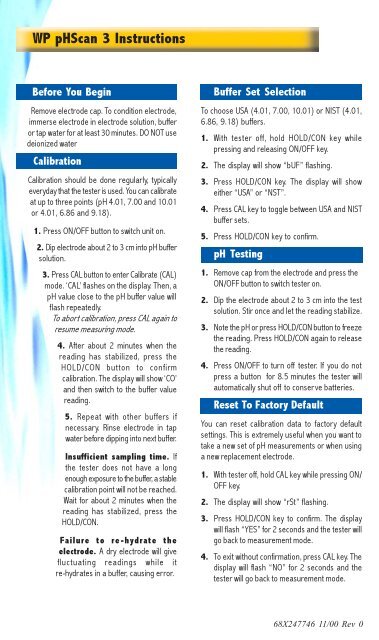
WP <strong>pHScan</strong> 3 Instructions<br />
Before You Begin<br />
Remove electrode cap. To condition electrode,<br />
immerse electrode in electrode solution, buffer<br />
or tap water for at least 30 minutes. DO NOT use<br />
deionized water<br />
Calibration<br />
Calibration should be done regularly, typically<br />
everyday that the tester is used. You can calibrate<br />
at up to three points (pH 4.01, 7.00 and 10.01<br />
or 4.01, 6.86 and 9.18).<br />
1. Press ON/OFF button to switch unit on.<br />
2. Dip electrode about 2 to 3 cm into pH buffer<br />
solution.<br />
3. Press CAL button to enter Calibrate (CAL)<br />
mode. ‘CAL’ flashes on the display. Then, a<br />
pH value close to the pH buffer value will<br />
flash repeatedly.<br />
To abort calibration, press CAL again to<br />
resume measuring mode.<br />
4. After about 2 minutes when the<br />
reading has stabilized, press the<br />
HOLD/CON button to confirm<br />
calibration. The display will show ‘CO’<br />
and then switch to the buffer value<br />
reading.<br />
5. Repeat with other buffers if<br />
necessary. Rinse electrode in tap<br />
water before dipping into next buffer.<br />
Insufficient sampling time. If<br />
the tester does not have a long<br />
enough exposure to the buffer, a stable<br />
calibration point will not be reached.<br />
Wait for about 2 minutes when the<br />
reading has stabilized, press the<br />
HOLD/CON.<br />
Failure to re-hydrate the<br />
electrode. A dry electrode will give<br />
fluctuating readings while it<br />
re-hydrates in a buffer, causing error.<br />
Buffer Set Selection<br />
To choose USA (4.01, 7.00, 10.01) or NIST (4.01,<br />
6.86, 9.18) buffers.<br />
1. With tester off, hold HOLD/CON key while<br />
pressing and releasing ON/OFF key.<br />
2. The display will show “bUF” flashing.<br />
3. Press HOLD/CON key. The display will show<br />
either “USA” or “NST”.<br />
4. Press CAL key to toggle between USA and NIST<br />
buffer sets.<br />
5. Press HOLD/CON key to confirm.<br />
pH Testing<br />
1. Remove cap from the electrode and press the<br />
ON/OFF button to switch tester on.<br />
2. Dip the electrode about 2 to 3 cm into the test<br />
solution. Stir once and let the reading stabilize.<br />
3. Note the pH or press HOLD/CON button to freeze<br />
the reading. Press HOLD/CON again to release<br />
the reading.<br />
4. Press ON/OFF to turn off tester. If you do not<br />
press a button for 8.5 minutes the tester will<br />
automatically shut off to conserve batteries.<br />
Reset To Factory Default<br />
You can reset calibration data to factory default<br />
settings. This is extremely useful when you want to<br />
take a new set of pH measurements or when using<br />
a new replacement electrode.<br />
1. With tester off, hold CAL key while pressing ON/<br />
OFF key.<br />
2. The display will show “rSt” flashing.<br />
3. Press HOLD/CON key to confirm. The display<br />
will flash “YES” for 2 seconds and the tester will<br />
go back to measurement mode.<br />
4. To exit without confirmation, press CAL key. The<br />
display will flash “NO” for 2 seconds and the<br />
tester will go back to measurement mode.<br />
68X247746 11/00 Rev 0


