

THC-A2 Automatic Torch Height Control for Mechanized Plasma ...
THC-A2 Automatic Torch Height Control for Mechanized Plasma ...
THC-A2 Automatic Torch Height Control for Mechanized Plasma ...

Create successful ePaper yourself
Turn your PDF publications into a flip-book with our unique Google optimized e-Paper software.
Installation and setup of ROBOTORCH <strong>THC</strong><br />
CAUTION: Portion of this install may include opening your plasma power supply and<br />
attaching wires. MAKE SURE THE UNIT IS UNPLUGGED prior to removing any cower<br />
or making any connections. <strong>Plasma</strong> units have HIGH VOLTAGES present that can be<br />
dangerous or lethal. IF YOU ARE NOT EXPERIENCED WORKING WITH HIGH<br />
VOLTAGES DO NOT ATTEMPT TO INSTALL THIS OR ANY OTHER DEWICE<br />
INSIDE YOUR PLASMA UNIT YOURSELF. SEEK PROFFESSIONAL HELP.<br />
1. Install Interface card (voltage divider). Best place to install interface card is inside of<br />
the plasma power supply. The connections are made trough the screw terminal blocks.<br />
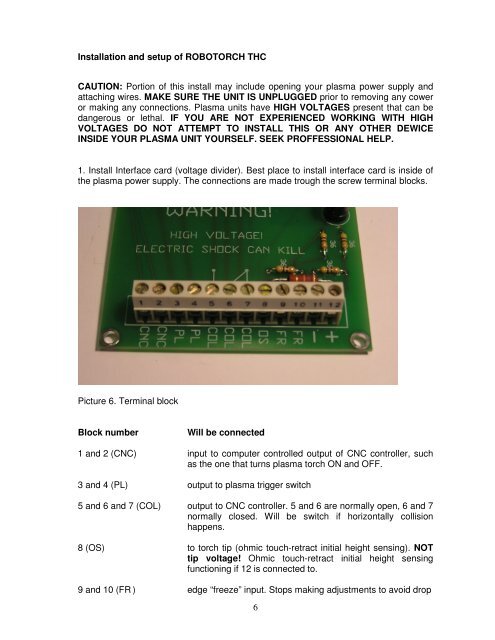
Picture 6. Terminal block<br />
Block number Will be connected<br />
1 and 2 (CNC) input to computer controlled output of CNC controller, such<br />
as the one that turns plasma torch ON and OFF.<br />
3 and 4 (PL) output to plasma trigger switch<br />
5 and 6 and 7 (COL) output to CNC controller. 5 and 6 are normally open, 6 and 7<br />
normally closed. Will be switch if horizontally collision<br />
happens.<br />
8 (OS) to torch tip (ohmic touch-retract initial height sensing). NOT<br />
tip voltage! Ohmic touch-retract initial height sensing<br />
functioning if 12 is connected to.<br />
9 and 10 (FR ) edge “freeze” input. Stops making adjustments to avoid drop<br />
6