SB6141 DOCSIS 3.0 Cable Modem
SB6141 DOCSIS 3.0 Cable Modem
SB6141 DOCSIS 3.0 Cable Modem

You also want an ePaper? Increase the reach of your titles
YUMPU automatically turns print PDFs into web optimized ePapers that Google loves.
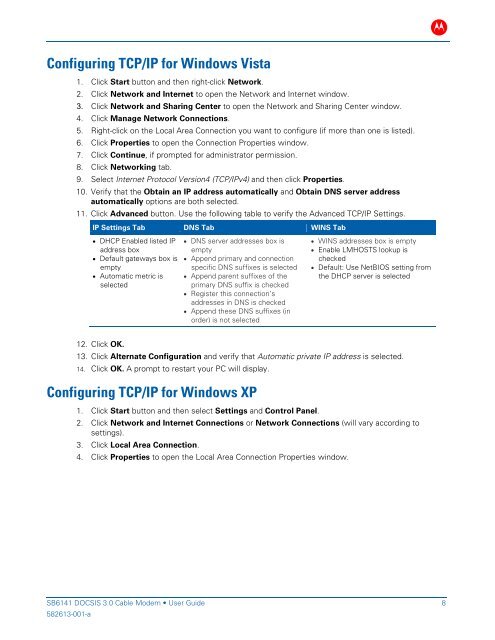
Configuring TCP/IP for Windows Vista<br />
<strong>SB6141</strong> <strong>DOCSIS</strong> <strong>3.0</strong> <strong>Cable</strong> <strong>Modem</strong> • User Guide 8<br />
582613-001-a<br />
1. Click Start button and then right-click Network.<br />
2. Click Network and Internet to open the Network and Internet window.<br />
3. Click Network and Sharing Center to open the Network and Sharing Center window.<br />
4. Click Manage Network Connections.<br />
5. Right-click on the Local Area Connection you want to configure (if more than one is listed).<br />
6. Click Properties to open the Connection Properties window.<br />
7. Click Continue, if prompted for administrator permission.<br />
8. Click Networking tab.<br />
9. Select Internet Protocol Version4 (TCP/IPv4) and then click Properties.<br />
10. Verify that the Obtain an IP address automatically and Obtain DNS server address<br />
automatically options are both selected.<br />
11. Click Advanced button. Use the following table to verify the Advanced TCP/IP Settings.<br />
IP Settings Tab DNS Tab WINS Tab<br />
• DHCP Enabled listed IP<br />
address box<br />
• Default gateways box is<br />
empty<br />
• Automatic metric is<br />
selected<br />
12. Click OK.<br />
• DNS server addresses box is<br />
empty<br />
• Append primary and connection<br />
specific DNS suffixes is selected<br />
• Append parent suffixes of the<br />
primary DNS suffix is checked<br />
• Register this connection’s<br />
addresses in DNS is checked<br />
• Append these DNS suffixes (in<br />
order) is not selected<br />
• WINS addresses box is empty<br />
• Enable LMHOSTS lookup is<br />
checked<br />
• Default: Use NetBIOS setting from<br />
the DHCP server is selected<br />
13. Click Alternate Configuration and verify that Automatic private IP address is selected.<br />
14. Click OK. A prompt to restart your PC will display.<br />
Configuring TCP/IP for Windows XP<br />
1. Click Start button and then select Settings and Control Panel.<br />
2. Click Network and Internet Connections or Network Connections (will vary according to<br />
settings).<br />
3. Click Local Area Connection.<br />
4. Click Properties to open the Local Area Connection Properties window.<br />
B