Crane User's Guide - Union Wire Rope
Crane User's Guide - Union Wire Rope
Crane User's Guide - Union Wire Rope
You also want an ePaper? Increase the reach of your titles
YUMPU automatically turns print PDFs into web optimized ePapers that Google loves.
when yoU’re<br />
installing wire<br />
roPe, there’s a<br />
Primary ConCern:<br />
Getting the rope on the<br />
equipment without trapping<br />
any twist that may<br />
have been induced during<br />
handling or installation .<br />
make sure the foundation<br />
layer is spooled tightly.<br />
guidelines for installation and maintenance.<br />
the Preferred teChniqUe for<br />
installing roPe onto a <strong>Crane</strong>.<br />
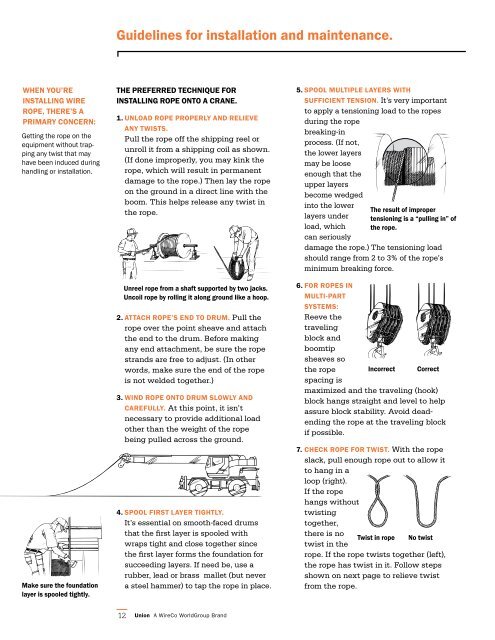
1. Unload roPe ProPerly and relieve<br />
any twists.<br />
Pull the rope off the shipping reel or<br />
unroll it from a shipping coil as shown.<br />
(If done improperly, you may kink the<br />
rope, which will result in permanent<br />
damage to the rope.) Then lay the rope<br />
on the ground in a direct line with the<br />
boom. This helps release any twist in<br />
the rope.<br />
2. attaCh roPe’s end to drUm. Pull the<br />
rope over the point sheave and attach<br />
the end to the drum. Before making<br />
any end attachment, be sure the rope<br />
strands are free to adjust. (In other<br />
words, make sure the end of the rope<br />
is not welded together.)<br />
3. wind roPe onto drUm slowly and<br />
CarefUlly. At this point, it isn’t<br />
necessary to provide additional load<br />
other than the weight of the rope<br />
being pulled across the ground.<br />
4. sPool first layer tightly.<br />
It’s essential on smooth-faced drums<br />
that the first layer is spooled with<br />
wraps tight and close together since<br />
the first layer forms the foundation for<br />
succeeding layers. If need be, use a<br />
rubber, lead or brass mallet (but never<br />
a steel hammer) to tap the rope in place.<br />
12<br />
Unreel rope from a shaft supported by two jacks.<br />
Uncoil rope by rolling it along ground like a hoop.<br />
5. sPool mUltiPle layers with<br />
sUffiCient tension. It’s very important<br />
to apply a tensioning load to the ropes<br />
during the rope<br />
breaking-in<br />
process. (If not,<br />
the lower layers<br />
may be loose<br />
enough that the<br />
upper layers<br />
become wedged<br />
into the lower<br />
layers under<br />
load, which<br />
can seriously<br />
the result of improper<br />
tensioning is a “pulling in” of<br />
the rope.<br />
damage the rope.) The tensioning load<br />
should range from 2 to 3% of the rope’s<br />
minimum breaking force.<br />
6. for roPes in<br />
mUlti-Part<br />
systems:<br />
Reeve the<br />
traveling<br />
block and<br />
boomtip<br />
sheaves so<br />
the rope incorrect Correct<br />
spacing is<br />
maximized and the traveling (hook)<br />
block hangs straight and level to help<br />
assure block stability. Avoid deadending<br />
the rope at the traveling block<br />
if possible.<br />
7. CheCk roPe for twist. With the rope<br />
slack, pull enough rope out to allow it<br />
to hang in a<br />
loop (right).<br />
If the rope<br />
hangs without<br />
twisting<br />
together,<br />
there is no<br />
twist in rope no twist<br />
twist in the<br />
rope. If the rope twists together (left),<br />
the rope has twist in it. Follow steps<br />
shown on next page to relieve twist<br />
from the rope.


