Operating & Maintenance Instructions - Garage Doors
Operating & Maintenance Instructions - Garage Doors
Operating & Maintenance Instructions - Garage Doors

You also want an ePaper? Increase the reach of your titles
YUMPU automatically turns print PDFs into web optimized ePapers that Google loves.
<strong>Operating</strong> & <strong>Maintenance</strong> <strong>Instructions</strong><br />
Date of Installation:<br />
Installation by:<br />
Contact details:<br />
01926 463888 www.garagedoorsonline.co.uk 01926 463888Issue<br />
3<br />
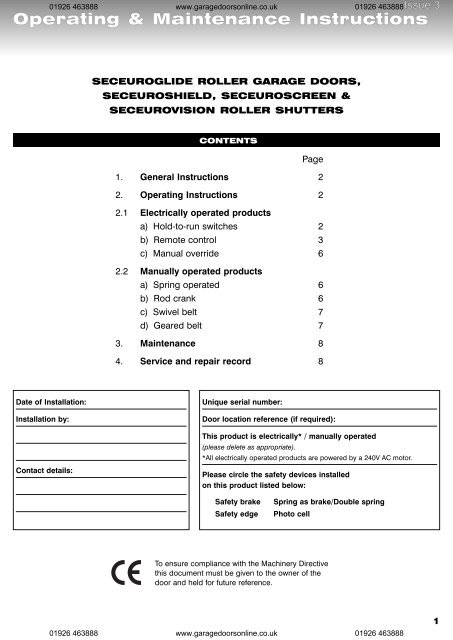
SECEUROGLIDE ROLLER GARAGE DOORS,<br />
SECEUROSHIELD, SECEUROSCREEN &<br />
SECEUROVISION ROLLER SHUTTERS<br />
CONTENTS<br />
Page<br />
1. General <strong>Instructions</strong> 2<br />
2. <strong>Operating</strong> <strong>Instructions</strong> 2<br />
2.1 Electrically operated products<br />
a) Hold-to-run switches 2<br />
b) Remote control 3<br />
c) Manual override 6<br />
2.2 Manually operated products<br />
a) Spring operated 6<br />
b) Rod crank 6<br />
c) Swivel belt 7<br />
d) Geared belt 7<br />
3. <strong>Maintenance</strong> 8<br />
4. Service and repair record 8<br />
Unique serial number:<br />
Door location reference (if required):<br />
This product is electrically* / manually operated<br />
(please delete as appropriate).<br />
*All electrically operated products are powered by a 240V AC motor.<br />
Please circle the safety devices installed<br />
on this product listed below:<br />
Safety brake Spring as brake/Double spring<br />
Safety edge Photo cell<br />
To ensure compliance with the Machinery Directive<br />
this document must be given to the owner of the<br />
door and held for future reference.<br />
01926 463888 www.garagedoorsonline.co.uk 01926 463888<br />
1
2<br />
01926 463888 www.garagedoorsonline.co.uk<br />
1. GENERAL INSTRUCTIONS<br />
01926 463888<br />
Your newly-installed product should give you many years of trouble-free service as it is designed to require minimal<br />
maintenance and servicing. In order to prolong the life of your door and to reduce the likelihood of problems, please adhere<br />
to the following instructions.<br />
Please note all products should only be operated by trained users.<br />
2. OPERATING INSTRUCTIONS<br />
2.1 ELECTRICALLY OPERATED PRODUCTS<br />
Only operate your shutter/garage door when it is in view, making sure it is not obstructed. Ensure, when the curtain is<br />
running, that you and any other person stands clear of the curtain and keeps hands etc. away from moving parts.<br />
A) HOLD-TO-RUN SWITCHES<br />
Hold-to-run single pole switch<br />
for operating one shutter<br />
Hold-to-run dual pole switch<br />
for operating two shutters<br />
Hold-to-run single pole key switch<br />
for operating one shutter<br />
• Make sure all windows and doors are closed.<br />
• If your electrically operated shutter contains any manually operated locks these must be disengaged before you<br />
operate the shutter. Failure to do so will damage the motor within the shutter.<br />
• Turn/press switch in desired direction. These are momentary switches, therefore operator must be present when<br />
opening and closing, with all openings in view.<br />
• It is very important that the motor completes its pre-set rotation, and the motor stops. It is the motor that locks the<br />
shutter/garage door, so even though the curtain looks down it may not be locked.<br />
• The motor must stop on its pre-set limits.<br />
Troubleshooting<br />
Fault<br />
The shutter/door fails to<br />
operate when the button is<br />
pressed/key is turned.<br />
The shutter/door stops before<br />
fully opening or closing, or<br />
fails to stop when reaching its<br />
final open or closed position.<br />
Cause<br />
1. There has been a power failure.<br />
2. The wrong direction is been<br />
selected on the control equipment.<br />
3. The thermal trip in the motor may<br />
have activated if the door has been<br />
operated several times recently.<br />
The limits in the motor have failed to<br />
operate or may not have been set<br />
correctly.<br />
Solution<br />
1. Wait for power to come back on or operate<br />
the shutter/door with the manual override if<br />
installed.<br />
2. Select the correct direction.<br />
3. Allow the motor to cool for approximately<br />
30minutes before attempting to operate the<br />
shutter/door again.<br />
Contact your installer.<br />
01926 463888 www.garagedoorsonline.co.uk 01926 463888
B) REMOTE CONTROL<br />
Please note the front of the control unit should only be removed by a trained engineer.<br />
Your shutter/garage door can be activated, depending on the type of equipment installed, by pressing<br />
and releasing the buttons on the front of the control unit, the buttons on your remote handset, or a<br />
separate hold-to-run switch (key, push or turn).<br />
Please note: All products should only be operated when in view; making sure they are not obstructed.<br />
When opening or closing the product door you must monitor the product until it has completed its<br />
operation. If the product is fitted with a safety device this could be activated during its operation which<br />
would cause the door to stop and reopen a short distance leaving the door partly open.<br />
Hand Transmitters<br />
The transmitters are fitted with four buttons (see diagram) and when any button is<br />
pressed the LED illuminates. The typical operating range is approx. 50m (160ft). When the<br />
batteries in the transmitters need replacing the LED will flash constantly when any button<br />
is pressed. (Batteries are 2 x CR2016 Lithium Cells).<br />
Multi-channel transmitters (Blue)<br />
Multi-channel transmitters operate in the same way as the standard hand transmitter but<br />
the grey button is used to select the door you wish to operate. The LED on the transmitter<br />
will flash to indicate which door you have selected. Press and release the grey button to<br />
change the door the hand transmitter will control.<br />
Vacation mode<br />
Before you go on holiday you can prevent the door being operated by the buttons on the<br />
receiver unit by engaging the vacation setting.<br />
SAFETY DEVICES<br />
The standard remote control receiver unit is supplied with a safety edge as standard and when required may also be<br />
supplied with a photo cell.<br />
Hold-to-run/deadman operation<br />
Your remote control unit may have been supplied without safety devices in hold-to-run (deadman) mode. If this is the case<br />
to close the door you will need to press and hold the down button whilst the door is in view ensuring at all times that there<br />
are no obstacles in the doorway. To open the door you will need to press and hold the up button whilst the door is in view<br />
ensuring at all times that there are no obstacles in the doorway. Please be aware it is possible to set the remote control so<br />
that the door will travel in the up direction in the standard automatic mode in which case a single press of the up button will<br />
open the door.<br />
Safety edge<br />
01926 463888 www.garagedoorsonline.co.uk<br />
2. OPERATING INSTRUCTIONS continued<br />
01926 463888<br />
1 2 3<br />
1. Press and hold the 1<br />
stop button.<br />
2. Whilst holding down<br />
the stop button press<br />
the close button.<br />
3. Release both buttons<br />
at the same time.<br />
Activating vacation mode Deactivating vacation mode<br />
OPEN BUTTON<br />
green<br />
STOP BUTTON<br />
red<br />
CLOSE BUTTON<br />
green<br />
ADD TRANSMITTER<br />
BUTTON<br />
grey<br />
STANDARD HAND<br />
TRANSMITTER<br />
(Grey)<br />
1. Press and release the<br />
open button<br />
The Safety Edge is fitted to the bottom of the door and is activated when the door starts to close. If it comes into contact<br />
with an object while the door is closing, it transmits a signal to the wall mounted control unit, the door will then stop and<br />
reopen a short distance.<br />
The safety edge also works as a weather seal, designed to be pressed against the ground, to prevent false sensing and<br />
reopening it is disabled for the last 50mm of door travel.<br />
If the safety edge hits an obstacle and the door stops you will be unable to close the door in the normal way.<br />
To close the door you can either:<br />
1. Press the up button on the transmitter or the control unit to raise the door to its fully open position. The safety device<br />
will automatically reset and the door can now be operated as normal with the safety device active.<br />
2. Press and hold the down button on the transmitter or control unit to close the door fully. If you release the button the<br />
door will stop. Ensure the door has fully lowered and locked before releasing the button. Please note the safety device<br />
will not be active until the door returns to its fully open position.<br />
3<br />
01926 463888 www.garagedoorsonline.co.uk 01926 463888<br />
LED
PHOTO CELL<br />
4<br />
01926 463888 www.garagedoorsonline.co.uk<br />
2. OPERATING INSTRUCTIONS continued<br />
01926 463888<br />
The PEC projects a pencil line beam across the door opening. If the beam is broken during the closing cycle, the shutter will<br />
stop and reopen a short distance.<br />
A visual indication is given on the signal LED as detailed in the System Status Indication section.<br />
If the photo cell beam is broken during the closing cycle the door will stop and reopen a short distance and a visual<br />
indication is given on the signal LED. You will now be unable to close the door in the normal way.<br />
To close the door you can either:<br />
1. Press the up button on the transmitter or the control unit to raise the door to its fully open position. The safety device<br />
will automatically reset and the door can now be operated as normal with the safety device active.<br />
2. Press and hold the down button on the transmitter or control unit to close the door fully. If you release the button the<br />
door will stop. Ensure the door has fully lowered and locked before releasing the button. Please note the safety device<br />
will not be active until the door returns to its fully open position.<br />
Adding transmitters<br />
• Press and hold down the Grey button on a transmitter that is already loaded onto the control unit.<br />
The lid mounted signal LED will flash YELLOW slowly, keep the button held down until it flashes YELLOW quickly.<br />
• Release the Grey Button.<br />
The lid mounted signal LED will continue to flash YELLOW quickly.<br />
• Press the top green button on the same transmitter once.<br />
The flashing LED will change from flashing YELLOW to flashing GREEN.<br />
• Now press the top green button on the new transmitter once and release.<br />
The flashing LED will change to continuous for 1 second each time it accepts a new transmitter.<br />
• Repeat step 4 for other transmitters to be added on to the system.<br />
Thirty seconds after loading the last transmitter the LED changes to flashing yellow for ten seconds and then returns to<br />
normal running mode. Alternatively you can press the top green button of a transmitter that has just been loaded, this will<br />
take it straight back to normal running mode.<br />
Note the manufactures code for the transmitter must match the manufacturers code for the receiver, if they do not match,<br />
you cannot add that particular transmitter on to the system, the LED will flash RED, GREEN then YELLOW once quickly, if<br />
they are not compatible. Please contact your supplier for further details.<br />
Remote Control Trouble Shooting Guide<br />
N.B. Always isolate the power before attempting to make any adjustments or repairs. Untrained operators are advised to<br />
contact an approved installer.<br />
System Status Indication<br />
The status of the control unit and/or door is indicated by the lid mounted signal LED. This is a three-colour “RED, YELLOW &<br />
GREEN” lamp (LED) mounted on the front of the control unit, as detailed below:<br />
Door positions<br />
LED signal Status<br />
GREEN solid open limit activated<br />
GREEN flashing door opening<br />
RED solid close limit activated<br />
RED flashing door closing<br />
YELLOW solid door stationary between the open and close limits<br />
Programming mode (using a transmitter)<br />
LED signal Status<br />
Slow flashing YELLOW<br />
then quick flashing YELLOW control unit in programming mode<br />
01926 463888 www.garagedoorsonline.co.uk 01926 463888
SYSTEM STATUS<br />
01926 463888 www.garagedoorsonline.co.uk<br />
2. OPERATING INSTRUCTIONS continued<br />
01926 463888<br />
LED signal/fault Cause Solution<br />
RED rapid flashing Photo Electric Cell (PEC) beam<br />
broken.<br />
RED flash then<br />
two YELLOW flashes<br />
RED flash then<br />
three YELLOW flashes<br />
RED flash then<br />
four YELLOW flashes<br />
A rapid RED, GREEN<br />
then<br />
YELLOW single flash<br />
Long YELLOW then<br />
two shorter RED flashes<br />
Reduced operating<br />
range<br />
The door stops<br />
automatically after the<br />
bottom edge of the door<br />
has passed the top<br />
magnet when the door is<br />
closing (this only applies<br />
when bottom slat safety<br />
edge is installed).<br />
1. Remove any obstacles which may be in the doorway<br />
(once you have removed the obstacle the signal light<br />
will change to solid yellow).<br />
2. Reset the safety device as described in the Photo Cell<br />
section.<br />
3. Ensure the photocell and reflector are clean.<br />
4. Re-align the photo cell and reflector (contact your<br />
installer).<br />
A motor stall has been detected. 1. Disengage manual locking device.<br />
2. Remove any objects which may have jammed in the<br />
guide rails, curtain or roll.<br />
3. Ensure nobody is attempting to ride up on the curtain.<br />
4. Ensure a non-approved item has been attached to the<br />
curtain.<br />
5. In extreme conditions the door may have frozen to the<br />
guide rails or floor. Try to operate the door again or<br />
defrost the frozen section.<br />
The thermal trip has activated<br />
on the motor or the motor is not<br />
connected.<br />
Door overrun time out; the door<br />
has been opening or closing for<br />
over 60 seconds without<br />
detecting a final end limit<br />
position.<br />
Indicates that a signal has been<br />
received from either a<br />
transmitter that has not been<br />
loaded on to the system or the<br />
transmitters’ manufacturers<br />
code does not match with the<br />
SeceuroSmart control unit.<br />
1. Allow the motor to cool for approximately 30minutes<br />
before attempting to operate the door again.<br />
2. The motor may not be connected to the remote control<br />
unit contact your installer.<br />
Contact your installer.<br />
PEC has failed Self Check test. Contact your installer.<br />
Batteries in transmitter are flat or<br />
aerials may not be fitted to<br />
remote control unit or they may<br />
be touching.<br />
•Signal interference.<br />
•Aerials touching or have been<br />
removed.<br />
•Top magnet removed from<br />
guide rail<br />
1. Load the transmitter on to the system as per the<br />
“Adding transmitters” section.<br />
2. Contact your installer if the transmitter will not load on<br />
to the system.<br />
1. Transmitter LED does not illuminate when flat and if<br />
batteries low it flashes when button pressed. Replace<br />
batteries.<br />
2. Ensure aerials are not touching, if aerials are missing<br />
then contact your installer.<br />
A device may be transmitting a strong signal on the same frequency as the remote<br />
control so the remote control may have stopped the door to ensure your safety is<br />
not compromised. The door will continue to operate once the interfering signal has<br />
gone.<br />
Ensure aerials are not touching, if aerials are missing then contact your installer.<br />
The door will not operate if the magnets are missing or are in the wrong position,<br />
contact your installer.<br />
To close the door press and hold the down button releasing the button once the<br />
door is fully down and locked (ensure the door is fully in view when operating).<br />
01926 463888 www.garagedoorsonline.co.uk 01926 463888<br />
5
6<br />
01926 463888 www.garagedoorsonline.co.uk<br />
2. OPERATING INSTRUCTIONS continued<br />
01926 463888<br />
C) POWER FAILURE/MANUAL OVERRIDE (IF FITTED)<br />
In the event of disruption to the power supply, or the motor temporarily over heating (the motor is protected by a thermal cutout),<br />
the door can be operated manually. Isolate power supply to shutter before using the manual override.<br />
Internally installed shutter with<br />
internal manual override<br />
2.2 MANUALLY OPERATED PRODUCTS<br />
Only operate your Shutter when it is in view, making sure it is not obstructed. Ensure, when the curtain is running, that any<br />
other person stands clear of the curtain and keep hands etc. away from moving parts.<br />
A) SPRING OPERATED<br />
Externally installed shutter with<br />
external manual override<br />
DO NOT OVERWIND<br />
Internally installed shutter with<br />
external manual override<br />
When the main power is reinstated, ensure that the power isolator is switched back on. If applicable secure the handle back<br />
onto the wall. Remember to keep the crank handle in a convenient place.<br />
A spring operated shutter may have a lock in the bottom slat or curtain, shoot bolts in the bottom slat, or pin locks in the<br />
guide rails.<br />
Opening the shutter – Press slightly down on the bottom slat when the shutter is in the closed position; disengage the<br />
locking mechanism(s). If applicable ensure the key is removed before opening the shutter.<br />
Push the shutter curtain upwards, using the handles provided, to open the shutter. Do not let go of the shutter until it has<br />
reached its fully open position.<br />
Closing the shutter – Pull the curtain down using the handles provided. When the curtain reaches the closed position, press<br />
down on the bottom handles and then engage the locking mechanism(s).<br />
Fault<br />
TO OPERATE:<br />
Lock will not engage<br />
B) ROD CRANK<br />
Hold crank handle in line with<br />
eye and rotate handle until<br />
the door reaches<br />
the open / closed<br />
position.<br />
Troubleshooting<br />
Lowering the curtain<br />
Cause<br />
TO OPERATE:<br />
Externally fitted doors will need<br />
the cover cap or override<br />
lock removing and the crank<br />
handle inserting. Rotate<br />
handle until the door<br />
reaches the open/closed<br />
position.<br />
The lock bar(s) is not correctly<br />
aligned with the lock hole.<br />
Solution<br />
TO OPERATE:<br />
Remove lock and insert crank<br />
handle and rotate until door<br />
reaches the open/close<br />
position.<br />
Apply more pressure to the bottom of the<br />
curtain until the lock engages or move the<br />
curtain around slightly until it is in the correct<br />
position for the lock(s) to engage.<br />
Make sure all windows and doors are closed. To lower the curtain, pull the crank handle out of the clip and hold the handle<br />
at an angle of 45 degrees. This will enable the user to wind the curtain up with ease and also minimise the wear on the crank<br />
knuckle. Turn the handle either clockwise or anti-clockwise. If the handle is turned the wrong way it will feel tight. On no<br />
account should this be forced as it will result in damage. If it does feel tight simply reverse the rotation of the crank handle.<br />
Once the direction has been identified continue until the curtain is fully down onto the cill or doorstep and continue the<br />
rotation until the crank handle feels tight.<br />
This means the curtain is in the locked position.<br />
01926 463888 www.garagedoorsonline.co.uk 01926 463888
01926 463888 www.garagedoorsonline.co.uk<br />
2. OPERATING INSTRUCTIONS continued<br />
01926 463888<br />
RAISING THE CURTAIN<br />
To raise the curtain, pull the crank handle out of the clip and hold the handle at an angle of 45 degrees. This will enable the<br />
user to wind the curtain up with ease and also minimise the wear on the crank knuckle. Turn the handle either clockwise or<br />
anticlockwise. If the handle is turned the wrong way it will feel tight. On no account should this be forced as it will result in<br />
damage. If it does feel tight simply reverse the rotation of the crank handle. Once the direction has been identified turn the<br />
handle. The locking mechanism will automatically be disengaged and the curtain will rise up. Do not wind up too fast as this<br />
will result in damage to the shutter lid. The buffers will stop on the lid.<br />
C) SWIVEL BELT<br />
Lowering the curtain<br />
Make sure all the windows and doors are closed. Pull the grey webbed belt out of the swivel winder, which will in turn<br />
release the curtain down the guide rails. The swivel winder has a brake on it so that the curtain can be stopped anywhere<br />
down the guide. This is ideal for blocking out the sun etc. To fully close the curtain, drop the curtain down onto the window<br />
cill or doorstep. Pull the tape out about 300mm (12 inches) and place a finger onto the tape where it leaves the swivel<br />
winder. Keep the finger in place and release the slack tape. The curtain will then rotate inside the shutter box, engaging the<br />
locking mechanism. When the locking mechanism has correctly engaged it should not be possible to manually lift the<br />
curtain. The slack tape will then be taken back into the swivel box.<br />
Raising the curtain<br />
To raise the curtain simply pull the tape downwards. This will disengage the locking mechanism automatically. The tape will<br />
coil up inside the swivel winder. Again the curtain can be left in any position e.g. halfway up. Physical stops are fitted to the<br />
bottom slat to prevent the curtain from lifting out of the guide rails. Do not lift the curtain too fast or vigorously as this may<br />
cause damage to the box lid.<br />
Troubleshooting<br />
Fault<br />
Lock mechanism will not<br />
engage<br />
D) GEARED BELT<br />
Lowering the curtain<br />
Make sure all windows and doors are closed. On the geared belt winder box there is a direction of rotation. Put the winder<br />
handle into the squared opening and turn the handle in the down direction. The curtain can be stopped anywhere down the<br />
guide e.g. halfway down. This is ideal for blocking out the sun etc. Lower the curtain down onto the window cill or doorstep<br />
and keep turning until the tape appears to be getting slack. Allow about 300mm (12 inches) of tape to come out of the<br />
geared box and then hold the tape at the tape exit of the box. Whilst holding the tape, pull the slack tape downwards and<br />
release it. This will rotate the curtain inside the shutter box and engage the locking mechanism. When the locking<br />
mechanism has correctly engaged it should not be possible to manually lift the curtain. Any slack tape can be wound back<br />
carefully into the geared box.<br />
Raising the curtain<br />
Cause<br />
The final 300mm of curtain has not<br />
been lowered with sufficient speed to<br />
engage the locking mechanism.<br />
Solution<br />
Repeat the process described above for<br />
lowering the final 300mm of curtain.<br />
To raise the curtain simply turn the handle in the upwards direction. The locking mechanism will automatically disengage<br />
and the curtain will lift up. The curtain can be stopped anywhere in the guides e.g. halfway up. Physical stops are fitted to<br />
the bottom slat to prevent the curtain from lifting out of the guide rails. Do not lift the curtain too fast or too vigorously or this<br />
may cause damage to the box lid.<br />
Troubleshooting<br />
Fault<br />
Lock mechanism will not<br />
engage<br />
Cause<br />
The final 300mm of curtain has not<br />
been lowered with sufficient speed to<br />
engage the locking mechanism.<br />
Solution<br />
Repeat the process described above for<br />
lowering the final 300mm of curtain.<br />
01926 463888 www.garagedoorsonline.co.uk 01926 463888<br />
7
8<br />
01926 463888 www.garagedoorsonline.co.uk<br />
3. MAINTENANCE<br />
01926 463888<br />
CAREFUL USE OF YOUR SHUTTER/DOOR IS THE BEST WAY TO AVOID MAINTENANCE OR REMEDIAL WORK<br />
Your Shutter/door is low maintenance. The curtain needs wiping with a damp cloth and a mild detergent to remove any<br />
excessive dirt/grime to maintain its prime appearance and to reduce the risk of the surface being damaged. This must be<br />
done more frequently in a salt air environment.<br />
Marks on the paint finish can be cleaned with many types of car polish. Chips in the paintwork should be touched up to<br />
prevent corrosion of the metal.<br />
The power to the shutter should be isolated before washing or repairing the paintwork.<br />
The motor and curtain have been designed to be lubrication free so you must not oil or grease the guide rails. Make sure no<br />
foreign items get collected in the guides i.e., stones, sticks, paper etc.<br />
Additional information for electrically operated products<br />
Your door should run smoothly and easily as the motor is not designed to over-come problems of a badly running or<br />
damaged door. If necessary contact your approved installer for repair.<br />
The motor should be stopping on the limits and not over-running (indicated by buzzing) when the door hits the floor or the<br />
open stops.<br />
N.B. Always isolate the power before attempting to make any adjustments or repairs. Untrained operators are advised to<br />
contact an approved installer.<br />
Date work carried out:<br />
Work carried out:<br />
Work performed by – Sign:<br />
Print:<br />
Company name:<br />
Date work carried out:<br />
Work carried out:<br />
Work performed by – Sign:<br />
Print:<br />
Company name:<br />
Date work carried out:<br />
Work carried out:<br />
Work performed by – Sign:<br />
Print:<br />
Company name:<br />
4. SERVICE AND REPAIR RECORD<br />
This product was manufactured by SWS UK, Claughton, Lancaster, LA2 9LA<br />
01926 463888 www.garagedoorsonline.co.uk 01926 463888