Replacing the handbrake drum - Legion Land Rover Colombia
Replacing the handbrake drum - Legion Land Rover Colombia
Replacing the handbrake drum - Legion Land Rover Colombia

Create successful ePaper yourself
Turn your PDF publications into a flip-book with our unique Google optimized e-Paper software.
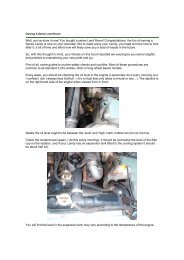
The above is an early output flange. The flanges are <strong>the</strong> same throughout <strong>the</strong> series range (236630) from SI to SIII. The V8<br />
box is different though, part number 576627. Later models have an oil catcher, which you can just see on <strong>the</strong> next photo. It’s<br />
still <strong>the</strong> same flange though, <strong>the</strong> oil catcher is a press fit.<br />
Okay, you now have <strong>the</strong> flange off, and can see <strong>the</strong> oil seal.<br />
Remove <strong>the</strong> shoes, making careful note of how <strong>the</strong> springs are fitted, and which way round <strong>the</strong>y are. I strongly suggest that<br />
you take great care removing <strong>the</strong> shoes on <strong>the</strong> adjuster side, as <strong>the</strong> adjuster on early models contains slides which will drop<br />
out if you are not careful, so tie <strong>the</strong>m in place with a bit of wire. If <strong>the</strong>y drop out it is possible to replace <strong>the</strong>m <strong>the</strong> wrong way,<br />
and <strong>the</strong>n it won’t adjust evenly, so beware! (it’s very difficult to know which way <strong>the</strong> right way is too…) The adjuster and<br />
activator are highlighted in <strong>the</strong> second photo in <strong>the</strong> article.<br />
Remove <strong>the</strong> oil seal. It’s a tight fit, you’ll need a lever, and it will pop out when you least expect it, so be careful.<br />
Stuff a lint free rag into <strong>the</strong> output shaft hole now, and spray <strong>the</strong> backplate with brake cleaner or degreaser to remove all <strong>the</strong><br />
oil. You should clean out <strong>the</strong> drain hole for <strong>the</strong> oil catcher too at this point, and <strong>the</strong>n dry everything off.<br />
<strong>Replacing</strong> <strong>the</strong> seal is <strong>the</strong> same as any o<strong>the</strong>r oil seal. You must make sure it goes in evenly and squarely or it won’t work. An<br />
ideal tool for this is <strong>the</strong> hub nut box spanner you use on <strong>the</strong> wheel hubs. It’s just <strong>the</strong> right size to go over <strong>the</strong> output shaft and<br />
rest on <strong>the</strong> seal. Send <strong>the</strong> seal home until it is flush with <strong>the</strong> gearbox face. Oil <strong>the</strong> lips of <strong>the</strong> seal with EP90, as if it runs dry at<br />
first, it won’t last long.<br />
Now fit your new shoes, paying attention to <strong>the</strong> way <strong>the</strong> springs are fitted. It’s easier to fit <strong>the</strong>m with <strong>the</strong> output flange out of<br />
<strong>the</strong> way.<br />
Refit <strong>the</strong> output flange, insert <strong>the</strong> felt washer, (neoprene facing inwards) <strong>the</strong>n <strong>the</strong> steel washer, and finally <strong>the</strong> castle nut. The<br />
output drive flange nut is torqued to 85lb/ft. Then fit a new split pin to <strong>the</strong> nut, and replace <strong>the</strong> <strong>drum</strong>. Don’t refit <strong>the</strong> propshaft<br />
just yet.<br />
You now need to adjust <strong>the</strong> shoes to accommodate <strong>the</strong> new linings. You might get away with it, as <strong>the</strong>y don’t wear <strong>the</strong> same<br />
as wheel brake shoes, but here’s how you do it anyway.