Replacing the handbrake drum - Legion Land Rover Colombia
Replacing the handbrake drum - Legion Land Rover Colombia
Replacing the handbrake drum - Legion Land Rover Colombia

You also want an ePaper? Increase the reach of your titles
YUMPU automatically turns print PDFs into web optimized ePapers that Google loves.
<strong>Replacing</strong> <strong>the</strong> <strong>handbrake</strong> <strong>drum</strong>/rear output shaft oil seal. Series models.<br />
You may notice oil coming out of your <strong>handbrake</strong> (transmission brake) <strong>drum</strong>. This will in all probability be a leak from <strong>the</strong><br />
gearbox rear output shaft oil seal.<br />
Later series models have an oil catcher on <strong>the</strong> output flange, and <strong>the</strong> oil is supposed to leak out of a hole in <strong>the</strong> casting, just<br />
in front of <strong>the</strong> <strong>handbrake</strong> backplate. If this gets blocked with mud or road dirt, <strong>the</strong>n <strong>the</strong> leak will progress out through <strong>the</strong> <strong>drum</strong><br />
and will also coat <strong>the</strong> brake shoes liberally with oil. If <strong>the</strong>y are oiled up, <strong>the</strong>n an MOT failure is on <strong>the</strong> cards as <strong>the</strong> <strong>handbrake</strong><br />
will not grip as it should.<br />
So, how to replace it? You’ll need new shoes (best option), an oil seal, FRC 1780, (fits all standard Series models, even SI,<br />
but not V8 or one ton) a felt washer 622042, four propshaft bolt nuts NZ60641L (always replace <strong>the</strong>se with new!) and possibly<br />
6 new nuts for <strong>the</strong> <strong>drum</strong>, 50525.<br />
First of all, Drain <strong>the</strong> oil from <strong>the</strong> transfer box, <strong>the</strong>n chock <strong>the</strong> front wheels and lift one rear wheel off <strong>the</strong> ground….. Support<br />
<strong>the</strong> <strong>Land</strong>y with an axle stand because (yes, you guessed it) Squished folk don’t get driving <strong>Land</strong>ies!..... The reason for doing<br />
this is so that you can revolve <strong>the</strong> <strong>handbrake</strong> <strong>drum</strong> and propshaft. It makes it a whole lot easier to get at <strong>the</strong> bolts securing<br />
<strong>the</strong> propshaft. They will come undone using an open spanner, or a cranked ring spanner, but if you have one of <strong>the</strong> special<br />
sockets designed for <strong>the</strong> job, all well and good. The spanner method just takes a bit longer.<br />
Once <strong>the</strong> nuts are off <strong>the</strong> propshaft slide it back in length (<strong>the</strong> splined end will probably ooze grease as you do this, if you<br />
have used grease regularly) <strong>the</strong>n tie it up out of <strong>the</strong> way. Now undo <strong>the</strong> 6 nuts holding <strong>the</strong> <strong>drum</strong> to <strong>the</strong> output shaft, and<br />
remove it. It will come off easily if <strong>the</strong> <strong>handbrake</strong> isn’t on!<br />
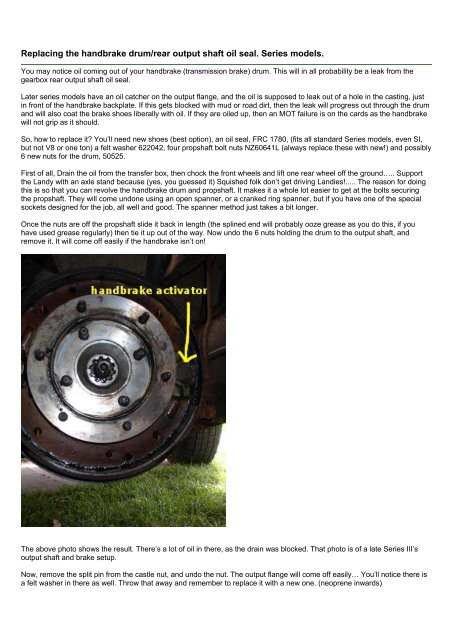
The above photo shows <strong>the</strong> result. There’s a lot of oil in <strong>the</strong>re, as <strong>the</strong> drain was blocked. That photo is of a late Series III’s<br />
output shaft and brake setup.<br />
Now, remove <strong>the</strong> split pin from <strong>the</strong> castle nut, and undo <strong>the</strong> nut. The output flange will come off easily… You’ll notice <strong>the</strong>re is<br />
a felt washer in <strong>the</strong>re as well. Throw that away and remember to replace it with a new one. (neoprene inwards)
This next photo shows <strong>the</strong> mess <strong>the</strong> oil leak can make, especially if you haven’t cleaned <strong>the</strong> drain hole out!<br />
And a quick look to see where <strong>the</strong> oil catcher is…<br />
And now a look at <strong>the</strong> earlier type without <strong>the</strong> oil catcher…
You can see <strong>the</strong> difference quite easily.<br />
Examine <strong>the</strong> output flange closely…if it is excessively scored you may need to replace it, as <strong>the</strong> lips of <strong>the</strong> seal run on it. If it’s<br />
badly scored no amount of new seals will stop it leaking! Light wear is acceptable, but it’s your decision!
The above is an early output flange. The flanges are <strong>the</strong> same throughout <strong>the</strong> series range (236630) from SI to SIII. The V8<br />
box is different though, part number 576627. Later models have an oil catcher, which you can just see on <strong>the</strong> next photo. It’s<br />
still <strong>the</strong> same flange though, <strong>the</strong> oil catcher is a press fit.<br />
Okay, you now have <strong>the</strong> flange off, and can see <strong>the</strong> oil seal.<br />
Remove <strong>the</strong> shoes, making careful note of how <strong>the</strong> springs are fitted, and which way round <strong>the</strong>y are. I strongly suggest that<br />
you take great care removing <strong>the</strong> shoes on <strong>the</strong> adjuster side, as <strong>the</strong> adjuster on early models contains slides which will drop<br />
out if you are not careful, so tie <strong>the</strong>m in place with a bit of wire. If <strong>the</strong>y drop out it is possible to replace <strong>the</strong>m <strong>the</strong> wrong way,<br />
and <strong>the</strong>n it won’t adjust evenly, so beware! (it’s very difficult to know which way <strong>the</strong> right way is too…) The adjuster and<br />
activator are highlighted in <strong>the</strong> second photo in <strong>the</strong> article.<br />
Remove <strong>the</strong> oil seal. It’s a tight fit, you’ll need a lever, and it will pop out when you least expect it, so be careful.<br />
Stuff a lint free rag into <strong>the</strong> output shaft hole now, and spray <strong>the</strong> backplate with brake cleaner or degreaser to remove all <strong>the</strong><br />
oil. You should clean out <strong>the</strong> drain hole for <strong>the</strong> oil catcher too at this point, and <strong>the</strong>n dry everything off.<br />
<strong>Replacing</strong> <strong>the</strong> seal is <strong>the</strong> same as any o<strong>the</strong>r oil seal. You must make sure it goes in evenly and squarely or it won’t work. An<br />
ideal tool for this is <strong>the</strong> hub nut box spanner you use on <strong>the</strong> wheel hubs. It’s just <strong>the</strong> right size to go over <strong>the</strong> output shaft and<br />
rest on <strong>the</strong> seal. Send <strong>the</strong> seal home until it is flush with <strong>the</strong> gearbox face. Oil <strong>the</strong> lips of <strong>the</strong> seal with EP90, as if it runs dry at<br />
first, it won’t last long.<br />
Now fit your new shoes, paying attention to <strong>the</strong> way <strong>the</strong> springs are fitted. It’s easier to fit <strong>the</strong>m with <strong>the</strong> output flange out of<br />
<strong>the</strong> way.<br />
Refit <strong>the</strong> output flange, insert <strong>the</strong> felt washer, (neoprene facing inwards) <strong>the</strong>n <strong>the</strong> steel washer, and finally <strong>the</strong> castle nut. The<br />
output drive flange nut is torqued to 85lb/ft. Then fit a new split pin to <strong>the</strong> nut, and replace <strong>the</strong> <strong>drum</strong>. Don’t refit <strong>the</strong> propshaft<br />
just yet.<br />
You now need to adjust <strong>the</strong> shoes to accommodate <strong>the</strong> new linings. You might get away with it, as <strong>the</strong>y don’t wear <strong>the</strong> same<br />
as wheel brake shoes, but here’s how you do it anyway.
On <strong>the</strong> passenger side (Right Hand Drive) of <strong>the</strong> gearbox <strong>the</strong>re is a square headed adjuster nut on <strong>the</strong> backplate of <strong>the</strong><br />
<strong>handbrake</strong>. Turn this clockwise until <strong>the</strong> shoes are in firm contact with <strong>the</strong> <strong>drum</strong>, and <strong>the</strong>n back it off just enough to release<br />
<strong>the</strong> brake. That should be about two clicks.<br />
Now apply <strong>the</strong> <strong>handbrake</strong> a few times, to centre <strong>the</strong> shoes. Ideally, it should operate after two clicks of <strong>the</strong> lever. If not this<br />
can be adjusted at <strong>the</strong> back of <strong>the</strong> <strong>handbrake</strong> lever, using <strong>the</strong> nut at <strong>the</strong> top of <strong>the</strong> vertical adjustment rod, I am afraid I don’t<br />
have a photo of this at <strong>the</strong> moment, but it’s fairly self explanatory. Tightening <strong>the</strong> nut down <strong>the</strong> adjuster rod will reduce <strong>the</strong><br />
number of clicks required to activate <strong>the</strong> <strong>handbrake</strong>.<br />
Now replace <strong>the</strong> propshaft, using <strong>the</strong> new nuts on <strong>the</strong> bolts.<br />
That’s <strong>the</strong> job done. I would suggest though that you check <strong>the</strong> <strong>handbrake</strong> after a few miles, just to make sure that <strong>the</strong> shoes<br />
are not binding on <strong>the</strong> <strong>drum</strong>. Keep adjusting until you get it right!