

tank tread kit - VEX Robotics
tank tread kit - VEX Robotics
tank tread kit - VEX Robotics

Create successful ePaper yourself
Turn your PDF publications into a flip-book with our unique Google optimized e-Paper software.
motion accessories<br />
<strong>tank</strong> <strong>tread</strong> <strong>kit</strong><br />
Tank <strong>tread</strong>s will enable your robot to explore much more<br />
demanding terrain than ordinary wheels. Tank <strong>tread</strong>s<br />
distribute a vehicle’s weight more evenly than wheels,<br />
allowing your robot to move more easily in sand or on soft,<br />
spongy surfaces into which wheels would sink and bog down.<br />
This increased surface area also gives your robot more<br />
traction for hauling heavy loads up an incline. And because<br />
each link can grip the surface over which it’s traveling, a<br />
robot with <strong>tank</strong> <strong>tread</strong>s can more easily climb obstacles or<br />
traverse crevasses in which wheels would get stuck.<br />
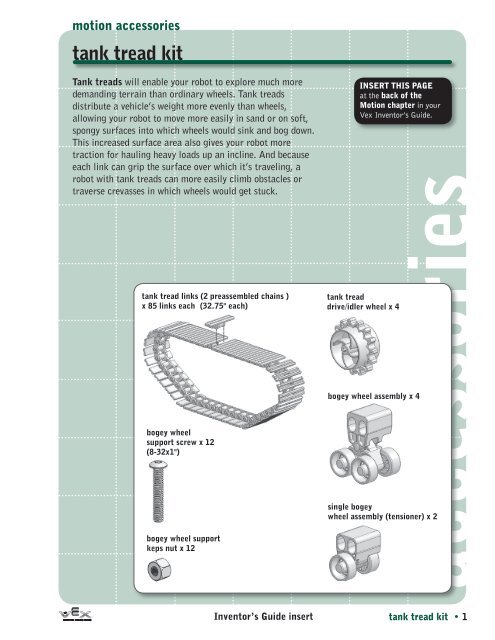
<strong>tank</strong> <strong>tread</strong> links (2 preassembled chains )<br />
x 85 links each (32.75" each)<br />
bogey wheel<br />
support screw x 12<br />
(8-32x1")<br />
bogey wheel support<br />
keps nut x 12<br />
INSERT THIS PAGE<br />
at the back of the<br />
Motion chapter in your<br />
Vex Inventor’s Guide.<br />
accessories<br />
<strong>tank</strong> <strong>tread</strong><br />
drive/idler wheel x 4<br />
bogey wheel assembly x 4<br />
single bogey<br />
wheel assembly (tensioner) x 2<br />
Inventor’s Guide insert<br />
<strong>tank</strong> <strong>tread</strong> <strong>kit</strong> • 1
motion accessories<br />
<strong>tank</strong> <strong>tread</strong> <strong>kit</strong>, continued<br />
As you learned in the Vex Inventor’s Guide, a<br />
robot’s structure and motion subsystems are<br />
usually interdependent and often have to be built<br />
together. In this case, you’ll need to have some<br />
pre-existing structure to which you can connect<br />
the <strong>tank</strong> track components. In particular, you’ll<br />
need a chassis rail or other structural component,<br />
two axles for the <strong>tank</strong> tracks’ drive wheels, and a<br />
motor to power one of those axles. Remember to<br />
mount the motor securely using two 6-32 screws,<br />
or you’ll have problems down to the road!<br />
Note: for more information on motors and motion<br />
systems, see the Motion chapter in your Vex<br />
Inventor’s Guide.<br />
Assembly Instructions<br />
1 Build Your Support Structure<br />
Start by assembling the chassis of your robot and the support<br />
structure on which you intend to mount the <strong>tank</strong> <strong>tread</strong>. (Note: the<br />
structure shown in these instructions is only for reference.) The<br />
mounting structure should include two axles spaced out such that<br />
there are 11 open holes in between them. One of these axles will be<br />
connected to a motor, which will drive the whole assembly.<br />
<strong>tank</strong> <strong>tread</strong> <strong>kit</strong> • 2<br />
accessories<br />
accessories<br />
NOTE: The following<br />
assembly instructions show<br />
how to build <strong>tank</strong> tracks for<br />
one side of your robot. The<br />
same directions should also<br />
be followed to build the<br />
other side.<br />
11 holes<br />
Inventor’s Guide insert
motion accessories<br />
<strong>tank</strong> <strong>tread</strong> <strong>kit</strong>, continued<br />
2 Add bogey wheel assemblies<br />
Add two bogey wheel assemblies to the support structure as shown.<br />
Note that, for both bogey wheel assemblies, there should be two<br />
spaces separating the bogey wheel assembly and the axle. Secure<br />
the bogey wheel assemblies to the support structure using two<br />
8-32x1" screws and two keps nuts per bogey wheel assembly. The<br />
oblong holes in the bogey wheel assemblies will allow you to adjust<br />
the tension of the tracks once you’ve finished assembling the system.<br />
accessories<br />
Parts needed in this step:<br />
bogey wheel 8-32 x 1"<br />
assembly screw keps nut<br />
x 2 x 4 x 4<br />
Your assembly should now look like this:<br />
Inventor’s Guide insert<br />
<strong>tank</strong> <strong>tread</strong> <strong>kit</strong> • 3
motion accessories<br />
<strong>tank</strong> <strong>tread</strong> <strong>kit</strong>, continued<br />
3 Add tensioner assembly<br />
Add one tensioner assembly to the support structure as shown.<br />
Note that the tensioner should be flush with the right bogey<br />
wheel assembly. Secure the tensioner to the support structure using<br />
two 8-32x1" screws and two keps nuts. The oblong holes in the<br />
tensioner assembly will allow you to adjust the tension of the tracks<br />
once you’ve finished assembling the system.<br />
accessories<br />
accessories<br />
Parts needed in this step:<br />
single bogey 8-32 x 1"<br />
wheel assembly screw keps nut<br />
(tensioner)<br />
x 1 x 2 x 2<br />
Your assembly should now look like this:<br />
<strong>tank</strong> <strong>tread</strong> <strong>kit</strong> • 4<br />
Inventor’s Guide insert
motion accessories<br />
<strong>tank</strong> <strong>tread</strong> <strong>kit</strong>, continued<br />
4 Mount drive wheels<br />
Mount the drive wheels on the axles of the support structure.<br />
accessories<br />
Parts needed in this step:<br />
<strong>tank</strong> <strong>tread</strong><br />
drive/idler<br />
wheel<br />
x 2<br />
Your assembly should now look like this:<br />
Inventor’s Guide insert<br />
<strong>tank</strong> <strong>tread</strong> <strong>kit</strong> • 5
motion accessories<br />
<strong>tank</strong> <strong>tread</strong> <strong>kit</strong>, continued<br />
5 Verify position of components.<br />
At this point, make sure that your assembly looks like this. It’s very<br />
important to have all the components in the right position with respect to<br />
one another, or the preassembled <strong>tread</strong> links might not fit.<br />
accessories<br />
accessories<br />
6 Adjust chain of <strong>tread</strong> links.<br />
The <strong>tread</strong> links come preassembled in two long chains of<br />
85 links apiece. For this design, you’ll need a section of<br />
chain with 47 links in it. The link material is slightly<br />
flexible, which makes it easy to separate links from the<br />
rest of the chain. Just bend the arms out – GENTLY! – just<br />
enough to disengage the hole from the posts on the next<br />
link. Reverse the process to reassemble the links.<br />
<strong>tank</strong> <strong>tread</strong> <strong>kit</strong> • 6<br />
Inventor’s Guide insert
motion accessories<br />
<strong>tank</strong> <strong>tread</strong> <strong>kit</strong>, continued<br />
7 Add <strong>tread</strong> links.<br />
Wrap the chain of 47 preassembled <strong>tread</strong> links around the drive<br />
wheels, tensioner, and bogey wheel assemblies, making sure that the<br />
teeth of the drive wheels mesh with the rollers of the links.<br />
accessories<br />
Parts needed in this step:<br />
<strong>tank</strong> <strong>tread</strong><br />
links<br />
x 1 chain<br />
Note how the teeth on the drive wheel fit<br />
between the rollers on the <strong>tread</strong> links.<br />
Inventor’s Guide insert<br />
<strong>tank</strong> <strong>tread</strong> <strong>kit</strong> • 7
motion accessories<br />
<strong>tank</strong> <strong>tread</strong> <strong>kit</strong>, continued<br />
Once the chain of <strong>tread</strong> links is securely in place, connect the first<br />
and last link to make a continuous loop.<br />
You can now slightly loosen the screws holding the bogey wheel<br />
assemblies and tensioner in place. Slide the tensioner and the<br />
bogey wheel assemblies to tighten the chain of <strong>tread</strong> links. If the<br />
<strong>tread</strong> links are loose, they’ll come off once the robot is in motion.<br />
Limited 90-day Warranty<br />
This product is warranted by Innovation One against manufacturing defects in material and workmanship under<br />
normal use for ninety (90) days from the date of purchase from authorized Innovation One dealers. For complete<br />
warranty details and exclusions, check with your dealer.<br />
Innovation One, Inc.<br />
350 North Henderson Street<br />
Fort Worth, TX 76102<br />
08/05<br />
Printed in China<br />
0405<br />
<strong>tank</strong> <strong>tread</strong> <strong>kit</strong> • 8<br />
Inventor’s Guide insert accessories