

Installation Instructions for Aluminium Venetian Blinds - Cheapa Blinds
Installation Instructions for Aluminium Venetian Blinds - Cheapa Blinds
Installation Instructions for Aluminium Venetian Blinds - Cheapa Blinds

Create successful ePaper yourself
Turn your PDF publications into a flip-book with our unique Google optimized e-Paper software.
<strong>Installation</strong> <strong>Instructions</strong> <strong>for</strong> <strong>Aluminium</strong> <strong>Venetian</strong> <strong>Blinds</strong><br />
Internal/ Reveal Fit:<br />
1.2 Measure the <strong>Venetian</strong> Blind width and also the window or door to<br />
ensure it is the correct size be<strong>for</strong>e installation.<br />
1.3 Be<strong>for</strong>e drilling any holes check the clearances <strong>for</strong> obstructions or<br />
obstacles that may hinder the blind from operating correctly.<br />
1.4 Ensure that the <strong>Venetian</strong> Blind will have unobstructed operational<br />
clearance.<br />
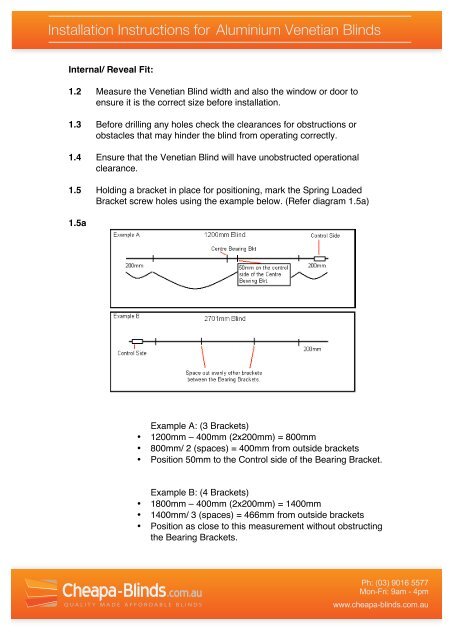
1.5 Holding a bracket in place <strong>for</strong> positioning, mark the Spring Loaded<br />
Bracket screw holes using the example below. (Refer diagram 1.5a)<br />
1.5a<br />
Example A: (3 Brackets)<br />
• 1200mm – 400mm (2x200mm) = 800mm<br />
• 800mm/ 2 (spaces) = 400mm from outside brackets<br />
• Position 50mm to the Control side of the Bearing Bracket.<br />
Example B: (4 Brackets)<br />
• 1800mm – 400mm (2x200mm) = 1400mm<br />
• 1400mm/ 3 (spaces) = 466mm from outside brackets<br />
• Position as close to this measurement without obstructing<br />
the Bearing Brackets.<br />
Ph: (03) 9016 5577<br />
Mon-Fri: 9am - 4pm<br />
www.cheapa-blinds.com.au