

Installation Instructions for Aluminium Venetian Blinds - Cheapa Blinds
Installation Instructions for Aluminium Venetian Blinds - Cheapa Blinds
Installation Instructions for Aluminium Venetian Blinds - Cheapa Blinds

You also want an ePaper? Increase the reach of your titles
YUMPU automatically turns print PDFs into web optimized ePapers that Google loves.
<strong>Installation</strong> <strong>Instructions</strong> <strong>for</strong> <strong>Aluminium</strong> <strong>Venetian</strong> <strong>Blinds</strong><br />
The installation of the Uniline <strong>Venetian</strong> Blind System can be broken down<br />
in to a series of steps or procedures. The order of steps laid out below is a<br />
recommended guide, but can be altered to suit individual requirements.<br />
Note: Uniline recommends the use of the following Tools:<br />
• Steel measuring tape<br />
• Spirit level<br />
• Power or battery drill & bits<br />
• Flat blade and Phillips head screwdrivers<br />
Mounting Bracket <strong>Installation</strong><br />
Note: Level mounting is critical to the correct operation of the blind<br />
(use a spirit level).<br />
Always use the correct mounting screws <strong>for</strong> mounting to the desired<br />
application, <strong>for</strong> example Gyprock, Timber, Masonry, Steel or<br />
<strong>Aluminium</strong>.)<br />
Note: Brick or Rendered Surfaces Warning:<br />
Make sure drilling is no closer than 25mm from edge of surfaces as the<br />
brick or render may chip or break out.<br />
The most important procedure in installing these blinds is to be sure<br />
that the correct anchorage method has been used so that the mounting<br />
area (i.e. wall or architrave) is able to support the weight of the blind<br />
and its operation.<br />
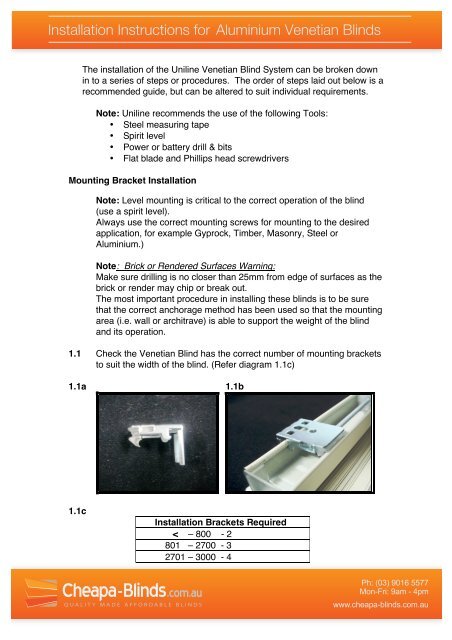
1.1 Check the <strong>Venetian</strong> Blind has the correct number of mounting brackets<br />
to suit the width of the blind. (Refer diagram 1.1c)<br />
1.1a 1.1b<br />
1.1c<br />
<strong>Installation</strong> Brackets Required<br />
< – 800 - 2<br />
801 – 2700 - 3<br />
2701 – 3000 - 4<br />
Ph: (03) 9016 5577<br />
Mon-Fri: 9am - 4pm<br />
www.cheapa-blinds.com.au
<strong>Installation</strong> <strong>Instructions</strong> <strong>for</strong> <strong>Aluminium</strong> <strong>Venetian</strong> <strong>Blinds</strong><br />
Internal/ Reveal Fit:<br />
1.2 Measure the <strong>Venetian</strong> Blind width and also the window or door to<br />
ensure it is the correct size be<strong>for</strong>e installation.<br />
1.3 Be<strong>for</strong>e drilling any holes check the clearances <strong>for</strong> obstructions or<br />
obstacles that may hinder the blind from operating correctly.<br />
1.4 Ensure that the <strong>Venetian</strong> Blind will have unobstructed operational<br />
clearance.<br />
1.5 Holding a bracket in place <strong>for</strong> positioning, mark the Spring Loaded<br />
Bracket screw holes using the example below. (Refer diagram 1.5a)<br />
1.5a<br />
Example A: (3 Brackets)<br />
• 1200mm – 400mm (2x200mm) = 800mm<br />
• 800mm/ 2 (spaces) = 400mm from outside brackets<br />
• Position 50mm to the Control side of the Bearing Bracket.<br />
Example B: (4 Brackets)<br />
• 1800mm – 400mm (2x200mm) = 1400mm<br />
• 1400mm/ 3 (spaces) = 466mm from outside brackets<br />
• Position as close to this measurement without obstructing<br />
the Bearing Brackets.<br />
Ph: (03) 9016 5577<br />
Mon-Fri: 9am - 4pm<br />
www.cheapa-blinds.com.au
<strong>Installation</strong> <strong>Instructions</strong> <strong>for</strong> <strong>Aluminium</strong> <strong>Venetian</strong> <strong>Blinds</strong><br />
Note: Make sure the Spring Loaded Brackets (3.934016) are not positioned<br />
over the Bearing Brackets ( 3.90….), this will stop the blind from<br />
operating.<br />
1.6 Pilot drill the holes that have been marked in the previous steps.<br />
1.7 Install the Spring Loaded Brackets where required using the<br />
appropriate screws <strong>for</strong> the application. (Refer diagram 1.7a)<br />
1.7a<br />
1.8 Be<strong>for</strong>e mounting, unroll the Lifting Cords from around the Head Rail<br />
making sure they are free of knots and tangles.<br />
1.9 Once all the Brackets are secured firmly, holding the blind in both<br />
hands position the Head Rail so that the front section clips onto the<br />
clear Polycarbonate section of the bracket.<br />
1.10 Once in place push the Head Rail back and lift until it clicks into the<br />
rear clasps on the bracket. If installed correctly an audible click sound<br />
should be heard. (Refer diagram 1.11a)<br />
1.11 Gently apply downward pressure on the Head Rail to make sure the<br />
blind is secure in all the brackets.<br />
1.11a<br />
Ph: (03) 9016 5577<br />
Mon-Fri: 9am - 4pm<br />
www.cheapa-blinds.com.au
<strong>Installation</strong> <strong>Instructions</strong> <strong>for</strong> <strong>Aluminium</strong> <strong>Venetian</strong> <strong>Blinds</strong><br />
1.12 Once firmly installed release the Lifting Cord from the packed position.<br />
1.13 Lower the blind by releasing the Lifting Cord from the Cord Lock<br />
angling the Lifting Cord towards the centre of the blind to release.<br />
Note: Make sure when raising or lowering <strong>Venetian</strong> <strong>Blinds</strong> that one hand<br />
always supports the Bottom Rail and the weight.<br />
1.14 Release the slats all the way to the bottom so the blind is fully down.<br />
1.15 Check that the drop of the blind is correct with the size of the window.<br />
1.16 The Hold Downs Pins in the Bottom Rail should measure 20mm from<br />
the sill.<br />
1.17 Mark the position of the Hold Downs in the sill so they align with the<br />
Pins in the Bottom Rail.<br />
1.18 Once the drop of the blind is correct, raise the blind pulling the Lifting<br />
Cord up and supporting the weight with one hand assisting the Bottom<br />
Rail.<br />
1.19 Lock off the Lifting Cord in the Cord Lock by pulling the Lifting Cord on<br />
a 45 degree angle to the outside of the blind.<br />
1.20 The blind should be held firmly enough to allow the Hold Down<br />
Brackets to be screwed into place.<br />
1.21 Using the marked positions screw the Hold Down Brackets into place.<br />
1.22 Lower the blind by pulling the Lifting Cord slightly enough to release<br />
the Lifting Cord from the Cord Lock and allow the slats to drop down,<br />
supporting the Bottom Rail with one hand.<br />
1.23 Press the Pins in the Bottom Rail into the holes in the Hold Down<br />
Brackets to lock the Bottom Rail and blind into position.<br />
1.24 Attach the Wand hook through the loop in the Wand Tilter and rotate<br />
to make sure the slats turn the full rotation in both directions.<br />
Ph: (03) 9016 5577<br />
Mon-Fri: 9am - 4pm<br />
www.cheapa-blinds.com.au
<strong>Installation</strong> <strong>Instructions</strong> <strong>for</strong> <strong>Aluminium</strong> <strong>Venetian</strong> <strong>Blinds</strong><br />
Face/ Outside Fit:<br />
2.1 Measure the <strong>Venetian</strong> Blind width and also the window or door to<br />
ensure it is the correct size be<strong>for</strong>e installation.<br />
2.2 Be<strong>for</strong>e drilling any holes check the clearances <strong>for</strong> obstructions or<br />
obstacles that may hinder the blind from operating correctly.<br />
2.3 Ensure that the <strong>Venetian</strong> Blind will have unobstructed operational<br />
clearance.<br />
2.4 Holding a bracket in place <strong>for</strong> positioning, mark the Spring Loaded<br />
Bracket screw holes using the example below. (Refer diagram 2.4a)<br />
2.4a<br />
Example A: (3 Brackets)<br />
• 1200mm – 400mm (2x200mm) = 800mm<br />
• 800mm/ 2 (spaces) = 400mm from outside brackets<br />
• Position 50mm to the Control side of the Bearing Bracket.<br />
Example B: (4 Brackets)<br />
• 1800mm – 400mm (2x200mm) = 1400mm<br />
• 1400mm/ 3 (spaces) = 466mm from outside brackets<br />
• Position as close to this measurement without obstructing<br />
the Bearing Brackets.<br />
Ph: (03) 9016 5577<br />
Mon-Fri: 9am - 4pm<br />
www.cheapa-blinds.com.au
<strong>Installation</strong> <strong>Instructions</strong> <strong>for</strong> <strong>Aluminium</strong> <strong>Venetian</strong> <strong>Blinds</strong><br />
Note: Make sure the Spring Loaded Brackets (3.934016) are not positioned<br />
over the Bearing Brackets ( 3.90….), this will stop the blind from<br />
operating.<br />
2.5 Pilot drill the holes that have been marked in the previous steps.<br />
2.6 Install the Spring Loaded Brackets where required using the<br />
appropriate screws <strong>for</strong> the application. (Refer diagram 2.6a)<br />
2.6a<br />
2.7 Be<strong>for</strong>e mounting, unroll the Lifting Cords from around the Head Rail<br />
making sure they are free of knots and tangles.<br />
2.8 Once all the Brackets are secured firmly, holding the blind in both<br />
hands position the Head Rail so that the front section clips onto the<br />
clear Polycarbonate section of the bracket.<br />
2.9 Once in place push the Head Rail back and lift until it clicks into the<br />
rear clasps on the bracket. If installed correctly an audible click sound<br />
should be heard. (Refer diagram 2.10a)<br />
2.10 Gently apply downward pressure on the Head Rail to make sure the<br />
blind is secure in all the brackets.<br />
2.10a<br />
Ph: (03) 9016 5577<br />
Mon-Fri: 9am - 4pm<br />
www.cheapa-blinds.com.au
<strong>Installation</strong> <strong>Instructions</strong> <strong>for</strong> <strong>Aluminium</strong> <strong>Venetian</strong> <strong>Blinds</strong><br />
2.11 Once firmly installed release the Lifting Cord from the packed position.<br />
2.12 Lower the blind by releasing the Lifting Cord from the Cord Lock angling<br />
the Lifting Cord towards the centre of the blind to release.<br />
Note: Make sure when raising or lowering <strong>Venetian</strong> <strong>Blinds</strong> that one hand<br />
always supports the Bottom Rail and the weight.<br />
2.13 Release the slats all the way to the bottom so the blind is fully down.<br />
2.14 Check that the drop of the blind is correct with the size of the window.<br />
2.15 The Hold Downs Pins in the Bottom Rail should measure<br />
approximately 5mm from the bottom of the architrave/ sill.<br />
2.16 Mark the position of the Hold Downs in the sill so they align with the<br />
Pins in the Bottom Rail.<br />
2.17 Once the drop of the blind is correct, raise the blind pulling the Lifting<br />
Cord up and supporting the weight with one hand assisting the Bottom<br />
Rail.<br />
2.18 Lock off the Lifting Cord in the Cord Lock by pulling the Lifting Cord on<br />
a 45 degree angle to the outside of the blind.<br />
2.19 The blind should be held firmly enough to support the weight while the<br />
Ph: (03) 9016 5577<br />
Mon-Fri: 9am - 4pm<br />
www.cheapa-blinds.com.au
<strong>Installation</strong> <strong>Instructions</strong> <strong>for</strong> <strong>Aluminium</strong> <strong>Venetian</strong> <strong>Blinds</strong><br />
Hold Down Brackets are screwed into place.<br />
2.20 Using the marked positions screw the Hold Down Brackets into place.<br />
2.21 Lower the blind by pulling the Lifting Cord slightly enough to release<br />
the Lifting Cord from the Cord Lock and allow the slats to drop down,<br />
supporting the Bottom Rail with one hand.<br />
2.22 Press the Pins in the Bottom Rail into the holes in the Hold Down<br />
Brackets to lock the Bottom Rail and blind into position.<br />
2.23 Attach the Wand hook through the loop in the Wand Tilter and rotate<br />
to make sure the slats turn the full rotation in both directions.<br />
Ph: (03) 9016 5577<br />
Mon-Fri: 9am - 4pm<br />
www.cheapa-blinds.com.au