VCT Flooring Installation - com. install procedures/tile - Mohawk Group
VCT Flooring Installation - com. install procedures/tile - Mohawk Group
VCT Flooring Installation - com. install procedures/tile - Mohawk Group

You also want an ePaper? Increase the reach of your titles
YUMPU automatically turns print PDFs into web optimized ePapers that Google loves.
In preparation for new floor <strong>tile</strong>, residual cut-back<br />
adhesive must be scraped to a thin, smooth film<br />
following re<strong>com</strong>mended work practices in accordance<br />
with local, state, and federal regulations.<br />
See Warning Statement on inside cover.<br />
Precautions<br />
The use of the correct adhesive and proper application<br />
is critical for quality, trouble-free <strong>install</strong>ation.<br />
Excessive amounts of adhesive will result in<br />
telegraphing or exudation (oozing) between the<br />
<strong>tile</strong> in service depending upon the type of adhesive<br />
used; whereas, insufficient coverage, caused by<br />
spreading too thin or using worn trowels, will prevent<br />
proper adhesion of the <strong>tile</strong>.<br />
Some concrete floors are excessively porous and<br />
absorptive. Premature set-up of the adhesives is<br />
first-hand evidence of excessive absorptivity (i.e.,<br />
when adhesive sets up in less open time than specified<br />
on the label). This condition can be corrected<br />
by priming the subfloor with the required adhesive<br />
(using a straightedge steel trowel for application of<br />
the adhesive). The prime coat should be as thin as<br />
possible.<br />
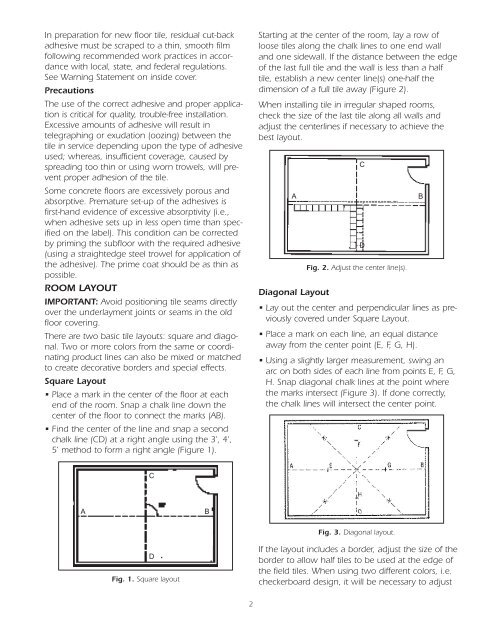
ROOM LAYOUT<br />
IMPORTANT: Avoid positioning <strong>tile</strong> seams directly<br />
over the underlayment joints or seams in the old<br />
floor covering.<br />
There are two basic <strong>tile</strong> layouts: square and diagonal.<br />
Two or more colors from the same or coordinating<br />
product lines can also be mixed or matched<br />
to create decorative borders and special effects.<br />
Square Layout<br />
• Place a mark in the center of the floor at each<br />
end of the room. Snap a chalk line down the<br />
center of the floor to connect the marks (AB).<br />
• Find the center of the line and snap a second<br />
chalk line (CD) at a right angle using the 3', 4',<br />
5' method to form a right angle (Figure 1).<br />
A B<br />
C<br />
D<br />
Fig. 1. Square layout<br />
2<br />
Starting at the center of the room, lay a row of<br />
loose <strong>tile</strong>s along the chalk lines to one end wall<br />
and one sidewall. If the distance between the edge<br />
of the last full <strong>tile</strong> and the wall is less than a half<br />
<strong>tile</strong>, establish a new center line(s) one-half the<br />
dimension of a full <strong>tile</strong> away (Figure 2).<br />
When <strong>install</strong>ing <strong>tile</strong> in irregular shaped rooms,<br />
check the size of the last <strong>tile</strong> along all walls and<br />
adjust the centerlines if necessary to achieve the<br />
best layout.<br />
A B<br />
Fig. 2. Adjust the center line(s).<br />
Diagonal Layout<br />
• Lay out the center and perpendicular lines as previously<br />
covered under Square Layout.<br />
• Place a mark on each line, an equal distance<br />
away from the center point (E, F, G, H).<br />
• Using a slightly larger measurement, swing an<br />
arc on both sides of each line from points E, F, G,<br />
H. Snap diagonal chalk lines at the point where<br />
the marks intersect (Figure 3). If done correctly,<br />
the chalk lines will intersect the center point.<br />
Fig. 3. Diagonal layout.<br />
If the layout includes a border, adjust the size of the<br />
border to allow half <strong>tile</strong>s to be used at the edge of<br />
the field <strong>tile</strong>s. When using two different colors, i.e.<br />
checkerboard design, it will be necessary to adjust<br />
C<br />
D