Physics 160 Practical Electronics Spring 2011 1 Syllabus - SCIPP
Physics 160 Practical Electronics Spring 2011 1 Syllabus - SCIPP
Physics 160 Practical Electronics Spring 2011 1 Syllabus - SCIPP

You also want an ePaper? Increase the reach of your titles
YUMPU automatically turns print PDFs into web optimized ePapers that Google loves.
<strong>Physics</strong> <strong>160</strong> <strong>Practical</strong> <strong>Electronics</strong> <strong>Spring</strong> <strong>2011</strong><br />
<strong>Syllabus</strong><br />
Lecture M,W 12:30–1:40 pm, ISB 231.<br />
Lab Section:<br />
M,W 2:00 pm–6:00 pm, Nat Sci II, Room 110.<br />
o TA: Peyton Rose<br />
o Email: prose@ucsc.edu<br />
o Phone: 459-4588 Office: Nat Sci II, Room 308<br />
Instructor: Robert Johnson<br />
Office: 323 Natural Sciences II; Office phone 459-2125<br />
E-mail: rjohnson@scipp.ucsc.edu<br />
Office hours: Fridays, 1:00–4:00 pm, in the lab (Nat Sci II, Room 110). You may use this time to finish<br />
your lab work, and you may also look for me in my office in Room 323 at other times.<br />
The course web site is http://scipp.ucsc.edu/~johnson/phys<strong>160</strong>/phys<strong>160</strong>.htm, or you can go directly to<br />
eCommons.<br />
Textbooks (both required):<br />
The Art of <strong>Electronics</strong>, 2 nd edition, by Horowitz and Hill.<br />
Student Manual for the Art of <strong>Electronics</strong>, by Hayes and Horowitz<br />
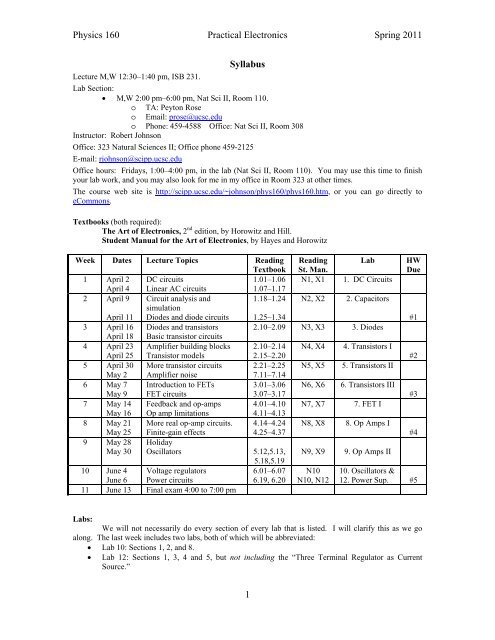
Week Dates Lecture Topics Reading Reading Lab HW<br />
Textbook St. Man.<br />
Due<br />
1 April 2 DC circuits<br />
1.01–1.06 N1, X1 1. DC Circuits<br />
April 4 Linear AC circuits<br />
1.07–1.17<br />
2 April 9 Circuit analysis and<br />
simulation<br />
1.18–1.24 N2, X2 2. Capacitors<br />
April 11 Diodes and diode circuits 1.25–1.34<br />
#1<br />
3 April 16 Diodes and transistors 2.10–2.09 N3, X3 3. Diodes<br />
April 18 Basic transistor circuits<br />
4 April 23 Amplifier building blocks 2.10–2.14 N4, X4 4. Transistors I<br />
April 25 Transistor models<br />
2.15–2.20<br />
#2<br />
5 April 30 More transistor circuits 2.21–2.25 N5, X5 5. Transistors II<br />
May 2 Amplifier noise<br />
7.11–7.14<br />
6 May 7 Introduction to FETs 3.01–3.06 N6, X6 6. Transistors III<br />
May 9 FET circuits<br />
3.07–3.17<br />
#3<br />
7 May 14 Feedback and op-amps 4.01–4.10 N7, X7 7. FET I<br />
May 16 Op amp limitations<br />
4.11–4.13<br />
8 May 21 More real op-amp circuits. 4.14–4.24 N8, X8 8. Op Amps I<br />
May 25 Finite-gain effects<br />
4.25–4.37<br />
#4<br />
9 May 28 Holiday<br />
May 30 Oscillators<br />
5.12,5.13,<br />
5.18,5.19<br />
N9, X9 9. Op Amps II<br />
10 June 4 Voltage regulators<br />
6.01–6.07 N10 10. Oscillators &<br />
June 6 Power circuits<br />
6.19, 6.20 N10, N12 12. Power Sup. #5<br />
11 June 13 Final exam 4:00 to 7:00 pm<br />
Labs:<br />
We will not necessarily do every section of every lab that is listed. I will clarify this as we go<br />
along. The last week includes two labs, both of which will be abbreviated:<br />
Lab 10: Sections 1, 2, and 8.<br />
Lab 12: Sections 1, 3, 4 and 5, but not including the “Three Terminal Regulator as Current<br />
Source.”<br />
1
<strong>Physics</strong> <strong>160</strong> <strong>Practical</strong> <strong>Electronics</strong> <strong>Spring</strong> <strong>2011</strong><br />
The lab work is done in pairs. It is important that both partners participate equally in the circuit<br />
construction and measurements. If we notice pairs in which one person is dominating the work we may try<br />
to shuffle the groups.<br />
There will not be any formal instruction in the lab sections, so you can come and go at will during<br />
your sections, as long as you coordinate with your partner. In addition, I will open the lab on Friday<br />
afternoons from 1:00 to 4:00 pm, in case you need more time to finish up, or in case you have questions for<br />
me. Your notebook with the completed lab report will be due during the lab session Monday of the<br />
following week. For that reason, you will need two lab books to do your work in.<br />
The lab schedule is problematic on Memorial Day week; we will have to work around that<br />
somehow.<br />
Lab Kits:<br />
In addition to the textbooks, you will have to purchase a lab kit containing various electronics<br />
parts needed in the lab experiments, for a nominal fee (which should show up on your overall UCSC billing<br />
after you register). Prof. Kuttner in Nat. Sci. II, Room 176 handles the purchase of the kits, and I will<br />
distribute them to you.<br />
Lab Precautions:<br />
Please keep in mind the following cautions, for your own safety, to avoid damage to equipment,<br />
and to make your time more productive:<br />
1. Never plug anything into the A/C power if it is not fully enclosed and insulated. There should never be<br />
any exposed metal in your setup that could pose a shock danger.<br />
2. Never open any chassis that uses A/C power while it is plugged in. In fact, do not open any of the<br />
equipment chasses without consulting me, Fred Kuttner, or the TA.<br />
3. Turn the VOM or DVM meter to the desired setting before connecting it to your circuit. You are<br />
guaranteed to blow out the fuse of the ammeter if you connect it across a voltage source. This happens<br />
very often and is a nuisance.<br />
4. Do not make changes to your circuit while it is powered. I know that this is easy to forget, but do try<br />
to take care with this to avoid damaging your components or blowing fuses.<br />
5. Turn off all equipment when done, including the DVM and VOM. Put all of the equipment away<br />
neatly before leaving. Do not expect your setup to remain intact on the workbench from one day to the<br />
next.<br />
6. When making measurements with an oscilloscope, the return side of the input must be connected to<br />
ground. For example, you cannot measure the voltage across a resistor in your circuit unless one side<br />
of the resistor is at ground potential. Do not try to play any tricks with the scope ground in order to get<br />
around this limitation.<br />
7. Do not connect any of your diodes directly across a voltage source. If forward biased, it will quickly<br />
burn out.<br />
8. Be careful when handling semiconductor components, as static electricity can destroy them.<br />
MOSFETs are especially sensitive.<br />
9. Test your circuit stage by stage as you assemble it. Resist the urge to wire up a big rat nest and then<br />
plug it in to see what happens. If it doesn’t self destruct, at the very least it will be terribly difficult to<br />
debug.<br />
10. Use the bread boards when wiring your circuit, and try to keep the wiring 2-dimensional and neat,<br />
preferably with an arrangement that mimics the schematic. You can simplify your circuit and<br />
minimize the number of wires by using the component leads themselves to make most of the<br />
connections. Fewer connections usually means greater reliability and easier debugging.<br />
11. Check the DC bias voltages and currents before worrying about signals. If the DC bias is not correct,<br />
then the amplifier will not work.<br />
Lab Notebook:<br />
A large part of your grade for this course will be based on your lab notebook. The grade will not<br />
be based so much on whether your answers are “right” in the notebook. Rather, we will be looking to see<br />
whether your notebook is complete. We won’t be able to judge whether it is complete unless we can<br />
follow it easily, and we will not give you the benefit of the doubt. So, neatness and organization count in a<br />
2
<strong>Physics</strong> <strong>160</strong> <strong>Practical</strong> <strong>Electronics</strong> <strong>Spring</strong> <strong>2011</strong><br />
big way. Keep your scribbling and scratch work separate from the “write-up” where you record you data<br />
and results to be graded (both can be in the same notebook, but not on the same pages).<br />
Here are some rules for the lab notebook:<br />
The notebook shall be hard bound. Use the 10” by 8” bound “Comp Book” with quad ruling, as<br />
can be purchased at the Bay Tree book store. You will need two such notebooks, for use in<br />
alternating weeks (to allow us to grade one report while you are doing the next).<br />
All work in the book shall be done in pen, not pencil.<br />
There should be no pages torn from the book, and any deletion shall be made by drawing a single<br />
line through the word or equation to be deleted, or an X over a figure to be deleted. Do not use<br />
white-out to make corrections.<br />
Each section in which work is reported shall be dated and shall be clearly labeled by the lab<br />
number, section number, and descriptor (e.g. “7-3, Source Follower”).<br />
Your writing and work shall flow from left to right and top to bottom. Writing shall be horizontal,<br />
except possibly for labels on the vertical axes of graphs.<br />
You shall use a straight edge for drawing straight lines, such as the axes of a graph or an “eyeball”<br />
fit of your data to a straight line.<br />
You must record all of your observations, both qualitative and quantitative, in the notebook for<br />
each section of each lab. Your notebook entries will constitute your “write-up;” no formal document is<br />
needed. Your notebook must clearly demonstrate that you did all parts of the lab and carefully observed<br />
the results, answering all of the questions posed by the lab manual. If you take care, you can complete the<br />
write-up while doing the lab, but in any case it must be sufficiently neat and organized that it can be easily<br />
followed by the grader.<br />
Lectures: although the emphasis of this course is on practical work, the fact that very few incoming<br />
students have any experience with the theory of transistor circuits makes the lecture and homework<br />
component essential. The point of the labs is not to build small projects according to recipes but rather to<br />
learn the basic principles of analog circuit design and operation. It is crucial to understand all aspects of<br />
the circuits while building them and making measurements. The lectures are meant to provide a foundation<br />
for that understanding prior to each lab. It is important to read over the assigned material prior to the<br />
lecture and lab. I will encourage that practice by assigning each week a short “reading quiz” to be<br />
completed online in eCommons.<br />
Homework: There will be 5 written assignments, due at 5 pm every other Friday. They will include the<br />
design and simulation exercises discussed below. Note that the simulation exercises are not optional but<br />
are required.<br />
Circuit Simulation:<br />
Some of the assignments for this course will require use of a computer. Specifically, you will<br />
need to run circuit simulations on the computer. To do so, I recommend OrCAD PSpice software, which is<br />
available from CADENCE for download on the web at no cost, for a demo version that will suffice for our<br />
small projects. Only Windows PCs are supported. Note that the product does work on my Windows 7. Go<br />
to http://www.cadence.com/products/orcad/pages/downloads.aspx and scroll down to where it says<br />
“Download free OrCAD 16.5 Demo Software” and click on that link. You will have to follow the<br />
instructions to establish a free account with CADENCE in order to complete the download. You will then<br />
come to a page to select what to download. Select OrCAD 16.5 Demo Software (Capture and PSpice<br />
only). The download will be a .zip file from which you have to extract everything and then execute the<br />
“setup.exe” program. I can help you if you have difficulties with this. I will also make available in the lab<br />
as many Windows PCs as possible with the software already installed.<br />
The OrCAD software includes a “schematic capture” program, which allows you to make a<br />
graphical schematic of your circuit by clicking and dragging parts and “wires.” You can then run the<br />
simulation directly from that schematic. I will demonstrate how to do this during some of the lecture<br />
sessions. There also are several library books listed below that explain how to use PSpice, and I have<br />
prepared a tutorial and posted it to the web page. If you prefer a different Spice-based circuit simulator that<br />
you are already familiar with, then you are welcome to use it for our assignments, but I may not be able to<br />
support it.<br />
3
<strong>Physics</strong> <strong>160</strong> <strong>Practical</strong> <strong>Electronics</strong> <strong>Spring</strong> <strong>2011</strong><br />
Exams: There will be only one exam, the final exam, which is scheduled at the normal time for a M,W,F<br />
12:30 lecture period: Wednesday, June 13, from 4:00 to 7:00 pm.<br />
Grading: 20% of your grade will be based on homework, 30% will be based on the final exam, 5% will be<br />
based on classroom participation and reading quizzes, and 45% will be based on your lab notebook (as<br />
graded by your TA).<br />
In addition to the textbook, here are some possible references from the library.<br />
P. Tuinenga, SPICE: a Guide to Circuit Simulation and Analysis Using PSpice, Prentice Hall.<br />
M. Rashid, SPICE for Circuits and <strong>Electronics</strong> Using PSpice, Prentice Hall.<br />
J. Svoboda, PSpice for Linear Circuits, Wyley.<br />
J. Nilsson and S. Riedel, Introduction to PSpice, Addison-Wesley.<br />
I. Sinclair, <strong>Practical</strong> <strong>Electronics</strong> Handbook, Oxford.<br />
4
<strong>Physics</strong> <strong>160</strong> <strong>Practical</strong> <strong>Electronics</strong> <strong>Spring</strong> <strong>2011</strong><br />
Helpful eCommons Information for Students<br />
Web Browser Compatibility<br />
We recommend using the latest version of Firefox or Internet Explorer to access<br />
eCommons. Safari and Google Chrome are not recommended. Firefox Javascript addons<br />
can conflict with eCommons and may need to be disabled.<br />
Logging in to eCommons<br />
To log into eCommons, you must obtain and use a CruzID Gold password. For more<br />
information, and to obtain the password, visit<br />
http://its.ucsc.edu/services/accounts/change_gold_password.php<br />
Once you have your CruzID Gold password, you can log into eCommons by visiting this<br />
site: http://ecommons.ucsc.edu/<br />
Support for Students<br />
The best way for students to request support for eCommons is to contact the ITS Help<br />
Desk:<br />
Online: http://itrequest.ucsc.edu/<br />
Phone: (831) 459-HELP<br />
Email: help@ucsc.edu<br />
In-Person: Kerr Hall<br />
o Kerr Hall Rm. 54 - M-F 8am to 5pm<br />
60-Minute Inactivity Timeout<br />
After 60 continuous minutes of inactivity, you will be automatically logged out of<br />
eCommons. This means any tasks or changes you were working on will not be saved<br />
beyond when you last saved them yourself. As an example, if you were in the middle of<br />
editing your calendar and left the room for 60 minutes without saving your work or<br />
logging out of eCommons, your calendar changes would be lost. The best practice is to<br />
save your work and log yourself out of eCommons when you are no longer actively<br />
working in it, especially when editing the site or completing coursework.<br />
Self-Disclosure of Non-Release of Information Status<br />
If you have instructed the Registrar to keep all information about you private using a<br />
Non-Release of Information request, and if you want to ensure that such information is<br />
not released publicly during the the normal course of classroom activities, please inform<br />
your instructor.<br />
5