Breville Customer Service Centre
Breville Customer Service Centre
Breville Customer Service Centre

Create successful ePaper yourself
Turn your PDF publications into a flip-book with our unique Google optimized e-Paper software.
<strong>Breville</strong> <strong>Customer</strong> <strong>Service</strong> <strong>Centre</strong><br />
Australian <strong>Customer</strong>s<br />
Mail: PO Box 22<br />
Botany NSW 2019<br />
AUSTRALIA<br />
Phone: 1300 139 798<br />
Fax: (02) 9384 9601<br />
Email: <strong>Customer</strong> <strong>Service</strong>:<br />
askus@breville.com.au<br />
www.breville.com.au<br />
<strong>Breville</strong> is a registered trademark of <strong>Breville</strong> Pty. Ltd. A.B.N. 98 000 092 928.<br />
Copyright <strong>Breville</strong> Pty. Ltd. 2011.<br />
Due to continued product improvement, the products illustrated/photographed<br />
in this booklet may vary slightly from the actual product.<br />
BIC300 Issue - A11<br />
New Zealand <strong>Customer</strong>s<br />
Mail: Private Bag 94411<br />
Botany Manukau 2163<br />
Auckland NEW ZEALAND<br />
Phone: 0800 273 845<br />
Fax: 0800 288 513<br />
Email: <strong>Customer</strong> <strong>Service</strong>:<br />
askus@breville.com.au
the Quick Time<br />
Instruction Booklet<br />
BIC300
CONGRATULATIONS<br />
on the purchase of your new <strong>Breville</strong><br />
the Quick Time
CONTENTS<br />
4 <strong>Breville</strong> recommends safety first<br />
6 Know your <strong>Breville</strong><br />
the Quick Time<br />
8 Induction cooking<br />
10 Operating your<br />
the Quick Time<br />
14 Care, cleaning & storage<br />
16 Troubleshooting<br />
3
4<br />
BREvILLE RECOMMENdS SAFETy FIRST<br />
At <strong>Breville</strong> we are very safety conscious. We design and manufacture consumer products with<br />
the safety of you, our valued customer, foremost in mind. In addition we ask that you exercise<br />
a degree of care when using any electrical appliance and adhere to the following precautions.<br />
IMPORTANT SAFEGUARdS<br />
REAd ALL INSTRUCTIONS<br />
BEFORE USE ANd SAvE FOR<br />
FUTURE REFERENCE<br />
• Carefully read all instructions before<br />
operation and save for future reference.<br />
• Remove and safely discard any<br />
packaging material and promotional<br />
labels before using the <strong>Breville</strong><br />
induction cooker for the first time.<br />
• To eliminate a choking hazard for young<br />
children, remove and safely discard the<br />
protective cover fitted over the pins of<br />
the power plug when unpacking this<br />
appliance for the first time.<br />
• Do not place the appliance near the<br />
edge of a bench top, counter or table<br />
during operation. Ensure that the<br />
surface is level, clean and free of water<br />
and other substances.<br />
• Do not place this appliance on a hot<br />
gas or electric burner, or where it could<br />
touch a heated oven.<br />
• Always operate the induction cooker on a<br />
dry, stable and heat resistant surface. Do<br />
not use on a cloth-covered surface, near<br />
curtains or other flammable materials.<br />
• Position the induction cooker clear of<br />
walls, and other heat sensitive materials<br />
such as cloths and curtains. Minimum of<br />
200mm distance.<br />
• Do not use this appliance on a sink<br />
drain board.<br />
• Do not leave the appliance unattended<br />
when in use.<br />
• Always ensure the induction cooker is<br />
properly assembled before use. Follow<br />
the instructions provided in this book.<br />
• If the appliance is not in use for an<br />
extended period, disconnect the<br />
appliance from the power outlet.<br />
• Use only cooking saucepans and pots<br />
suitable for use with an induction cooker.<br />
• Extreme caution must be used when<br />
the appliance is in use with an<br />
induction safe cooking saucepan.<br />
Do not move the appliance during<br />
cooking or while a saucepan remains<br />
on the induction cooker.<br />
• Do not operate the appliance in the<br />
vicinity of magnetically sensitive objects<br />
(eg magnetic cards).<br />
• The outer surface will be hot when the<br />
appliance is operating and for some time<br />
after use.<br />
• The appliance is not intended to be<br />
operated by means of an external timer<br />
or separate remote control system.<br />
• The temperature of accessible surfaces<br />
will be high when the appliance is<br />
operating and for some time after use.<br />
• Do not place anything on top of the<br />
appliances surface (except induction<br />
cooker pots and pans) when in use and<br />
when stored.<br />
• Do not place metallic utensils, noncompatible<br />
induction cookware, lids,<br />
knives, forks, spoons or other metallic<br />
objects on the induction cooker glass<br />
ceramic plate, as these may be heated<br />
and become hot when the appliance is<br />
switched on.<br />
• Do not insert sharp objects into the<br />
ventilation system.<br />
• To avoid overheating, do not place<br />
any aluminium foil or metal plates on<br />
the appliance.<br />
• Do not touch the hot surface of the glass<br />
ceramic plate. The induction cooker<br />
does not heat up itself during cooking,<br />
but the temperature of the cookware<br />
heats up the glass ceramic plate.
BREvILLE RECOMMENdS SAFETy FIRST<br />
• Do not heat any opened or unopened<br />
cans on the induction cooker.<br />
• Always switch the on/off switch to the<br />
off position, switch the appliance off at<br />
the power outlet, then unplug the power<br />
cord and cool completely, if appliance<br />
is not in use, before cleaning, before<br />
attempting to move the appliance, and<br />
when storing the appliance.<br />
• Maximum weight of pot and content<br />
should not exceed 6kg.<br />
• Keep the appliance clean. Follow<br />
cleaning instructions provided in this<br />
book (page 14).<br />
IMPORTANT SAFEGUARdS FOR<br />
ALL ELECTRICAL APPLIANCES<br />
• Fully unwind the cord before use.<br />
• To protect against electric shock, do not<br />
immerse the cord, plug or appliance in<br />
water or any other liquid.<br />
• Do not allow the cord to hang over the<br />
edge of a table or bench, touch hot<br />
surfaces or become knotted.<br />
• This appliance is not intended for use<br />
by persons (including children) with<br />
reduced physical, sensory or mental<br />
capabilities, or lack of experience and<br />
knowledge, unless they have been given<br />
supervision or instruction concerning<br />
use of the appliance by a person<br />
responsible for their safety.<br />
• Children should be supervised to ensure<br />
that they do not play with the appliance.<br />
• It is recommended to regularly inspect<br />
the appliance. Do not use the appliance<br />
if the power supply cord, plug or<br />
appliance becomes damaged in any<br />
way. Return the entire appliance to the<br />
nearest authorised <strong>Breville</strong> <strong>Service</strong><br />
<strong>Centre</strong> for examination and/or repair.<br />
• Any maintenance other than cleaning<br />
should be performed at an authorised<br />
<strong>Breville</strong> <strong>Service</strong> <strong>Centre</strong>.<br />
• This appliance is for household use only.<br />
Do not use in moving vehicles or boats.<br />
Do not use outdoors. Do not use this<br />
appliance for anything other than its<br />
intended use. Misuse may cause injury.<br />
• Do not use harsh abrasives, caustic<br />
cleaners or oven cleaners when cleaning<br />
this appliance.<br />
• The installation of a residual current<br />
device (safety switch) is recommended<br />
to provide additional safety protection<br />
when using electrical appliances. It<br />
is advisable that a safety switch with<br />
a rated residual operating current<br />
not exceeding 30mA be installed in<br />
the electrical circuit supplying the<br />
appliance. See your electrician for<br />
professional advice.<br />
WARNING<br />
Fully unwind the cord from the cord<br />
storage facility before use.<br />
Before use, people with electronic<br />
implants such as pacemakers, etc.,<br />
And or other health issues should<br />
consult their doctor, as the induction<br />
cooker generates a magnetic field.<br />
If the glass ceramic plate surface is<br />
cracked, switch off the appliance to<br />
avoid the possibility of electric shock.<br />
Return the appliance to the nearest<br />
authorised <strong>Breville</strong> service centre<br />
for repair.<br />
Always keep in mind that the induction<br />
cooker, after being switched off, will<br />
continue to radiate residual heat on the<br />
glass ceramic plate heating surface.<br />
Do not use these induction cooker<br />
within reach of young children.<br />
SAvE THESE<br />
INSTRUCTIONS<br />
5
KNOW<br />
your <strong>Breville</strong> the Quick Time
KNOW yOUR BREvILLE - THE QUICK TIME <br />
A<br />
A<br />
B<br />
C<br />
D<br />
E<br />
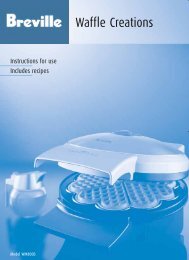
A. Silicon handle covers<br />
for heat protection<br />
B. Induction safe 20cm casserole pot<br />
Tri-ply stainless steel<br />
C. Ceramic glass cooktop<br />
D. Power On/Off<br />
E. Control dial<br />
for precise temperature, power and time<br />
selection.<br />
F<br />
G<br />
H<br />
I<br />
F. LEd screen<br />
G. 2100 Watt heat element<br />
H. Integrated safety<br />
with pot detection and safety cut out.<br />
I. Menu selector<br />
J. Non-slip feet<br />
J<br />
7
8<br />
KNOW yOUR BREvILLE - THE QUICK TIME <br />
O<br />
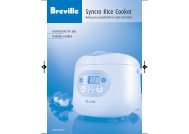
digital Screen<br />
K. Power mode: 10 levels<br />
(P-1 minimum power to<br />
P-10 maximum power)<br />
L. Menu selector<br />
M. Adjustable temperature mode<br />
60°C to 220°C<br />
N. Timer: 1 to 180 minutes<br />
O. Power On/Off<br />
K<br />
N<br />
M<br />
L
INdUCTION COOKING<br />
with your <strong>Breville</strong> the Quick Time
PAGE INdUCTION HEAdER..... COOKING<br />
WHAT IS INdUCTION COOKING?<br />
An induction cooker creates an<br />
electromagnetic field to heat the cooking<br />
saucepan/pot. Very little energy is wasted<br />
heating the glass ceramic plate, as most of<br />
the heat is transferred directly to the food.<br />
As the majority of the heat is absorbed<br />
by the saucepan/pot, the cooking surface<br />
remains cooler to the touch than most<br />
traditional cooktops making cooking fast,<br />
safe and energy efficient.<br />
Induction<br />
Cookware<br />
Heat is generated<br />
in the pot.<br />
Magnetic Field<br />
Power Coil<br />
SUITABLE COOKWARE FOR<br />
INdUCTION COOKING<br />
To achieve maximum efficiency, it is<br />
essential to use the correct type of<br />
saucepans/pot.<br />
Most suitable saucepan/pot’s are;<br />
• Stainless Steel with an iron base or core<br />
• Cast iron<br />
• With ferrous metals<br />
(one that can be magnetised)<br />
• Induction compatible cookware<br />
10<br />
NOTE<br />
All saucepan/pot’s require a base<br />
diameter between 12cm to 21cm to<br />
operate the induction cooker.<br />
Unsuitable saucepan/pot’s are;<br />
• Ceramic<br />
• Heat resistant glassware<br />
• Any pottery<br />
• Copper or aluminium<br />
• With feet<br />
• With a curved based<br />
• With a base diameter less than 12cm<br />
A <strong>Breville</strong> induction safe 18/8 stainless steel<br />
20cm casserole pot has been included with<br />
your induction cooker to get you started.<br />
The pot base is made of a high quality<br />
aluminium core sandwiched between two<br />
layers of solid stainless steel.<br />
Ergonomic handles are also made of solid<br />
stainless steel with silicon covers for heat<br />
protection.<br />
Stainless Steel<br />
Aluminium<br />
Stainless Steel
OPERATING<br />
your <strong>Breville</strong> the Quick Time
PAGE OPERATING HEAdER..... yOUR BREvILLE - THE QUICK TIME BEFORE FIRST USE<br />
Before using your <strong>Breville</strong> induction cooker<br />
become familiar with all the parts.<br />
Remove and safely discard all packaging<br />
materials and promotional labels.<br />
Wipe the glass ceramic plate surface with a<br />
soft damp cloth and dry thoroughly.<br />
Do not immerse the power cord, power plug<br />
and any other part of the induction cooker<br />
in water or any other liquid.<br />
OPERATION OF yOUR BREvILLE<br />
INdUCTION COOKER<br />
1. Place the induction cooker on a dry, level<br />
work surface.<br />
2. Position the <strong>Breville</strong> Casserole Pot that<br />
is enclosed or an induction compatible<br />
saucepan/pot in the centre of the<br />
circular design on the glass ceramic<br />
plate surface, ensure liquid or food is<br />
inside the saucepan/pot.<br />
3. Insert the power plug into a 230V or<br />
240V power outlet and switch power<br />
outlet ‘On’.<br />
NOTE<br />
Ensure the saucepan/pot is positioned<br />
in the centre of the circular design on<br />
the glass ceramic plate surface.<br />
WARNING<br />
Never use the saucepan/pot when<br />
empty, ensure liquid or food is inside<br />
the saucepan/pot.<br />
4. The LED screen will initially display<br />
(888:), a sound will beep and the<br />
appliance will be activated and start in a<br />
standby mode by flashing (–) symbol.<br />
5. Press the power on/off<br />
A beep will sound.<br />
button once.<br />
12<br />
6. By default, the induction cooker will<br />
automatically set to the power level mode<br />
P at level P-6. The LED screen will flash<br />
P-6 (5 times) and indicator light will<br />
illuminate next to P power level icon.<br />
The induction cooker is now heating at<br />
this power level and is ready to use.<br />
NOTE<br />
When appliance is in standby mode,<br />
the appliance is not heating, when<br />
the standby on/off switch is pressed<br />
the LED illumination indicated power<br />
is activated by default P-6 and a fan<br />
automatically starts working during<br />
the heating process.<br />
NOTE<br />
A fan will run continuously during the<br />
heating process.<br />
WARNING<br />
Induction cooking glass ceramic<br />
plate surface is hot after cooking.<br />
Do Not Touch!<br />
The induction cooker offers two heating<br />
options the Power level mode or the<br />
Adjustable temperature mode. Each of these<br />
heating options can be combined with a<br />
Timer mode. Heating options and Timer<br />
mode can be selected by simply pressing<br />
the Menu button.<br />
As the power level mode is the default<br />
heating option on the induction cooker, there<br />
is no need to press the menu button to go<br />
to this heating option. However, if the Menu<br />
button is accidentally pressed, press the<br />
Menu button twice to go back to the power<br />
level mode. A corresponding indicator light<br />
will illuminate on the LED screen, adjacent<br />
to the Power level P icon. A beep will sound<br />
every time Menu button is pressed.
PAGE OPERATING HEAdER..... yOUR BREvILLE - THE QUICK TIME To select the Adjustable temperature mode<br />
heating option, press the menu button twice<br />
and a corresponding indicator light will<br />
illuminate on the LED screen, adjacent to<br />
the temperature C˚ icon. A beep will sound<br />
every time Menu button is pressed.<br />
To select the timer mode, press the menu<br />
button once after heating option is selected<br />
and a corresponding indicator light will<br />
illuminate on the LED screen, adjacent to<br />
the timer icon. A beep will sound every<br />
time Menu button is pressed.<br />
POWER LEvEL MOdE<br />
1. When power level mode is selected,<br />
a corresponding indicator light will<br />
illuminate on the LED screen, adjacent<br />
to the power P icon. A beep will sound<br />
every time Menu button is pressed.<br />
2. The induction cooker will initially be set<br />
to level P-6 by default. The LED screen<br />
will flash P-6.<br />
3. Select the desired power levels using<br />
the control dial turn dial clockwise<br />
to increase power and anti-clockwise<br />
to decrease power. The power levels<br />
are adjustable on a scale from P-1<br />
minimum power to P-10 maximum<br />
power. A beep will sound each time<br />
power level is changed.<br />
4. During the selection period, the display<br />
on the LED screen will continue to flash<br />
until the desired power level has been<br />
selected, the LED screen will cease<br />
flashing after approximately 5 seconds<br />
and display selected power.<br />
5. The induction cooker will then begin<br />
heating. Be careful as temperature is<br />
reached a lot faster than traditional<br />
cooking methods.<br />
6. In this power level mode, it is also<br />
possible to set the cooking time with<br />
the Timer mode. Refer to timer mode<br />
details.<br />
7. When cooking is complete, press the<br />
power on/off button once to the<br />
standby mode. A beep will sound. Switch<br />
‘Off’ at the power outlet and unplug the<br />
power cord.<br />
NOTE<br />
The power level mode can be adjusted<br />
at any time during the cooking<br />
process by adjusting the control dial.<br />
AdJUSTABLE TEMPERATURE MOdE<br />
1. When temperature mode is selected,<br />
a corresponding indicator light will<br />
illuminate on the LED screen, adjacent<br />
to the temperature C˚ icon. A beep<br />
will sound every time Menu button is<br />
pressed.<br />
2. The induction cooker will initially set to<br />
140°C by default. The LED screen will<br />
flash 140°C.<br />
3. Select the desired temperature using<br />
the control dial, turn dial clockwise to<br />
increase temperature and anti-clockwise<br />
to decrease temperature.<br />
4. The temperature is adjustable on a scale<br />
from 60°C to 220°C. A beep will sound<br />
each time temperature is changed.<br />
5. During the selection period, the<br />
LED screen will continue to flash until<br />
the desired temperature has been<br />
selected, the LED screen will cease<br />
flashing after approx. 5 seconds and<br />
display selected temperature.<br />
6. The induction cooker will then<br />
begin heating.<br />
7. In this adjustable temperature C˚ mode,<br />
it is also possible to set the cooking time<br />
with the timer mode. Refer to the timer<br />
mode details, page 13.<br />
13
PAGE OPERATING HEAdER..... yOUR BREvILLE - THE QUICK TIME 8. When cooking is complete, press the<br />
power on/off button once to the<br />
standby mode. A beep will sound. Switch<br />
‘off’ at the power outlet and unplug the<br />
power cord.<br />
NOTE<br />
Temperature can be adjusted at any<br />
time during the cooking process,<br />
and the <strong>Breville</strong> induction cooker<br />
temperatures can be lowered or<br />
increased on a scale of 60˚C to 220˚C.<br />
TIMER MOdE<br />
1. Power level and/or Adjustable<br />
temperature mode must be selected<br />
prior to setting the Timer mode.<br />
2. To select the Timer mode, press the<br />
mode button once, a corresponding<br />
indicator light will illuminate on the<br />
LED screen adjacent to the timer mode<br />
icon. A beep will sound.<br />
3. Select the desired Time using the Control<br />
dial. Turn dial clockwise to increase time<br />
and anti-clockwise to decrease time. The<br />
time is adjustable on a scale from<br />
1 minute to 180 minutes. A beep will<br />
sound each time the timing is changed.<br />
4. During the selection period, the<br />
LED screen will continue to flash,<br />
when the desired time has been<br />
selected, the LED screen will cease<br />
flashing after approximately 5 seconds<br />
and display selected.<br />
14<br />
NOTE<br />
Turning the control dial slowly<br />
increases or decreases the timing<br />
by 1 minute increments, allowing<br />
for accurate selection. A beep will<br />
sound each time the time is changed.<br />
Turning the control dial very quickly<br />
clockwise increases timing by<br />
10 minute increments, anticlockwise<br />
decreases increments by 10 minute<br />
increments fast motion selection.<br />
5. Timer count down then commences<br />
and when the selected time has lapsed,<br />
a beep will sound 5 times and the<br />
induction cooker will automatically<br />
switch to stand-by mode.<br />
NOTE<br />
The Timer mode does not need to be<br />
set to use the Power level mode or<br />
Adjustable temperature mode.<br />
To readjust power level and<br />
temperature during cooking with<br />
timer mode, switch off the appliance,<br />
switch back on and reset.<br />
WARNING<br />
If the <strong>Breville</strong> induction cooker detects<br />
the temperature on the glass ceramic<br />
plate surface exceeding 100°C during<br />
cooking, the heating process will cease<br />
and the stand-by mode will activate for<br />
60 seconds to reduce the temperature.<br />
At the same time, the LED screen will<br />
display the error message E6. This<br />
error message will turn off when the<br />
temperature falls below 100°C.
CARE, CLEANING<br />
& STORAGE<br />
for your <strong>Breville</strong> the Quick Time
PAGE CARE, HEAdER..... CLEANING & STORAGE<br />
CARE ANd CLEANING<br />
Before cleaning, press the power on/off<br />
button once. A beep will sound. Switch<br />
power off at the power outlet and unplug the<br />
power cord from the power outlet.<br />
Ensure induction cooker has completely<br />
cooled down before cleaning and storage.<br />
To clean, glass ceramic plate surface,<br />
wipe with a slightly damp cloth using a<br />
mild detergent, to remove any food residue.<br />
Dry thoroughly.<br />
NOTE<br />
Do not use abrasives, harsh cleaning<br />
solutions or metal scourer pads as<br />
these may scratch the glass ceramic<br />
plate surface and make subsequent<br />
cleaning more difficult.<br />
NOTE<br />
Do not use abrasives or harsh cleaning<br />
solutions to clean the glass ceramic<br />
plate surface.<br />
WARNING<br />
Do not immerse the breville induction<br />
cooker or power cord and power plug<br />
in water or any other liquid.<br />
WARNING<br />
To prevent damage to the appliance<br />
do not use alkaline cleaning agents<br />
when cleaning, use a soft cloth and<br />
mild detergent.<br />
16<br />
STORAGE<br />
Before storage, press the power on/off<br />
button once. A beep will sound. Switch off<br />
at the power outlet and unplug power cord<br />
from the power outlet.<br />
Ensure the appliance is completely cooled,<br />
clean and dry. Store the appliance flat on the<br />
bench or in a convenient cupboard.<br />
Do not place anything on top of the<br />
appliance during storage.
TROUBLESHOOTING
PAGE TROUBLESHOOTING<br />
HEAdER.....<br />
ERROR OR COdE<br />
dISPLAyEd ON<br />
LEd SCREEN<br />
18<br />
POSSIBLE CAUSES WHAT TO dO<br />
– Appliance is in ‘Standby’<br />
mode/ position<br />
HOT To warn the user the glass is<br />
hot after normal use.<br />
E0 Induction Cooking failed does<br />
not work<br />
Err Non-compatible induction<br />
saucepan/pot has been used.<br />
The appliance has detected no<br />
pot on the glass ceramic plate.<br />
Place an Induction compatible saucepan/<br />
pot on top of the glass ceramic plate.<br />
Do not touch hot glass. Fan and display<br />
will turn off when cooled down.<br />
Appliance is to be taken to an authorised<br />
<strong>Breville</strong> <strong>Service</strong> <strong>Centre</strong> inspection, repair<br />
and/or replacement.<br />
Use an induction compatible<br />
saucepan/pot.<br />
E2 Appliance has overheated Allow the appliance to cool down,<br />
press power on/off button remove<br />
saucepan/pot and cool appliance before<br />
switching power on.<br />
E3, E4 Incorrect voltage Ensure the appliance is plugged into a<br />
230V or 240V power outlet.<br />
E5 Open circuit Appliance is to be taken to an authorised<br />
<strong>Breville</strong> <strong>Service</strong> <strong>Centre</strong> for inspection,<br />
repair and/or replacement.<br />
E6 Glass ceramic plate is<br />
overheated<br />
Appliance does<br />
not function<br />
Allow the appliance to cool down,<br />
press power on/off button remove<br />
saucepan/pot and cool appliance before<br />
switching power on.<br />
Appliance is not plugged in Plug the power plug into the wall socket.<br />
Appliance is plugged in Appliance is to be taken to an authorised<br />
<strong>Breville</strong> <strong>Service</strong> <strong>Centre</strong> for inspection,<br />
repair and/or replacement.<br />
Food is not heated You have used a pot not<br />
suitable for induction cooking<br />
The appliance<br />
turns itself off<br />
You have used a pot not<br />
suitable for induction cooking<br />
Use an induction suitable pot.<br />
Use an induction suitable pot.<br />
There is no pot on the plate Place an induction pot on the induction<br />
plate, and switch the appliance back on.
PAGE NOTESHEAdER.....<br />
19