Sauna Kit Assembly Instructions - Superior Sauna & Steam
Sauna Kit Assembly Instructions - Superior Sauna & Steam
Sauna Kit Assembly Instructions - Superior Sauna & Steam

You also want an ePaper? Increase the reach of your titles
YUMPU automatically turns print PDFs into web optimized ePapers that Google loves.
<strong>Sauna</strong> <strong>Kit</strong> <strong>Assembly</strong> <strong>Instructions</strong><br />
Thank you for purchasing a <strong>Superior</strong> <strong>Sauna</strong>. It will bring you many years of sauna enjoyment.<br />
On arrival from freight truck, please inspect palletized sauna kit for possible shipping damage. Check off itemized parts<br />
on the original invoice to make sure your kit has arrived complete and intact. Notify trucking company and <strong>Superior</strong><br />
<strong>Sauna</strong> (phone 877-872-2806) at the time of delivery if any damages.<br />
Review these instructions thoroughly as it will make your residential or commercial sauna project easier if you<br />
understand the assembly process before starting. See our Literature Library on the website www.<strong>Superior</strong><strong>Sauna</strong>s.com<br />
for specific install manuals for components like <strong>Sauna</strong> Heaters, Lighting <strong>Kit</strong>s, Bench Skirting Valances and more.<br />
Sincerely,<br />
Chuck Porter<br />
Managing Partner/Design Consultant<br />
Tools Needed:<br />
Safety Glasses, worn at all times<br />
Tape Measure<br />
Level and a Framing Square<br />
Stapler, electric or hand powered<br />
Hammer and nail punch<br />
Torx and other driver bits<br />
Chalk Line<br />
Brad Nail Gun is recommended for<br />
installing paneling. See local tool rental shop.<br />
Saws: Circular Saw, Miter Box Saw or<br />
Miter Table Chop Saw works best<br />
Cordless Drill or Screw Gun<br />
Recommended Fasteners:<br />
Use only quality stainless steel or chromated screws and fasteners<br />
Stainless steel brad nails for T&G paneling and trim pieces<br />
Staples for foil vapor barrier behind paneling can be steel<br />
Note: Galvanized steel fasteners will likely corrode and leave stains on wood<br />
Parts not included with <strong>Sauna</strong> Liner <strong>Kit</strong>s:<br />
Wall Framing Materials: 2x4’s or 2x6’s, treated lumber sill plate, 16d framing nails, etc.<br />
Fiberglass Insulation: obtain highest R value according to wall thickness (paper faced for easier install)<br />
Electrical Wiring & Supplies: check <strong>Sauna</strong> Heater install manual for correct gauge wire<br />
FRAMING PREPARATION: NOTE: BEFORE YOU BEGIN INSTALLING WALL PANELING IT IS<br />
EXTREMELY IMPORTANT THAT THERE ARE ADEQUATE BLOCKING / NAILERS INSTALLED TO<br />
THE FRAMING TO SUPPORT HEATER AND BENCHES, ETC. At this point review where every part of<br />
the sauna will be mounted including the <strong>Sauna</strong> Heater, Bench Rails, Bench Pillars, Valance Brackets,<br />
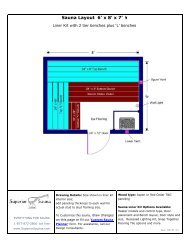
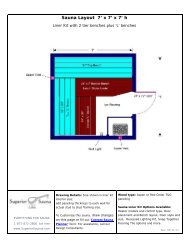
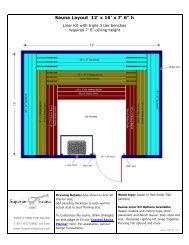
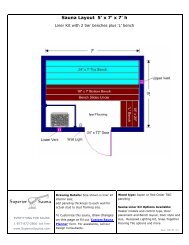
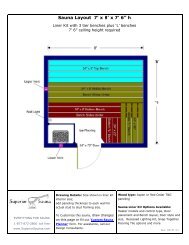
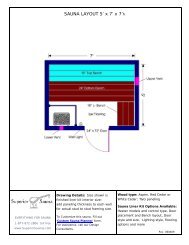
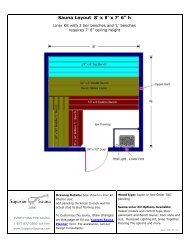
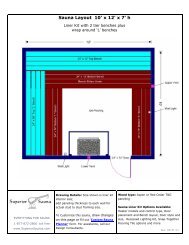
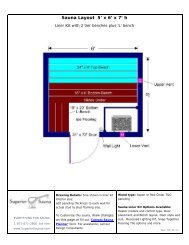
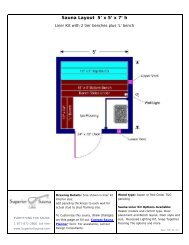
etc. Make sure that every part has solid framing or nailers to fasten to. See last page 3-D <strong>Sauna</strong> Room<br />
Design Drawing for visual description of support nailers. Bench top heights are typically 18” and 36”<br />
from floor, with bench rail supports 1-3/4” lower than bench tops. See sauna heater install manual for<br />
proper heater supports.<br />
1
Remember T&G Paneling thickness on wall studs (for example ¾” T&G on 2 sides total 1 ½”) means the<br />
net interior space and benches are at that length. For Vertical T&G Paneling, check that you have<br />
horizontal nailers or furring strips in at least 4 spots along T&G board length, with approx 1/3 up from<br />
floor and 1/3 down from ceiling for paneling to fasten to. Ideally sauna heater and wall light are placed<br />
on opposite wall from benches. Heater controls should be directly on the outside of the wall from the<br />
heater, as this makes the electrical wiring much simpler. Heater controls are best placed on latch side of<br />
door for ease of use when entering sauna.<br />
WIRING & INSULATION: After blocking / nailers are installed, you should have a licensed electrician<br />
rough in all of the required wiring for the <strong>Sauna</strong> Heater and Control Panel, Lighting and any other<br />
accessories. Paper faced fiberglass insulation is recommended for easier stapling to face of framing<br />
studs. Next, insulate the 2x4” or 2x6” constructed walls with max. R value fiberglass for wall thickness,<br />
and ceiling with fiberglass or proper heat rated foam at R19 to R33 value.<br />
SUPERIOR SAUNA KIT ASSEMBLY:<br />
1. Vapor Barrier: BE SURE PROPER NAILER SUPPORTS ARE INSTALLED<br />
BETWEEN STUDS FOR BENCH RAILS AND HEATER MOUNTING<br />
BEFORE BEGINNING (see Framing Preparation). Staple the special sauna<br />
foil vapor barrier (foil side facing you) starting at floor and work horizontally<br />
around the room attaching with staples. Allow a little extra vapor barrier in<br />
corners to be sure foil doesn’t get stretched and torn during paneling<br />
assembly. Continue stapling foil vapor barrier tiers around room up to the<br />
ceiling, allowing 2” to 3” overlap onto lower row. Then install vapor barrier on<br />
ceiling, taking care to overlap with foil on walls. For best results, tape seams<br />
with high-heat aluminum foil tape.<br />
2. Tongue & Groove Paneling: most applications are vertical to minimize<br />
board waste. A brad finish nailer gun is recommended for speed and<br />
accuracy. Using a regular hammer for paneling install can cause damage to<br />
board tongues preventing the paneling from fully seating. Also a small punch<br />
is required to sink each nail head below surface. It is advised to use stainless<br />
steel finishing nails to prevent fastener corrosion which will cause unsightly<br />
discoloring and dark streaks. Nail into board tongue at 45 degree angle or so<br />
into framing stud or nailer, positioned so that nail will just be hidden by<br />
groove of next board. It is best to cut a few pieces of paneling so you can use<br />
the scrap cut-offs to practice nailing technique. Allow a minimum ½” gap from bottom of T&G to finished floor<br />
level which will allow airflow and prevent moisture wicking off floor and staining / deteriorating wall boards.<br />
Allow enough clearance for flooring material or tiles to slide underneath T&G and still have ½” gap.<br />
Start T&G paneling on both sidewalls then panel front and back walls. Use a level to start first board straight<br />
then check levelness every few boards. Nail on into tongue on ends and at least 2 spots in between evenly<br />
spaced. The end peice of paneling near corners can be face nailed where the corner trim piece will cover nail<br />
spots (3/4” cove molding is typical). Do not install panels over the door rough opening until after the door is<br />
installed. After all walls are paneled then install T&G boards on the ceiling. Cut to fit and install cove molding<br />
trim in corners and ceiling as needed. Recommended Horizontal Paneling Board Application: starting at<br />
bottom of room, alternate short pieces to either end of wall every other row. Or place seams as desired in<br />
other pattern or random.<br />
2
3. <strong>Sauna</strong> Benches: Now see bench installation instruction sheet and bench<br />
parts. View the Bench Video at www.<strong>Superior</strong><strong>Sauna</strong>s.com to help visualize<br />
bench designs. Mount rails and set benches, be sure rails are well fastened<br />
into nailer support behind T&G paneling. Most <strong>Sauna</strong>s have 2 bench tiers,<br />
with typical Bench top heights at 18” and 36”. For 3 rd tier Benches, set height<br />
at 54” (recommended minimum ceiling height of 7’ 6”). See Bench <strong>Assembly</strong><br />
Brochure for more details and diagrams.<br />
A. For Basswood Benches: Bench top is 1 ¾” thick. Top of Bench Rail<br />
heights need to be mounted at 16 ¼” for the 1 st tier, 34 ¼” for the 2 nd tier, and 52 ¼” for the 3 rd tier if<br />
needed.<br />
B. For Cedar Benches: Bench top is 1 ½” thick. Top of Bench Rail heights need to be mounted at 16 ½”<br />
for the 1 st tier, 34 ½” for the 2 nd tier, and 52 ½” for the 3 rd tier if needed.<br />
C. Wall Mounted Bench Rails: Use a pencil to scribe bench rail height and mounting positions. In<br />
certain cases wall rails may need trimming. If dowels are in rails they should face up and towards the<br />
front of bench, to fit between bench seat boards to hold from sliding. Start with the rails for the main<br />
benches. Use the provided 3 ¾” fasteners to mount the rail to the wall, making sure the screws are<br />
hitting the nailer supports inside the wall. Use a level to ensure that all of the bench rails will be square<br />
with each other.<br />
D. Pillar Supports: Once all wall rails are in place, install the main bench tops to help determine where<br />
pillar supports will fit. Install the adjustable feet into bottom of pillars and supports then adjust height<br />
accordingly to raise the pillar to bottom of bench. Pillars that support the end of an L-Bench should be<br />
installed directly in front of the adjacent bench. Double Pillars that support the center of main benches<br />
should be installed last. Lay the double pillar down under bottom bench and raise up in place with the<br />
bench tops resting on the wall rails. Adjust the feet to raise the pillar to bottom of benches. Fasten all<br />
pillars to walls with 3 ¾” screws, making sure screws are hitting the support nailers inside the wall.<br />
E. Bench Valance / Skirting Installation: For kits that include Bench Valances, review the provided<br />
Bench Support Layout drawing. All parts are labeled according to the layout drawing. Valance<br />
Brackets need to be mounted directly in front of the according wall mounted rail so that the top of the<br />
bracket is flush with the top of the rail and make sure that the Valance Bracket stop block is facing<br />
down. Use the provided 2 ¾” fasteners to secure the brackets to the wall. In certain cases brackets<br />
may be pre-installed on to the according pillar. Now set the valances in place.<br />
F. Backrest, standard or deluxe: Position the backrest approximately 20” from the top of the bench to<br />
the top of the backrest or what ever position suites your comfort by test positioning before fastening.<br />
Fasten using the provided 2” fasteners making sure to use a level to make for a clean install.<br />
G. Finishing: You may want to do a final sanding with an electric palm sander, fine grit paper to polish<br />
paneling and benches to a perfect finished look and feel. Use optional natural sauna wood treatment<br />
Paraffin Oil for protecting sauna benches from moisture and perspiration soaking in.<br />
4. Venting: is very important for health of sauna woods and provides adequate oxygen<br />
for sauna users, especially in wood burning saunas. Outlet vent should be<br />
underneath the top bench on wall across from sauna heater to minimize heat loss.<br />
Trace louvered vent box on wall and cut slightly larger hole through wall with a jig saw<br />
for a clean cut, then fasten vent box in wall with louvers on exterior side of wall.<br />
Attach sliding vent door w/ frame on inside wall with air finish nailer. You will also<br />
need a lower intake vent under heater or nearby if you do not have approximately a<br />
1/2” gap under door. For maximum efficiency, install the intake vent directly<br />
underneath the heater to create a convection effect that will more evenly heat the<br />
room.<br />
5. Lighting: Install wall mounted Vapor Proof <strong>Sauna</strong> Light Fixture according to instruction sheet. For the Spectra<br />
Recessed <strong>Sauna</strong> Lighting <strong>Kit</strong>, see our website Literature Library Install Guides if it is not enclosed in the<br />
<strong>Sauna</strong> <strong>Kit</strong> Literature Envelope. Always test fit vapor proof fixtures with wiring attached before drilling holes in<br />
ceiling, to be sure wiring will reach. Sections of the Spectra wire harness can be extended by splicing in extra<br />
wire per installation instructions.<br />
3
6. Door: Now insert the pre-hung door in rough opening using a square and a level to properly shim<br />
the door. If you do not install the door perfectly square you may have problems with the door<br />
closing properly. For added strength and durability replace one screw per hinge (on jamb side)<br />
with a longer screw that will fasten into the framing. This step will ensure your sauna door will stay<br />
square throughout the years. After the door is securely fastened into place, stuff fiberglass<br />
insulation around door jam and seal with foil vapor barrier. Finish installing T&G wall paneling up to<br />
the door jamb then install the Door Casing Trim with a finishing air nail gun. Use suitable exterior<br />
door trim to match sauna exterior walls. Door handles are one of the few sauna parts that can<br />
have a stain or wood sealant applied to prevent sweat and moisture from soaking in and staining.<br />
7. Heater: The <strong>Sauna</strong> Heater should be installed by a licensed electrician according to the heater<br />
installation manual following the manufacturer’s specifications. When fastening the heater on the wall, be<br />
absolutely sure fasteners are going into blocking or studs behind paneling to support the weight of heater and<br />
rocks. Wall mounted <strong>Sauna</strong> heater controls should be placed on exterior wall, near latch side of door for easy<br />
use on entering (never put wall controls facing inside sauna room).<br />
8. Heater Guard: Now attach heater guard according to heater manufacturer’s installation manual. Place prebuilt<br />
heater guard into place and fasten using the provided 2” fasteners. For custom built heater guards, follow<br />
the heater installation manuals specifications to ensure the prevention of combustion. Inspect heater guard a<br />
couple times a year to make sure it is securely installed.<br />
7. Flooring: Now assemble snap together Red Cedar or Ipe hardwood tile flooring on<br />
walking area in front of benches. Plastic based tiles are safe to use in cooler<br />
temperatures of sauna floor and allow . If saw cutting is needed to fit tiles perfectly,<br />
remove any screws from bottom of tile that may be in path of saw blade. Ipe is a very<br />
dense wood (similar to teak) and it is recommended to use a quality saw with a sharp<br />
blade.<br />
8. Base Board Trim: After flooring material is installed, cut baseboard trim to fit around<br />
bottom edge of walls, leaving a ¼” gap between flooring material and baseboard trim.<br />
Attach with finishing air nail gun.<br />
9. Wood Filler Putty: Do not use any paraffin based wood putties because the heat of the sauna will melt the<br />
filler out of the wood. We recommend using ‘DAP Plastic Wood’ or ‘Wood Workers Friend’ that can be found at<br />
hardware stores or home centers.<br />
10. Finishing Sanding: Wear protective breathing mask to avoid breathing sanding dust. Cedar dust is especially<br />
dangerous to the respiratory system. Once you have finished the installation of your sauna kit, use a powered<br />
random orbit palm sander and sanding sponges with a fine grit (180-220) sand paper to give a final touch up<br />
sanding to remove small dents, nicks and marks from installation. Use a vacuum to remove all of the sanding<br />
dust.<br />
Shared / docs / Lit-Library / saunas and parts install / edit / sauna_kit_assembly_instr.doc rev. 042111<br />
4