Amulet 400
Amulet 400
Amulet 400

Create successful ePaper yourself
Turn your PDF publications into a flip-book with our unique Google optimized e-Paper software.
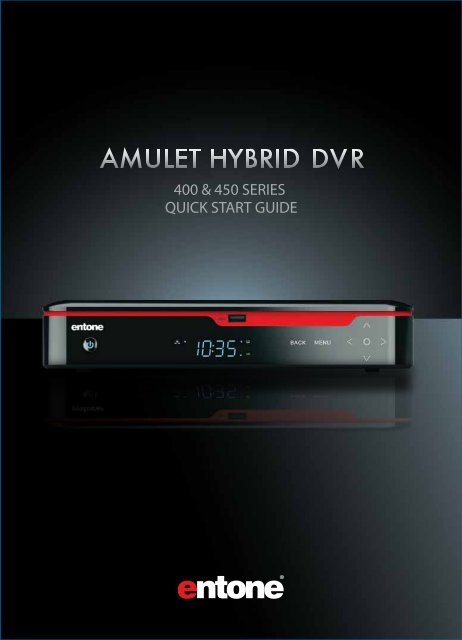
<strong>400</strong> & 450 SERIES<br />
QUICK START GUIDE<br />
®
COPYRIGHT<br />
©2011 Entone, Inc. All rights reserved. This document contains proprietary information protected by copyright. No part of this publication may<br />
be reproduced, stored in a retrieval system, or transmitted in any form or by any means, electronic, mechanical, photocopying, recording or<br />
otherwise, without the prior written consent of Entone, Inc., 20863 Stevens Creek Blvd, Suite 300, Cupertino, CA 95014, U.S.A.<br />
DISCLAIMER<br />
IF THIS PRODUCT DIRECTS YOU TO COPY MATERIALS, YOU MUST HAVE PERMISSION FROM THE COPYRIGHT OWNER OF THE MATERIALS TO<br />
AVOID VIOLATING THE LAW WHICH COULD RESULT IN DAMAGES OR OTHER REMEDIES.<br />
TRADEMARKS<br />
Entone and the tagline “Connecting the Home” are trademarks of Entone, Inc. All other trademarks or registered trademarks belong to their<br />
respective owners.<br />
CHANGES<br />
The material in this document is for information only and is subject to change without notice. While reasonable eorts have been made in the<br />
preparation of this document to assure its accuracy, Entone, Inc. assumes no liability resulting from the use of the information contained herein.<br />
Entone, Inc. reserves the right to make changes in the product design without reservation and without notication to its users.<br />
P/N: 95-801000-09 - V1.2
TABLE OF CONTENTS<br />
OVERVIEW<br />
2 Safety Instructions<br />
4 What’s Included<br />
6 Front Panel<br />
7 Back Panel<br />
8 Remote Control<br />
CONNECTING VIDEO<br />
10 High-Denition TVs<br />
12 Standard Denition TVs<br />
CONNECTING TV SOURCE<br />
14 Cable or ATSC Antenna<br />
CONNECTING AUDIO<br />
15<br />
16<br />
TV (Stereo)<br />
A/V Receiver (Surround Sound)<br />
CONNECTING NETWORK<br />
17 Wired<br />
18 Wireless<br />
POWERING UP<br />
19 Setting up Remote Control<br />
20 Connecting to Power Source<br />
21 Declaration of Conformity<br />
QUICK START GUIDE<br />
AMULET HYBRID DVR<br />
1
QUICK START GUIDE<br />
AMULET HYBRID DVR<br />
2<br />
IMPORTANT SAFETY INSTRUCTIONS<br />
• WARNING: To reduce the risk of re or electric shock, do not expose this<br />
apparatus to rain or moisture.<br />
• The apparatus shall not be exposed to dripping or splashing and that<br />
no objects lled with liquids, such as vases, shall be placed on the<br />
apparatus.<br />
• Read these instructions.<br />
• Keep these instructions.<br />
• Heed all warnings.<br />
• Follow all instructions.<br />
• Do not use this apparatus near water.<br />
• Clean only with dry cloth.<br />
• Do not block any ventilation openings. Install in accordance with the<br />
manufacturer’s instructions.<br />
• Do not defeat the safety purpose of the polarized or grounding-type<br />
plug. A polarized plug has two blades with one wider than the other.<br />
A grounding type plug has two blades and a third grounding prong.<br />
The wide blade or the third prongs are provided for your safety. If the<br />
provided plug does not t into your outlet, consult an electrician for<br />
replacement of the obsolete outlet.<br />
• Protect the power cord from being walked on or pinched particularly<br />
at plugs, convenience receptacles, and the point where they exit from<br />
the apparatus.<br />
• Only use attachments/accessories specied by the manufacturer.<br />
• Use only with the cart, stand, tripod, bracket, or table specied by the<br />
manufacturer, or sold with the apparatus. When a cart is used, use<br />
caution when moving the cart/apparatus combination to avoid injury<br />
from tip-over.<br />
• Unplug this apparatus during lightning storms or when unused for long<br />
periods of time.<br />
• Refer all servicing to qualied service personnel. Servicing is required<br />
when the apparatus has been damaged in any way, such as<br />
power-supply cord or plug is damaged, liquid has been spilled or<br />
objects have fallen into the apparatus, the apparatus has been exposed<br />
to rain or moisture, does not operate normally, or has been dropped.<br />
•<br />
To reduce the risk of electric shock, DO NOT remove cover or back<br />
panel. No user serviceable parts inside. Refer servicing to qualied<br />
personnel.
IMPORTANT SAFETY INSTRUCTIONS (CONTINUED)<br />
•<br />
•<br />
•<br />
•<br />
•<br />
•<br />
•<br />
•<br />
•<br />
•<br />
•<br />
•<br />
•<br />
To help prevent electric shock, plug the power cable into properly<br />
grounded sources. Use only properly grounded extension cords and<br />
adaptors, if they are needed.<br />
The AC main plug is used as the disconnect device, the disconnect<br />
device shall remain readily operable.<br />
Make sure nothing is lying on any of the cables.<br />
Be sure the cables are located where they will not be stepped on or<br />
tripped over.<br />
Do not spill food or liquids onto the unit.<br />
Do not push any objects into the free slots. Doing so will damage<br />
the unit, can cause re or electrical shock, and can short out interior<br />
components.<br />
Do not install near any heat sources such as radiators, heat registers,<br />
stoves, or other apparatus (including ampliers) that produce heat.<br />
Do not block cooling vents.<br />
Do not place the equipment in a closed-in wall unit.<br />
When you disconnect a cable, pull on its connector or on its strain<br />
relief loop, not on the cable itself. Some cables have a connector with<br />
locking tabs; if you are disconnecting this type of cable, press in on the<br />
locking tabs before disconnecting the cables.<br />
When you connect a cable, make sure both connectors are correctly<br />
oriented and aligned before connecting to avoid bending connector pins.<br />
For PLUGGABLE EQUIPMENT, the socket-outlet shall be installed near<br />
the equipment and shall be easily accessible.<br />
Changes or Modications not expressly approved by the party<br />
responsible could void the user’s authority to operate this device.<br />
QUICK START GUIDE<br />
AMULET HYBRID DVR<br />
3
QUICK START GUIDE<br />
AMULET HYBRID DVR<br />
4<br />
WHAT'S INCLUDED<br />
Universal IR Remote Control<br />
URC Quick Reference Guide<br />
<strong>Amulet</strong> Hybrid DVR<br />
2xAA Batteries for<br />
Remote Control<br />
<strong>Amulet</strong> Quick Start Guide
Composite Audio/Video Cable<br />
(For SD Video and Stereo Audio)<br />
Ethernet Cable<br />
(For Wired Networking)<br />
AC Power Adapter + Power Cord<br />
(100-240V, Output 12V/5A)<br />
ADDITIONAL ITEMS THAT MAY BE REQUIRED (NOT INCLUDED):<br />
• HDMI Cable<br />
• Component Video Cable<br />
• Coaxial Cable<br />
• Digital Audio Cable<br />
• Network Router<br />
QUICK START GUIDE<br />
AMULET HYBRID DVR<br />
5
QUICK START GUIDE<br />
AMULET HYBRID DVR<br />
6<br />
AMULET HYBRID DVR – FRONT PANEL<br />
3<br />
6<br />
7<br />
POWER<br />
LINK<br />
CLOCK<br />
RECORD<br />
HD<br />
1 2 3 7 4 5 6<br />
7-way Navigation<br />
+ MENU<br />
USB 2.0<br />
Button<br />
Status LED<br />
4-Digit LED<br />
Status LED<br />
Status LED<br />
Capacitive<br />
Touch Panel<br />
USB 2.0<br />
Connector<br />
Availability of certain features is dependent on your service provider.<br />
Solid Blue indicates the unit is on<br />
Solid Red indicates the unit is in standby mode<br />
Flashing Blue indicates the unit is starting up<br />
Press button once to put unit in standby mode, press<br />
again to resume<br />
To restart the device, press and hold button for at<br />
least 5 seconds or longer<br />
Blue dot indicates that Ethernet or Wi-Fi network connection<br />
is active<br />
Clock displays current time set by your service provider. It<br />
may not display time during the restart process<br />
Blue dot indicates a TV program is currently recording<br />
Blue dot indicates current program is playing in HD (720p<br />
or higher) resolution<br />
Use Back, Menu, OK and Directional buttons to help with<br />
navigating the user interface without a remote control<br />
To connect USB devices such as USB Flash Drive,<br />
External USB Hard Drive
AMULET HYBRID DVR – BACK PANEL<br />
Name Description<br />
1<br />
2<br />
3<br />
4<br />
5<br />
6<br />
7<br />
8<br />
9<br />
10<br />
11<br />
12<br />
1 2 3<br />
4<br />
eSATA External Serial ATA Connector (May supports future upgrades).<br />
CABLE/ANT IN For Clear QAM Cable TV Source and ATSC Antenna<br />
TV OUT Connection to RF TV Output<br />
Wi-Fi (Optional) Provide extended range and coverage to wireless network<br />
VIDEO Composite Video for SD Video<br />
COMPONENT VIDEO Component Video Output (Y, Pb, Pr) for HD Video<br />
AUDIO Stereo Audio Output (Left / Right)<br />
DIGITAL AUDIO Optical connection for 5.1 Surround Sound<br />
HDMI Connection for HD Video and Multi-Channel Audio<br />
10/100 ETHERNET Connects to wired network<br />
USB 2.0 Connects other USB devices such as USB Flash Drive<br />
POWER IN Power connection to AC Adapter<br />
Availability of certain features is dependent on your service provider.<br />
6<br />
5 7 8 9<br />
10<br />
11<br />
12<br />
QUICK START GUIDE<br />
AMULET HYBRID DVR<br />
7
8<br />
QUICK START GUIDE AMULET HYBRID DVR<br />
REMOTE CONTROL<br />
18<br />
17<br />
16<br />
15<br />
14<br />
1<br />
2<br />
3<br />
4<br />
5<br />
6<br />
7<br />
8<br />
9<br />
10<br />
11<br />
12<br />
13
Button(s) Description<br />
1<br />
2<br />
3<br />
4<br />
5<br />
6<br />
7<br />
8<br />
9<br />
10<br />
11<br />
12<br />
13<br />
14<br />
15<br />
16<br />
17<br />
18<br />
POWER<br />
DEVICE CONTROL<br />
TRANSPORT KEYS<br />
SHORTCUT<br />
MENU<br />
INFO<br />
NAVIGATION<br />
EXIT<br />
GUIDE<br />
CH/PG<br />
LAST<br />
NUMBER KEYS<br />
CC<br />
INPUT<br />
MUTE<br />
VOL + /-<br />
BACK<br />
OPTIONS<br />
Switches the power on/o for the currently selected device<br />
Switches STB to power on or standby mode<br />
TV: Select to control TV (if programmed)<br />
STB: This button is pre-programmed to control the <strong>Amulet</strong><br />
Hybrid DVR<br />
AUX: Select to control another device (if programmed)<br />
Controls video program for LIVE TV / DVR / VOD<br />
REPLAY: Plays back a few seconds<br />
REW: Rewinds video<br />
FF: Fast forwards video<br />
SKIP: Skips ahead in 30 second increments<br />
REC: Starts recording program<br />
PAUSE: Pauses video<br />
PLAY: Plays video or resumes a paused program<br />
STOP: Stops playback of video<br />
Color-code buttons correspond to features that are enabled by<br />
your service provider (contact service provider for more details)<br />
Displays on-screen menu or home screen<br />
Displays on-screen information about the current TV / VOD /<br />
DVR program<br />
ARROW KEYS: Navigates up, down, left and right within the<br />
on-screen guide or menus<br />
OK: Executes the currently selected menu option<br />
Exits the current menu item or back to LIVE TV<br />
Displays the on-screen program guide<br />
Changes channel up/down or goes page up/down within<br />
on-screen program guide<br />
Changes channel to the most recently viewed channel<br />
Allows direct access to specic channels and menu items<br />
Toggles closed captioning on or o<br />
Changes the current A/V input of the selected device programmed<br />
(i.e. TV or AUX)<br />
May be used when entering a period in certain channels<br />
Displays on-screen keyboard for certain applications<br />
Turns the volume of the currently selected device on/o<br />
Increases or decreases volume of the currently selected device<br />
Goes back one level within menus *<br />
Provides additional options for certain on-screen menu or<br />
highlighted item*<br />
* Availability of certain features is dependent on your service provider<br />
QUICK START GUIDE<br />
AMULET HYBRID DVR<br />
9
QUICK START GUIDE<br />
AMULET HYBRID DVR<br />
10<br />
CONNECTING VIDEO HDTV (High-Denition)<br />
Select only one Video option, then proceed to TV Source<br />
OPTION #1 (Recommended)<br />
Connect via HDMI*<br />
S-VIDEO<br />
Delivers the best video & audio<br />
quality via a single cable<br />
Cable not included<br />
*This connection provides both Video and Multi-Channel Audio. If you have selected HDMI for your Video then<br />
proceed to page 14.
OPTION #2<br />
Connect via Component Video<br />
S-VIDEO<br />
Cable not included<br />
Component Video<br />
Delivers excellent<br />
picture quality<br />
QUICK START GUIDE<br />
AMULET HYBRID DVR<br />
11
QUICK START GUIDE<br />
AMULET HYBRID DVR<br />
12<br />
CONNECTING VIDEO SDTV (Standard-Denition)<br />
Select only one Video option, then proceed to TV Source<br />
OPTION #1<br />
Connect via Composite Video<br />
Use yellow cable for Video Connection<br />
(If you selected HDMI, do not use this<br />
cable)<br />
S-VIDEO<br />
Cable included<br />
Composite Video<br />
Delivers good picture quality
CONNECTING VIDEO SDTV (Standard-Denition)<br />
Select only one Video option, then proceed to TV Source<br />
OPTION #2<br />
Connect via Coaxial<br />
S-VIDEO<br />
Coaxial Cable<br />
Delivers good picture quality<br />
Cable not included<br />
ANT IN<br />
QUICK START GUIDE<br />
AMULET HYBRID DVR<br />
13
QUICK START GUIDE<br />
AMULET HYBRID DVR<br />
14<br />
CONNECTING TV SOURCE CABLE OR ATSC ANTENNA<br />
Select only one TV Source option, then proceed to Audio<br />
OPTION #1<br />
Connect to Cable TV Source using RF Coaxial Cable<br />
OPTION #2<br />
Connect to ATSC Antenna Source (Outdoor or Indoor Antenna)<br />
Cable not included
CONNECTING AUDIO TV (Stereo)<br />
Select only one Audio option, then proceed to Networking<br />
OPTION #1<br />
Connect to TV's Stereo Audio<br />
Use red/white cables for Audio Connection if you selected<br />
Component Video, or Composite Video<br />
(If you selected HDMI, do not use these cables)<br />
S-VIDEO<br />
Cable included<br />
QUICK START GUIDE<br />
AMULET HYBRID DVR<br />
15
QUICK START GUIDE<br />
AMULET HYBRID DVR<br />
16<br />
CONNECTING AUDIO A/V RECEIVER (Surround Sound)<br />
OPTION #2<br />
Connect to an A/V Receiver for Digital 5.1 Surround Sound<br />
Cable not included
CONNECTING NETWORK WIRED<br />
Select only one Networking option, then proceed to Powering up<br />
OPTION #1<br />
Connect to a Wired Network via DSL, Cable Modem or<br />
Network Router<br />
Router not included<br />
Cable included<br />
QUICK START GUIDE<br />
AMULET HYBRID DVR<br />
17
QUICK START GUIDE<br />
AMULET HYBRID DVR<br />
18<br />
CONNECTING NETWORK WIRELESS<br />
OPTION #2<br />
Connect to a Wireless Network via a Wireless Network Router or<br />
Access Point<br />
Wireless Router not included<br />
Attaching and adjusting the Antenna angle will help achieve better coverage and range.
POWERING UP SETTING UP REMOTE CONTROL<br />
1.<br />
2.<br />
3.<br />
4.<br />
Locate the two AA batteries and remote control in the accessory<br />
box<br />
To open the battery cover, press down on the battery cover<br />
latch and slide it o<br />
Insert the AA batteries, matching the "+" and "-" marks on the<br />
batteries to the "+" and "-" marks on the interior of the remote<br />
control<br />
Snap the battery cover back onto the remote control<br />
QUICK START GUIDE<br />
AMULET HYBRID DVR<br />
19
QUICK START GUIDE<br />
AMULET HYBRID DVR<br />
20<br />
FINAL SETUP CONNECTING TO POWER SOURCE<br />
1. Connect the power cord to the “POWER” connector on<br />
the back of the <strong>Amulet</strong> Hybrid DVR<br />
2. Connect the AC power adapter to a power outlet<br />
3. Press the power button on the front of the <strong>Amulet</strong> Hybrid<br />
DVR to turn unit ON<br />
4. Follow the on-screen instructions<br />
2<br />
1
DECLARATION OF CONFORMITY<br />
To ensure proper use of this product, please read this manual carefully and retain it for future reference.<br />
Should the unit require maintenance, contact an authorized service location.<br />
WARNING: This symbol indicates the presence of uninsulated dangerous voltage within the product's<br />
enclosure that constitutes a risk of electric shock. Do not open the product's case.<br />
CAUTION: This symbol indicates you must take care; there is risk of damage to the equipment or<br />
to yourself.<br />
To prevent re or shock hazard, do not expose this product to rain or moisture. To reduce the risk of<br />
electric shock, DO NOT remove the cover or back. No user serviceable parts are inside. For servicing refer<br />
to qualied personnel.<br />
Declaration of Conformity (United States Only)<br />
This device complies with Part 15 of the FCC Rules. Operation is subject to the following conditions: (1)<br />
this device may not cause harmful interference, and (2) this device must accept any interference<br />
received, including interference that may cause undesired operation. This equipment has been tested<br />
and found to comply with the limits for a Class B digital device, pursuant to Part 15 of the Federal<br />
Communication Commission (FCC) Rules. These limits are designed to provide reasonable protection<br />
against harmful interference in a residential installation. This equipment generates, uses, and can<br />
radiate radio frequency energy, and if not installed and used in accordance with the instructions, may<br />
cause harmful interference to radio communications. However, there is no guarantee that interference<br />
will not occur in a particular installation. If this equipment does cause harmful interference to radio or<br />
television reception, which can be determined by turning the equipment OFF and ON, the user is<br />
encouraged to try to correct the interference by one or more of the following measures:<br />
• Reorient or relocate the receiving antenna.<br />
• Increase the separation between the equipment and the receiver.<br />
• Connect the equipment to a dierent circuit from that to which the receiver is connected.<br />
• Consult the dealer or an experienced radio/TV technician for help.<br />
Part 68 - Compliance Registration<br />
This equipment complies with Part 68 of the FCC rules and the requirements adopted by the ACTA. A<br />
label on the bottom of this equipment contains, among other information, the Ringer Equivalence<br />
Number (REN) and the product identier. For products approved after July 23, 2001 the product<br />
identier is in the format US:AAAEQ##TXXXX. The digits represented by ## are the REN without a<br />
decimal point (e.g. 03 is a REN of 0.3). The REN is used to determine the number of devices that may be<br />
connected to a telephone line. For earlier products, the REN is separately shown on the label. If<br />
requested, this number must be provided to the telephone company. Excessive RENs on a telephone<br />
line may result in the devices not ringing in response to an incoming call. In most, but not all areas, the<br />
sum of RENs should not exceed ve (5.0). To be certain of the number of devices that may be connected<br />
to a line, as determined by the total RENs, contact the local telephone company. This equipment is<br />
designed to connect to the telephone network or premises wiring using a compatible modular jack that<br />
is Part 68 compliant. An FCC compliant telephone cord and modular plug is provided with the<br />
equipment. If this terminal equipment causes harm to the telephone network, the telephone company<br />
may request you to disconnect the equipment until the problem is resolved. The telephone company<br />
will notify you in advance if temporary discontinuance of service is required. If advance notication is<br />
not practical, the telephone company will notify you as soon as possible. You will be advised of your<br />
right to le a complaint with the FCC if you believe such action is necessary. If you experience trouble<br />
with this equipment, do not try to repair the equipment yourself. The equipment cannot be repaired in<br />
the eld. Contact your ISP for further instructions. The telephone company may make changes to their<br />
facilities, equipment, operations, or procedures that could aect the operation of this equipment. If this<br />
happens, the telephone company will provide advance notice in order for you to make the modications<br />
necessary to maintain uninterrupted service. If your home has specially wired alarm equipment<br />
connected to the telephone line, ensure that the installation of this equipment does not disable your<br />
alarm equipment. If you have questions about what will disable alarm equipment, consult your<br />
telephone company or a qualied installer. This equipment cannot be used on public coin phone<br />
service provided by the telephone company. Connection of this equipment to party line service is<br />
subject to state taris.<br />
QUICK START GUIDE<br />
AMULET HYBRID DVR<br />
21
QUICK START GUIDE<br />
AMULET HYBRID DVR<br />
22<br />
DECLARATION OF CONFORMITY (CONTINUED)<br />
Declaration of Conformity (Europe Only)<br />
This product is in conformity with the Council Directives:<br />
• EMC Directive 2004/108/EC<br />
• Low voltage Directive 2006/95/EC<br />
Canada Certication Notice<br />
ICES-003 Class B Notice<br />
This Class B digital apparatus complies with Canadian ICES-003.<br />
Avis NMB-003, Classe B<br />
Cet appareil numérique de la classe B est conforme à la norme NMB-003 du Canada<br />
The Industry Canada label identies certied equipment. This certication means that the equipment<br />
meets certain telecommunications network protective operations and safety requirements as<br />
prescribed in the appropriate Terminal Equipment Technical Requirements document(s). The<br />
department does not guarantee the equipment will operate to the user’s satisfaction. This equipment<br />
meets the applicable Industry Canada Terminal Equipment Technical Specication. This is conrmed by<br />
the registration number. The abbreviation, IC, before the registration number signies that registration<br />
was performed based on a Declaration of Conformity indicating that Industry Canada technical<br />
specications were met. It does not imply that Industry Canada approved the equipment. The Ringer<br />
Equivalence Number (REN) is 0.0. The Ringer Equivalence Number that is assigned to each piece of<br />
terminal equipment provides an indication of the maximum number of terminals allowed to be<br />
connected to a telephone interface. The termination on an interface may consist of any combination of<br />
devices subject only to the requirement that the sum of the Ringer Equivalence Numbers of all the<br />
devices does not exceed 5.0. Before installing this equipment, users should ensure that it is permissible<br />
to be connected to the facilities of the local Telecommunication Company. The equipment must also be<br />
installed using an acceptable method of connection. The customer should be aware that compliance<br />
with the above conditions may not prevent degradation of service in some situations. Connection to a<br />
party line service is subject to state taris. Contact the state public utility commission, public service<br />
commission, or corporation commission for information. If your home has specially wired alarm<br />
equipment connected to the telephone line, ensure that the installation of this equipment does not<br />
disable your alarm equipment. If you have questions about what will disable alarm equipment, consult<br />
your telephone company or a qualied installer. If you experience trouble with this equipment, do not<br />
try to repair the equipment yourself. The equipment cannot be repaired in the eld and must be<br />
returned to the manufacturer. Repairs to certied equipment should be coordinated by a<br />
representative, and designated by the supplier. Users should ensure, for their own protection, that the<br />
electrical ground connections of the power utility, telephone lines, and internal, metallic water pipe<br />
system, if present, are connected together. This precaution may be particularly important in rural areas.<br />
CAUTION: Users should not attempt to make such connections themselves, but should contact the<br />
appropriate electrical inspection authority, or electrician, as appropriate.
NOTES
NOTES
© 2011 Entone, Inc. Entone, <strong>Amulet</strong> and connecting the home are trademarks of Entone, Inc. Other company, product, and service names may be trademarks or<br />
service marks of others. All information contained in this document is subject to change without notice. Information contained in this document is provided on an<br />
as is basis. In no event will Entone be liable for damages arising directly or indirectly from any use of the information contained in this document. Subject to<br />
change without notice.<br />
®