IM Nail Extractor Tech - Innomed, Inc.
IM Nail Extractor Tech - Innomed, Inc.
IM Nail Extractor Tech - Innomed, Inc.

You also want an ePaper? Increase the reach of your titles
YUMPU automatically turns print PDFs into web optimized ePapers that Google loves.
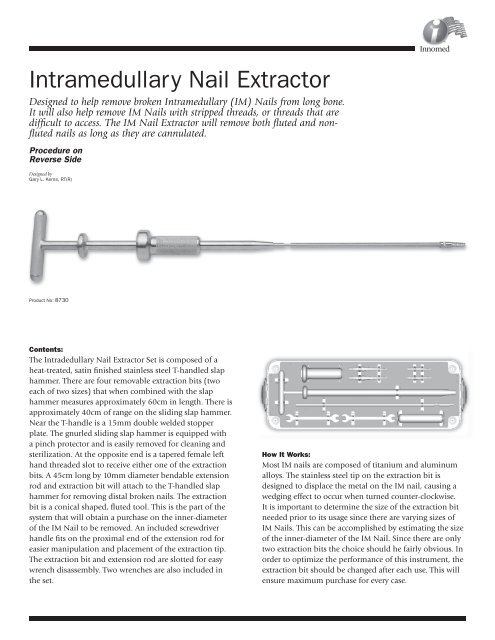
Intramedullary <strong>Nail</strong> <strong>Extractor</strong><br />
Designed to help remove broken Intramedullary (<strong>IM</strong>) <strong>Nail</strong>s from long bone.<br />
It will also help remove <strong>IM</strong> <strong>Nail</strong>s with stripped threads, or threads that are<br />
diffi cult to access. The <strong>IM</strong> <strong>Nail</strong> <strong>Extractor</strong> will remove both fl uted and nonfl<br />
uted nails as long as they are cannulated.<br />
Procedure on<br />
Reverse Side<br />
Designed by<br />
Gary L. Kerns, RT(R)<br />
Product No: 8730<br />
Contents:<br />
The Intradedullary <strong>Nail</strong> <strong>Extractor</strong> Set is composed of a<br />
heat-treated, satin fi nished stainless steel T-handled slap<br />
hammer. There are four removable extraction bits (two<br />
each of two sizes) that when combined with the slap<br />
hammer measures approximately 60cm in length. There is<br />
approximately 40cm of range on the sliding slap hammer.<br />
Near the T-handle is a 15mm double welded stopper<br />
plate. The gnurled sliding slap hammer is equipped with<br />
a pinch protector and is easily removed for cleaning and<br />
sterilization. At the opposite end is a tapered female left<br />
hand threaded slot to receive either one of the extraction<br />
bits. A 45cm long by 10mm diameter bendable extension<br />
rod and extraction bit will attach to the T-handled slap<br />
hammer for removing distal broken nails. The extraction<br />
bit is a conical shaped, fl uted tool. This is the part of the<br />
system that will obtain a purchase on the inner-diameter<br />
of the <strong>IM</strong> <strong>Nail</strong> to be removed. An included screwdriver<br />
handle fi ts on the proximal end of the extension rod for<br />
easier manipulation and placement of the extraction tip.<br />
The extraction bit and extension rod are slotted for easy<br />
wrench disassembly. Two wrenches are also included in<br />
the set.<br />
<br />
<strong>Innomed</strong><br />
How It Works:<br />
Most <strong>IM</strong> nails are composed of titanium and aluminum<br />
alloys. The stainless steel tip on the extraction bit is<br />
designed to displace the metal on the <strong>IM</strong> nail, causing a<br />
wedging effect to occur when turned counter-clockwise.<br />
It is important to determine the size of the extraction bit<br />
needed prior to its usage since there are varying sizes of<br />
<strong>IM</strong> <strong>Nail</strong>s. This can be accomplished by estimating the size<br />
of the inner-diameter of the <strong>IM</strong> <strong>Nail</strong>. Since there are only<br />
two extraction bits the choice should he fairly obvious. In<br />
order to optimize the performance of this instrument, the<br />
extraction bit should be changed after each use. This will<br />
ensure maximum purchase for every case.
Procedure: Removing A Broken Intramedullary <strong>Nail</strong><br />
Step One<br />
Expose the greater trochanter and insert the larger extraction<br />
bit under fl uoroscopy. Turn the T-handle counter-clockwise<br />
until the extraction bit is fi rmly seated within the <strong>IM</strong> <strong>Nail</strong>. If the<br />
proximal screw or screws do not allow good purchase on the <strong>IM</strong><br />
<strong>Nail</strong>, remove them before tightening.<br />
Step Two<br />
Once the bit is fi rmly in place, remove the proximal screws if<br />
this has not already been done.<br />
Step Three<br />
While holding the T-handle with one hand, take the sliding slap<br />
hammer with the other hand and strike the welded stopper<br />
plate. It may be necessary to strike the stopper plate several<br />
times for complete removal. It is important to maintain continuous<br />
counter-clockwise torque on the T-handle until the nail is<br />
removed.<br />
Phone (912) 236-0000<br />
Fax (912) 236-7766<br />
Internet www.innomed.net<br />
eMail info@innomed.net<br />
Step 4<br />
After removal of the broken portion of the nail, it may be helpful<br />
to ream the femoral shaft. This will ensure the fragments and<br />
debris will not inhibit the removal of the distal broken portion<br />
of nail.<br />
Step Five<br />
Manipulate the screwdriver handle, extension rod and smaller<br />
extraction bit through the femoral shaft. Under fl uoroscopy,<br />
guide the extraction bit into the hollow broken nail. Turn the<br />
screwdriver handle counter-clockwise until the bit is seated<br />
fi rmly in place. Remove the distal screws.<br />
Step Six<br />
While maintaining continuous counter-clockwise torque on the<br />
screwdriver, pull back to remove the distal portion of the nail.<br />
If the nail does not come out easily, remove the screwdriver<br />
handle from the extension rod and attach the T-handled slap<br />
hammer. Repeat step three.<br />
<br />
<strong>Innomed</strong><br />
103 Estus Drive, Savannah, GA 31404<br />
© 2003 <strong>Innomed</strong>, <strong>Inc</strong>., All rights reserved.