Kinetic Dura-Lar™ Sculpture - Dick Blick - Dick Blick Art Materials
Kinetic Dura-Lar™ Sculpture - Dick Blick - Dick Blick Art Materials
Kinetic Dura-Lar™ Sculpture - Dick Blick - Dick Blick Art Materials

Create successful ePaper yourself
Turn your PDF publications into a flip-book with our unique Google optimized e-Paper software.
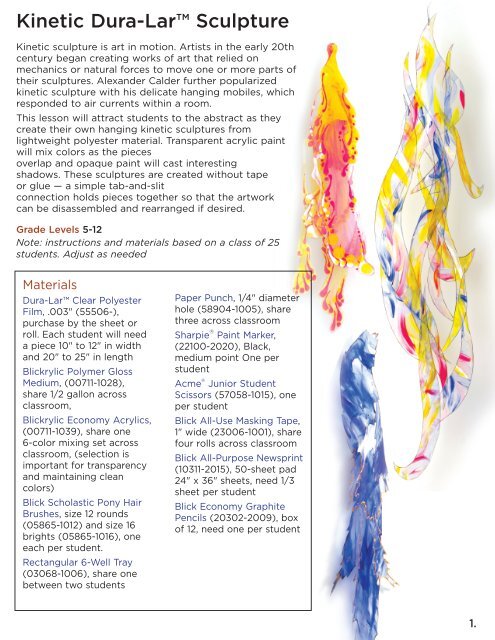
<strong>Kinetic</strong> <strong>Dura</strong>-Lar <strong>Sculpture</strong><br />
<strong>Kinetic</strong> sculpture is art in motion. <strong>Art</strong>ists in the early 20th<br />
century began creating works of art that relied on<br />
mechanics or natural forces to move one or more parts of<br />
their sculptures. Alexander Calder further popularized<br />
kinetic sculpture with his delicate hanging mobiles, which<br />
responded to air currents within a room.<br />
This lesson will attract students to the abstract as they<br />
create their own hanging kinetic sculptures from<br />
lightweight polyester material. Transparent acrylic paint<br />
will mix colors as the pieces<br />
overlap and opaque paint will cast interesting<br />
shadows. These sculptures are created without tape<br />
or glue — a simple tab-and-slit<br />
connection holds pieces together so that the artwork<br />
can be disassembled and rearranged if desired.<br />
Grade Levels 5-12<br />
Note: instructions and materials based on a class of 25<br />
students. Adjust as needed<br />
<strong>Materials</strong><br />
<strong>Dura</strong>-Lar Clear Polyester<br />
Film, .003" (55506-),<br />
purchase by the sheet or<br />
roll. Each student will need<br />
a piece 10" to 12" in width<br />
and 20" to 25" in length<br />
<strong>Blick</strong>rylic Polymer Gloss<br />
Medium, (00711-1028),<br />
share 1/2 gallon across<br />
classroom,<br />
<strong>Blick</strong>rylic Economy Acrylics,<br />
(00711-1039), share one<br />
6-color mixing set across<br />
classroom, (selection is<br />
important for transparency<br />
and maintaining clean<br />
colors)<br />
<strong>Blick</strong> Scholastic Pony Hair<br />
Brushes, size 12 rounds<br />
(05865-1012) and size 16<br />
brights (05865-1016), one<br />
each per student.<br />
Rectangular 6-Well Tray<br />
(03068-1006), share one<br />
between two students<br />
Paper Punch, 1/4" diameter<br />
hole (58904-1005), share<br />
three across classroom<br />
Sharpie ® Paint Marker,<br />
(22100-2020), Black,<br />
medium point One per<br />
student<br />
Acme ® Junior Student<br />
Scissors (57058-1015), one<br />
per student<br />
<strong>Blick</strong> All-Use Masking Tape,<br />
1" wide (23006-1001), share<br />
four rolls across classroom<br />
<strong>Blick</strong> All-Purpose Newsprint<br />
(10311-2015), 50-sheet pad<br />
24" x 36" sheets, need 1/3<br />
sheet per student<br />
<strong>Blick</strong> Economy Graphite<br />
Pencils (20302-2009), box<br />
of 12, need one per student<br />
1.
Process<br />
1. First, prepare preliminary sketches.<br />
Visualizing a finished sculpture is difficult,<br />
and the finished products usually are not<br />
very close to the sketch, but it is<br />
important that students have an idea to<br />
begin with. Viewing examples, such as the<br />
ones on page 1 will be helpful to students<br />
as they plan.<br />
The sculpture will consist of one large<br />
piece — the base, to which the other<br />
pieces will attach — and any number of<br />
vertically-oriented<br />
smaller pieces. Use<br />
newsprint and<br />
pencil to plan a<br />
BASE<br />
BASE<br />
pattern. To avoid<br />
waste, have<br />
students plan pieces<br />
that interlock and<br />
touch the edge of<br />
1 2 3 4 5 6 1<br />
the page. The<br />
example at right (A)<br />
is a basic layout<br />
with base and 6 pieces. Example (B)<br />
enhances the basic layout with free-form<br />
edges.<br />
Design Hints<br />
– Design the hanging pieces<br />
2 3 4 5<br />
6<br />
(A) (B)<br />
BASE<br />
BASE<br />
1 2 3 4 5 6<br />
1 2 3 4 5<br />
with a smaller end and it will<br />
be easier to attach.<br />
– Depending on the skill level<br />
(C)<br />
of your class, have them design pieces<br />
with a tab end, so that it is slightly larger.<br />
Example (C) illustrates some tab<br />
options. The tabs will hold the piece<br />
securely to the base when assembling<br />
sculpture and will offer more dimensional<br />
options.<br />
2. To prevent wrinkling and protect fingers<br />
and tabletops, have students tape their<br />
<strong>Dura</strong>-Lar on all sides to the tabletop with<br />
masking tape before painting. Mix on the<br />
surface with a large, soft brush. Students<br />
may blend colors or leave visible<br />
brushstrokes, but the painting should be<br />
abstract — remember, it will be cut apart.<br />
Allow to dry.<br />
Painting Hints<br />
– Mix 1 part color with 6 parts gloss<br />
medium to make colors (yellow, magenta<br />
and blue) transparent.<br />
– Use white and black sparingly — too<br />
much opaque paint will not be as<br />
effective.<br />
6<br />
Process, continued<br />
– A thin application is best — thick areas<br />
may crack later.<br />
After the sculpture is assembled, you may<br />
want to give students the option of<br />
adding more paint to the surface. It’s<br />
better to keep the coverage minimal at<br />
the start and then determine where to<br />
add.<br />
3. Place the <strong>Dura</strong>-Lar sheet over the<br />
newsprint sketch. Use a Sharpie Paint<br />
Marker to trace the sketch onto the<br />
painting. Paint markers dry quickly, so<br />
there’s less smearing, but other<br />
permanent markers will also work<br />
(waterbased markers will not adhere). Cut<br />
the pieces apart, leaving the marker line<br />
as part of the piece. The black edge will<br />
help define the shape of the pieces.<br />
4. Use the punch to determine a hanging<br />
hole in the base. Have students hold the<br />
base up in front of them to decide where<br />
they would like to hang the first piece off<br />
the base. Lay the base back down on the<br />
table with the piece positioned on top of<br />
it. Using the marker, place a small dot on<br />
either side of the hanging piece, then cut<br />
a slit between the dots. Insert the hanging<br />
piece through the slit.<br />
Assembly Hints<br />
– Some pieces may require slits in more<br />
than one location to hold securely.<br />
– Slits may be placed at any angle and on<br />
other pieces, not just the base.<br />
– If inserting a “tab” piece (see design<br />
hints, first step), tabs can be folded to fit<br />
through narrow slits.<br />
– Attach pieces to both the front and the<br />
back of the base .<br />
5. Use a wire or clear nylon line through the<br />
punched hole to hang. Hang from ceiling<br />
or light fixtures where light and air<br />
currents are available. Do not place next<br />
to a bare bulb or heating vent, or hang in<br />
a location with motion-detecting security<br />
alarms.<br />
Copyright © 2006 <strong>Dick</strong> <strong>Blick</strong> <strong>Art</strong> <strong>Materials</strong>. All rights reserved.. JD<br />
2.
National Standards<br />
Content Standard #1 — Understanding and applying<br />
media, techniques and processes<br />
5-8<br />
Students intentionally take advantage of the qualities<br />
and characteristics of art media, techniques and<br />
processes to enhance communication of their experience<br />
and ideas<br />
9-12<br />
Students conceive and create works of visual art that<br />
demonstrate an understanding of how the<br />
communication of their ideas relates to the media,<br />
techniques and processes they use<br />
Content Standard #2 — Using knowledge of structures<br />
and functions<br />
5-8<br />
Students generalize about the effects of visual<br />
structures and functions and reflect upon these effects<br />
in their own work.<br />
9-12<br />
Students create artworks that use organizational<br />
principles and functions to solve specific visual arts<br />
problems.<br />
3.