Adding Gold Metallic Trim and Glitter - Photoshop Elements User
Adding Gold Metallic Trim and Glitter - Photoshop Elements User
Adding Gold Metallic Trim and Glitter - Photoshop Elements User

Create successful ePaper yourself
Turn your PDF publications into a flip-book with our unique Google optimized e-Paper software.
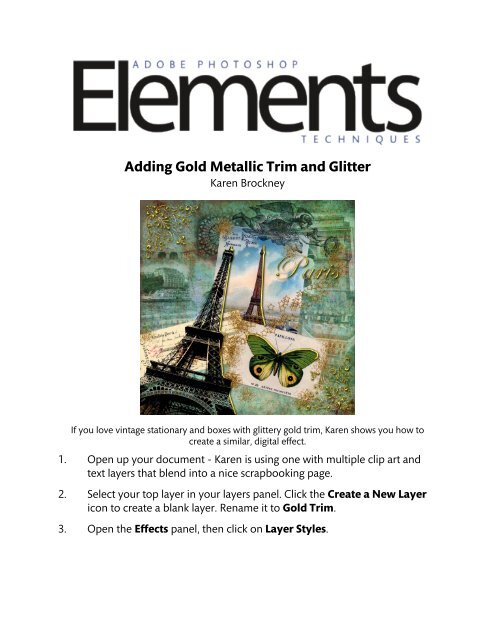
<strong>Adding</strong> <strong>Gold</strong> <strong>Metallic</strong> <strong>Trim</strong> <strong>and</strong> <strong>Glitter</strong><br />
Karen Brockney<br />
If you love vintage stationary <strong>and</strong> boxes with glittery gold trim, Karen shows you how to<br />
create a similar, digital effect.<br />
1. Open up your document - Karen is using one with multiple clip art <strong>and</strong><br />
text layers that blend into a nice scrapbooking page.<br />
2. Select your top layer in your layers panel. Click the Create a New Layer<br />
icon to create a blank layer. Rename it to <strong>Gold</strong> <strong>Trim</strong>.<br />
3. Open the Effects panel, then click on Layer Styles.
4. From the drop down menu, select Wow Neon. Then double-click Wow-<br />
Neon Yellow Off. Nothing will happen inside your image yet, but don’t<br />
worry.<br />
5. From the drop down menu, select Wow Chrome. Double-click Wow-<br />
Chrome Shiny Edge. Again, nothing will happen inside your image.<br />
6. Select the Brush tool. In the tool options bar, select a hard round brush<br />
<strong>and</strong> set the brush side to about 25 px.<br />
7. With the <strong>Gold</strong> <strong>Trim</strong> layer selected, paint carefully along the edges of the<br />
clip art you want to embellish. For straight edges, release the mouse<br />
button, then press Shift <strong>and</strong> click where you want the straight line to end.<br />
8. To embellish an intricate design, right-click or control-click on the <strong>Gold</strong><br />
<strong>Trim</strong> layer <strong>and</strong> select Copy Layer Style from the drop down menu.<br />
9. In the layers panel, select all the layers you want to apply the gold trim to,<br />
right-click or control-click on one of them <strong>and</strong> select Paste Layer Style<br />
from the drop down menu.<br />
10. Select the <strong>Gold</strong> <strong>Trim</strong> layer <strong>and</strong> click the Create a New Layer icon to add<br />
a new layer above it. Rename it <strong>Glitter</strong>.<br />
11. Select the Pattern Stamp tool. In the tool options bar, select a Spatter<br />
brush, change the size to about 300 px <strong>and</strong> set the Opacity to 100%. In<br />
the Pattern Picker, select the Texture Fill 2 set, then select the Towel<br />
pattern.<br />
12. Click around the place spatter of paint on the image. Using the left <strong>and</strong><br />
right bracket keys to resize the spatter.<br />
13. In the tool options bar, select the Flowing Stars brush. Paint a trail of<br />
stars on the image as well.<br />
14. In the layers panel, add a Solid Color adjustment layer. Select a dark gold<br />
color <strong>and</strong> press Ok.<br />
15. Change the blend mode to Soft Light. Press Control+G or Comm<strong>and</strong>+G<br />
to create a clipping mask with the layer below.<br />
16. Right-click or control-click the Solid Color layer <strong>and</strong> select Duplicate<br />
Layer from the drop down menu. Press Ok.
17. Double-click the layer thumbnail <strong>and</strong> choose a lighter gold color, then<br />
press Ok. Change the blend mode to Color Burn.<br />
18. Tip: If you’re using a different document resolution or brush size, you may<br />
have to edit the layer style to get the metallic effect. In the Layers panel,<br />
double-click the fx icon. You can increate or decrease the Bevel <strong>and</strong> the<br />
Stroke size as needed.