Revolution SR7 - Sailworks
Revolution SR7 - Sailworks
Revolution SR7 - Sailworks

You also want an ePaper? Increase the reach of your titles
YUMPU automatically turns print PDFs into web optimized ePapers that Google loves.
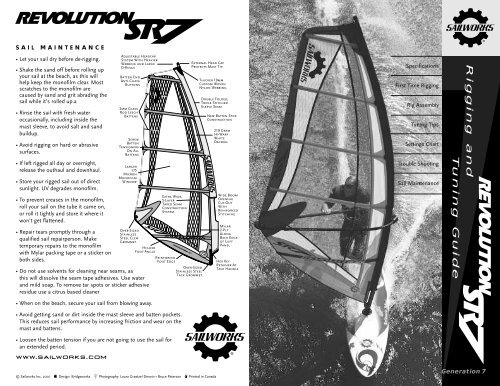
SAIL MAINTENANCE<br />
• Let your sail dry before de-rigging.<br />
• Shake the sand off before rolling up<br />
your sail at the beach, as this will<br />
help keep the monofilm clear. Most<br />
scratches to the monofilm are<br />
caused by sand and grit abrading the<br />
sail while it’s rolled up.a<br />
• Rinse the sail with fresh water<br />
occasionally, including inside the<br />
mast sleeve, to avoid salt and sand<br />
buildup.<br />
• Avoid rigging on hard or abrasive<br />
surfaces.<br />
• If left rigged all day or overnight,<br />
release the outhaul and downhaul.<br />
• Store your rigged sail out of direct<br />
sunlight. UV degrades monofilm.<br />
• To prevent creases in the monofilm,<br />
roll your sail on the tube it came on,<br />
or roll it tightly and store it where it<br />
won’t get flattened.<br />
• Repair tears promptly through a<br />
qualified sail repairperson. Make<br />
temporary repairs to the monofilm<br />
with Mylar packing tape or a sticker on<br />
both sides.<br />
• Do not use solvents for cleaning near seams, as<br />
this will dissolve the seam tape adhesives. Use water<br />
and mild soap. To remove tar spots or sticker adhesive<br />
residue use a citrus based cleaner<br />
• When on the beach, secure your sail from blowing away.<br />
• Avoid getting sand or dirt inside the mast sleeve and batten pockets.<br />
This reduces sail performance by increasing friction and wear on the<br />
mast and battens.<br />
• Loosen the batten tension if you are not going to use the sail for<br />
an extended period.<br />
www.sailworks.com<br />
Adjustable Headcap<br />
System With Heavier<br />
Webbing and Large<br />
D-Rings<br />
Batten End<br />
Anti-Chafe<br />
Buttons<br />
2mm Glass<br />
Rod Leech<br />
Battens<br />
Screw<br />
Batten<br />
Tensioners<br />
On All<br />
Battens<br />
Larger<br />
175<br />
Micron<br />
Monofilm<br />
Window<br />
Over-Sized<br />
Stainless<br />
Steel Clew<br />
Grommet<br />
Higher<br />
Foot Angle<br />
Extra Wide,<br />
5-Layer<br />
Taped Seam<br />
Construction<br />
System<br />
Reinforced<br />
Foot Edge<br />
Over-Sized<br />
Stainless Steel<br />
Tack Grommet<br />
External Head Cap<br />
Protects Mast Tip<br />
Thicker 19mm<br />
Custom Woven<br />
Nylon Webbing<br />
Double Folded,<br />
Triple Stitched<br />
Sleeve Seam<br />
© <strong>Sailworks</strong> Inc. 2001 y Design: Bridgeworks ® Photography: Laura Graetzel Derwin • Bruce Peterson Ú Printed in Canada<br />
New Batten Stop<br />
Construction<br />
210 Gram<br />
Hi-Warp<br />
White<br />
Dacron<br />
Wide Boom<br />
Opening<br />
Cut-Out<br />
With<br />
Reinforced<br />
Stitching<br />
Mylar<br />
2-Ply<br />
Along<br />
Back Edge<br />
of Luff<br />
Panel<br />
Hex Key<br />
Retainer At<br />
Tack Handle<br />
Specifications<br />
First Time Rigging<br />
Rig Assembly<br />
Tuning Tips<br />
Settings Chart<br />
Trouble Shooting<br />
Sail Maintenance<br />
Tuning Guide<br />
Rigging and<br />
Generation 7
Rigging & Tuning Guide<br />
REVOLUTION <strong>SR7</strong>: seventh generation, built<br />
to our core design concept - progressive<br />
evolution. The REVOLUTION <strong>SR7</strong> is highly<br />
adjustable, so you can easily tune the rig<br />
balance to suit your sailing style and the<br />
conditions you sail in. Rock solid handling<br />
and an exceptionally balanced center of power.<br />
Follow this rigging guide to maximize your<br />
windsurfing experience!<br />
The 2001 REVOLUTION <strong>SR7</strong> brings subtle<br />
geometric refinements over last year’s model:<br />
• realigned batten framework with more rake<br />
angle<br />
• lower aspect planshape<br />
• slightly increased head roach<br />
• tighter leech with mini battens to stabilize<br />
leech flutter<br />
R E V O S R 7 D I M E N S I O N S REQUIRED MAST SAILWORKS MAST<br />
SIZE LUFF BOOM BOOM WEIGHT # MAST IDEAL MCS IMCS EPX FR<br />
m 2 MEDIAN (cm/ft) MEDIAN (cm/ft) MAX (cm/ft) (kg/lbs) BTNS SLEEVE MAST CURVE % STIFFNESS 370 400 430 460 400 430 460<br />
2.9 346 / 11' 4" 130 / 4' 4" 135 / 4' 5" 2.50 / 5.5 4 OPEN EPX 370 12 15 - 19<br />
3.2 352 / 11' 7" 133 / 4' 5" 138 / 4' 6" 2.60 / 5.7 5 OPEN EPX 370 12 15 - 19<br />
3.5 365 / 12' 0" 137 / 4' 6" 142 / 4' 8" 2.85 / 6.3 5 OPEN EPX 370 12 15 - 19<br />
3.8 379 / 12' 5" 140 / 4' 7" 145 / 4' 9" 3.00 / 6.6 5 OPEN EPX 370 12 15 - 19<br />
4.0 384 / 12' 7" 144 / 4' 9" 149 / 4' 11" 3.05 / 6.7 5 OPEN EPX 400 12 15 - 21<br />
4.2 391 / 12' 10" 150 / 4' 11" 155 / 5' 1" 3.20 / 7.0 5 OPEN EPX 400 12 17 - 21<br />
4.4 398 / 13' 1" 154 / 5' 1" 159 / 5' 3" 3.25 / 7.2 5 OPEN EPX 400 12 17 - 21<br />
4.6 406 / 13' 4" 160 / 5' 3" 165 / 5' 5" 3.40 / 7.5 5 OPEN EPX 400 12 17 - 21<br />
4.8 413 / 13' 7" 164 / 5' 5" 169 / 5' 7" 3.45 / 7.6 5 OPEN EPX 430 12 17 - 21<br />
5.0 419 / 13' 9" 167 / 5' 6" 172 / 5' 8" 3.55 / 7.8 5 OPEN EPX 430 12 21 - 26<br />
5.2 427 / 14' 0" 170 / 5' 7" 175 / 5' 9" 3.65 / 8.0 5 OPEN EPX 430 12 21 - 26<br />
5.4 436 / 14' 4" 174 / 5' 8" 179 / 5' 11" 3.75 / 8.3 5 OPEN EPX 430 12 21 - 26<br />
5.8 452 / 14 10" 180 / 5' 11" 185 / 6' 1" 3.90 / 8.6 5 OPEN EPX 430 12 21 - 26<br />
6.3 469 / 15' 5" 185 / 6' 1" 190 / 6' 3" 4.05 / 8.9 5 FIXED EPX 460 12 24 - 26<br />
Ideal Mast Alternate Mast<br />
Note that the luff and boom lengths listed are intended as a guide to rig assembly and sail trim.<br />
Depending on the rig components you choose, these dimensions may not always correspond exactly to the settings that are best for you. We measure<br />
median boom length from the front of the mast at the middle of the boom opening, to the back of the clew. Maximum boom length is achieved at high<br />
levels of downhaul and outhaul with the boom placed at the top of the boom opening. We measure luff length from the top of the mast cap, around the<br />
front of the mast curve to a point opposite the pulleys of the tack grommet (using the minimum amount of headcap or mast base extension).<br />
F I R S T T I M E R I G G I N G<br />
USE THE RIGHT MAST<br />
One of the most important parts of your rig is the mast, specifically its curve<br />
and stiffness and how closely these parameters match the sail. The mast acts<br />
quite literally as the backbone of the rig and it governs the sail’s performance.<br />
The mast requirements for the REVOLUTION <strong>SR7</strong> are printed on the sailbag<br />
and at the tack of your sail. Listed on pg. 1 is a broader range of mast<br />
specifications (length and IMCS stiffness) necessary for compatibility with the<br />
shaping and tension profile of your sail. Your mast should be within this<br />
required range, regardless of the brand or model to achieve optimum<br />
performance. Note that NOT all sail sizes will work on the same mast. As a<br />
rule, larger sails need longer and stiffer masts while smaller sails require<br />
shorter and softer masts. Two common mast compatibility problems are:<br />
i) Using too long, or too stiff a mast. This restricts wind<br />
range by over-tensioning the sail.<br />
ii) Using too short or too soft a mast. This also restricts<br />
wind range, by insufficiently stabilizing the sail.<br />
NOTE: Each REVOLUTION <strong>SR7</strong> size is designed and balanced on a specific<br />
<strong>Sailworks</strong> mast to suit conditions typical for the “average” size sailor<br />
(140 - 190 lb./ 63 - 86 kg). If you are lighter than this average, or prefer a softer<br />
handling feel, consider using the next mast softer or shorter listed in the table.<br />
Heavier sailors can use a slightly stiffer mast to increase rig tension and stability.<br />
The luff and boom lengths listed are intended as a guide to rig assembly and<br />
sail trim. Depending on the rig components you choose, these dimensions may<br />
not always correspond exactly to the settings that are best for you. We measure<br />
median boom length from the front of the mast at the middle of the boom<br />
opening, to the back of the clew. Maximum boom length is achieved at high levels<br />
of downhaul and outhaul with the boom placed at the top of the boom opening.<br />
We measure luff length from the top of the mast cap, around the front of the<br />
mast curve to a point opposite the pulleys of the tack grommet (using the<br />
minimum amount of headcap or mast base extension).<br />
USE A MAST DESIGNED FOR SURF SAILING IF YOU<br />
WILL BE SAILING IN OR NEAR BREAKING WAVES!<br />
SET THE HEADCAP LENGTH<br />
The REVOLUTION <strong>SR7</strong> is fitted with an adjustable headcap system (except the<br />
6.3 size, which is fixed). This allows for masts longer than the sail’s luff length.<br />
Check the luff length of your sail (printed at the tack and on the sailbag), and<br />
compare it to your mast length. If your mast is shorter than the luff length,<br />
adjust the headcap extension strap so the headcap is as close to the top of the<br />
mast sleeve as you can set it. If your mast is longer than the luff length,<br />
estimate the amount of mast that will extend out the top of the sleeve (mast<br />
length minus luff length). Adjust the strap so that the top of the headcap is<br />
1-2 cm shorter than this distance away from the top of the mast sleeve to allow<br />
for the headcap strap to cinch tight.
R I G A S S E M B L Y<br />
1. INSERT THE MAST<br />
Pull the sail down the mast in sections using the tack handle and working the mast tip to the top of the<br />
sleeve before pulling the tack all the way down to the base of the mast. Try to keep the battens all rotated<br />
to the under-side of the mast. Check that the headcap is seated completely onto or into the mast and<br />
that the two-piece coupling of the mast is joined completely before applying downhaul tension.<br />
2. INSERT THE MAST BASE<br />
Estimate the amount of mast base extension needed by subtracting your mast length from the luff<br />
length of the sail. Your downhaul pulley system should have 6:1 purchase and enough line to make<br />
lacing easy. Lace the downhaul line through the tack grommet. Keep the line looping in the same<br />
direction each time you feed it through the grommet and through your base pulley. We recommend<br />
coming up through the grommet and lacing counter-clockwise through your base pulley. Try not to<br />
cross the lines, as this increases friction and will make the downhaul harder to pull. Do not fully<br />
downhaul the sail yet – leave the downhaul just “hand-tight”.<br />
3. ATTACH THE BOOM<br />
Adjust your boom to the length specified for the sail. Attach the boom to the mast at the middle of<br />
the boom opening and re-adjust it after the sail is fully rigged. Be careful not to attach it too high in<br />
the boom opening - you must account for the sail to be downhauled further. Also be careful not to<br />
pinch the mast sleeve under the boom clamp. Lace the outhaul through the clew grommet, and pull<br />
the outhaul completely so the sail is flat, using the recommended boom length.<br />
4. TUNE THE DOWNHAUL<br />
The downhaul controls the sail’s shape and performance. Discover its effect by pulling and slowly<br />
releasing the line. Use an easy-rig or downhauling tool so the line is easier to pull hard. Watch the<br />
change in depth and tension of the leading edge (front 1/3 of the sail), and the flattening and<br />
loosening of the head area (upper leech) as more downhaul is pulled. Notice the rotation of the<br />
batten tips around the mast. Also notice the change in the angles, or twist, of the battens; the top<br />
batten should open to leeward the furthest – called “progressive twist”. Twist is cut into the sail, but<br />
is ultimately controlled by the<br />
downhaul tension. More downhaul<br />
induces more twist; less downhaul<br />
allows less twist. Twist improves sail<br />
efficiency by lowering the center of<br />
effort and making the sail easier to<br />
control. The optimum downhaul<br />
setting gives a tight luff and a lean (not<br />
full) entry, and the leech area between<br />
the top two battens should become<br />
loose (see REVOLUTION <strong>SR7</strong><br />
SETTINGS chart on the next page).<br />
Once you’re familiar with the correct<br />
downhaul setting, re-check the headcap<br />
length vs. mast base height. If<br />
necessary, re-adjust these so that the<br />
tack grommet sits very close to the<br />
mast base cleat, and the amount of<br />
mast extending out the top of the mast<br />
sleeve is minimized by lowering the<br />
mast base.<br />
5. TENSION THE SBT’S<br />
(Streamlined Batten Tensioners)<br />
The battens are tensioned using the hex-key tool found under the<br />
strap above the tack handle. Insert the hex-key into the cap screw<br />
inside the SBT at the leech end of each batten. Turn the hex-key to<br />
the right (clockwise) to tighten. Tension the battens JUST until the<br />
wrinkles across the batten pockets disappear. Look for a<br />
continuous smooth shape to the sailcloth next to the batten pocket Needs more batten tension<br />
(see photos). You should see a smooth reflection, with no wrinkles<br />
in the sailcloth alongside the battens. CAUTION: DO NOT OVER-<br />
TENSION THE BATTENS - POOR ROTATION, EXCESSIVE FOIL<br />
DEPTH AND DAMAGE TO THE SAIL CAN RESULT. Replace the<br />
hex-key tool back in its pocket above the tack handle. The batten<br />
tension will need to be re-tightened after one or two uses as the<br />
sail sets into its final shape, but once the batten tension is set, it’s<br />
not necessary to release batten tension after each session.<br />
Correct batten tension<br />
6. BALANCE THE OUTHAUL SETTING<br />
Release any outhaul tension and allow the sail to relax naturally.<br />
Now pull the outhaul a minimum of 3.0 cm (1 1/4 inch) from this<br />
neutral position. Cleat off the outhaul line. Check the foil depth by<br />
pushing on the sail area under your harness lines or standing it up<br />
in the wind. Under pressure, the sail will increase in depth as the<br />
battens pull back from the mast. When luffing or without pressure,<br />
the sail will flatten. Less outhaul makes the sail fuller and more powerful for reaching, but it will also<br />
be harder to control when over-powered or sailing upwind. For upwind sailing or over-powered<br />
conditions, more outhaul tension will improve performance by making the sail flatter and tighter.<br />
Whenever you increase or release downhaul, realize that the outhaul tension is also changed and may<br />
need to be adjusted too.<br />
TUNING TIPS FOR CONDITIONS AND RANGE<br />
(please refer to REVOLUTION <strong>SR7</strong> Settings Chart on the next page)<br />
WIND RANGE<br />
• Downhaul controls the rig tension and the twist profile. More downhaul tightens the sail and<br />
induces more twist, which is good for overpowering conditions; less downhaul softens the sail<br />
and allows less twist, which is good in light wind and makes pumping more efficient.<br />
Recognize downhaul tension by noticing the rotation of the batten tips around the mast and<br />
the looseness of the leech between the top two battens.<br />
• Outhaul controls the depth of the foil. Use less outhaul in lighter winds to allow the sail to be<br />
fuller. In stronger winds more outhaul will flatten the sail, reducing power, for more control. For<br />
upwind sailing, or over-powered conditions, more outhaul tension will improve performance by<br />
making the sail tighter and more stable. This setting also suits the sailor who likes transition<br />
tricks and maneuvers by allowing the sail to luff and re-power faster.<br />
CONDITIONS<br />
• In side shore, side-off shore waves or bumpy conditions, where you need a lot of recovery<br />
balance, you won’t want the most powerful setting. Set the downhaul a little tighter and the sail<br />
will feel smoother, softer and more controllable.<br />
• For wave riding and big moves, where you will be sailing at some extreme reaches off the wind,<br />
you will want to reduce the chance of getting back-winded. Increase the amount of outhaul to<br />
flatten the sail. At this setting, the batten just above the boom clears the mast without touching it.<br />
• On flat water, ease up both the downhaul and outhaul to give the sail more power. At this<br />
setting, the batten just above the boom should touch the mast (lean entry), but should not<br />
extend forward of it.
You can expand the REVOLUTION <strong>SR7</strong>’s wind range significantly by adjusting the<br />
downhaul and outhaul. IMPORTANT: Downhaul and outhaul tensions are closely<br />
interrelated. Whenever you pull or ease the downhaul, you inversely affect the outhaul<br />
tension, so readjustment of the outhaul may be required.<br />
S E T T I N G S<br />
LEECH TWIST PROFILE CROSS SECTION PROFILE<br />
M I N I M U M Minimum Settings<br />
• Light wind/underpowered<br />
Full Entry<br />
• Flat water • Downwind sailing<br />
• More power, less control<br />
Batten tip<br />
O P T I M U M Optimum Settings<br />
• Steady/moderate wind<br />
Lean Entry<br />
• Choppy water • All-round sailing<br />
• Power and control<br />
M A X I M U M Maximum Settings<br />
• High wind/overpowered<br />
• Upwind sailing<br />
• More control, less power<br />
Batten tip<br />
Flat Entry<br />
Batten tip<br />
T R O U B L E S H O O T I N G<br />
Q. “How do I know how much downhaul to give the sail in light-wind wave sailing?”<br />
A. The ideal light wind setting should have a little tension in the leech with a little bit of<br />
looseness near the top of the sail, with only a little bit of outhaul. This will give the sail<br />
more foil and more power for lighter wind.<br />
Q. “How does the downhaul affect the outhaul; why do I need to adjust both?”<br />
A. When you downhaul a sail, you are essentially bending the mast into the curve of the sail’s<br />
mast sleeve. As you pull more downhaul, the clew moves away from the mast, increasing<br />
the boom length. As you ease off the downhaul, the clew moves toward the mast,<br />
decreasing boom length.<br />
Q. “How do I rig my sail for bump & jump conditions?”<br />
A. Set your sail up to get the maximum power and twist for control in gusts and chop. Pull<br />
the downhaul to the optimum setting noted in the chart above, and pull the outhaul just<br />
enough to give the sail tension without reducing foil depth.<br />
Q. “What do I do If I keep getting backwinded when wave sailing?”<br />
A. Flatten the sail more by pulling the outhaul and downhaul so the batten above the boom<br />
clears the mast. If the foil is too deep it will backwind as you change direction on a wave.<br />
A flatter sail will be more controllable in wave riding, but less powerful to get up on a plane.<br />
GETTING THE MOST FROM YOUR GEAR<br />
• If it doesn’t feel right, it probably isn’t. A well-tuned rig should be effortless to sail. Don’t<br />
be afraid to make changes and explore different settings.<br />
• When you have found settings (boom length, mast base length, boom height, mast step<br />
position, downhaul and outhaul position, harness line position) that feel balanced,<br />
record the position of each adjustment so that they are easy to repeat next session. Mark<br />
the settings with a waterproof marker right on your equipment.<br />
C H A R T 2 0 0 1<br />
DOWNHAUL SETTINGS OUTHAUL SETTINGS<br />
Minimum Downhaul<br />
• Leech is loose as indicated by white arc lines on photo<br />
• Deeper foil<br />
• Less twist<br />
• Full entry - batten tip above boom sits beside mast,<br />
but doesn’t extend past it<br />
Optimum Downhaul<br />
• Leech is loose as indicated by white arc lines on photo<br />
• Lean foil<br />
• Moderate twist<br />
• Lean entry - batten tip above boom sits at center<br />
of mast<br />
Maximum Downhaul<br />
• Leech is loose as indicated by white arc lines on photo<br />
• Flatter foil<br />
• More twist<br />
• Flat entry - batten tip above boom sits behind mast<br />
Minimum Outhaul<br />
• Boom length becomes shorter<br />
• Pull the outhaul about 1.5 cm from neutral<br />
• Deeper foil<br />
Optimum Outhaul<br />
• Boom at referenced length on tack<br />
• Pull the outhaul about 3 cm from neutral<br />
• Lean foil<br />
Maximum Outhaul<br />
• Boom length becomes longer<br />
• Pull the outhaul about 5 cm from neutral<br />
• Flatter foil<br />
Q: “Why do I keep getting pitched forward? The sail seems to pitch me to the front of my<br />
board.”<br />
A: - Move the mast step forward to give more leverage over the rig.<br />
- Pull the downhaul more, or pull a bit on the outhaul to stabilize the sail shape better.<br />
- Check your harness line balance point: When you are hooked in and planing, try lifting<br />
your hands off the boom. If the sail moves to the front or the back of the board, move<br />
your lines the other direction. Or try increasing your downhaul tension (moving the draft<br />
back) and do not touch the outhaul (it automatically gets looser by pulling the downhaul.<br />
Increasing only the outhaul would move your draft forward). Note that your harness lines<br />
will not balance in the same position on the boom for every size sail – larger sails set up<br />
further back, smaller sails set up further forward.<br />
Q. “Why does my back arm get tired? I’m having a hard time sheeting in.”<br />
A. - You may need to move your harness lines back. - Pull some more outhaul to move the<br />
draft forward.<br />
- Check your settings. An extreme downhaul setting and very little outhaul moves the draft<br />
back, causing you to use your back arm more to compensate.<br />
- You’re over powered. Try a smaller sail.