You also want an ePaper? Increase the reach of your titles
YUMPU automatically turns print PDFs into web optimized ePapers that Google loves.
<strong>RIGGING</strong> <strong>AND</strong> <strong>TUNING</strong> <strong>GUIDE</strong>
www.neilpryDe.com
CONTeNTS<br />
eNGLISH DeUTSCH frANCAiS<br />
Step by Step Rigging 04<br />
Setup and Tuning 08<br />
De-Rigging 14<br />
eSPANOL<br />
Armado paso a paso 43<br />
Regulado y puesta a punto 47<br />
Desarmado 53<br />
Schritt für Schritt Aufriggen 17<br />
Aufbau und Tuning 21<br />
Abriggen 27<br />
56<br />
60<br />
66<br />
Gréer Etape par Etape 30<br />
Montage et Réglage 34<br />
Dégréer 40
English Deutsch Français Español<br />
STEP BY STEP <strong>RIGGING</strong><br />
1. Feeding the mast<br />
a. Fit both parts of your mast together and<br />
run your fingers over the join to check<br />
that it is smooth.<br />
b. Slide the mast into the luff<br />
pocket without threading<br />
it onto the cams and with<br />
the mast above both the<br />
sail body and battens.<br />
04<br />
c. Feed the mast in until it runs into the<br />
leading edge of the luff sleeve. Don’t<br />
force it all the way up the sleeve while<br />
holding the bottom of the sail. Instead<br />
walk up the sail and hold the mast with<br />
one hand (through the boom opening).<br />
Reach out with your other hand and grab<br />
the top of the sail as far up the luff as<br />
possible. Hold the luff sleeve and gently<br />
pull it down over the mast until it is<br />
stopped by the head cap.
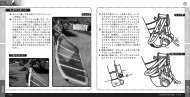
d. Next, walk to the top and check if the<br />
head cap is properly inserted into the<br />
mast (see picture).<br />
e. And then go to the bottom of the sail<br />
and pull out the slack using the handle<br />
on the tack fairing.<br />
f. Run your fingers over the luff<br />
sleeve at the join in the mast<br />
to check it is still fitted<br />
together properly.<br />
(The RS:Racing has a mark on<br />
the sail where the join should be.)<br />
e.<br />
2. Attach extension and apply<br />
downhaul<br />
d.<br />
a. Attach extension and thread the<br />
downhaul through the extension and<br />
the sail according to the instructions<br />
on page 8.<br />
b. Apply enough downhaul so that the<br />
mast is exposed through the boom<br />
opening (approx 12cm less than the<br />
maximum setting).<br />
05<br />
Español Français Deutsch English
English Deutsch Français Español<br />
3. Putting the cams onto the mast<br />
a. Put the boom on first. Set the boom to<br />
the recommended setting printed on<br />
the bottom of the sail. Next, clamp the<br />
boom on the mast and apply a little bit<br />
of outhaul tension. (approx 5cm from<br />
neutral)<br />
b. Open the zippers on the luff sleeve<br />
and release the downhaul about 10cm<br />
before applying the cams.<br />
06<br />
c. Starting with the top cam put one hand<br />
on the sail body just on the edge of the<br />
mast sleeve, while your other hand goes<br />
under the cam supporting the cam with<br />
whole palm of your hand. Push down<br />
gently with the hand on the edge of the<br />
sleeve while the hand under the cam<br />
pushes the cam forward a little and it will<br />
go on to the mast easily.<br />
(If it doesn’t go on easily then you may<br />
have too much outhaul.)<br />
d. Do this for all the cams except the<br />
bottom one.
e. For the bottom cam put one hand into<br />
the zipper and push down onto the sail<br />
body, with the other hand again push<br />
the cam forward and up onto the mast.<br />
f. After all the cams are on close the zips.<br />
4. Finish Rigging<br />
a. Apply downhaul and outhaul to your<br />
preferred setting.<br />
b. Loop the tack strap around the base<br />
and apply tension.<br />
Check your setup and tune your sails<br />
and then you are ready to race!<br />
07<br />
Español Français Deutsch English
English Deutsch Français Español<br />
SETUP <strong>AND</strong> <strong>TUNING</strong><br />
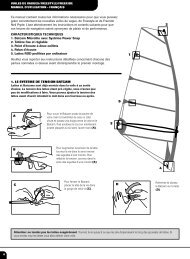
1. Downhaul<br />
a. Thread line as shown. Race and slalom sails should<br />
be rigged using the 6:1 technique.<br />
b. Downhaul sail until tack-fitting is aligned with the<br />
edge of the extension (as shown). This edge<br />
represents the end of the luff length of the sail.<br />
08<br />
For example, when the extension is set on 22 cm,<br />
and used on a 460 mast, the edge of the extension<br />
measures 482 cm to this point.<br />
c. In stronger winds, you can increase downhaul<br />
by approximately 1 cm.<br />
d. In lighter winds, you can release downhaul by<br />
approximately 1 cm.<br />
2<br />
5<br />
8<br />
4 7<br />
1<br />
MXT<br />
6 9<br />
3<br />
PULL<br />
LOOP<br />
5<br />
4<br />
1<br />
2<br />
Downhaul alignment<br />
3<br />
LOOP<br />
d<br />
XT and UXT<br />
6<br />
PULL
LOOP<br />
3<br />
2<br />
LOOP<br />
1<br />
PULL<br />
4<br />
Español Français Deutsch English
English Deutsch Français Español<br />
4. Boom Position<br />
a. Set the boom at chest level.<br />
b. According to sailing style and wind<br />
conditions, you can set the boom lower<br />
or higher within a range of approximately<br />
20cm up or down.<br />
10<br />
Lower = more control in strong winds<br />
or in wave sailing conditions.<br />
Higher = early planing and better<br />
upwind performance.<br />
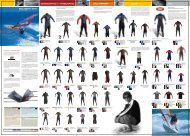
5. Batten Tension<br />
In an RS:Racing, the amount of pressure you apply<br />
to the batten tensioner will determine how much<br />
pressure is applied to both the batten <strong>AND</strong> luff pocket.<br />
Before adjusting batten tension for the first time, use<br />
your sail for at least an hour in powered-up conditions.<br />
Then, check for vertical wrinkles on the batten or luff<br />
pockets. If visible, gradually increase the amount of<br />
batten tension until the sail body next to the batten<br />
pockets is free of any creases. When the sail is new,<br />
it is normal for there to be some creases in the luff<br />
pocket while the sail settles into its designed shape.<br />
PRO TIP: For the top three battens in an RS:Racing (those<br />
without cambers), it is ok to use a little less batten tension<br />
because you do not want to put tension into the leech. A<br />
taught upper leech can prevent the sail from twisting off<br />
cleanly - hence causing drag, which will slow you down.
A<br />
B<br />
A<br />
Español Français Deutsch English
English Deutsch Français Español<br />
7. Correct Downhaul<br />
a. Looking from the bottom of the sail, the<br />
head area between the 2 nd and 3 rd<br />
battens from the top of the sail should<br />
be loose from 2/3 to 3/4 of the way in<br />
from the leech.<br />
b. Looking up the leech from the clew of<br />
the sail, while the 2 battens above the<br />
boom will be standing up slightly, the 3 rd<br />
will start to drop away in a smooth curve<br />
towards the 4 th batten. Above the 4 th<br />
batten, the leech will be loose.<br />
12
8. Under Downhauled Sails<br />
An under downhauled sail will have a very tight<br />
leech in the top section of the sail. While on the<br />
land it will look nice, on the water this will translate<br />
into a sail with a “heavy” feeling, very little range<br />
and very little control, particularly when the wind<br />
increases.<br />
9. Over Downhauled Sails<br />
An over downhauled sail will have a very open<br />
leech that can easily be identified by seeing<br />
wrinkles going towards the mast sleeve. The<br />
bottom of the sail will also be extremely flat. On<br />
the water you will feel little drive from the sail, the<br />
leech will flutter and the sail will feel a little twitchy.<br />
13<br />
Español Français Deutsch English
English Deutsch Français Español<br />
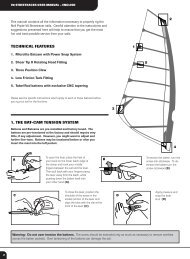
DE-<strong>RIGGING</strong><br />
1. Tack Strap<br />
14<br />
Be sure to remove the tack strap<br />
before de-rigging the sail. Leaving<br />
the tack strap on while releasing<br />
the downhaul tension will damage<br />
the sail.<br />
2. Release outhaul tension<br />
Take off the outhaul tension in order<br />
to remove the boom.<br />
3. Remove boom from the mast<br />
and sail<br />
4. Open the cam zippers
5. Release downhaul<br />
Before releasing downhaul check again to<br />
see if the tack strap is off the mast base.<br />
Put your foot on top of the extension; pull<br />
the downhaul line up and out of the cleat.<br />
Release downhaul tension gently so the<br />
cams come off the mast one by one to<br />
prevent possible damage to<br />
the sail or mast.<br />
Note: The cambers will pop off the mast<br />
quite loudly - this is normal. If the bottom<br />
cam does not pop off push it down<br />
gently to release it.<br />
6. Take the mast out of the sail<br />
Pull the mast out of the sail while using<br />
the de-rigging loop on the top of the<br />
sail. Make sure that you twist the mast<br />
for easy removal from the sleeve.<br />
15<br />
Español Français Deutsch English
English Deutsch Français Español<br />
7. Rolling up the sail<br />
a. When rolling the sail be sure to flatten out the<br />
mast sleeve to have the fold on the seam on the<br />
leading edge. Also while rolling up the sail<br />
make sure the luff sleeve stays flat.<br />
16<br />
b. After rolling up the sail apply the<br />
elastic around the toggle to make<br />
sure the sail stays rolled up tightly.<br />
Further support: If you require further assistance in<br />
rigging or de-rigging your sail, please visit the SUPPORT<br />
section on www.neilpryde.com. Our technical team<br />
is readily available to answer any questions that you may<br />
have with regards to any of your NeilPryde products.
WWW.NEILPRYDE.COM