Anleitung für Einbau und Wartung GRAF Trinkwasser
Anleitung für Einbau und Wartung GRAF Trinkwasser
Anleitung für Einbau und Wartung GRAF Trinkwasser

You also want an ePaper? Increase the reach of your titles
YUMPU automatically turns print PDFs into web optimized ePapers that Google loves.
info@graf-online.de<br />
www.graf-online.de<br />
4. Installation and assembly<br />
Remove the <strong>GRAF</strong> SILENTIO mains water back-up supply from its transport packing; in the same box are<br />
also the other parts and accessories. Firstly, check the whole equipment for any possible damage. Any<br />
damage must be reported before the assembly and installation begins.<br />
4.1 Wall assembly<br />
The <strong>GRAF</strong> SILENTIO mains water back-up supply must be installed above the back surge level and in a<br />
frost free and dry environment that is above any possible regional flood levels.<br />
When choosing a position for installation it is important to be sure that there is at least 50 cm free space<br />
available above the equipment for any maintenance or adjustment regulation. The wall intended for<br />
mounting must be suitable for supporting the equipment with an approxi-mate maximum weight of 45 kg<br />
when filled with water.<br />
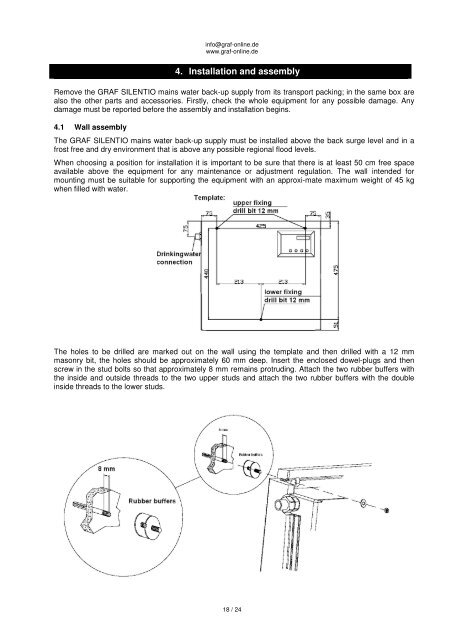
The holes to be drilled are marked out on the wall using the template and then drilled with a 12 mm<br />
masonry bit, the holes should be approximately 60 mm deep. Insert the enclosed dowel-plugs and then<br />
screw in the stud bolts so that approximately 8 mm remains protruding. Attach the two rubber buffers with<br />
the inside and outside threads to the two upper studs and attach the two rubber buffers with the double<br />
inside threads to the lower studs.<br />
18 / 24