Project | intermediate Acrylic & Oil Color Step by Step CALLA LILY ...
Project | intermediate Acrylic & Oil Color Step by Step CALLA LILY ...
Project | intermediate Acrylic & Oil Color Step by Step CALLA LILY ...

Create successful ePaper yourself
Turn your PDF publications into a flip-book with our unique Google optimized e-Paper software.
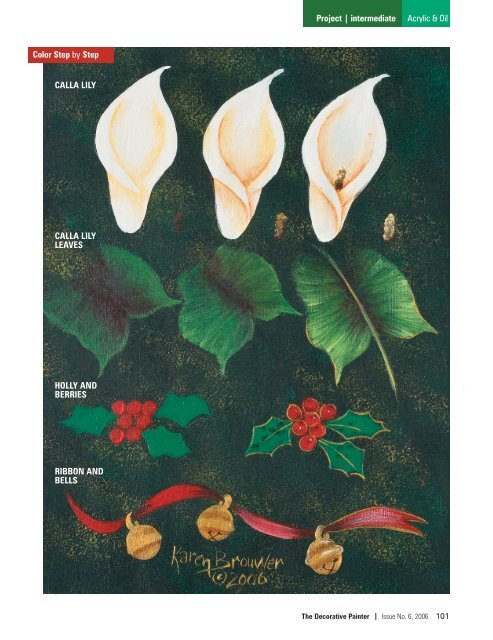
<strong>Color</strong> <strong>Step</strong> <strong>by</strong> <strong>Step</strong><br />
<strong>CALLA</strong> <strong>LILY</strong><br />
<strong>CALLA</strong> <strong>LILY</strong><br />
LEAVES<br />
HOLLY AND<br />
BERRIES<br />
RIBBON AND<br />
BELLS<br />
<strong>Project</strong> | <strong>intermediate</strong> <strong>Acrylic</strong> & <strong>Oil</strong><br />
The Decorative Painter Issue No. 6, 2006 101
out the putty into a slight slope.<br />
Moisten a cotton swab and wipe<br />
along the edge of the stem.<br />
OPTION 3: NOT USING<br />
MOTHER-OF-PEARL/PAUA<br />
If you do not have mother-ofpearl<br />
you may still paint this design.<br />
First, basecoat the areas that are in<br />
mother-of-pearl with three coats of<br />
Titanium White. Make sure the coats<br />
are thin, as you do not want any<br />
edges; it needs to be a smooth, even<br />
coat. Then recoat with Pearl White.<br />
Paint the paua in matching colors.<br />
Continue with the following instructions.<br />
LET’S PAINT<br />
<strong>CALLA</strong> LILIES<br />
Using the no. 6 filbert, pull out<br />
Raw Sienna oil to make a loading<br />
zone. Thinly load the paint on to the<br />
brush, and lightly paint in the shadows<br />
on the calla lilies. Soften with a<br />
mop so that there are not any hard<br />
edges. Mix Permanent Alizarin Crimson+touch<br />
of Burnt Umber oil and<br />
reinforce shadows with this mix.<br />
Again soften any hard edges with the<br />
mop. Using a 1 ⁄8-inch deerfoot loaded<br />
in Burnt Umber acrylic, stipple in the<br />
stamen, then lightly stipple over<br />
with Raw Sienna, Cadmium Yellow<br />
and a little Titanium White.<br />
<strong>CALLA</strong> <strong>LILY</strong> LEAVES<br />
Keep the background calla lily<br />
leaves transparent <strong>by</strong> using very thin<br />
paint. Mix Sap Green+Phthalo Blue+<br />
Raw Sienna+Cadmium Yellow Pale<br />
Hue (3:1:1:1), and add a touch of<br />
Titanium White to create a mid mix.<br />
Using a no. 4 filbert, lightly base the<br />
102 The Decorative Painter Issue No. 6, 2006<br />
leaves from the outside edge, pulling<br />
in to the center. Wipe the brush<br />
clean.<br />
Thinly load the no. 4 filbert in Permanent<br />
Alizarin Crimson+Burnt<br />
Umber; deepen along both sides of the<br />
vein and along the stem. Add a touch<br />
of Titanium White to the mid mix and<br />
lightly pull this color in from the outside<br />
edge to lighten one side of the<br />
stem. Loosely outline the leaves with<br />
Emperor’s Gold. Add a touch of the<br />
mid mix to the bottom of the calla<br />
lily and soften with a mini mop.<br />
RIBBON<br />
Load the no. 3 round in Berry Red<br />
and paint the ribbon using S-strokes.<br />
When dry, paint a second coat. Using<br />
a no. 4 filbert sideloaded in Berry<br />
Red+Burnt Umber (1:1), float the<br />
shadows on the ribbon. Add a little<br />
Pearl White to Berry Red, and load<br />
this mix on to the no. 3 round. Wipe<br />
lightly on a paper towel to remove<br />
excess paint and dry-brush on the<br />
highlights. Add a touch of Titanium<br />
White to this mix and dry-brush on<br />
extra highlights. Using a liner, outline<br />
the ribbon with Emperor’s Gold.<br />
PAUA BERRIES AND PAUA LEAVES<br />
Outline the leaves and berries<br />
with Emperor’s Gold, and add Pearl<br />
White highlight dots to the berries.<br />
BELLS<br />
Sideload the no. 4 filbert in a<br />
water-mixable oils mix of Burnt<br />
Umber+Permanent Alizarin Crimson<br />
(1:1) and shade the bells. Soften<br />
with a mini mop. Using Burnt Umber<br />
acrylic, paint the lines and holes on<br />
the bell. Add a touch of Pearl White<br />
highlights to the Burnt Umber lines,<br />
and add Pearl White highlights on<br />
the bell. Outline the bell with<br />
Emperor’s Gold.<br />
FINISHING<br />
You may use your favorite varnish<br />
to finish the piece, but I prefer Envirotex<br />
Craft Smart Liquid Gloss,<br />
which comes in two bottles—a hard-<br />
ener and a resin. Thoroughly mix<br />
exactly the same proportions of each<br />
bottle in a clean container with a<br />
Popsicle stick. Unless coating a large<br />
surface, don’t mix very much at a<br />
time, as the mixture needs to be used<br />
within approximately 30 minutes<br />
before it starts to set. It is difficult to<br />
achieve a smooth finish when this<br />
happens.<br />
With the item on a flat surface,<br />
carefully pour a small amount of varnish<br />
on the item. The mixture<br />
should level out, but you can help<br />
spread the varnish with an old bristle<br />
brush. If you use too much it will run<br />
over the edges and possibly stick the<br />
item to the surface. Don’t pour on<br />
too much at first; you can always add<br />
more if needed.<br />
To get rid of the small bubbles in<br />
the varnish, I use a small butane<br />
torch. A short sharp tap from this<br />
torch will eliminate any bubbles<br />
immediately leaving a clear smooth<br />
surface. Leave overnight to harden; it<br />
should take 24 hours for it to completely<br />
set. You can purchase a<br />
cleaner or use acetone for cleanup. y<br />
Artist’s Sketch<br />
Karen Brouwer<br />
teaches eight classes<br />
a week to more than<br />
70 students from her<br />
home studio in Australia.<br />
She loves to<br />
travel-teach and has<br />
been lucky enough to have taught all<br />
over Australia, New Zealand and the<br />
United States. She is known for her<br />
designs using mother-of-pearl and has<br />
taught at a number of SDP Conferences.<br />
She will teach two classes at<br />
the SDP Anaheim Conference. Along<br />
with her good friend Karin Parson, they<br />
founded True Blue Decorative Artists<br />
Inc., which became an SDP affiliated<br />
chapter in 2006.<br />
You may write to Karen at 30<br />
Wellington Rd., Tyabb 3913, Victoria,<br />
Australia or e-mail brouwer@<br />
netspace.com.au.
<strong>Project</strong> | <strong>intermediate</strong> <strong>Acrylic</strong> & <strong>Oil</strong><br />
Design shown at actual size.<br />
The Decorative Painter Issue No. 6, 2006 103
SURFACE<br />
The porcelain bell (item no. 88032)<br />
is available from Romamerica, 20<br />
Spurlin Drive, Somerville, AL 35670,<br />
(888) 982-2640, www.romamerica.com.<br />
PALETTE<br />
DELTA CREATIVE AIR-DRY PERMENAMELS<br />
Fuchsia<br />
Harvest Orange<br />
Hunter Green<br />
Light Burgundy<br />
Mediterranean Blue<br />
Paradise<br />
Tangerine<br />
Ultra White<br />
DELTA CREATIVE<br />
IRIDESCENT GLASS PAINT<br />
Ivory/Gold<br />
BRUSHES<br />
LOEW-CORNELL LA-CORNEILLE GOLDEN<br />
TAKLON<br />
Series 7040 no. 2 round stroke<br />
Series 7050 no. 0 script liner<br />
Series 7300 nos. 4 and 6 shaders<br />
Series 7350 3 ⁄4-inch Glaze brush<br />
SUPPLIES<br />
Delta Ceramcoat Paint & Toss<br />
Sponges<br />
Delta Surface Conditioner<br />
Palette paper<br />
Scissors<br />
Tracing paper<br />
Transfer paper<br />
Water container<br />
PREPARATION<br />
Take a moment to review all<br />
instructions on product packaging<br />
before beginning any project. Apply a<br />
liberal coat of surface conditioner to<br />
each bell using the glaze brush and<br />
allow to evaporate. This will make the<br />
glass appear milky. Trace and transfer<br />
the designs.<br />
LET’S PAINT<br />
HOLLY LEAVES<br />
Using the no. 6 shader and Hunter<br />
Green, float along the outside edge of<br />
the holly leaves and inside each scallop<br />
where a flower will be.<br />
BERRIES<br />
Lightly apply Fuchsia to all the<br />
berries using the no. 4 shader. Wipe<br />
out the tops to highlight.<br />
FORGET-ME-NOTS<br />
Stroke the forget-me-nots with Paradise<br />
using the no. 4 shader. Using the<br />
same brush, float in shadows with<br />
Mediterranean Blue. Float highlights<br />
with Ultra White+touch of Paradise<br />
using the same brush.<br />
TURQUOISE RIBBON<br />
Using the highlight mix from the<br />
flowers and the no. 4 shader, basecoat<br />
the light turquoise ribbon. Float shadows<br />
on the ribbon with Paradise.<br />
Ornaments <strong>Acrylic</strong><br />
Porcelain<br />
ORNAMENTS<br />
Pastel porcelain<br />
dainties really<br />
ring a bell.<br />
designed <strong>by</strong> Chris Thornton<br />
ROSES<br />
Basecoat the roses with Fuchsia<br />
using the no. 4 shader. Using the same<br />
brush, float shadows with Light Burgundy.<br />
Float highlights with Ultra<br />
White+touch of Fuchsia using the same<br />
brush.<br />
PINK RIBBON<br />
Using the highlight mix from the<br />
roses, basecoat the pink ribbon with<br />
the no. 4 shader. Float shadows on the<br />
ribbon with Fuchsia.<br />
DAISIES<br />
Stroke the daisies with Tangerine<br />
using the no. 2 round stroke. Using the<br />
no. 4 shader, float shadows with Harvest<br />
Orange. Float highlights with Ultra<br />
White+touch of Tangerine using the<br />
same brush.<br />
PEACH RIBBON<br />
Using the highlight mix from the<br />
daisies, basecoat the peach ribbon and<br />
loop of each bell using the no. 4<br />
shader. Float shadows on the ribbon<br />
with Tangerine.<br />
TINY LEAVES<br />
Using the no. 2 round stroke brush,<br />
add the tiny leaves with Hunter Green.<br />
Using the no. 0 liner, add stems with<br />
the same color.<br />
FINISHING<br />
Dab the center of each flower with<br />
Tangerine and Ultra White using the no.<br />
0 liner. Using a wedge sponge, apply<br />
an even coat of Ivory Gold Iridescent<br />
to each bell. Paint in an up-and-down,<br />
patting motion. y<br />
The Decorative Painter Issue No. 6, 2006 105
<strong>Color</strong> <strong>Step</strong> <strong>by</strong> <strong>Step</strong><br />
Roses<br />
Forget-me-nots<br />
Daisies<br />
Designs shown<br />
at actual size.<br />
Ornaments <strong>Acrylic</strong><br />
Artist’s Sketch<br />
Chris Thornton has<br />
always felt her artistic<br />
ability was greatly<br />
influenced <strong>by</strong> being<br />
raised in Alaska. “It<br />
was dark when we<br />
went to school and<br />
dark when we came home,” Chris<br />
says. “My mother always kept us<br />
occupied at the kitchen table with a<br />
variety of art projects—this she claims<br />
saved her sanity.”<br />
Since 1968 Chris has written 38<br />
how-to decorative painting books with<br />
a number of publishers. When SDP<br />
launched its Learn to Paint program in<br />
2000, she was honored when her<br />
design was chosen to be taught to<br />
50,000 people throughout the United<br />
States all in one day. Now the fun<br />
really begins, she says, being chosen<br />
to work with Disney.<br />
You may write to Chris at P.O. Box<br />
617, Douglass, KS 67039.
Easy<br />
Faux<br />
and<br />
Design<br />
Part 5<br />
Martha Kenton TDA<br />
This is my final article in the<br />
series on incorporating specialty<br />
treatments with decorative<br />
designs. I hope the articles<br />
provide you with inspiration to create<br />
interesting backgrounds for your<br />
artwork or home décor. Holiday decorating<br />
is very inspiring. Shiny ornaments<br />
and rich colors provide relief<br />
from the starkness of winter. Combining<br />
old with new is something I<br />
enjoy. I thought using a faux metal<br />
patina would provide a nostalgic setting<br />
for delicate roses.<br />
I must thank Murry Eckles for<br />
teaching me all the important aspects<br />
of stroke roses, having faith in my<br />
work and sharing encouraging words.<br />
I have painted thousands of roses<br />
using many techniques. My method<br />
has helped many of you create successful<br />
roses in much less time than it<br />
took me (many times on your first<br />
attempt!). Practice before you paint<br />
roses, and give yourself permission to<br />
make mistakes. My roses are never<br />
perfect, but they make me happy.<br />
SURFACE<br />
The 12 1 ⁄8-<strong>by</strong>-17 1 ⁄4-inch wooden oval<br />
tray with insert and antique brass handles<br />
(item no. TBB 20002) is available<br />
from Craine’s Cutouts & Crafts, P.O.<br />
Box 306, Haysville, KS 67060, (316)<br />
522-8689, www.crainescutouts.com.<br />
PALETTE<br />
DELTA CERAMCOAT ACRYLICS<br />
Alpine Green (TCS BG-9-6-8)<br />
Apple Green (TCS YG-6-2-3)<br />
Autumn Brown (TCS BR-2-2-6)<br />
Black Cherry (TCS RE-6-4-8)<br />
Black Green (TCS GR-5-3-9)<br />
Chocolate Cherry (TCS RE-7-2-9)<br />
Flesh Tan (TCS BR-2-2-2)<br />
Ivory (TCS WH-8-2-6)<br />
Seminole Green (TCS YG-4-3-6)<br />
White (TCS WH-5-1-1)<br />
BRUSHES<br />
SILVER BRUSH LTD.<br />
Series 1511S Silverwhite 1-inch<br />
stroke brush<br />
Series 2407S Ultra Mini<br />
no. 20/0 script liner<br />
<strong>Project</strong> | beginner Faux<br />
Series 2502S Ru<strong>by</strong> Satin<br />
nos. 6 and 10 flat shaders<br />
SUPPLIES<br />
4 round antique brass cabinet<br />
knobs for tray feet (optional)<br />
Cheesecloth<br />
Delta Ceramcoat: All-Purpose<br />
Sealer, Exterior/Interior<br />
Varnish (satin or gloss), Faux<br />
Finish Clear Glaze Base<br />
E6000 Multi-purpose adhesive to<br />
attach feet to tray<br />
Fine-grit sandpaper<br />
Foam plates or water media<br />
palette<br />
Krylon 18kt Gold Plate<br />
spray paint<br />
Natural sea sponge<br />
Paper towels<br />
Screwdrivers to attach hardware<br />
Stylus<br />
Tracing paper<br />
Water containers<br />
White transfer paper<br />
The Decorative Painter Issue No. 6, 2006 107
<strong>Color</strong> <strong>Step</strong> <strong>by</strong> <strong>Step</strong><br />
PREPARATION<br />
Sand all parts of the tray. Apply<br />
sealer. Dry. Lightly sand again.<br />
Remove sanding residue. Paint all<br />
portions of the tray with two or three<br />
coats of 18kt Gold Plate spray according<br />
to the manufacturer’s instructions.<br />
This paint provides a wonderful<br />
metallic shine from beneath the faux<br />
treatment. Metallic acrylic paint<br />
could be substituted but may not provide<br />
the same luster. Set aside to dry.<br />
Trace the rose design onto tracing<br />
paper for future use.<br />
FAUX TREATMENT<br />
Cut a piece of cheesecloth large<br />
enough to form a comfortable size<br />
ball in your hand. Pull the cut edges<br />
to the middle and create a ball<br />
shape. This is done to keep fibers<br />
from shedding. Set aside.<br />
Mix Black Cherry+glaze (1:1) and<br />
mix Black Green+glaze (1:1).<br />
Dampen the sea sponge with water.<br />
Dab the sponge in the Black Cherry<br />
mix and stipple randomly over the<br />
insert surface. Repeat using the Black<br />
Green mix. Leave some areas of<br />
metallic gold unpainted. Dab the<br />
cheesecloth ball over the wet paint<br />
to soften the colors. Mingle colors<br />
together in some places for color<br />
variation. More red or green may be<br />
added, if desired. Repeat the finish<br />
technique for the frame. For variation,<br />
try mixing Black Cherry and<br />
108 The Decorative Painter Issue No. 6, 2006<br />
Black Green together on the sponge<br />
as you work. Dry.<br />
ROSE LEAVES<br />
Trace the design onto the insert<br />
using white transfer paper and a stylus.<br />
Create all shading and highlighting<br />
with a sideloading technique. Use<br />
the no. 6 brush for small leaves and<br />
tight design areas, and the no. 10<br />
brush for large leaves and areas such<br />
as vein shadows and highlights on<br />
large leaves. Mix colors on the brush<br />
as you work for color variations.<br />
■ <strong>Step</strong> 1: Basecoat the leaves with<br />
Seminole Green. Shade Black Green<br />
down the vein area, under the rose<br />
petals or other leaves and under the<br />
leaf curls.<br />
■ <strong>Step</strong> 2: Highlight the leaves with<br />
Apple Green+a little Seminole Green.<br />
Apply highlights opposite the vein<br />
shadows, on edges of the leaf curls and<br />
on the outside leaf edges.<br />
■ <strong>Step</strong> 3: Add brighter highlights <strong>by</strong><br />
adding a little Flesh Tan to the Apple<br />
Green mix. Apply veins with the no.<br />
20/0 script liner using Apple<br />
Green+Seminole Green. Brighten veins<br />
in some areas with Apple Green<br />
mix+Flesh Tan. Add accents using<br />
Autumn Brown+Black Cherry for the<br />
warm areas and Flesh Tan+Alpine<br />
Green for the cool areas.<br />
HOLLY LEAVES<br />
■ <strong>Step</strong> 1: Paint the holly leaves<br />
using the same method as the rose<br />
FAUX FINISH<br />
leaves. Basecoat the leaves with<br />
Alpine Green. Shade Black Green<br />
down the vein shadow, on leaf curls<br />
and under overlapping areas.<br />
■ <strong>Step</strong> 2: Highlight as before using<br />
Apple Green+Alpine Green. Add leaf<br />
veins using highlight colors and the<br />
script brush.<br />
■ <strong>Step</strong> 3: You may need to add<br />
brighter highlights to the leaves<br />
using Flesh Tan+Apple Green+Alpine<br />
Green. Add a little Ivory to the mix if<br />
you need lighter highlights. You may<br />
add accents as directed for the rose<br />
leaves using the same colors.<br />
HOLLY BERRIES<br />
■ <strong>Step</strong> 1: Add Flesh Tan dots on<br />
the berries. Dry. Shade using the no.<br />
6 brush loaded with Autumn Brown+<br />
Black Cherry. Dry.<br />
■ <strong>Step</strong> 2: Float an Ivory highlight<br />
opposite the shade.<br />
■ <strong>Step</strong> 3: When dry, add tiny White<br />
dots to the lightest side using the<br />
back end of the brush handle large<br />
enough to fill the berry size. When<br />
dry, apply a small dark dot using your<br />
color of choice. Add the stems using<br />
the leaf vein mix and the script<br />
brush.<br />
STROKE ROSES<br />
A stroke rose needs to contain<br />
contrast between the lights and<br />
darks. Some colors need more contrast<br />
than others. For example, white<br />
or cream roses could have greens,
<strong>Color</strong> <strong>Step</strong> <strong>by</strong> <strong>Step</strong><br />
ROSE LEAVES<br />
HOLLY LEAVES<br />
AND BERRIES<br />
STROKE ROSES<br />
ROSE BACK VIEW<br />
<strong>Step</strong> 1<br />
<strong>Step</strong> 2<br />
<strong>Project</strong> | beginner Faux<br />
<strong>Step</strong> 3<br />
<strong>Step</strong> 1 <strong>Step</strong> 2 <strong>Step</strong> 3<br />
<strong>Step</strong> 1 <strong>Step</strong> 2 <strong>Step</strong> 3<br />
The Decorative Painter Issue No. 6, 2006 109
Painting Tips<br />
■ Reload the brush often.<br />
■ Always blend paint well whenever<br />
fresh color is applied to the brush.<br />
■ Keep colors concentrated on the<br />
brush. Watery paint makes it difficult<br />
to achieve solid coverage and strokes<br />
will be difficult to control.<br />
■ Turn the piece as you work for better<br />
stroke angles.<br />
■ Position the multiloaded brush so<br />
that darks are always in the middle of<br />
the flower and the lightest color is<br />
toward the outside petal edges.<br />
■ If you find the need to repaint a rose,<br />
it’s fine to stroke petals over that rose<br />
without applying new basecoating<br />
over it. The underlying painting could<br />
then be used as a petal guide.<br />
—M.K.<br />
110 The Decorative Painter Issue No. 6, 2006<br />
golds or pinks. Therefore, you must<br />
control the values and paint blends<br />
to keep the rose white or cream.<br />
My process involves multiloading a<br />
flat brush with two or more colors at a<br />
time (many times four or more). I do<br />
not premix colors; I prefer variations<br />
provided <strong>by</strong> working colors mixed on<br />
the brush so I can adjust as I work.<br />
Beautiful color variations are created,<br />
which provides more interest when<br />
several roses are present in a design.<br />
I find it easier to layer one rose<br />
over another instead of trying to<br />
paint a petal around the designs,<br />
especially when only small portions<br />
are visible.<br />
LET’S PAINT ROSES<br />
■ <strong>Step</strong> 1: Load the no. 10 flat<br />
brush with Flesh Tan. Pick up a little<br />
Autumn Brown on one side of the<br />
brush and blend on the palette. Add<br />
a small amount of Black Cherry to<br />
the Autumn Brown side of the brush<br />
(add a little Chocolate Cherry to the<br />
same side if a darker color is desired).<br />
Blend to provide smooth color gradation.<br />
Begin at the upper back on<br />
the rose. It’s fine if the stroke is<br />
choppy; this creates lacier petal<br />
edges. Pick up a little Ivory on the<br />
tan edge of the brush. Blend. Establish<br />
a few smaller petals at the upper<br />
back of the rose. Keep these small<br />
and layered. Paint the bottom petal<br />
to establish the length of the flower.<br />
■ <strong>Step</strong> 2: Add side petals, loading<br />
the brush as described previously and<br />
as shown in the step-<strong>by</strong>-step color<br />
worksheet. You can add a little Ivory<br />
to help distinguish petal layers.<br />
Darks could also be adjusted, if<br />
desired. Turn the piece to allow the<br />
strokes to be pulled freely.<br />
■ <strong>Step</strong> 3: Close up the front of the<br />
rose <strong>by</strong> attaching the beginning of<br />
the stroke at the upper back petal.<br />
This may be achieved in one continuous<br />
stroke connecting to the opposite<br />
side or in two as shown on the<br />
worksheet. Add a little White to the