System EccoLine L200 - User manual for the ward - Tunstall GmbH
System EccoLine L200 - User manual for the ward - Tunstall GmbH
System EccoLine L200 - User manual for the ward - Tunstall GmbH

You also want an ePaper? Increase the reach of your titles
YUMPU automatically turns print PDFs into web optimized ePapers that Google loves.
Nurse call systems <strong>for</strong> hospitals,<br />
care homes and similar<br />
establishments<br />
<strong>System</strong> <strong>EccoLine</strong> <strong>L200</strong><br />
<strong>User</strong> Manual <strong>for</strong> <strong>the</strong> Ward<br />
All <strong>the</strong> reassurance you need<br />
t
The <strong>manual</strong> was prepared with due care, and all details were checked <strong>for</strong> <strong>the</strong>ir correctness. However, we cannot<br />
assume any responsibility <strong>for</strong>m possible discrepancies or incomplete in<strong>for</strong>mation.<br />
All rights to this documentation are reserved, in particular copyright and distribution rights. No part of this documentation<br />
may be reproduced in any <strong>for</strong>m or processed, copied or distributed using electronic systems without <strong>the</strong> prior<br />
written consent by <strong>Tunstall</strong> <strong>GmbH</strong>.<br />
We reserve <strong>the</strong> right <strong>for</strong> implementing technical changes.<br />
<strong>Tunstall</strong> <strong>GmbH</strong>
Table of Contents<br />
1 For your safety . . . . . . . . . . . . . . . . . . . . . . . . . . . . . 1<br />
2 About this <strong>manual</strong> . . . . . . . . . . . . . . . . . . . . . . . . . . 3<br />
Structure of <strong>the</strong> <strong>manual</strong> . . . . . . . . . . . . . . . . . . . . . . . . . . . 4<br />
Symbols and icons used in <strong>the</strong> text . . . . . . . . . . . . . . . . . 5<br />
3 The <strong>EccoLine</strong> <strong>L200</strong> <strong>System</strong> . . . . . . . . . . . . . . . . . . 7<br />
Equipment . . . . . . . . . . . . . . . . . . . . . . . . . . . . . . . . . . . . . . 9<br />
Ward . . . . . . . . . . . . . . . . . . . . . . . . . . . . . . . . . . . . . . . . . . . 15<br />
Call types and <strong>the</strong>ir priority . . . . . . . . . . . . . . . . . . . . . . . . 16<br />
<strong>System</strong> add-ons . . . . . . . . . . . . . . . . . . . . . . . . . . . . . . . . . 17<br />
4 Patients / residents . . . . . . . . . . . . . . . . . . . . . . . . . 19<br />
Call switch . . . . . . . . . . . . . . . . . . . . . . . . . . . . . . . . . . . . . . 20<br />
Pear push switch . . . . . . . . . . . . . . . . . . . . . . . . . . . . . . . . . 21<br />
Connection socket <strong>L200</strong> . . . . . . . . . . . . . . . . . . . . . . . . . . 22<br />
5 Nursing staff . . . . . . . . . . . . . . . . . . . . . . . . . . . . . . . 23<br />
Registering staff presence . . . . . . . . . . . . . . . . . . . . . . . . . 24<br />
Call display . . . . . . . . . . . . . . . . . . . . . . . . . . . . . . . . . . . . . 26<br />
Handling a call . . . . . . . . . . . . . . . . . . . . . . . . . . . . . . . . . . . 29<br />
Watching fault displays . . . . . . . . . . . . . . . . . . . . . . . . . . . 31<br />
Cleaning and disinfecting <strong>the</strong> devices . . . . . . . . . . . . . . . 32<br />
6 ComStation <strong>L200</strong> . . . . . . . . . . . . . . . . . . . . . . . . . . . 35<br />
ComStation <strong>L200</strong> . . . . . . . . . . . . . . . . . . . . . . . . . . . . . . . . 36<br />
Logging on / off . . . . . . . . . . . . . . . . . . . . . . . . . . . . . . . . . . 40<br />
If “Fault” is displayed... . . . . . . . . . . . . . . . . . . . . . . . . . . . . 42<br />
Handling calls . . . . . . . . . . . . . . . . . . . . . . . . . . . . . . . . . . . 45<br />
Ward coupling . . . . . . . . . . . . . . . . . . . . . . . . . . . . . . . . . . . 50<br />
Activating a shift . . . . . . . . . . . . . . . . . . . . . . . . . . . . . . . . . 54<br />
Setting <strong>the</strong> ComStation <strong>L200</strong> . . . . . . . . . . . . . . . . . . . . . . 59<br />
What to do, if... . . . . . . . . . . . . . . . . . . . . . . . . . . . . . . . . . . 61<br />
7 <strong>System</strong> administrator . . . . . . . . . . . . . . . . . . . . . . . 63<br />
Basic knowledge on this chapter . . . . . . . . . . . . . . . . . . . 64<br />
Initialising <strong>the</strong> ComStation <strong>L200</strong> . . . . . . . . . . . . . . . . . . . . 70<br />
Switching addresses to active/inactive . . . . . . . . . . . . . . 72<br />
Setting room numbers . . . . . . . . . . . . . . . . . . . . . . . . . . . . 74<br />
Setting <strong>the</strong> ComStation number<br />
(and ComStation address) . . . . . . . . . . . . . . . . . . . . . . . . . 77<br />
Setting up <strong>ward</strong> coupling programs . . . . . . . . . . . . . . . . . 79<br />
Setting shifts . . . . . . . . . . . . . . . . . . . . . . . . . . . . . . . . . . . . 82<br />
Inquiry about software version . . . . . . . . . . . . . . . . . . . . . 86<br />
Assign group signal lamps . . . . . . . . . . . . . . . . . . . . . . . . .<br />
87<br />
<strong>System</strong> <strong>EccoLine</strong> <strong>L200</strong> − <strong>User</strong> Manual <strong>for</strong> <strong>the</strong> Ward, 00 8812 19, 08/05 (Rev. 1.1) I
Table of Contents<br />
II<br />
<strong>System</strong> <strong>EccoLine</strong> <strong>L200</strong> − <strong>User</strong> Manual <strong>for</strong> <strong>the</strong> Ward, 00 8812 19, 08/05 (Rev. 1.1)
1<br />
For your safety<br />
1.1 General<br />
Please observe <strong>the</strong> following points <strong>for</strong> <strong>the</strong> safety of staff and patients.<br />
You must acquire sufficient knowledge of <strong>the</strong> operation<br />
and use of <strong>the</strong> call system using <strong>the</strong> appropriate measures,<br />
e.g. training. These measures should be repeated as necessary.<br />
This <strong>manual</strong> assumes an adequate level of knowledge.<br />
This <strong>manual</strong> assumes that you are familiar with <strong>the</strong> procedures<br />
involved in hospital care.<br />
The connection of external devices and operating materials<br />
may only be carried out by specially trained staff.<br />
Immediately notify a technician of all functional irregularities,<br />
all failures and faults.<br />
Check <strong>the</strong> plug-in call devices (pear push switches, etc.)<br />
each time <strong>the</strong>y are plugged in, to ensure that <strong>the</strong> call triggering<br />
function is functioning perfectly.<br />
Do not expose <strong>the</strong> <strong>EccoLine</strong> <strong>L200</strong>-devices to any extreme<br />
conditions such as extreme heat or cold, damp, excessive<br />
dust or strong vibrations.<br />
Do not use any aggressive or corrosive cleaning agents to<br />
clean <strong>the</strong> devices.<br />
1.1.1 ComStation <strong>L200</strong><br />
Do not position <strong>the</strong> ComStation <strong>L200</strong> in damp environments<br />
and ensure that it is not allowed to become wet. The ComStation<br />
<strong>L200</strong> is supplied with power via <strong>the</strong> supply cable and must<br />
not <strong>the</strong>re<strong>for</strong>e be allowed to come into contact with dampness.<br />
Ensure that <strong>the</strong> supply cable <strong>for</strong> <strong>the</strong> ComStation <strong>L200</strong> is always<br />
plugged in .<br />
The ComStation <strong>L200</strong> remains below <strong>the</strong> prescribed limit values<br />
<strong>for</strong> electromagnetic compatibility. However, faults may<br />
still occur in individual case and in certain conditions. In this<br />
case, increase <strong>the</strong> distance between <strong>the</strong> devices creating<br />
<strong>the</strong> interference or carry out <strong>the</strong> relevant anti-interference<br />
measures.<br />
<strong>System</strong> <strong>EccoLine</strong> <strong>L200</strong> − <strong>User</strong> Manual <strong>for</strong> <strong>the</strong> Ward, 00 8812 19, 08/05 (Rev. 1.1) 1
For your safety<br />
2<br />
Never open <strong>the</strong> housing <strong>for</strong> <strong>the</strong> ComStation <strong>L200</strong>. Return<br />
<strong>the</strong> unit to <strong>the</strong> supplier in <strong>the</strong> event of a defect.<br />
Bright sunlight can impair <strong>the</strong> legibility of <strong>the</strong> display. Position<br />
<strong>the</strong> ComStation <strong>L200</strong> in an anti-glare location.<br />
<strong>System</strong> <strong>EccoLine</strong> <strong>L200</strong> − <strong>User</strong> Manual <strong>for</strong> <strong>the</strong> Ward, 00 8812 19, 08/05 (Rev. 1.1)
2<br />
About this<br />
<strong>manual</strong><br />
This <strong>manual</strong> is aimed at staff using <strong>the</strong> <strong>EccoLine</strong> <strong>L200</strong> call system.<br />
This chapter is intended to facilitate <strong>the</strong> use of this <strong>manual</strong> and<br />
help you to quickly find <strong>the</strong> in<strong>for</strong>mation you require. It contains<br />
in<strong>for</strong>mation regarding <strong>the</strong> structure of <strong>the</strong> <strong>manual</strong> and <strong>the</strong> symbols<br />
and icons which are used in <strong>the</strong> text.<br />
<strong>System</strong> <strong>EccoLine</strong> <strong>L200</strong> − <strong>User</strong> Manual <strong>for</strong> <strong>the</strong> Ward, 00 8812 19, 08/05 (Rev. 1.1) 3
About this <strong>manual</strong><br />
4<br />
2.1 Structure of <strong>the</strong> <strong>manual</strong><br />
The following chapters can be found in this <strong>manual</strong> after this<br />
chapter:<br />
3 The <strong>EccoLine</strong> <strong>L200</strong> <strong>System</strong><br />
This chapter describes <strong>the</strong> layout of <strong>the</strong> <strong>EccoLine</strong> <strong>L200</strong> system,<br />
what a normal working procedure looks like using <strong>the</strong> system,<br />
and what equipment may be used in <strong>the</strong> system.<br />
4 Patients / residents<br />
This chapter contains <strong>the</strong> in<strong>for</strong>mation required by patients and<br />
residents to operate <strong>EccoLine</strong> <strong>L200</strong> units. The nursing staff also<br />
need to know this in<strong>for</strong>mation in order to instruct patients/residents<br />
in operating <strong>the</strong> equipment. This chapter should also be<br />
made available to <strong>the</strong> patients/residents, e.g. as a copy.<br />
5 Nursing staff<br />
This chapter describes <strong>the</strong> activities which <strong>the</strong> nursing staff need<br />
to carry out in <strong>the</strong> <strong>EccoLine</strong> <strong>L200</strong> system. Only <strong>the</strong> ComStation<br />
<strong>L200</strong> is described in a separate chapter.<br />
6 ComStation <strong>L200</strong><br />
The ComStation <strong>L200</strong> display panel is set−up in <strong>the</strong> nurse station<br />
in <strong>the</strong> <strong>ward</strong>. In this chapter <strong>the</strong>re is a detailed description of how<br />
to operate <strong>the</strong> ComStation <strong>L200</strong>.<br />
7 <strong>System</strong> administrator<br />
The system administrator <strong>for</strong> <strong>the</strong> <strong>EccoLine</strong> <strong>L200</strong> call system requires<br />
more in-depth in<strong>for</strong>mation which is not relevant to <strong>the</strong><br />
nursing staff. This in<strong>for</strong>mation is provided in <strong>the</strong> “<strong>System</strong> administrator”<br />
chapter.<br />
<strong>System</strong> <strong>EccoLine</strong> <strong>L200</strong> − <strong>User</strong> Manual <strong>for</strong> <strong>the</strong> Ward, 00 8812 19, 08/05 (Rev. 1.1)
About this <strong>manual</strong><br />
2.2 Symbols and icons used in <strong>the</strong><br />
text<br />
<br />
Throughout <strong>the</strong> text of this <strong>manual</strong>, you will find various symbols<br />
and marks, which always have <strong>the</strong> same meaning:<br />
The Danger sign means:<br />
“Danger It is imperative to observe <strong>the</strong>se instructions.”<br />
The pointing finger means:<br />
“This is additional in<strong>for</strong>mation.”<br />
A bullet in front of <strong>the</strong> text means:<br />
“This is a compulsory action.”<br />
A tick mark in front of <strong>the</strong> text means:<br />
“This is <strong>the</strong> result of an action.”<br />
A box in front of <strong>the</strong> text means:<br />
“This is a bullet point.”<br />
<strong>System</strong> <strong>EccoLine</strong> <strong>L200</strong> − <strong>User</strong> Manual <strong>for</strong> <strong>the</strong> Ward, 00 8812 19, 08/05 (Rev. 1.1) 5
About this <strong>manual</strong><br />
6<br />
<strong>System</strong> <strong>EccoLine</strong> <strong>L200</strong> − <strong>User</strong> Manual <strong>for</strong> <strong>the</strong> Ward, 00 8812 19, 08/05 (Rev. 1.1)
3<br />
The <strong>EccoLine</strong><br />
<strong>L200</strong> <strong>System</strong><br />
<strong>EccoLine</strong> <strong>L200</strong> is a modern lightcall system <strong>for</strong> hospitals, care<br />
homes and homes <strong>for</strong> <strong>the</strong> elderly.<br />
3.1 Basic function<br />
When a patient/resident requires help, he presses a call button.<br />
His call is displayed on <strong>the</strong> signal devices in <strong>the</strong> <strong>ward</strong>. A member<br />
of <strong>the</strong> nursing staff goes to <strong>the</strong> call location and presses <strong>the</strong> presence<br />
button on entering <strong>the</strong> room. This activates <strong>the</strong> staff presence<br />
in <strong>the</strong> room and <strong>the</strong> call is acknowledged. Once <strong>the</strong> nursing<br />
staff member has dealt with <strong>the</strong> patient/resident’s problem,<br />
he presses <strong>the</strong> presence button in <strong>the</strong> room a second time to<br />
switch off <strong>the</strong> staff presence, and leaves <strong>the</strong> room. Pressing <strong>the</strong><br />
presence button a second time will simultaneously cancel <strong>the</strong><br />
call. Clearing all call displays.<br />
Calls which have not yet been acknowledged are known as<br />
fresh calls. Calls which have been acknowledged but have not<br />
yet been cancelled, are known as acknowledged calls.<br />
3.1.1 Easy-to-use functions<br />
Ward coupling<br />
During quiet periods, multiple <strong>ward</strong>s can be coupled on an organisational<br />
level. In o<strong>the</strong>r words, all calls in <strong>the</strong> coupled <strong>ward</strong>s are<br />
displayed in those <strong>ward</strong>s.<br />
ComStation <strong>L200</strong> / Call <strong>for</strong><strong>ward</strong>ing<br />
A ComStation <strong>L200</strong> display panel can be set up in <strong>the</strong> <strong>ward</strong><br />
nurse station. When <strong>the</strong> ComStation <strong>L200</strong> is in operation, <strong>the</strong><br />
calls are first displayed only on <strong>the</strong> room signal lamp <strong>for</strong> <strong>the</strong> call<br />
location and on <strong>the</strong> ComStation <strong>L200</strong>. The calls can be acknowledged<br />
both at <strong>the</strong> call location and on <strong>the</strong> ComStation <strong>L200</strong>.<br />
A call is only displayed on <strong>the</strong> o<strong>the</strong>r signal devices in <strong>the</strong> <strong>ward</strong> if<br />
it remains unacknowledged <strong>for</strong> 30 seconds (call <strong>for</strong><strong>ward</strong>ing).<br />
After that <strong>the</strong> call <strong>for</strong><strong>ward</strong>ing remains, that means <strong>the</strong> following<br />
calls will immediately be signalled at <strong>the</strong> ComStation <strong>L200</strong> and<br />
all signal devices. This condition remains until a call will be acknowledged<br />
at <strong>the</strong> ComStation <strong>L200</strong>.<br />
<strong>System</strong> <strong>EccoLine</strong> <strong>L200</strong> − <strong>User</strong> Manual <strong>for</strong> <strong>the</strong> Ward, 00 8812 19, 08/05 (Rev. 1.1) 7
The <strong>EccoLine</strong> <strong>L200</strong> <strong>System</strong><br />
8<br />
<br />
Call re-freshening<br />
Additional safety offers <strong>the</strong> function call re-freshening: If an acknowledged<br />
call isn’t cancelled within 3 minutes, it is signalled as<br />
fresh call again.<br />
Zones and shifts<br />
Wards can be divided organisationally into smaller units (zones).<br />
The calls in a zone are <strong>the</strong>n only displayed within that zone. The<br />
zone divisions can be changed in <strong>the</strong> course of a day (shift operation).<br />
Note! If a call isn’t acknowlewdged within 2 minutes, <strong>the</strong> dividing<br />
into zones will be switched off. The dividing into zones will be<br />
switched off <strong>for</strong> all calls. The dividing into zones will automatically<br />
be switched on again as soon as all calls of <strong>the</strong> <strong>ward</strong> are cancelled.<br />
Swing rooms<br />
Individual rooms in a <strong>ward</strong> – known as swing rooms – can be<br />
assigned to ano<strong>the</strong>r <strong>ward</strong> temporarily. This can be useful when<br />
a <strong>ward</strong> is full and additional patients are accommodated in a different<br />
<strong>ward</strong>, <strong>for</strong> example.<br />
If swing rooms are defined in your system, please contact<br />
<strong>Tunstall</strong> <strong>GmbH</strong> <strong>for</strong> getting a description of this function.<br />
<strong>System</strong> <strong>EccoLine</strong> <strong>L200</strong> − <strong>User</strong> Manual <strong>for</strong> <strong>the</strong> Ward, 00 8812 19, 08/05 (Rev. 1.1)
3.2 Equipment<br />
The <strong>EccoLine</strong> <strong>L200</strong> <strong>System</strong><br />
Descriptions of all <strong>the</strong> <strong>EccoLine</strong> <strong>L200</strong> system equipment with<br />
operating instructions included in this <strong>manual</strong>, are given below.<br />
As a call system can be assembled in many different ways,<br />
equipment may be described here which is not used in your establishment.<br />
Patient-/resident operator terminals<br />
Pear push switch<br />
incl. two red call switches<br />
<strong>for</strong> raising calls using <strong>the</strong> red call buttons.<br />
Pear push switch incl. red call<br />
switch and yellow light switch<br />
<strong>for</strong> raising calls using <strong>the</strong> red call button<br />
and <strong>for</strong> switching <strong>the</strong> light on and off<br />
using <strong>the</strong> yellow light switch.<br />
Page 21<br />
Page 21<br />
<strong>System</strong> <strong>EccoLine</strong> <strong>L200</strong> − <strong>User</strong> Manual <strong>for</strong> <strong>the</strong> Ward, 00 8812 19, 08/05 (Rev. 1.1) 9
The <strong>EccoLine</strong> <strong>L200</strong> <strong>System</strong><br />
10<br />
Signalling devices<br />
0125<br />
Nurse call terminal <strong>L200</strong><br />
The terminal contains <strong>the</strong> electronics<br />
<strong>for</strong> operating a room.<br />
The integrated room signal lamp is<br />
used to display calls and staff presence<br />
in <strong>the</strong> relevant room.<br />
Room signal lamp, 2 sections<br />
For displaying staff presence in rooms<br />
with ComStation <strong>L200</strong>.<br />
Room signal lamp, 3 sections<br />
For displaying calls, staff presence and<br />
call location WC.<br />
Corridor display Alpha 11<br />
For plain text display of calls.<br />
Time display in standby mode.<br />
Group signal lamp<br />
For displaying calls from o<strong>the</strong>r <strong>ward</strong>s if<br />
those <strong>ward</strong>s are coupled with <strong>the</strong> current<br />
<strong>ward</strong>.<br />
Direction signal lamp<br />
For displaying <strong>the</strong> direction to <strong>the</strong> call<br />
location at unclear points.<br />
Staff presence combination <strong>L200</strong><br />
For <strong>the</strong> acoustic indication of (<strong>for</strong><strong>ward</strong>ed)<br />
calls from a <strong>ward</strong> with staff<br />
presence activated.<br />
Buttons <strong>for</strong> activating staff presence<br />
and <strong>for</strong> raising calls.<br />
Page 26<br />
<strong>System</strong> <strong>EccoLine</strong> <strong>L200</strong> − <strong>User</strong> Manual <strong>for</strong> <strong>the</strong> Ward, 00 8812 19, 08/05 (Rev. 1.1)<br />
−<br />
Page 26<br />
Page 27<br />
Page 26<br />
Page 27<br />
Page 24
Display combination <strong>L200</strong><br />
For <strong>the</strong> visual and acoustic indication of<br />
(<strong>for</strong><strong>ward</strong>ed) calls from a <strong>ward</strong> with staff<br />
presence activated.<br />
Buttons <strong>for</strong> activating staff presence<br />
and <strong>for</strong> raising calls.<br />
ComStation <strong>L200</strong><br />
In <strong>the</strong> nurse station <strong>for</strong> displaying calls,<br />
staff presence and faults.<br />
Options <strong>for</strong> call acknowledgement,<br />
<strong>ward</strong> coupling, shift activation.<br />
Configuration options <strong>for</strong> <strong>the</strong> system<br />
administrator.<br />
The <strong>EccoLine</strong> <strong>L200</strong> <strong>System</strong><br />
Page 24,<br />
25<br />
Page 36<br />
<strong>System</strong> <strong>EccoLine</strong> <strong>L200</strong> − <strong>User</strong> Manual <strong>for</strong> <strong>the</strong> Ward, 00 8812 19, 08/05 (Rev. 1.1) 11
The <strong>EccoLine</strong> <strong>L200</strong> <strong>System</strong><br />
12<br />
Range of switches<br />
Call switch <strong>L200</strong><br />
For raising calls by pressing <strong>the</strong> red call<br />
button.<br />
Pull cord call switch <strong>L200</strong><br />
For raising calls by pulling on <strong>the</strong> red<br />
call cord.<br />
Pneumatic call switch <strong>L200</strong><br />
For raising calls by pressing <strong>the</strong> red call<br />
ball.<br />
Staff presence combination <strong>L200</strong><br />
For switching <strong>the</strong> staff presence in <strong>the</strong><br />
room on and off using <strong>the</strong> green presence<br />
button and <strong>for</strong> raising calls using<br />
<strong>the</strong> red call button.<br />
(For<strong>ward</strong>ed) calls from <strong>the</strong> <strong>ward</strong> are<br />
indicated acoustically with <strong>the</strong> staff<br />
presence activated.<br />
Display combination <strong>L200</strong><br />
For switching <strong>the</strong> staff presence in <strong>the</strong><br />
room on and off using <strong>the</strong> green presence<br />
button and <strong>for</strong> raising calls using<br />
<strong>the</strong> red call button.<br />
With <strong>the</strong> staff presence activated, (<strong>for</strong><strong>ward</strong>ed)<br />
calls from <strong>the</strong> <strong>ward</strong> are indicated<br />
on <strong>the</strong> display and acoustically.<br />
Page 20<br />
Page 20<br />
Page 20<br />
Page 24<br />
Page 24,<br />
25<br />
<strong>System</strong> <strong>EccoLine</strong> <strong>L200</strong> − <strong>User</strong> Manual <strong>for</strong> <strong>the</strong> Ward, 00 8812 19, 08/05 (Rev. 1.1)
Cancel switch <strong>L200</strong>/WC<br />
In <strong>the</strong> WC area <strong>for</strong> cancelling WC calls<br />
and assist WC calls using <strong>the</strong> grey cancel<br />
button.<br />
Call switch with cancel switch<br />
<strong>L200</strong>/WC<br />
In <strong>the</strong> WC area <strong>for</strong> raising calls using<br />
<strong>the</strong> red call button and <strong>for</strong> cancelling<br />
WC calls and WC assist calls using <strong>the</strong><br />
grey cancel button.<br />
Emergency switch <strong>L200</strong><br />
For raising calls of highest priority<br />
(emergency calls) by <strong>the</strong> staff. Blue<br />
emergency button with transparent protective<br />
cover.<br />
The <strong>EccoLine</strong> <strong>L200</strong> <strong>System</strong><br />
Page 30<br />
Page 30<br />
<strong>System</strong> <strong>EccoLine</strong> <strong>L200</strong> − <strong>User</strong> Manual <strong>for</strong> <strong>the</strong> Ward, 00 8812 19, 08/05 (Rev. 1.1) 13<br />
−
The <strong>EccoLine</strong> <strong>L200</strong> <strong>System</strong><br />
14<br />
Connection sockets<br />
Connection socket <strong>L200</strong><br />
For raising calls using <strong>the</strong> red call button<br />
and <strong>for</strong> connecting 2 plug-in call devices<br />
such as pear push switches.<br />
Connection socket ComStation<br />
For connecting <strong>the</strong> ComStation <strong>L200</strong>.<br />
Page 22<br />
<strong>System</strong> <strong>EccoLine</strong> <strong>L200</strong> − <strong>User</strong> Manual <strong>for</strong> <strong>the</strong> Ward, 00 8812 19, 08/05 (Rev. 1.1)<br />
−
Nurse call terminal <strong>L200</strong><br />
(incl. room signal lamp)<br />
Room signal lamp<br />
Corridor display<br />
Alpha 11<br />
0125<br />
ComStation <strong>L200</strong><br />
Staff presence<br />
combination <strong>L200</strong><br />
Cancel switch<br />
<strong>L200</strong>/WC<br />
Call switch<br />
<strong>L200</strong><br />
0125<br />
Ward<br />
The <strong>EccoLine</strong> <strong>L200</strong> <strong>System</strong><br />
<strong>System</strong> <strong>EccoLine</strong> <strong>L200</strong> − <strong>User</strong> Manual <strong>for</strong> <strong>the</strong> Ward, 00 8812 19, 08/05 (Rev. 1.1) 15<br />
Pull cord call<br />
switch <strong>L200</strong><br />
Pneumatic call<br />
switch <strong>L200</strong><br />
Connection socket <strong>L200</strong><br />
Pear push<br />
switch
The <strong>EccoLine</strong> <strong>L200</strong> <strong>System</strong><br />
16<br />
3.4 Call types and <strong>the</strong>ir priority<br />
The type of help required can vary. This is why a distinction is<br />
made between different call types: Patient calls, WC calls, staff<br />
assist calls, assist WC calls and emergency calls. It is important<br />
that you are familiar with <strong>the</strong>se call types because <strong>the</strong>y indicate<br />
what help <strong>the</strong> patients require.<br />
The call types are in turn divided into three call categories: call,<br />
assist call and emergency call. The call categories differ in <strong>the</strong>ir<br />
priority level. Assist calls are more urgent than calls, emergency<br />
calls are more urgent than assist calls.<br />
Call category<br />
Urgency Call type<br />
Call low Patient call A patient/resident has pressed a<br />
call button, or <strong>the</strong> plug on a call<br />
device has been removed from<br />
<strong>the</strong> connection socket (disconnection<br />
call).<br />
Assist call medium Staff assist<br />
call<br />
Emergency<br />
call<br />
WC call A call has been triggered in a<br />
WC room.<br />
WC assist<br />
call<br />
high Emergency<br />
call<br />
3.4.1 WC calls and WC assist calls<br />
A call has been raised with <strong>the</strong><br />
staff presence activated.<br />
A WC call has been raised with<br />
<strong>the</strong> staff presence activated.<br />
Call has been raised by a<br />
special call device, e.g. emergency<br />
switch <strong>L200</strong> or smoke detector<br />
WC calls and WC assist calls are raised in separate WC rooms.<br />
To ensure that <strong>the</strong> nursing staff is aware of this situation, <strong>the</strong>se<br />
calls are displayed separately on <strong>the</strong> room signal lamp. WC calls<br />
and WC assist calls also need to be cancelled at <strong>the</strong> call location<br />
using a special cancel button. Switching off <strong>the</strong> staff presence will<br />
not cancel WC calls/WC assist calls.<br />
<strong>System</strong> <strong>EccoLine</strong> <strong>L200</strong> − <strong>User</strong> Manual <strong>for</strong> <strong>the</strong> Ward, 00 8812 19, 08/05 (Rev. 1.1)
3.5 <strong>System</strong> add-ons<br />
<br />
The <strong>EccoLine</strong> <strong>L200</strong> <strong>System</strong><br />
This <strong>manual</strong> describes <strong>the</strong> basic equipment <strong>for</strong> <strong>the</strong> <strong>EccoLine</strong><br />
<strong>L200</strong> system. However, numerous additional devices can be<br />
connected to <strong>the</strong> system. No operating instructions are given in<br />
this <strong>manual</strong> <strong>for</strong> <strong>the</strong>se devices.<br />
Given below is a brief description of a few of <strong>the</strong> possible system<br />
add-ons.<br />
Note! For all system add-ons, refer to <strong>the</strong> user in<strong>for</strong>mation included<br />
with <strong>the</strong> devices.<br />
3.5.1 Radio triggers<br />
The patients/residents can use wireless call devices (radio<br />
triggers). To do this, a radio receiver is plugged into <strong>the</strong> connection<br />
socket <strong>L200</strong> to receive <strong>the</strong> radio signals from <strong>the</strong> radio transmitter.<br />
A normal call is raised in <strong>the</strong> <strong>EccoLine</strong> <strong>L200</strong> system.<br />
3.5.2 Technical alarm<br />
No call device in <strong>the</strong> basic <strong>EccoLine</strong> <strong>L200</strong> system equipment raises<br />
an emergency call. This call type has been reserved <strong>for</strong><br />
special add-ons, e.g. <strong>for</strong> <strong>the</strong> alarm from smoke detectors.<br />
3.5.3 Radio pager<br />
Calls can be <strong>for</strong><strong>ward</strong>ed to radio pagers (beepers) so that <strong>the</strong> staff<br />
can move freely around <strong>the</strong> building but still be in<strong>for</strong>med immediately<br />
of any calls.<br />
3.5.4 Cordless telephones<br />
Calls can be displayed on cordless telephones. This means that<br />
<strong>the</strong> cordless telephone has a beeper function in addition to <strong>the</strong><br />
telephone function. The nursing staff can move freely around <strong>the</strong><br />
building and still be in<strong>for</strong>med immediately of any calls.<br />
<strong>System</strong> <strong>EccoLine</strong> <strong>L200</strong> − <strong>User</strong> Manual <strong>for</strong> <strong>the</strong> Ward, 00 8812 19, 08/05 (Rev. 1.1) 17
The <strong>EccoLine</strong> <strong>L200</strong> <strong>System</strong><br />
18<br />
<strong>System</strong> <strong>EccoLine</strong> <strong>L200</strong> − <strong>User</strong> Manual <strong>for</strong> <strong>the</strong> Ward, 00 8812 19, 08/05 (Rev. 1.1)
4<br />
Patients /<br />
residents<br />
The nursing staff members instruct <strong>the</strong> patients or residents on<br />
how to operate <strong>the</strong> call devices <strong>for</strong> <strong>the</strong> <strong>EccoLine</strong> <strong>L200</strong> system.<br />
The staff <strong>the</strong>n provide an in<strong>for</strong>mation booklet (e.g. a copy of <strong>the</strong><br />
next few pages) which describes <strong>the</strong> devices in detail.<br />
<strong>System</strong> <strong>EccoLine</strong> <strong>L200</strong> − <strong>User</strong> Manual <strong>for</strong> <strong>the</strong> Ward, 00 8812 19, 08/05 (Rev. 1.1) 19
Patients / residents<br />
20<br />
4.1 Call switch<br />
1<br />
2<br />
2 2<br />
1 Call button (red)<br />
<strong>for</strong> raising calls.<br />
2 Light (red)<br />
<strong>for</strong> locating <strong>the</strong> switch in <strong>the</strong> dark (dim light) and <strong>for</strong> confirming<br />
<strong>the</strong> call raised (bright light).<br />
3 Call cord (red)<br />
<strong>for</strong> raising calls.<br />
4 Call ball (red)<br />
<strong>for</strong> raising calls.<br />
4.1.1 If you need help<br />
If you need help, press <strong>the</strong> red call button 1, pull <strong>the</strong> call cord 3<br />
or press <strong>the</strong> call ball 4.<br />
To confirm <strong>the</strong> call raised, <strong>the</strong> red light 2 will be brightly lit.<br />
A member of <strong>the</strong> nursing staff will come to assist you.<br />
3<br />
<strong>System</strong> <strong>EccoLine</strong> <strong>L200</strong> − <strong>User</strong> Manual <strong>for</strong> <strong>the</strong> Ward, 00 8812 19, 08/05 (Rev. 1.1)<br />
4
4.2 Pear push switch<br />
Pear push switch<br />
incl. call and light switch<br />
Patients / residents<br />
Pear push switch<br />
incl. two call switches<br />
1 Call button (red)<br />
<strong>for</strong> raising calls.<br />
2 Light (red)<br />
<strong>for</strong> locating <strong>the</strong> remote call switch in <strong>the</strong> dark (dim light) and<br />
<strong>for</strong> confirming <strong>the</strong> call raised (bright light).<br />
3 Reading light (yellow)<br />
<strong>for</strong> switching <strong>the</strong> reading light on and off<br />
4.2.1 If you need help<br />
If you need help, press a red call button 1.<br />
To confirm <strong>the</strong> call raised, <strong>the</strong> red reassurance light 2 will be<br />
brightly lit.<br />
A member of <strong>the</strong> nursing staff will come to assist you.<br />
4.2.2 Switching <strong>the</strong> reading light on and off<br />
To switch your reading light on or off, press <strong>the</strong> yellow button 3.<br />
4.2.3 Equipment and cable clamp<br />
By means of <strong>the</strong> equipment and cable clamp you can fix <strong>the</strong> pear<br />
push switch to <strong>the</strong> bed gallow. Under excessive <strong>for</strong>ce <strong>the</strong> clamp<br />
will slip off. So <strong>the</strong> device is protected against damage.<br />
<strong>System</strong> <strong>EccoLine</strong> <strong>L200</strong> − <strong>User</strong> Manual <strong>for</strong> <strong>the</strong> Ward, 00 8812 19, 08/05 (Rev. 1.1) 21
Patients / residents<br />
22<br />
4.3 Connection socket <strong>L200</strong><br />
A call device (e.g. pear push switch) is normally connected to <strong>the</strong><br />
connection socket <strong>L200</strong>. If necessary, a call can also be raised<br />
directly on <strong>the</strong> connection socket <strong>L200</strong>.<br />
1 Call button (red)<br />
<strong>for</strong> raising calls.<br />
2 Light (red)<br />
<strong>for</strong> locating <strong>the</strong> button in <strong>the</strong> dark (dim light) and <strong>for</strong> confirming<br />
<strong>the</strong> call raised (bright light).<br />
3 Sockets<br />
<strong>for</strong> connecting plug-in call devices.<br />
4.3.1 If you need help<br />
If you need help, press a red call button 1.<br />
To confirm <strong>the</strong> call raised, <strong>the</strong> red light 2 will be brightly lit.<br />
A member of <strong>the</strong> nursing staff will come to assist you.<br />
<strong>System</strong> <strong>EccoLine</strong> <strong>L200</strong> − <strong>User</strong> Manual <strong>for</strong> <strong>the</strong> Ward, 00 8812 19, 08/05 (Rev. 1.1)
5<br />
Nursing staff<br />
This chapter describes <strong>the</strong> activities which <strong>the</strong> nursing staff need<br />
to carry out in <strong>the</strong> <strong>EccoLine</strong> <strong>L200</strong> system.<br />
The ComStation <strong>L200</strong>, <strong>the</strong> display panel in <strong>the</strong> nurse station, is<br />
described separately in <strong>the</strong> next chapter.<br />
<strong>System</strong> <strong>EccoLine</strong> <strong>L200</strong> − <strong>User</strong> Manual <strong>for</strong> <strong>the</strong> Ward, 00 8812 19, 08/05 (Rev. 1.1) 23
Nursing staff<br />
24<br />
5.1 Registering staff presence<br />
The use of presence buttons is of critical importance <strong>for</strong> using <strong>the</strong><br />
call system correctly.<br />
Each time you enter a room, you must activate your presence<br />
by pressing <strong>the</strong> staff presence switch on <strong>the</strong> staff presence<br />
combination <strong>L200</strong> or <strong>the</strong> display combination <strong>L200</strong>.<br />
Each time you leave a room, you must switch your presence<br />
back off again by pressing <strong>the</strong> staff presence switch once<br />
again.<br />
5.1.1 Meaning of <strong>the</strong> presence message<br />
When <strong>the</strong> staff presence is switched on in a room, <strong>the</strong> following<br />
will occur:<br />
The room signal light in <strong>the</strong> corridor will be lit in green to indicate<br />
<strong>the</strong> staff presence.<br />
The presence is indicated on <strong>the</strong> ComStation <strong>L200</strong>.<br />
Each call from this room raised be<strong>for</strong>e <strong>the</strong> staff presence was<br />
switched on, will be acknowledged. When <strong>the</strong> staff presence<br />
is switched off, i.e. when leaving <strong>the</strong> room, <strong>the</strong> call will be cancelled.<br />
Note: WC calls and assist WC calls must be cancelled<br />
using a grey cancel button.<br />
Calls raised within a <strong>ward</strong> are indicated in this room by a call<br />
tone.<br />
When a ComStation <strong>L200</strong> is in operation, calls from <strong>the</strong> <strong>ward</strong><br />
are initially displayed only on <strong>the</strong> ComStation <strong>L200</strong>. If <strong>the</strong>y are<br />
not acknowledged within 30 seconds, <strong>the</strong>y are displayed on<br />
<strong>the</strong> staff presence combinations <strong>L200</strong> and <strong>the</strong> display combinations<br />
<strong>L200</strong> in <strong>the</strong> rooms with staff presence activated (call<br />
<strong>for</strong><strong>ward</strong>ing).<br />
If a call is <strong>the</strong>n raised in this room, this will automatically be an<br />
assist call (staff assist call) of high priority. Accordingly, it will<br />
be displayed differently.<br />
<strong>System</strong> <strong>EccoLine</strong> <strong>L200</strong> − <strong>User</strong> Manual <strong>for</strong> <strong>the</strong> Ward, 00 8812 19, 08/05 (Rev. 1.1)
5.1.2 Presence buttons<br />
4<br />
2<br />
Nursing staff<br />
<strong>System</strong> <strong>EccoLine</strong> <strong>L200</strong> − <strong>User</strong> Manual <strong>for</strong> <strong>the</strong> Ward, 00 8812 19, 08/05 (Rev. 1.1) 25<br />
3<br />
1<br />
Staff presence combination <strong>L200</strong> Display combination <strong>L200</strong><br />
1 Presence button (green)<br />
<strong>for</strong> switching staff presence on and off.<br />
2 Light (yellow)<br />
lit when <strong>the</strong> staff presence is activated as a reminder to switch<br />
it off.<br />
3 Call button (red)<br />
<strong>for</strong> raising calls.<br />
4 Light (red)<br />
<strong>for</strong> locating <strong>the</strong> button in <strong>the</strong> dark (dim light) and <strong>for</strong> confirming<br />
<strong>the</strong> call raised (bright light).<br />
4 Display<br />
<strong>for</strong> displaying (<strong>for</strong><strong>ward</strong>ed) calls.<br />
2<br />
1<br />
5<br />
4<br />
3
Nursing staff<br />
26<br />
5.2 Call display<br />
Calls are displayed on <strong>the</strong> signal devices:<br />
5.2.1 Room signal lamp<br />
The room signal lamp is integrated into <strong>the</strong> nurse call terminal<br />
<strong>L200</strong> or designed as separated room signal lamp. It displays<br />
calls and staff presence in <strong>the</strong> room:<br />
red<br />
green<br />
white<br />
5.2.2 Group signal lamp<br />
Continuous light: Call<br />
Flashing slowly: Assist call<br />
Flashing quickly: Emergency call<br />
Continuous light: Presence<br />
Flashing slowly: Acknowledged call<br />
(no presence)<br />
Continuous light: Call from WC area (in<br />
addition to call display)<br />
Group signal lamps in <strong>the</strong> current <strong>ward</strong> indicate calls from o<strong>the</strong>r<br />
<strong>ward</strong>s coupled to <strong>the</strong> <strong>ward</strong>.<br />
red<br />
green<br />
Continuous light: Calls in <strong>ward</strong> 1<br />
Flashing slowly: Most urgent call in<br />
<strong>ward</strong> 1 = assist call<br />
Flashing quickly: Most urgent call<br />
in <strong>ward</strong> 1 = emergency call<br />
Continuous light:<br />
Staff presence in <strong>ward</strong> 1.<br />
Flashing slowly: Acknowledged call in<br />
<strong>ward</strong> 1 (no presence)<br />
<strong>System</strong> <strong>EccoLine</strong> <strong>L200</strong> − <strong>User</strong> Manual <strong>for</strong> <strong>the</strong> Ward, 00 8812 19, 08/05 (Rev. 1.1)
5.2.3 Direction signal lamp<br />
Nursing staff<br />
Direction signal lamps display <strong>the</strong> route to <strong>the</strong> call location by illuminating<br />
arrows. In this process, a direction signal lamp is used<br />
to display all rooms in <strong>the</strong> direction indicated:<br />
red<br />
green<br />
Continuous light: Call(s)<br />
Flashing slowly:<br />
Most urgent call = assist call<br />
Flashing quickly:<br />
Most urgent call = emergency call<br />
Continuous light: Presence<br />
5.2.4 Corridor display Alpha 11<br />
Flashing slowly:<br />
Acknowledged call (no presence)<br />
The corridor display indicates <strong>the</strong> calls from <strong>the</strong> <strong>ward</strong> by first<br />
showing <strong>the</strong> call type and <strong>the</strong>n showing <strong>the</strong> room number.<br />
0125<br />
If <strong>the</strong>re are multiple calls, <strong>the</strong> highest priority call is displayed.<br />
In standby mode, <strong>the</strong> time is displayed.<br />
5.2.5 Staff presence combination <strong>L200</strong><br />
In rooms with <strong>the</strong> presence activated, <strong>the</strong> calls from <strong>the</strong> whole<br />
<strong>ward</strong> are indicated acoustically on <strong>the</strong> staff presence combination<br />
<strong>L200</strong> by a call tone. For calls you hear a slow tone sequence,<br />
<strong>for</strong> assist calls you hear a middle tone sequence, <strong>for</strong> emergency<br />
calls a quick tone sequence.<br />
<strong>System</strong> <strong>EccoLine</strong> <strong>L200</strong> − <strong>User</strong> Manual <strong>for</strong> <strong>the</strong> Ward, 00 8812 19, 08/05 (Rev. 1.1) 27
Nursing staff<br />
28<br />
5.2.6 Display combination <strong>L200</strong><br />
WC call<br />
0107<br />
In rooms with <strong>the</strong> presence activated, <strong>the</strong> calls from <strong>the</strong> whole<br />
<strong>ward</strong> are indicated acoustically on <strong>the</strong> display combination <strong>L200</strong><br />
by a call tone. In addition, <strong>the</strong> call type and <strong>the</strong> call location (room<br />
number) are indicated on <strong>the</strong> display.<br />
For calls you hear a slow tone sequence, <strong>for</strong> assist calls you hear<br />
a middle tone sequence, <strong>for</strong> emergency calls a quick tone sequence.<br />
5.2.7 ComStation <strong>L200</strong><br />
When a ComStation <strong>L200</strong> is in operation, <strong>the</strong> calls are first displayed<br />
only on <strong>the</strong> room signal lamp of <strong>the</strong> call location and on<br />
<strong>the</strong> ComStation <strong>L200</strong>. The calls can be acknowledged at <strong>the</strong> call<br />
location or at <strong>the</strong> ComStation <strong>L200</strong>.<br />
If a call is not acknowledged after 30 seconds, it will be displayed<br />
on <strong>the</strong> remaining signal devices of <strong>the</strong> <strong>ward</strong> (call <strong>for</strong><strong>ward</strong>ing).<br />
After that <strong>the</strong> call <strong>for</strong><strong>ward</strong>ing remains, that means <strong>the</strong> following<br />
calls will immediately be signalled at <strong>the</strong> ComStation <strong>L200</strong> and<br />
all signal devices of <strong>the</strong> <strong>ward</strong>. This condition remains until a call<br />
will be acknowledged at <strong>the</strong> ComStation <strong>L200</strong>.<br />
The call display on <strong>the</strong> ComStation <strong>L200</strong> is described on p. 45ff.<br />
5.2.8 Ward coupling<br />
5.2.9 Zones<br />
When <strong>ward</strong>s are coupled, all calls from <strong>the</strong> coupled area are displayed<br />
on <strong>the</strong> signal devices in <strong>the</strong> coupled area.<br />
If <strong>the</strong> <strong>ward</strong> is divided into zones (zone nursing, shift operation),<br />
only calls within that zone are displayed on <strong>the</strong> presence combinations<br />
<strong>L200</strong>, display combinations <strong>L200</strong> and ComStation<br />
<strong>L200</strong>. Zone nursing (shift operation) does not affect <strong>the</strong> functioning<br />
of <strong>the</strong> group signal lamps, direction signal lamps and corridor<br />
displays.<br />
<strong>System</strong> <strong>EccoLine</strong> <strong>L200</strong> − <strong>User</strong> Manual <strong>for</strong> <strong>the</strong> Ward, 00 8812 19, 08/05 (Rev. 1.1)
5.3 Handling a call<br />
<br />
Nursing staff<br />
A call is displayed (see page 26ff). How to handle <strong>the</strong> call:<br />
Go to <strong>the</strong> call location. The signal devices will indicate <strong>the</strong> way<br />
to you.<br />
Press <strong>the</strong> presence button on entering <strong>the</strong> room (call location).<br />
The presence will be switched on. The call is acknowledged<br />
if it has not yet been acknowledged on <strong>the</strong> ComStation <strong>L200</strong>.<br />
Take care of <strong>the</strong> person seeking help.<br />
Once you have helped <strong>the</strong> person, <strong>the</strong> call needs to be cancelled.<br />
This normally happens automatically when you switch<br />
off <strong>the</strong> staff presence. In WCs, press <strong>the</strong> grey cancel button<br />
to cancel <strong>the</strong> call.<br />
Note! Only acknowledged calls can be cancelled.<br />
When you leave <strong>the</strong> room, switch off <strong>the</strong> presence by pressing<br />
<strong>the</strong> presence button again.<br />
The person seeking help has received <strong>the</strong> relevant assistance.<br />
The call is cancelled, all call signals have been switched<br />
off.<br />
5.3.1 Obtaining support<br />
<br />
If you need help from additional staff following a call, press a call<br />
button again. With <strong>the</strong> presence switched on at <strong>the</strong> same time,<br />
this will signal a call of higher priority (assist call).<br />
Note! A staff assist call reactivates an acknowledged call and<br />
must be acknowledged once more be<strong>for</strong>e being cancelled.<br />
<strong>System</strong> <strong>EccoLine</strong> <strong>L200</strong> − <strong>User</strong> Manual <strong>for</strong> <strong>the</strong> Ward, 00 8812 19, 08/05 (Rev. 1.1) 29
Nursing staff<br />
30<br />
5.3.2 Raising an emergency call<br />
If you need assistance of highest priority (e.g. cardiac response<br />
team), please raise an emergency call at <strong>the</strong> emergency switch<br />
<strong>L200</strong>. For this lift <strong>the</strong> protection cover 3 and press <strong>the</strong> blue emergency<br />
button 1.<br />
For confirming <strong>the</strong> emergency call raised <strong>the</strong> red light 2 lights up<br />
brightly.<br />
1 Emergency button (blue)<br />
<strong>for</strong> raising emergency calls.<br />
2 Light (red)<br />
<strong>for</strong> locating <strong>the</strong> button in <strong>the</strong> dark (dim light) and <strong>for</strong> confirming<br />
<strong>the</strong> emergency call raised (bright light).<br />
3 Protection cover (transparent)<br />
<strong>for</strong> preventing accidental alarm setting.<br />
5.3.3 Cancelling a WC call /WC assist call<br />
Cancel switch <strong>L200</strong>/WC<br />
Call switch with<br />
cancel switch <strong>L200</strong>/WC<br />
1 Cancel switch (grey)<br />
<strong>for</strong> cancelling WC calls and WC assist calls<br />
2 Light (red)<br />
lit brightly when a call has been raised which needs to be<br />
cancelled using this switch.<br />
3 Call button (red)<br />
<strong>for</strong> raising calls.<br />
WC calls and WC assist calls are not automatically cancelled by<br />
switching off <strong>the</strong> staff presence. The grey cancel button needs<br />
to be pressed to cancel <strong>the</strong>se calls.<br />
<strong>System</strong> <strong>EccoLine</strong> <strong>L200</strong> − <strong>User</strong> Manual <strong>for</strong> <strong>the</strong> Ward, 00 8812 19, 08/05 (Rev. 1.1)
5.4 Watching fault displays<br />
Nursing staff<br />
The <strong>EccoLine</strong> <strong>L200</strong> system is protected against faults thanks to<br />
a high degree of safety devices. However, faults may still occur<br />
in <strong>the</strong> call system, which may mean that calls cannot be raised<br />
from all <strong>the</strong> rooms.<br />
If a ComStation <strong>L200</strong> is being operated, this will in<strong>for</strong>m <strong>the</strong> user<br />
immediately of faults in <strong>the</strong> call system (see page 42ff).<br />
In systems without a ComStation <strong>L200</strong>, faults can be displayed<br />
via o<strong>the</strong>r acoustic or optical devices. The universal interfaces<br />
<strong>L200</strong> and <strong>the</strong> SMU <strong>L200</strong> have error message outputs <strong>for</strong> this purpose.<br />
Notify your system administrator of which devices are displaying<br />
faults in <strong>the</strong> call system. Monitor <strong>the</strong>se displays.<br />
Danger! When a fault is displayed, in<strong>for</strong>m <strong>the</strong> system administrator<br />
immediately so that <strong>the</strong> fault can be rectified.<br />
<strong>System</strong> <strong>EccoLine</strong> <strong>L200</strong> − <strong>User</strong> Manual <strong>for</strong> <strong>the</strong> Ward, 00 8812 19, 08/05 (Rev. 1.1) 31
Nursing staff<br />
32<br />
5.5 Cleaning and disinfecting <strong>the</strong><br />
devices<br />
5.5.1 Cleaning<br />
Basically, <strong>the</strong> devices can be cleaned with a moist tissue using<br />
diluted and residue-free household cleaners or detergents.<br />
Non residue-free cleaning fluids collect in <strong>the</strong> spaces between<br />
<strong>the</strong> buttons and <strong>the</strong> housing.<br />
Do not use harsh or abrasive cleaning material or scouring<br />
cream.<br />
When cleaning, do not touch any electrical contacts.<br />
Housings are not water-proof. There<strong>for</strong>e, do not immerse any<br />
housing into water or cleaning solutions.<br />
When selecting a cleaning medium, <strong>the</strong> product properties on<br />
<strong>the</strong> next page should be considered.<br />
5.5.2 Disinfecting<br />
The devices of <strong>the</strong> nurse call system are suitable <strong>for</strong> moist wipe<br />
disinfection.<br />
Recommended medium <strong>for</strong> disinfecting, e.g. Dismozon pur<br />
(0.5%) from Bode Chemie, Hamburg, Germany. This oxygen−<br />
active surface cleaner and disinfectant features <strong>the</strong> comprehensive<br />
ingredient Magnesium monoperoxyphthalate hexahydrate<br />
(MMPP). Be<strong>for</strong>e using <strong>the</strong> disinfectant, read <strong>the</strong> manufacturer’s<br />
instructions.<br />
When disinfecting, do not come into contact with <strong>the</strong> electrical<br />
contacts.<br />
Housings are not water-proof. There<strong>for</strong>e, do not immerse any<br />
housing into water.<br />
Comply with <strong>the</strong> applicable directives <strong>for</strong> hygiene at <strong>the</strong> hospital.<br />
When selecting a disinfecting medium, <strong>the</strong> product properties on<br />
<strong>the</strong> next page should be considered.<br />
<strong>System</strong> <strong>EccoLine</strong> <strong>L200</strong> − <strong>User</strong> Manual <strong>for</strong> <strong>the</strong> Ward, 00 8812 19, 08/05 (Rev. 1.1)
5.5.3 Product materials<br />
Devices made of non-transparent plastics<br />
Nursing staff<br />
The housings <strong>for</strong> <strong>the</strong> majority of <strong>the</strong> equipment (switches, pear<br />
push switches, connection sockets) of <strong>the</strong> nurse call system are<br />
made from <strong>the</strong> user-friendly plastic ABS.<br />
ABS features a good resistance against dilute organic and inorganic<br />
acids, lyes, saline solutions as well as against most animal<br />
and vegetable fats and oils.<br />
However, concentrated mineral acids, aromatic hydrocarbons,<br />
hydrogen chlorides, esters, e<strong>the</strong>r and ketones are aggressive <strong>for</strong><br />
ABS. There<strong>for</strong>e, do not use any cleaning or disinfecting media<br />
which contain <strong>the</strong> be<strong>for</strong>e-mentioned ingredients.<br />
The buttons at <strong>the</strong> ComStation <strong>L200</strong> are designed as robust<br />
membrane keyboards made from polyurethane. Cleaning can<br />
be effected with any cleaning medium which is also suitable <strong>for</strong><br />
ABS material. Do not use any cleaning agent which contains isopropanol.<br />
This ingredient may damage <strong>the</strong> membrane.<br />
Devices made of transparent plastics<br />
The nurse-call terminals <strong>L200</strong> and <strong>the</strong> terminals <strong>L200</strong> and all signal<br />
lamps are made from transparent polycarbonate.<br />
This polycarbonate is resistant against dilute acids, oils and<br />
ethanol. However, polycarbonate is not resistant against lye solutions,<br />
concentrated acids, hydrogen chlorides, aromatic hydrocarbons<br />
and methanol.<br />
Corridor display Alpha 11<br />
The housings of <strong>the</strong> corridor display Alpha 11 is made from aluminium.<br />
Simple wiping with a damp cloth using a dilute household<br />
cleaner will suffice. Do not use a dry cloth. This may lead to<br />
<strong>the</strong> accumulation of static electricity which in turn could damage<br />
<strong>the</strong> corridor display units.<br />
The display’s front window is made from acrylic glass. This<br />
acrylic material features good resistance against dilute acids,<br />
lyes, saline solutions as well as against mineral oils. However,<br />
concentrated acids and lyes, aromatic hydrocarbons, hydrogen<br />
chlorides, esters, e<strong>the</strong>r and ketones may damage <strong>the</strong> acrylic<br />
glass. Recommended cleaning agents <strong>for</strong> <strong>the</strong> acrylic glass are<br />
warm water with dishwasher detergent or anti-static plastic<br />
cleaning agents and <strong>the</strong> use of a soft cloth. Do not clean acrylic<br />
glass with a glass cleaners such as Sidolin or o<strong>the</strong>r special<br />
cleaners.<br />
<strong>System</strong> <strong>EccoLine</strong> <strong>L200</strong> − <strong>User</strong> Manual <strong>for</strong> <strong>the</strong> Ward, 00 8812 19, 08/05 (Rev. 1.1) 33
Nursing staff<br />
34<br />
<br />
Note! The in<strong>for</strong>mation is based on our current knowledge and<br />
experience. <strong>User</strong>s, <strong>the</strong>re<strong>for</strong>e, are not relieved from <strong>the</strong> need <strong>for</strong><br />
individual tests considering <strong>the</strong> host of possible effects from <strong>the</strong><br />
use of any specific cleaning medium. As such, <strong>Tunstall</strong> shall not<br />
assume any legal responsibility <strong>for</strong> a specific application when<br />
using <strong>the</strong> be<strong>for</strong>e-mentioned cleaning methods and media.<br />
<strong>System</strong> <strong>EccoLine</strong> <strong>L200</strong> − <strong>User</strong> Manual <strong>for</strong> <strong>the</strong> Ward, 00 8812 19, 08/05 (Rev. 1.1)
6<br />
ComStation <strong>L200</strong><br />
This chapter contains <strong>the</strong> following sections:<br />
ComStation <strong>L200</strong><br />
This section covers <strong>the</strong> ComStation <strong>L200</strong>, its display, its buttons<br />
and <strong>the</strong> main window.<br />
Logging on and off<br />
Find out here how to log on and off in <strong>the</strong> ComStation <strong>L200</strong>.<br />
If “Fault” is displayed...<br />
... you need to react immediately. To find out how to do this, read<br />
this section.<br />
Handling calls<br />
The procedure <strong>for</strong> handling calls is given in this section.<br />
Ward coupling<br />
If you have <strong>the</strong> relevant option set up, <strong>ward</strong>s can be coupled, e.g.<br />
in quiet periods. The procedure <strong>for</strong> <strong>ward</strong> coupling and how to decouple<br />
<strong>the</strong> <strong>ward</strong>s, is given in this section.<br />
Activating a shift<br />
If shifts have been set up to organise your <strong>ward</strong> operations, you<br />
need to read this section. You will find out how to activate a shift.<br />
Setting <strong>the</strong> ComStation <strong>L200</strong><br />
The procedures <strong>for</strong> setting <strong>the</strong> volume, time, date and display<br />
contrast <strong>for</strong> <strong>the</strong> ComStation <strong>L200</strong> are given in this section.<br />
What to do, if...<br />
If problems occur during your work, please refer to this section.<br />
<strong>System</strong> <strong>EccoLine</strong> <strong>L200</strong> − <strong>User</strong> Manual <strong>for</strong> <strong>the</strong> Ward, 00 8812 19, 08/05 (Rev. 1.1) 35
ComStation <strong>L200</strong><br />
36<br />
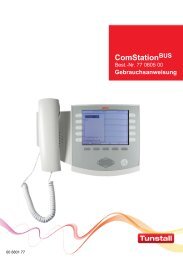
6.1 ComStation <strong>L200</strong><br />
The ComStation <strong>L200</strong> is a display panel <strong>for</strong> <strong>the</strong> <strong>ward</strong> nurse<br />
station. A <strong>ward</strong> is handled by <strong>the</strong> ComStation <strong>L200</strong>.<br />
In <strong>the</strong> following cases, <strong>the</strong> area handled is not identical to <strong>the</strong><br />
<strong>ward</strong>:<br />
Ward coupling (see page 50ff)<br />
Shift operation (see page 54ff)<br />
The ComStation <strong>L200</strong> is positioned on a table or fixed to <strong>the</strong> wall<br />
in <strong>the</strong> <strong>ward</strong> nurse station.<br />
<strong>System</strong> <strong>EccoLine</strong> <strong>L200</strong> − <strong>User</strong> Manual <strong>for</strong> <strong>the</strong> Ward, 00 8812 19, 08/05 (Rev. 1.1)
6.1.1 The display<br />
2<br />
1<br />
3<br />
1 1<br />
<br />
1 List continuation display<br />
2 List left<br />
3 Title bar<br />
4 List right<br />
5 Menu<br />
11:46:25<br />
ComStation <strong>L200</strong><br />
Note! The list continuation display is dark when <strong>the</strong> list is moved<br />
down<strong>ward</strong>s (bottom field) or up<strong>ward</strong>s (top field).<br />
<strong>System</strong> <strong>EccoLine</strong> <strong>L200</strong> − <strong>User</strong> Manual <strong>for</strong> <strong>the</strong> Ward, 00 8812 19, 08/05 (Rev. 1.1) 37<br />
4<br />
1<br />
5
ComStation <strong>L200</strong><br />
38<br />
6.1.2 The buttons<br />
ComStation 1<br />
* Assist call R 0108<br />
* Call R 0104<br />
Call R 0103<br />
Call R 0107<br />
Call R 0109<br />
Log off <strong>System</strong> Program<br />
PR1 R 0107<br />
PR1 R 0108<br />
PR1 R 0101<br />
PR1 R 0102<br />
1 Function buttons<br />
<strong>for</strong> selecting <strong>the</strong> relevant list field.<br />
2 Menu buttons<br />
<strong>for</strong> selecting <strong>the</strong> relevant menu option.<br />
3 Automatic button<br />
For <strong>the</strong> automatic acknowledgement of <strong>the</strong> most urgent call.<br />
For returning to <strong>the</strong> main window when you are in a different<br />
menu. The most urgent call is also acknowledged at <strong>the</strong> same<br />
time.<br />
4 Navigation buttons<br />
For moving between selection options on <strong>the</strong> display.<br />
For moving through lists when <strong>the</strong> list continuation display is<br />
dark.<br />
<strong>System</strong> <strong>EccoLine</strong> <strong>L200</strong> − <strong>User</strong> Manual <strong>for</strong> <strong>the</strong> Ward, 00 8812 19, 08/05 (Rev. 1.1)
6.1.3 The main window<br />
3<br />
2<br />
1<br />
ComStation <strong>L200</strong><br />
The main window is displayed once you have logged on to <strong>the</strong><br />
device.<br />
ComStation 1<br />
1 1<br />
* Assist call R 0108<br />
* Call R 0104<br />
Call R 0103<br />
Call R 0107<br />
Call R 0109<br />
Log off <strong>System</strong> Program<br />
PR1 R 0107<br />
PR1 R 0108<br />
PR1 R 0101<br />
PR1 R 0102<br />
1 List continuation display<br />
The field is dark when <strong>the</strong> list is moved down<strong>ward</strong>s (bottom field)<br />
or up<strong>ward</strong>s (top field). Move through <strong>the</strong> list using <strong>the</strong> navigation<br />
buttons.<br />
2 Call list<br />
The calls from <strong>the</strong> rooms connected are displayed. Fresh calls<br />
are identified using an asterisk (*). The function buttons next to<br />
<strong>the</strong> list fields can be used to acknowledge <strong>the</strong> calls.<br />
3 Title bar<br />
From left to right:<br />
Menu level: if you are not in <strong>the</strong> main window.<br />
Function display:<br />
ComStation 1 (...8): The figure gives <strong>the</strong> number of <strong>the</strong><br />
ComStation <strong>L200</strong>.<br />
Fault: Fault in <strong>the</strong> call system.<br />
WIC: This <strong>ward</strong> is coupled to o<strong>the</strong>r <strong>ward</strong>s.<br />
S1 (...8).: Shift 1 (...8) is active.<br />
Clock<br />
4 Presence list<br />
The presence messages (PR1) <strong>for</strong> <strong>the</strong> connected rooms are displayed<br />
in <strong>the</strong> order of <strong>the</strong>ir appearance. The oldest message will<br />
be at <strong>the</strong> top.<br />
5 Menu<br />
The menu buttons can be used to select <strong>the</strong> menu options.<br />
<strong>System</strong> <strong>EccoLine</strong> <strong>L200</strong> − <strong>User</strong> Manual <strong>for</strong> <strong>the</strong> Ward, 00 8812 19, 08/05 (Rev. 1.1) 39<br />
4<br />
1<br />
5
ComStation <strong>L200</strong><br />
40<br />
6.2 Logging on / off<br />
Be<strong>for</strong>e you can start working on <strong>the</strong> ComStation <strong>L200</strong> you need<br />
to log on. When you leave <strong>the</strong> ComStation <strong>L200</strong>, you need to log<br />
off.<br />
6.2.1 Logging on<br />
The ComStation <strong>L200</strong> is always switched on. Be<strong>for</strong>e you log on,<br />
you will see <strong>the</strong> following window in <strong>the</strong> display:<br />
Log on<br />
ComStation 1 11:50:52<br />
Press ”Log on“.<br />
You are now logged on. The main window <strong>for</strong> <strong>the</strong> ComStation<br />
<strong>L200</strong> will appear. The green field in <strong>the</strong> room signal lamp will<br />
be on to indicate that <strong>the</strong> ComStation <strong>L200</strong> is occupied.<br />
Screensaver<br />
If no button is pressed <strong>for</strong> 10 minutes, a screensaver will be<br />
switched on and <strong>the</strong> display goes dark. Press any button to<br />
switch <strong>the</strong> screensaver off again.<br />
<strong>System</strong> <strong>EccoLine</strong> <strong>L200</strong> − <strong>User</strong> Manual <strong>for</strong> <strong>the</strong> Ward, 00 8812 19, 08/05 (Rev. 1.1)
6.2.2 Logging off<br />
ComStation <strong>L200</strong><br />
Each time you leave <strong>the</strong> ComStation <strong>L200</strong>, you should log off.<br />
The calls <strong>for</strong> your ComStation <strong>L200</strong> will <strong>the</strong>n be displayed on <strong>the</strong><br />
<strong>ward</strong> signal devices.<br />
If you do not log off when leaving <strong>the</strong> ComStation <strong>L200</strong>, <strong>the</strong> calls<br />
will be displayed on <strong>the</strong> <strong>ward</strong> signal devices after 30 seconds<br />
(call <strong>for</strong><strong>ward</strong>ing).<br />
How to log off:<br />
Press “Log off” in <strong>the</strong> main ComStation <strong>L200</strong> window.<br />
Log off <strong>System</strong> Program<br />
The following menu will appear:<br />
Back Off<br />
Press ”Off“.<br />
ComStation 1 18:45:30<br />
You are now logged off. The window <strong>for</strong> ano<strong>the</strong>r logon will be<br />
displayed (see page 40). The green field in <strong>the</strong> room signal<br />
lamp will go out to indicate that <strong>the</strong> ComStation <strong>L200</strong> is unoccupied.<br />
<strong>System</strong> <strong>EccoLine</strong> <strong>L200</strong> − <strong>User</strong> Manual <strong>for</strong> <strong>the</strong> Ward, 00 8812 19, 08/05 (Rev. 1.1) 41
ComStation <strong>L200</strong><br />
42<br />
6.3 If “Fault” is displayed...<br />
<br />
Fault!<br />
Log off<br />
Fault 11:45:25<br />
<strong>System</strong> Program<br />
Note! If “Fault RX” is displayed, read <strong>the</strong> section on page 44.<br />
If ”Fault” appears in <strong>the</strong> title bar, you need to take action immediately.<br />
There is a fault in <strong>the</strong> call system. This means it may be that calls<br />
can no longer be raised from all <strong>the</strong> rooms.<br />
The fault will also be indicated acoustically in that you will hear<br />
<strong>the</strong> tone sequence “1 second tone − 20 seconds pause” being<br />
repeated.<br />
You must <strong>the</strong>re<strong>for</strong>e react immediately:<br />
Log off <strong>System</strong> Program<br />
Press “<strong>System</strong>“.<br />
The following menu will appear:<br />
Back Set Config Service Info<br />
Press ”Info“.<br />
<strong>System</strong> <strong>EccoLine</strong> <strong>L200</strong> − <strong>User</strong> Manual <strong>for</strong> <strong>the</strong> Ward, 00 8812 19, 08/05 (Rev. 1.1)
The following menu will appear:<br />
ComStation <strong>L200</strong><br />
Back ComStation WCU Fault<br />
Press ”Fault“.<br />
All rooms with faults will be displayed.<br />
The acoustic fault indication will be switched off.<br />
Fault<br />
Back<br />
R 0101 (01) A<br />
R 0103 (03) A<br />
R 0104 (04) A<br />
Fault 11:45:30<br />
The in<strong>for</strong>mation has <strong>the</strong> following important meanings <strong>for</strong> <strong>the</strong><br />
system administrator:<br />
R 0101 (01) A<br />
A: Room is active<br />
No A: Room is inactive.<br />
Address<br />
Room number (max. 6 figures)<br />
In<strong>for</strong>m a system administrator of <strong>the</strong> fault. The technician will<br />
<strong>the</strong>n rectify <strong>the</strong> fault.<br />
Press “Back” until <strong>the</strong> main window appears.<br />
The main window will be back on <strong>the</strong> screen. You can continue<br />
your work.<br />
<strong>System</strong> <strong>EccoLine</strong> <strong>L200</strong> − <strong>User</strong> Manual <strong>for</strong> <strong>the</strong> Ward, 00 8812 19, 08/05 (Rev. 1.1) 43
ComStation <strong>L200</strong><br />
44<br />
Acoustic fault indication<br />
The acoustic fault indication is sounded when a new fault occurs.<br />
The acoustic fault indication is switched off when <strong>the</strong> fault has<br />
been rectified or when you have displayed <strong>the</strong> faults as described.<br />
In <strong>the</strong> second case, <strong>the</strong> acoustic fault indication will be<br />
switched off although <strong>the</strong> fault has not yet been rectified!<br />
6.3.1 If “Fault RX” is displayed...<br />
If ”Fault RX” appears in <strong>the</strong> title bar, you need to take action<br />
immediately.<br />
A problem has occurred in <strong>the</strong> data transfer to or from your<br />
ComStation <strong>L200</strong>.<br />
The fault will also be indicated acoustically in that you will hear<br />
<strong>the</strong> tone sequence “1 second tone − 20 seconds pause” being<br />
repeated.<br />
You must <strong>the</strong>re<strong>for</strong>e react immediately:<br />
Press <strong>the</strong> Automatic button.<br />
The ComStation <strong>L200</strong> will be initialised, thus correcting <strong>the</strong><br />
fault. You can continue your work.<br />
<strong>System</strong> <strong>EccoLine</strong> <strong>L200</strong> − <strong>User</strong> Manual <strong>for</strong> <strong>the</strong> Ward, 00 8812 19, 08/05 (Rev. 1.1)
6.4 Handling calls<br />
6.4.1 Call display<br />
ComStation <strong>L200</strong><br />
The calls from <strong>the</strong> connected rooms are displayed on <strong>the</strong> lefthand<br />
side of <strong>the</strong> main window in <strong>the</strong> call list – along with details<br />
on <strong>the</strong> call category and room number.<br />
* Assist call R 0108<br />
* Call R 0104<br />
Call R 0103<br />
Log off <strong>System</strong> Program<br />
Call list<br />
ComStation 1<br />
Call R 0107<br />
PR1 R 0107<br />
PR1 R 0108<br />
PR1 R 0101<br />
PR1 R 0102<br />
Call R 0109 PR1 R 0117<br />
11:45:30<br />
The calls are sorted by call category – in o<strong>the</strong>r words, <strong>the</strong> priority<br />
level. The most urgent call will be at <strong>the</strong> top.<br />
This means that emergency calls will be at <strong>the</strong> top, followed by<br />
assist calls and <strong>the</strong>n calls at <strong>the</strong> bottom. The oldest call will be at<br />
<strong>the</strong> top within <strong>the</strong> call categories.<br />
The call category of a call can be determined acoustically:<br />
Call<br />
1 second tone − 10 seconds pause...<br />
Assist call<br />
1 second tone − 1 second pause...<br />
Emergency call<br />
0.3 second tone − 0.3 second pause...<br />
The more urgent <strong>the</strong> call, <strong>the</strong> faster <strong>the</strong> sequence of tones.<br />
<strong>System</strong> <strong>EccoLine</strong> <strong>L200</strong> − <strong>User</strong> Manual <strong>for</strong> <strong>the</strong> Ward, 00 8812 19, 08/05 (Rev. 1.1) 45
ComStation <strong>L200</strong><br />
46<br />
<br />
If <strong>the</strong>re are multiple calls, only <strong>the</strong> most important call can be<br />
heard.<br />
Note! The acoustic call display is especially important if you do<br />
not have <strong>the</strong> main window on <strong>the</strong> display. Calls are <strong>the</strong>n indicated<br />
visually ra<strong>the</strong>r than just acoustically.<br />
Call category What you hear Call type<br />
Emergency call Fast sequence of tones Emergency call<br />
Assist call Medium sequence of<br />
tones<br />
WC assist call<br />
Call Slow sequence of tones WC call<br />
Staff assist call 1<br />
Patient call<br />
Fresh calls are identified using an asterisk (*).<br />
The call type of an incoming call is given when you acknowledge<br />
<strong>the</strong> call and <strong>the</strong> call window is displayed:<br />
1 Call location<br />
2 Presence<br />
3 Call type<br />
4 Bed-no.<br />
Back<br />
Room 0108<br />
PR1<br />
Staff assist call 1<br />
Bed 4<br />
ComStation 1 11:45:30<br />
PR1 R 0107<br />
PR1 R 0108<br />
PR1 R 0101<br />
PR1 R 0102<br />
PR1 R 0117<br />
Once you have acknowledged <strong>the</strong> call, <strong>the</strong> call is known as an<br />
acknowledged call. Be<strong>for</strong>ehand it would have been called a fresh<br />
<strong>System</strong> <strong>EccoLine</strong> <strong>L200</strong> − <strong>User</strong> Manual <strong>for</strong> <strong>the</strong> Ward, 00 8812 19, 08/05 (Rev. 1.1)
ComStation <strong>L200</strong><br />
call. Acknowledged calls are displayed in <strong>the</strong> call list underneath<br />
<strong>the</strong> fresh calls. Acknowledged calls are not indicated acoustically.<br />
6.4.2 Acknowledging calls<br />
Calls are displayed in <strong>the</strong> call list. Fresh calls are identified using<br />
an asterisk. The most urgent call is at <strong>the</strong> top of <strong>the</strong> call list. You<br />
will hear <strong>the</strong> call tones <strong>for</strong> <strong>the</strong> most urgent call.<br />
Acknowledge <strong>the</strong> call. You have two options available <strong>for</strong><br />
doing this:<br />
Press <strong>the</strong> function button next to <strong>the</strong> call required,<br />
or<br />
press <strong>the</strong> Automatic button. This will automatically acknowledge<br />
<strong>the</strong> call at <strong>the</strong> top of <strong>the</strong> call list.<br />
E.g<br />
.<br />
* Assist call R 0108<br />
* Call R 0104<br />
Call R 0103<br />
Call R 0107<br />
ComStation 1 11:45:30<br />
Logging off <strong>System</strong> Program<br />
PR1 R 0107<br />
PR1 R 0108<br />
PR1 R 0101<br />
PR1 R 0102<br />
Call R 0109 PR1 R 0117<br />
Function button or Automatic button<br />
<strong>System</strong> <strong>EccoLine</strong> <strong>L200</strong> − <strong>User</strong> Manual <strong>for</strong> <strong>the</strong> Ward, 00 8812 19, 08/05 (Rev. 1.1) 47
ComStation <strong>L200</strong><br />
48<br />
The call window appears:<br />
Room 0108<br />
PR1<br />
Staff assist call 1<br />
Bed 4<br />
Close <strong>the</strong> call window<br />
ComStation 1 11:45:33<br />
PR1 R 0107<br />
PR1 R 0108<br />
PR1 R 0101<br />
PR1 R 0102<br />
PR1 R 0117<br />
Back + −<br />
When you have read <strong>the</strong> in<strong>for</strong>mation in <strong>the</strong> call window, press<br />
“Back”.<br />
The call window disappears. The call appears in <strong>the</strong> call list<br />
with <strong>the</strong> acknowledged calls.<br />
The call window can be opened again at any time by pressing<br />
<strong>the</strong> function button <strong>for</strong> <strong>the</strong> call.<br />
Obtaining staff assistance<br />
If you need additional staff to assist:<br />
Take a look in <strong>the</strong> PR list to see where <strong>the</strong> o<strong>the</strong>r nursing staff<br />
are located.<br />
Helping <strong>the</strong> caller<br />
Go to <strong>the</strong> call location.<br />
Press <strong>the</strong> presence button on entering <strong>the</strong> room.<br />
The presence will be switched on.<br />
Take care of <strong>the</strong> person seeking help.<br />
Once you have helped <strong>the</strong> person, <strong>the</strong> call needs to be cancelled.<br />
This normally happens automatically when you switch<br />
<strong>System</strong> <strong>EccoLine</strong> <strong>L200</strong> − <strong>User</strong> Manual <strong>for</strong> <strong>the</strong> Ward, 00 8812 19, 08/05 (Rev. 1.1)
ComStation <strong>L200</strong><br />
off <strong>the</strong> staff presence. In WCs, press <strong>the</strong> grey cancel button<br />
to cancel <strong>the</strong> call.<br />
Note! Only acknowledged calls can be cancelled.<br />
When you leave <strong>the</strong> room, switch off <strong>the</strong> presence by pressing<br />
<strong>the</strong> presence button again.<br />
The person seeking help has received <strong>the</strong> relevant assistance.<br />
The call is cancelled, all call signals have been switched<br />
off.<br />
<strong>System</strong> <strong>EccoLine</strong> <strong>L200</strong> − <strong>User</strong> Manual <strong>for</strong> <strong>the</strong> Ward, 00 8812 19, 08/05 (Rev. 1.1) 49
ComStation <strong>L200</strong><br />
50<br />
6.5 Ward coupling<br />
<br />
<br />
You only need to read this section if you have <strong>ward</strong> coupling set<br />
up on your system. Find out <strong>the</strong> relevant in<strong>for</strong>mation from your<br />
system administrator.<br />
You will normally only be looking after <strong>the</strong> rooms in your <strong>ward</strong> on<br />
<strong>the</strong> ComStation <strong>L200</strong>. If necessary – e.g. in quiet periods – multiple<br />
<strong>ward</strong>s can be coupled toge<strong>the</strong>r.<br />
All calls and staff presences in <strong>the</strong> coupled area are displayed on<br />
<strong>the</strong> signal devices in that area.<br />
Ward coupling can be set ei<strong>the</strong>r by you, by ano<strong>the</strong>r ComStation<br />
<strong>L200</strong>, or automatically.<br />
Note! Ward can be coupled automatically if a certain call category<br />
(e.g. emergency call) has been raised. Ask your system<br />
administrator whe<strong>the</strong>r this variant has been set up in your establishment.<br />
Whilst two or more <strong>ward</strong>s are coupled, you will see “WIC” in <strong>the</strong><br />
title bar on <strong>the</strong> display.<br />
Log off<br />
ComStation 1 WIC 11:45:25<br />
You are coupled to o<strong>the</strong>r<br />
<strong>ward</strong>s<br />
<strong>System</strong> Program<br />
Note! Ward coupling cancels shifts (see page 54ff). This means<br />
that if a shift was set up, it will be deactivated. The <strong>ward</strong> is no<br />
longer divided into zones.<br />
<strong>System</strong> <strong>EccoLine</strong> <strong>L200</strong> − <strong>User</strong> Manual <strong>for</strong> <strong>the</strong> Ward, 00 8812 19, 08/05 (Rev. 1.1)
ComStation <strong>L200</strong><br />
Your system administrator has set a maximum of eight <strong>ward</strong><br />
coupling programs (WIC programs) from which you can choose.<br />
Each WIC program involves <strong>the</strong> coupling of specific <strong>ward</strong>s.<br />
Ask your system administrator which <strong>ward</strong>s are coupled in which<br />
programs, and note <strong>the</strong> following:<br />
WIC Program A<br />
WIC Program B<br />
WIC Program C<br />
WIC Program D<br />
WIC Program E<br />
WIC Program F<br />
WIC Program G<br />
WIC Program H<br />
Coupled Wards:<br />
You can activate <strong>the</strong>se programs. Fur<strong>the</strong>r WIC programs may be<br />
active at <strong>the</strong> same time, which you cannot influence. If a program<br />
is active, <strong>the</strong> respective <strong>ward</strong>s are coupled.<br />
<strong>System</strong> <strong>EccoLine</strong> <strong>L200</strong> − <strong>User</strong> Manual <strong>for</strong> <strong>the</strong> Ward, 00 8812 19, 08/05 (Rev. 1.1) 51
ComStation <strong>L200</strong><br />
52<br />
6.5.1 Activating / deactivating WIC programs<br />
How to activate an inactive WIC program or to deactivate an active<br />
WIC program<br />
Log off <strong>System</strong> Program<br />
Press “Program“.<br />
The following menu will appear:<br />
Back WIC Shift Swing room<br />
Press ”WIC“.<br />
The WIC programs (8 maximum) will be displayed.<br />
WIC<br />
WIC program A<br />
WIC program B<br />
WIC program C<br />
WIC program D<br />
WIC program E<br />
Back<br />
ComStation 1 11:45:30<br />
WIC program F<br />
WIC program G<br />
WIC program H<br />
Active WIC programs have a dark background. These have<br />
been activated ei<strong>the</strong>r by you or by ano<strong>the</strong>r ComStation <strong>L200</strong>.<br />
Inactive WIC programs have no dark background.<br />
You can activate or deactivate WIC programs.<br />
If you want to activate an inactive WIC program, press <strong>the</strong><br />
function button, so that <strong>the</strong> program gets a dark background.<br />
The WIC program is activated immediately.<br />
<strong>System</strong> <strong>EccoLine</strong> <strong>L200</strong> − <strong>User</strong> Manual <strong>for</strong> <strong>the</strong> Ward, 00 8812 19, 08/05 (Rev. 1.1)
ComStation <strong>L200</strong><br />
If you want to deactivate an active WIC program, press <strong>the</strong><br />
function button, so that <strong>the</strong> dark background of <strong>the</strong> program<br />
disappears. The WIC program is deactivated immediately.<br />
Press “Back” until <strong>the</strong> main window appears.<br />
The main window will be back on <strong>the</strong> screen. If <strong>the</strong>re is still a<br />
WIC program active, <strong>the</strong> title bar will display “WIC”.<br />
ComStation 1 11:46:01<br />
WIC<br />
<strong>System</strong> <strong>EccoLine</strong> <strong>L200</strong> − <strong>User</strong> Manual <strong>for</strong> <strong>the</strong> Ward, 00 8812 19, 08/05 (Rev. 1.1) 53
ComStation <strong>L200</strong><br />
54<br />
6.6 Activating a shift<br />
<br />
You only need to read this section if you have shifts set up on your<br />
system. Find out <strong>the</strong> relevant in<strong>for</strong>mation from your system administrator.<br />
To provide support <strong>for</strong> zone nursing, <strong>Tunstall</strong> has developed <strong>the</strong><br />
concept of zones and shifts:<br />
Zone<br />
A zone is part of a <strong>ward</strong> within which calls (and presences) are<br />
displayed. Calls raised within <strong>the</strong> zone are not displayed in <strong>the</strong><br />
rest of <strong>the</strong> <strong>ward</strong>. Specific staff are normally responsible <strong>for</strong> a<br />
zone.<br />
Note! Rooms with terminals and ComStation <strong>L200</strong>s can be allocated<br />
to zones. Additional call devices in <strong>the</strong> corridor (connected<br />
via universal interface) belong to all zones.<br />
Shift<br />
The zones specified in a <strong>ward</strong> are not permanent. The division<br />
into zones can be changed. Each division of <strong>the</strong> <strong>ward</strong> into zones<br />
is known as a “shift”.<br />
A shift is <strong>the</strong> division of a <strong>ward</strong> in a maximum of 8 zones. In this<br />
process, <strong>the</strong> zones may vary, i.e. all rooms can belong to more<br />
than one zone.<br />
A maximum of 8 shifts can be specified <strong>for</strong> each <strong>ward</strong>. Which of<br />
<strong>the</strong> shifts is active is selected on <strong>the</strong> ComStation <strong>L200</strong>.<br />
<strong>System</strong> <strong>EccoLine</strong> <strong>L200</strong> − <strong>User</strong> Manual <strong>for</strong> <strong>the</strong> Ward, 00 8812 19, 08/05 (Rev. 1.1)
Example<br />
Shift 1<br />
Zone 1<br />
Shift 2<br />
Zone 1 Zone 2<br />
Shift 3<br />
Zone 3<br />
Zone 1 Zone 2<br />
ComStation <strong>L200</strong><br />
<strong>System</strong> <strong>EccoLine</strong> <strong>L200</strong> − <strong>User</strong> Manual <strong>for</strong> <strong>the</strong> Ward, 00 8812 19, 08/05 (Rev. 1.1) 55
ComStation <strong>L200</strong><br />
Find out from your system administrator how <strong>the</strong> shifts are specified on your <strong>ward</strong>. Enter<br />
<strong>the</strong> room numbers into <strong>the</strong> following table. If <strong>the</strong>re are more zones or shifts in your <strong>ward</strong><br />
than are provided <strong>for</strong> in <strong>the</strong> table, create your own table.<br />
56<br />
Shift 1<br />
Shift 2<br />
Shift 3<br />
Shift 4<br />
Zone 1 Zone 2 Zone 3 Zone 4 Zone 5 Zone 6<br />
<strong>System</strong> <strong>EccoLine</strong> <strong>L200</strong> − <strong>User</strong> Manual <strong>for</strong> <strong>the</strong> Ward, 00 8812 19, 08/05 (Rev. 1.1)
6.6.1 Activating a shift<br />
How to activate a shift:<br />
Log off <strong>System</strong> Program<br />
Press “Program“.<br />
The following menu will appear:<br />
Back WIC Shift Swing room<br />
ComStation <strong>L200</strong><br />
Press ”Shift“.<br />
The shifts available <strong>for</strong> selection in your <strong>ward</strong> will be displayed.<br />
Shift<br />
Back<br />
Shift 1<br />
Shift 2<br />
Shift 3<br />
Shift 4<br />
Shift 5<br />
ComStation 1 11:45:30<br />
Shift 6<br />
Shift 7<br />
Shift 8<br />
When a shift is active, it will have a dark background.<br />
If a shift has a dark background, press <strong>the</strong> function button <strong>for</strong><br />
it.<br />
The shift will no longer have a dark background and is <strong>the</strong>re<strong>for</strong>e<br />
inactive.<br />
Press <strong>the</strong> function button <strong>for</strong> <strong>the</strong> shift you want to activate.<br />
<strong>System</strong> <strong>EccoLine</strong> <strong>L200</strong> − <strong>User</strong> Manual <strong>for</strong> <strong>the</strong> Ward, 00 8812 19, 08/05 (Rev. 1.1) 57
ComStation <strong>L200</strong><br />
58<br />
<br />
The shift has a dark background, and is <strong>the</strong>re<strong>for</strong>e active.<br />
Press “Back” until <strong>the</strong> main window appears.<br />
The main window will be back on <strong>the</strong> screen. The shift is active.<br />
The active shift will be entered in <strong>the</strong> title bar.<br />
ComStation 1 S3 11:46:01<br />
Note! Ward coupling (see page 50ff) reverses shift settings. This<br />
means that if a shift was active, it will be deactivated. The <strong>ward</strong><br />
is no longer divided into zones. The title bar will display “WIC”.<br />
6.6.2 Deactivating shifts<br />
You want to deactivate all <strong>the</strong> shifts, and you don’t want <strong>the</strong> <strong>ward</strong><br />
to be divided into zones.<br />
Proceed as described in <strong>the</strong> previous section. But do not activate<br />
a new shift once <strong>the</strong> active shift has been switched off.<br />
<strong>System</strong> <strong>EccoLine</strong> <strong>L200</strong> − <strong>User</strong> Manual <strong>for</strong> <strong>the</strong> Ward, 00 8812 19, 08/05 (Rev. 1.1)
ComStation <strong>L200</strong><br />
6.7 Setting <strong>the</strong> ComStation <strong>L200</strong><br />
<br />
The following values can be set on <strong>the</strong> ComStation <strong>L200</strong>:<br />
Volume (of <strong>the</strong> buzzer)<br />
Time (<strong>for</strong> <strong>the</strong> entire call system)<br />
Date (<strong>for</strong> <strong>the</strong> entire call system)<br />
Contrast <strong>for</strong> <strong>the</strong> display<br />
Note! Please note that <strong>the</strong> time and date setting applies not just<br />
to your ComStation <strong>L200</strong> but <strong>for</strong> <strong>the</strong> entire call system.<br />
Proceed as follows:<br />
Log off <strong>System</strong> Program<br />
Press “<strong>System</strong>“.<br />
The following menu will appear:<br />
Back Set Config Service Info<br />
Press ”Set“.<br />
The following menu will appear:<br />
Back Volume Time Date Contrast<br />
Press “Volume”, “Time”, “Date” or “Contrast” depending on<br />
<strong>the</strong> setting you want to change.<br />
The settings window will be displayed.<br />
<strong>System</strong> <strong>EccoLine</strong> <strong>L200</strong> − <strong>User</strong> Manual <strong>for</strong> <strong>the</strong> Ward, 00 8812 19, 08/05 (Rev. 1.1) 59
ComStation <strong>L200</strong><br />
60<br />
Volume<br />
Buzzer<br />
New time<br />
New date<br />
Contrast<br />
Back Set + −<br />
The menu buttons “+” and “−” are used to set <strong>the</strong> values.<br />
Press ”Set“.<br />
The value has been set.<br />
Press “Back” until <strong>the</strong> main window appears.<br />
<strong>System</strong> <strong>EccoLine</strong> <strong>L200</strong> − <strong>User</strong> Manual <strong>for</strong> <strong>the</strong> Ward, 00 8812 19, 08/05 (Rev. 1.1)
6.8 What to do, if...<br />
ComStation <strong>L200</strong><br />
Problem Possible cause Remedy<br />
ComStation <strong>L200</strong> is no longer A power plug has become dis- Insert <strong>the</strong> plug and log on again.<br />
reacting<br />
connected.<br />
Display is dark. The screensaver has been activated.<br />
Press any button.<br />
The following will appear on <strong>the</strong> The ComStation <strong>L200</strong> is not op- Call <strong>the</strong> system administrator<br />
display: Fault, no connection to erational because <strong>the</strong>re is no immediately. Ensure that <strong>the</strong> pa-<br />
WCU. An acoustic fault indica- connection to <strong>the</strong> <strong>ward</strong> control tients/residents are still receiving<br />
tion will be sounded.<br />
unit (WCU <strong>L200</strong>).<br />
optimum care. Monitor <strong>the</strong> display<br />
on o<strong>the</strong>r signal devices.<br />
Danger! If <strong>the</strong> problem has not been resolved using <strong>the</strong><br />
measures given, in<strong>for</strong>m a system administrator.<br />
<strong>System</strong> <strong>EccoLine</strong> <strong>L200</strong> − <strong>User</strong> Manual <strong>for</strong> <strong>the</strong> Ward, 00 8812 19, 08/05 (Rev. 1.1) 61
ComStation <strong>L200</strong><br />
62<br />
<strong>System</strong> <strong>EccoLine</strong> <strong>L200</strong> − <strong>User</strong> Manual <strong>for</strong> <strong>the</strong> Ward, 00 8812 19, 08/05 (Rev. 1.1)
7<br />
<strong>System</strong><br />
administrator<br />
Danger! Ensure that <strong>the</strong> calls in <strong>the</strong> call system are always<br />
handled. If <strong>the</strong> ComStation <strong>L200</strong> is occupied by a system administrator,<br />
<strong>the</strong> nursing staff must monitor <strong>the</strong> o<strong>the</strong>r signal devices<br />
to <strong>the</strong> call display.<br />
This chapter assumes that you have read <strong>the</strong> previous chapter<br />
carefully and that you are familiar with <strong>the</strong> functions described.<br />
The ComStation <strong>L200</strong> and <strong>the</strong> <strong>ward</strong> control unit WCU <strong>L200</strong> will<br />
have been configured according to <strong>the</strong> requirements of your establishment<br />
when <strong>the</strong> call system was set up. However, it may be<br />
that you want to change <strong>the</strong> configuration. There are various<br />
ways of doing this, which are described in this chapter.<br />
These configuration changes are carried out using a ComStation<br />
<strong>L200</strong>. The configuration menu <strong>for</strong> <strong>the</strong> ComStation <strong>L200</strong> is protected<br />
by a password which should only be known to you as <strong>the</strong><br />
system administrator.<br />
The following section covers in<strong>for</strong>mation required <strong>for</strong> <strong>the</strong> configuration.<br />
The configuration steps are <strong>the</strong>n described in detail.<br />
<strong>System</strong> <strong>EccoLine</strong> <strong>L200</strong> − <strong>User</strong> Manual <strong>for</strong> <strong>the</strong> Ward, 00 8812 19, 08/05 (Rev. 1.1) 63
<strong>System</strong> administrator<br />
64<br />
7.1 Basic knowledge on this<br />
chapter<br />
7.1.1 Addresses<br />
<br />
The data in <strong>the</strong> call system is managed using addresses. A maximum<br />
of 92 addresses can be assigned on each <strong>ward</strong>. The following<br />
devices have addresses:<br />
Nurse call terminal <strong>L200</strong><br />
and <strong>the</strong> variant nurse call terminal <strong>L200</strong>/D<br />
The terminal contains <strong>the</strong> electronics <strong>for</strong> operating a<br />
room. The integrated room signal lamp is used to<br />
display calls and staff presence in <strong>the</strong> relevant room.<br />
Terminal <strong>L200</strong><br />
and <strong>the</strong> variant terminal <strong>L200</strong>/D<br />
The terminal contains <strong>the</strong> electronics <strong>for</strong> operating a<br />
room.<br />
ComStation <strong>L200</strong><br />
In <strong>the</strong> nurse station <strong>for</strong> displaying calls, staff presence<br />
and faults. Options <strong>for</strong> call acknowledgement, <strong>ward</strong><br />
coupling, shift activation, swing room allocation, configuration.<br />
Universal interface<br />
Depending on <strong>the</strong> operating mode set, <strong>for</strong> connecting<br />
group signal lamps, direction signal lamps, corridor<br />
displays and external call devices.<br />
Note! For <strong>the</strong> sake of simplicity, all <strong>the</strong> terminals (nurse call terminal<br />
<strong>L200</strong>, nurse call terminal <strong>L200</strong>/D, terminal <strong>L200</strong>, terminal<br />
<strong>L200</strong>/D) will be referred to as just terminal in <strong>the</strong> following section.<br />
Each address must only be occupied once in <strong>the</strong> <strong>ward</strong>. The call<br />
system identifies <strong>the</strong> device by its unique address. The addresses<br />
cannot be freely assigned. The following sectors are<br />
fixed:<br />
Address can be occupied with<br />
1 to 63 Terminals (= rooms)<br />
65 to 72 ComStation <strong>L200</strong><br />
80 to 92 Universal interfaces<br />
<strong>System</strong> <strong>EccoLine</strong> <strong>L200</strong> − <strong>User</strong> Manual <strong>for</strong> <strong>the</strong> Ward, 00 8812 19, 08/05 (Rev. 1.1)
Addresses <strong>for</strong> terminals = room address<br />
<strong>System</strong> administrator<br />
Each room connected to <strong>the</strong> call system is fitted with a terminal.<br />
For this reason, <strong>the</strong> address of <strong>the</strong> terminal is also known as <strong>the</strong><br />
room address.<br />
The address of a terminal is set on a 10-pole coding switch on<br />
<strong>the</strong> board.<br />
1 2 4 8 16 32<br />
Room address<br />
Factory setting: Address 1<br />
ATTENTION: Do not change<br />
coding switches 8 and 1!<br />
Factory setting.<br />
Fig. 1: Terminal<br />
<strong>System</strong> <strong>EccoLine</strong> <strong>L200</strong> − <strong>User</strong> Manual <strong>for</strong> <strong>the</strong> Ward, 00 8812 19, 08/05 (Rev. 1.1) 65<br />
ON, if display combination <strong>L200</strong> is connected<br />
Lamp test<br />
ON<br />
OFF<br />
There are 63 addresses <strong>for</strong> terminals available in each <strong>ward</strong>, i.e.<br />
a maximum of 63 rooms can be connected.
<strong>System</strong> administrator<br />
66<br />
ComStation address<br />
Each ComStation <strong>L200</strong> has an address. This address is saved<br />
in <strong>the</strong> ComStation <strong>L200</strong> software and can be changed using <strong>the</strong><br />
setting on <strong>the</strong> ComStation <strong>L200</strong>. There are 8 addresses available<br />
<strong>for</strong> <strong>the</strong> ComStation <strong>L200</strong> on each <strong>ward</strong>.<br />
To make things easier, <strong>the</strong> ComStation display is used to display<br />
and set <strong>the</strong> ComStation number and not <strong>the</strong> ComStation address.<br />
The ComStation address is calculated from <strong>the</strong> ComStation<br />
number:<br />
ComStation address = ComStation no. + 64<br />
ComStation 1<br />
Log off <strong>System</strong> Program<br />
Fig. 2: ComStation <strong>L200</strong><br />
ComStation number<br />
The procedure <strong>for</strong> setting <strong>the</strong> ComStation number and <strong>the</strong>re<strong>for</strong>e<br />
also <strong>the</strong> ComStation address is given on page 77f.<br />
<strong>System</strong> <strong>EccoLine</strong> <strong>L200</strong> − <strong>User</strong> Manual <strong>for</strong> <strong>the</strong> Ward, 00 8812 19, 08/05 (Rev. 1.1)
Addresses <strong>for</strong> universal interfaces<br />
<strong>System</strong> administrator<br />
Universal interfaces can be used to connect group signal lamps,<br />
direction signal lamps, corridor displays or external call devices<br />
to <strong>the</strong> NewLine <strong>L200</strong> system. Depending on <strong>the</strong> device connected,<br />
a different number needs to be set on <strong>the</strong> universal interface<br />
10-pole coding switch.<br />
This universal interface number is used indirectly to set <strong>the</strong> address<br />
<strong>for</strong> <strong>the</strong> universal interface and <strong>the</strong> type of connected devices.<br />
ATTENTION: Do not change coding<br />
switches 5, 8 and 10! Factory setting.<br />
Fig. 3: Universal interface<br />
1 2 4 8<br />
Number of <strong>the</strong><br />
universal<br />
interface<br />
Inputs (OFF = Normally open contact, ON = Normally closed contact)<br />
OFF = if corridor display Alpha 11 is connected.<br />
<strong>System</strong> <strong>EccoLine</strong> <strong>L200</strong> − <strong>User</strong> Manual <strong>for</strong> <strong>the</strong> Ward, 00 8812 19, 08/05 (Rev. 1.1) 67<br />
Lamp test
<strong>System</strong> administrator<br />
68<br />
Universal interface<br />
Number Address Connected devices<br />
1 80 External call devices,<br />
Collective displays, corridor<br />
display<br />
2 81 Group signal lamp 1<br />
Group signal lamp 2<br />
Corridor display<br />
3 82 Group signal lamp 3<br />
Group signal lamp 4<br />
Corridor display<br />
4 83 Group signal lamp 5<br />
Group signal lamp 6<br />
Corridor display<br />
5 84 Group signal lamp 7<br />
Group signal lamp 8<br />
Corridor display<br />
6 85 Direction signal lamp 1<br />
Direction signal lamp 2<br />
Corridor display<br />
7 86 Direction signal lamp 3<br />
Direction signal lamp 4<br />
Corridor display<br />
8 87 Direction signal lamp 5<br />
Direction signal lamp 6<br />
Corridor display<br />
9 88 Direction signal lamp 7<br />
Direction signal lamp 8<br />
Corridor display<br />
10 89 Direction signal lamp 9<br />
Direction signal lamp 10<br />
Corridor display<br />
11 90 Direction signal lamp 11<br />
Direction signal lamp 12<br />
Corridor display<br />
12 91 Direction signal lamp 13<br />
Direction signal lamp 14<br />
Corridor display<br />
13 92 Direction signal lamp 13<br />
Direction signal lamp 14<br />
Corridor display<br />
Factory setting: Universal interface number 1 (1 = ON)<br />
Lamp test ON = 9, Lamp test OFF = 9<br />
Coding switches 5, 8, 10 are factory-set, do not change!<br />
<strong>System</strong> <strong>EccoLine</strong> <strong>L200</strong> − <strong>User</strong> Manual <strong>for</strong> <strong>the</strong> Ward, 00 8812 19, 08/05 (Rev. 1.1)
7.1.2 Configuration<br />
<strong>System</strong> administrator<br />
The <strong>ward</strong> control unit WCU <strong>L200</strong> controls all <strong>the</strong> call system<br />
functions in <strong>the</strong> <strong>ward</strong>. It is installed in a floor distributing frame or<br />
an installation room.<br />
All parameters <strong>for</strong> <strong>the</strong> <strong>ward</strong> are saved in <strong>the</strong> WCU <strong>L200</strong>, e.g.: Interface<br />
settings, call type definitions, call category definitions,<br />
coupling programs <strong>for</strong> <strong>the</strong> <strong>ward</strong>, shifts, room numbers, ComStation<br />
numbers, address activation.<br />
These parameters have been set according to <strong>the</strong> requirements<br />
in your establishment. Some of <strong>the</strong>se parameters can be<br />
changed if necessary, i.e. reset:<br />
Activating addresses<br />
Setting room numbers<br />
Setting up <strong>ward</strong> coupling programs<br />
Setting up shifts<br />
<strong>System</strong> <strong>EccoLine</strong> <strong>L200</strong> − <strong>User</strong> Manual <strong>for</strong> <strong>the</strong> Ward, 00 8812 19, 08/05 (Rev. 1.1) 69
<strong>System</strong> administrator<br />
70<br />
7.2 Initialising <strong>the</strong> ComStation <strong>L200</strong><br />
<br />
The data used by <strong>the</strong> ComStation <strong>L200</strong> in operation are saved<br />
in <strong>the</strong> WCU <strong>L200</strong>. In order to have <strong>the</strong> data from <strong>the</strong> WCU <strong>L200</strong><br />
available at <strong>the</strong> ComStation <strong>L200</strong>, it needs to download <strong>the</strong> data<br />
from <strong>the</strong> WCU <strong>L200</strong>. This process is known as “initialising <strong>the</strong><br />
ComStation <strong>L200</strong>”.<br />
WCU <strong>L200</strong> WCU <strong>L200</strong> saves all <strong>the</strong> data <strong>for</strong> <strong>the</strong> <strong>ward</strong>.<br />
Initialising <strong>the</strong> ComStation <strong>L200</strong>:<br />
The ComStation <strong>L200</strong> downloads <strong>the</strong> data from <strong>the</strong> WCU.<br />
ComStation <strong>L200</strong> uses <strong>the</strong> data in operation<br />
The ComStation <strong>L200</strong> is automatically initialised if <strong>the</strong> ComStation<br />
<strong>L200</strong> or <strong>the</strong> WCU <strong>L200</strong> is connected to <strong>the</strong> power supply.<br />
There are also situations where <strong>the</strong> ComStation <strong>L200</strong> needs to<br />
be initialised.<br />
Example:<br />
There are multiple ComStations <strong>L200</strong> in your <strong>ward</strong>. You have<br />
made changes to <strong>the</strong> configuration. The new data is available in<br />
<strong>the</strong> WCU <strong>L200</strong> and <strong>the</strong> “ComStation configuration”. The data is<br />
not yet available on <strong>the</strong> o<strong>the</strong>r ComStation <strong>L200</strong> in <strong>the</strong> <strong>ward</strong>. You<br />
need to initialise <strong>the</strong> o<strong>the</strong>r ComStations <strong>L200</strong> in succession so<br />
that <strong>the</strong>y download <strong>the</strong> new data.<br />
Note! If you need to initialise <strong>the</strong> ComStation <strong>L200</strong> using <strong>the</strong> activities<br />
described in this <strong>manual</strong>, this will be indicated in <strong>the</strong> text.<br />
How to initialise a ComStation:<br />
Press “<strong>System</strong>“.<br />
Press ”Config“.<br />
Press ”Init CS“.<br />
The ComStation <strong>L200</strong> will be initialised. The following will<br />
appear on <strong>the</strong> display:<br />
<strong>System</strong> <strong>EccoLine</strong> <strong>L200</strong> − <strong>User</strong> Manual <strong>for</strong> <strong>the</strong> Ward, 00 8812 19, 08/05 (Rev. 1.1)
Initialisation<br />
Please wait<br />
<strong>System</strong> administrator<br />
The current WCU <strong>L200</strong> data is available on <strong>the</strong> ComStation<br />
<strong>L200</strong>.<br />
<strong>System</strong> <strong>EccoLine</strong> <strong>L200</strong> − <strong>User</strong> Manual <strong>for</strong> <strong>the</strong> Ward, 00 8812 19, 08/05 (Rev. 1.1) 71
<strong>System</strong> administrator<br />
72<br />
7.3 Switching addresses to<br />
active/inactive<br />
Each terminal (= room), each ComStation <strong>L200</strong> and each universal<br />
interface on <strong>the</strong> <strong>ward</strong> has a unique address which is occupied<br />
only once on <strong>the</strong> <strong>ward</strong> (see page 64ff).<br />
Each address issued on <strong>the</strong> <strong>ward</strong> must be active. When <strong>the</strong> address<br />
is active, <strong>the</strong> room/ComStation <strong>L200</strong>/universal interface<br />
will be monitored <strong>for</strong> faults.<br />
Addresses not issued on <strong>the</strong> <strong>ward</strong> must be switched to inactive.<br />
O<strong>the</strong>rwise, a fault will be displayed.<br />
Proceed as follows to switch an address to active or inactive:<br />
Press “<strong>System</strong>“.<br />
Press ”Config“.<br />
Press ”Init“.<br />
The logon window <strong>for</strong> <strong>the</strong> configuration menu will be displayed.<br />
Enter your password by pressing <strong>the</strong> function buttons with <strong>the</strong><br />
relevant characters in order.<br />
Press “R-Config”.<br />
Press ”Status“.<br />
All addresses which can be issued on <strong>the</strong> <strong>ward</strong> will be displayed:<br />
E.g<br />
.<br />
Status<br />
Back<br />
R 0101 (01) A<br />
R 0102 (02) A<br />
R 0103 (03) A<br />
R 0104 (04) A<br />
R 0105 (05) A<br />
ComStation 1 11:45:30<br />
R 0106 (06) A<br />
R 0107 (07) A<br />
R 0108 (08) A<br />
R 0108 (08) A<br />
R 0108 (08) A<br />
<strong>System</strong> <strong>EccoLine</strong> <strong>L200</strong> − <strong>User</strong> Manual <strong>for</strong> <strong>the</strong> Ward, 00 8812 19, 08/05 (Rev. 1.1)
Active addresses are identified with an “A”.<br />
Inactive addresses are not marked.<br />
<strong>System</strong> administrator<br />
Note! If <strong>the</strong>re are swing rooms set up in your establishment, SO<br />
or SI may be displayed instead of A. These entries cannot be<br />
changed in this menu. For fur<strong>the</strong>r in<strong>for</strong>mation about swing rooms<br />
please contact <strong>Tunstall</strong> <strong>GmbH</strong>.<br />
Press <strong>the</strong> function button <strong>for</strong> an address to toggle between active<br />
and inactive.<br />
Switch <strong>the</strong> addresses issued on <strong>the</strong> <strong>ward</strong> to active. Switch <strong>the</strong><br />
addresses not issued on <strong>the</strong> <strong>ward</strong> to inactive.<br />
Addresses with “A” are active. Addresses with no “A” are inactive.<br />
Press “Back” until <strong>the</strong> main window appears.<br />
Initialise <strong>the</strong> remaining ComStations <strong>L200</strong> in your <strong>ward</strong>, as described<br />
in <strong>the</strong> section “Initialising ComStation <strong>L200</strong>” (page<br />
64ff).<br />
The settings you have made are available on all ComStations<br />
<strong>L200</strong> in your <strong>ward</strong>.<br />
<strong>System</strong> <strong>EccoLine</strong> <strong>L200</strong> − <strong>User</strong> Manual <strong>for</strong> <strong>the</strong> Ward, 00 8812 19, 08/05 (Rev. 1.1) 73
<strong>System</strong> administrator<br />
74<br />
7.4 Setting room numbers<br />
<br />
<br />
Each address has a number. As most addresses are occupied<br />
by terminals, <strong>the</strong> numbers are normally <strong>the</strong> room numbers.<br />
These room numbers are set on <strong>the</strong> ComStation <strong>L200</strong>. The room<br />
number is displayed during <strong>ward</strong> operation on <strong>the</strong> ComStation<br />
<strong>L200</strong> display, on <strong>the</strong> corridor display Alpha 11 and on <strong>the</strong> corridor<br />
display <strong>L200</strong>.<br />
Note! The “room number” is not identical to <strong>the</strong> ComStation<br />
number (see page 66) or to <strong>the</strong> universal interface number (see<br />
page 67).<br />
R 0101 (01) A<br />
Address<br />
A: Room is active<br />
No A: Room is inactive<br />
Room number (max. 6 figures)<br />
There is a maximum of 6 figures <strong>for</strong> entering <strong>the</strong> room number.<br />
The room number must consist of numbers, letters and special<br />
characters. It is displayed on <strong>the</strong> ComStation <strong>L200</strong> in this <strong>for</strong>m<br />
in <strong>ward</strong> operation.<br />
* Assist call R 0108<br />
* Call R 0104<br />
Room number<br />
PR1 R 0107<br />
PR1 R 0108<br />
Note! The corridor display <strong>L200</strong> only displays <strong>the</strong> first four digits<br />
of <strong>the</strong> room number. Letters and special characters are not displayed<br />
at all.<br />
Proceed as follows to set a room number:<br />
Press “<strong>System</strong>“.<br />
Press ”Config“.<br />
Press ”Init“.<br />
The logon window <strong>for</strong> <strong>the</strong> configuration menu will be displayed.<br />
<strong>System</strong> <strong>EccoLine</strong> <strong>L200</strong> − <strong>User</strong> Manual <strong>for</strong> <strong>the</strong> Ward, 00 8812 19, 08/05 (Rev. 1.1)
<strong>System</strong> administrator<br />
Enter your password by pressing <strong>the</strong> function buttons with <strong>the</strong><br />
relevant characters in order.<br />
Press “R-Config”.<br />
Press ”Room“.<br />
All addresses in <strong>ward</strong> are displayed:<br />
E.g<br />
.<br />
Room<br />
Back<br />
R 0101 (01) A<br />
R 0102 (02) A<br />
R 0103 (03) A<br />
R 0104 (04) A<br />
R 0105 (05) A<br />
ComStation 1 11:45:30<br />
R 0106 (06) A<br />
R 0107 (07) A<br />
R 0108 (08) A<br />
R 0108 (08) A<br />
R 0108 (08) A<br />
Press <strong>the</strong> function button <strong>for</strong> <strong>the</strong> address required.<br />
A window with <strong>the</strong> parameters <strong>for</strong> <strong>the</strong> address will be displayed:<br />
Room<br />
R 0101 (01) A<br />
Address 3<br />
R 0102 (02) A<br />
Status<br />
Back<br />
Number<br />
R 0103 (03) A<br />
Ward SR<br />
R 0104 Address (04) ASR<br />
R 0105 (05) A<br />
ComStation 1 11:45:30<br />
R 0106 (06) A<br />
R 0107 (07) A<br />
0ctive Active<br />
R 0108 (08) A<br />
R 0108 (08) A<br />
R 0108 (08) A<br />
Set Delete + −<br />
<strong>System</strong> <strong>EccoLine</strong> <strong>L200</strong> − <strong>User</strong> Manual <strong>for</strong> <strong>the</strong> Ward, 00 8812 19, 08/05 (Rev. 1.1) 75
<strong>System</strong> administrator<br />
76<br />
<br />
The “up/down” navigation buttons are used to change <strong>the</strong> row.<br />
The “left/right” navigation buttons are used to change <strong>the</strong> digit of<br />
<strong>the</strong> room number.<br />
“+” and “−” are used to set <strong>the</strong> value.<br />
“Delete” can be used to change <strong>the</strong> digits in <strong>the</strong> room number to<br />
spaces.<br />
Note! The “Status” field can be used to set “Active” if you want<br />
to switch <strong>the</strong> address to active at <strong>the</strong> same time. Ano<strong>the</strong>r option<br />
<strong>for</strong> switching addresses to active is described on page 72ff.<br />
Enter <strong>the</strong> room number into <strong>the</strong> “Number” field (max. 6 figures<br />
consisting of digits, letters and special characters).<br />
The fields “Ward SR” and “Address SR” relate to swing rooms.<br />
(If swing rooms are installed in your system please contact<br />
<strong>Tunstall</strong> <strong>GmbH</strong> <strong>for</strong> more in<strong>for</strong>mation) Do not enter anything here.<br />
Press “Set” to set <strong>the</strong> new values. (If you press “Back”, <strong>the</strong><br />
window will be closed without <strong>the</strong> values being saved)<br />
When <strong>the</strong> address has been switched to active, it will be active.<br />
The room number has been set. It is displayed on <strong>the</strong><br />
ComStation <strong>L200</strong> display during operation.<br />
Press “Back” until <strong>the</strong> main window appears.<br />
Initialise <strong>the</strong> remaining ComStation <strong>L200</strong>s in your <strong>ward</strong>, as described<br />
in <strong>the</strong> section “Initialising ComStation <strong>L200</strong>” (page<br />
64ff).<br />
The settings you have made are available on all ComStations<br />
<strong>L200</strong> in your <strong>ward</strong>.<br />
<strong>System</strong> <strong>EccoLine</strong> <strong>L200</strong> − <strong>User</strong> Manual <strong>for</strong> <strong>the</strong> Ward, 00 8812 19, 08/05 (Rev. 1.1)
<strong>System</strong> administrator<br />
7.5 Setting <strong>the</strong> ComStation number<br />
(and ComStation address)<br />
A maximum of 8 ComStations <strong>L200</strong> can be set up <strong>for</strong> each <strong>ward</strong>.<br />
Each of <strong>the</strong>se ComStations <strong>L200</strong> has a number between 1 and<br />
8. This number is displayed on <strong>the</strong> ComStation display during<br />
operation.<br />
ComStation number<br />
ComStation 2 11:46:01<br />
The ComStation <strong>L200</strong> is used to set <strong>the</strong> ComStation address at<br />
<strong>the</strong> same time. The ComStation address is calculated from <strong>the</strong><br />
ComStation number:<br />
ComStation address = ComStation no. + 64<br />
Example:<br />
ComStation <strong>L200</strong> number 3 will have <strong>the</strong> address 67.<br />
The ComStation address and <strong>the</strong> ComStation number <strong>for</strong> a<br />
ComStation <strong>L200</strong> are set at <strong>the</strong> same time using <strong>the</strong> following<br />
procedure:<br />
Press “<strong>System</strong>“.<br />
Press ”Config“.<br />
Press ”Init“.<br />
The logon window <strong>for</strong> <strong>the</strong> configuration menu will be displayed.<br />
Enter your password by pressing <strong>the</strong> function buttons with <strong>the</strong><br />
relevant characters in order.<br />
Press ”Config 1“.<br />
Press “CS-No.”<br />
The settings window <strong>for</strong> <strong>the</strong> ComStation number will appear.<br />
<strong>System</strong> <strong>EccoLine</strong> <strong>L200</strong> − <strong>User</strong> Manual <strong>for</strong> <strong>the</strong> Ward, 00 8812 19, 08/05 (Rev. 1.1) 77
<strong>System</strong> administrator<br />
78<br />
New ComStation number<br />
Back Set + −<br />
The menu buttons “+” and “−” are used to set <strong>the</strong> value <strong>for</strong> <strong>the</strong><br />
ComStation number. The address is automatically <strong>the</strong> total of<br />
<strong>the</strong> ComStation number and 64.<br />
Press ”Set“.<br />
The ComStation number (and indirectly <strong>the</strong> ComStation address)<br />
is set.<br />
Press “Back” until <strong>the</strong> main window appears.<br />
The new ComStation number will appear in <strong>the</strong> title bar <strong>for</strong> <strong>the</strong><br />
ComStation.<br />
<strong>System</strong> <strong>EccoLine</strong> <strong>L200</strong> − <strong>User</strong> Manual <strong>for</strong> <strong>the</strong> Ward, 00 8812 19, 08/05 (Rev. 1.1)
7.6 Setting up <strong>ward</strong> coupling<br />
programs<br />
<strong>System</strong> administrator<br />
First read page 50ff: “Ward coupling”.<br />
The system management unit SMU <strong>L200</strong> coordinates <strong>the</strong> interaction<br />
of all <strong>the</strong> <strong>ward</strong> control units WCU <strong>L200</strong> in <strong>the</strong> building. A<br />
maximum of 32 WIC programs will have been saved in <strong>the</strong> SMU<br />
<strong>L200</strong> when <strong>the</strong> call system was installed. Eight of <strong>the</strong>se WIC programs<br />
can be selected to make <strong>the</strong>m available to <strong>the</strong> nursing<br />
staff in your <strong>ward</strong>. The eight programs selected are assigned <strong>the</strong><br />
designations A to H.<br />
The nursing staff can activate one of <strong>the</strong>se programs as required.<br />
The 32 WIC programs are available to all <strong>ward</strong>s. The WIC programs<br />
A to H on <strong>the</strong> individual <strong>ward</strong>s can <strong>the</strong>re<strong>for</strong>e be assigned<br />
differently.<br />
Example <strong>for</strong> <strong>the</strong> allocation of <strong>the</strong> 32 WIC programs to <strong>the</strong> <strong>ward</strong>s:<br />
WIC programs Ward on port 1 Ward on port 2 Ward on port 3 Ward on port 4<br />
01<br />
02<br />
03 D<br />
04 B<br />
05<br />
06 A A<br />
07<br />
08 B<br />
09<br />
10<br />
11<br />
12<br />
13 D A<br />
14<br />
15 B<br />
16 A<br />
17<br />
18<br />
19<br />
20<br />
21 B<br />
22<br />
23<br />
24<br />
25 C<br />
26<br />
27 C C<br />
28<br />
29<br />
30 C B<br />
31<br />
32 D<br />
<strong>System</strong> <strong>EccoLine</strong> <strong>L200</strong> − <strong>User</strong> Manual <strong>for</strong> <strong>the</strong> Ward, 00 8812 19, 08/05 (Rev. 1.1) 79
<strong>System</strong> administrator<br />
80<br />
How to set up <strong>the</strong> 8 WIC programs <strong>for</strong> your <strong>ward</strong>:<br />
Press “<strong>System</strong>“.<br />
Press ”Config“.<br />
Press ”Init“.<br />
The logon window <strong>for</strong> <strong>the</strong> configuration menu will be displayed.<br />
Enter your password by pressing <strong>the</strong> function buttons with <strong>the</strong><br />
relevant characters in order.<br />
Press ”Config 1“.<br />
Press ”WIC“.<br />
The window <strong>for</strong> setting up <strong>the</strong> WIC programs will appear:<br />
K-Init K1<br />
Back<br />
ComStation 1 11:45:30<br />
WIC<br />
WIC program A<br />
WIC program B<br />
WIC program C<br />
WIC program D<br />
WIC program E<br />
WIC program F<br />
WIC program G<br />
WIC program H<br />
Set Delete + −<br />
Set up <strong>the</strong> 8 WIC programs by setting <strong>the</strong> number of <strong>the</strong> relevant<br />
WIC program on <strong>the</strong> SMU <strong>L200</strong>.<br />
You can move between rows using <strong>the</strong> navigation buttons.<br />
“+” and “−” are used to set <strong>the</strong> value.<br />
“Delete” is used to reset all <strong>the</strong> values to “0”.<br />
Press “Set” to set <strong>the</strong> new values. (If you press “Back”, <strong>the</strong><br />
window will be closed without <strong>the</strong> values being saved)<br />
The WIC programs are set <strong>for</strong> your <strong>ward</strong>. The nursing staff<br />
can activate <strong>the</strong>m as necessary (see page 50ff).<br />
Press “Back” until <strong>the</strong> main window appears.<br />
Initialise <strong>the</strong> remaining ComStations <strong>L200</strong> in your <strong>ward</strong>, as described<br />
in <strong>the</strong> section “Initialising ComStation <strong>L200</strong>” (page<br />
64ff).<br />
<strong>System</strong> <strong>EccoLine</strong> <strong>L200</strong> − <strong>User</strong> Manual <strong>for</strong> <strong>the</strong> Ward, 00 8812 19, 08/05 (Rev. 1.1)
<strong>System</strong> administrator<br />
The settings you have made are available on all ComStations<br />
<strong>L200</strong> in your <strong>ward</strong>.<br />
<strong>System</strong> <strong>EccoLine</strong> <strong>L200</strong> − <strong>User</strong> Manual <strong>for</strong> <strong>the</strong> Ward, 00 8812 19, 08/05 (Rev. 1.1) 81
<strong>System</strong> administrator<br />
82<br />
7.7 Setting shifts<br />
First read page 54ff. “Activating a shift”.<br />
Do you want to set up shifts which <strong>the</strong> nursing staff can activate?<br />
You can set up a maximum of 8 shifts. A maximum of 8 zones can<br />
be set up in each shift. The zones in a shift may intersect, i.e. <strong>the</strong><br />
rooms may belong to more than one zone. You need to allocate<br />
each room to at least one zone. This is because calls from unallocated<br />
rooms will not be displayed.<br />
Proceed as follows to set up a shift:<br />
Press “<strong>System</strong>“.<br />
Press ”Config“.<br />
Press ”Init“.<br />
The logon window <strong>for</strong> <strong>the</strong> configuration menu will be displayed.<br />
Enter your password by pressing <strong>the</strong> function buttons with <strong>the</strong><br />
relevant characters in order.<br />
Press “R-Config”.<br />
Press ”Zone“.<br />
The 8 possible shifts will be displayed:<br />
E.g<br />
.<br />
R-Config<br />
Back<br />
Shift 1<br />
Shift 2<br />
Shift 3<br />
Shift 4<br />
Shift 5<br />
ComStation 1 11:45:30<br />
Shift 6<br />
Shift 7<br />
Shift 8<br />
Press <strong>the</strong> function button <strong>for</strong> <strong>the</strong> shift you want to set up.<br />
The window <strong>for</strong> setting up shifts will be displayed.<br />
<strong>System</strong> <strong>EccoLine</strong> <strong>L200</strong> − <strong>User</strong> Manual <strong>for</strong> <strong>the</strong> Ward, 00 8812 19, 08/05 (Rev. 1.1)
S:3<br />
Back<br />
Zone 1<br />
Zone 2<br />
Zone 3<br />
Zone 4<br />
Zone 5<br />
ComStation 1 11:45:40<br />
Zone 6<br />
Zone 7<br />
Zone 8<br />
Shift 3<br />
<strong>System</strong> administrator<br />
Then set up <strong>the</strong> zones <strong>for</strong> <strong>the</strong> shift in succession and switch <strong>the</strong><br />
shift to active. To find out how to do this, read <strong>the</strong> next few sections.<br />
Setting up zones<br />
In <strong>the</strong> window <strong>for</strong> setting up shifts, press <strong>the</strong> function button<br />
<strong>for</strong> <strong>the</strong> zone you want to set up.<br />
The window <strong>for</strong> setting up zones will be displayed.<br />
S:3 R:1<br />
Back<br />
R 0101 (01) A<br />
R 0102 (02)<br />
R 0103 (03)<br />
R 0104 (04)<br />
R 0105 (05)<br />
ComStation 1 11:45:50<br />
R 0106 (06)<br />
R 0107 (07)<br />
R 0108 (08)<br />
R 0109 (09)<br />
R 0110 (10)<br />
<strong>System</strong> <strong>EccoLine</strong> <strong>L200</strong> − <strong>User</strong> Manual <strong>for</strong> <strong>the</strong> Ward, 00 8812 19, 08/05 (Rev. 1.1) 83
<strong>System</strong> administrator<br />
84<br />
<br />
All addresses in <strong>the</strong> <strong>ward</strong> will be displayed. The addresses 01 to<br />
63 are rooms (terminals). The addresses 65 to 72 are ComStation<br />
<strong>L200</strong>. The remaining addresses cannot be allocated to<br />
zones.<br />
R 0101 (01) A<br />
A: Room is active,<br />
i.e. it belongs to <strong>the</strong> zone<br />
No A: Room is inactive<br />
i.e. it does not belong to <strong>the</strong> zone<br />
Address<br />
Room number<br />
Press <strong>the</strong> function buttons <strong>for</strong> all rooms and ComStation <strong>L200</strong><br />
to be included in <strong>the</strong> zone so that <strong>the</strong>y are marked with an “A”.<br />
Pressing <strong>the</strong> function button again will reverse this allocation.<br />
Danger! Calls from rooms not allocated to any zones will not be<br />
displayed. It is <strong>the</strong>re<strong>for</strong>e essential to allocate each room to a<br />
zone.<br />
Note! Please note: If <strong>the</strong>re is a ComStation <strong>L200</strong> and a terminal<br />
in a room, <strong>the</strong> addresses <strong>for</strong> <strong>the</strong> room (terminal) and <strong>the</strong> ComStation<br />
<strong>L200</strong> need to be allocated.<br />
Once all <strong>the</strong> rooms and ComStation <strong>L200</strong> <strong>for</strong> <strong>the</strong> <strong>ward</strong> have<br />
been set up, press “Set”.<br />
If you press “Back”, <strong>the</strong> window will be closed with <strong>the</strong> old settings.<br />
The zone has been set up. The window <strong>for</strong> setting up shifts will<br />
be displayed again.<br />
Set up all <strong>the</strong> zones in <strong>the</strong> shift in succession using <strong>the</strong> same<br />
method described. Then switch <strong>the</strong> shift to active, as described<br />
in <strong>the</strong> next section.<br />
Activating a shift<br />
In order <strong>for</strong> a shift to be available to <strong>the</strong> nursing staff <strong>for</strong> selection,<br />
<strong>the</strong> shift needs to be switched to active.<br />
Please note that this activation process is not identical to <strong>the</strong> process<br />
<strong>for</strong> activating <strong>the</strong> shift by <strong>the</strong> nursing staff.<br />
In <strong>the</strong> window <strong>for</strong> setting up <strong>the</strong> shift, press <strong>the</strong> function button<br />
<strong>for</strong> <strong>the</strong> shift, so that an “A” appears.<br />
<strong>System</strong> <strong>EccoLine</strong> <strong>L200</strong> − <strong>User</strong> Manual <strong>for</strong> <strong>the</strong> Ward, 00 8812 19, 08/05 (Rev. 1.1)
<strong>System</strong> administrator<br />
The shift is active. It can now be selected by <strong>the</strong> nursing staff<br />
(see page 54ff).<br />
S:3<br />
Back<br />
Zone 1<br />
Zone 2<br />
Zone 3<br />
Zone 4<br />
Zone 5<br />
ComStation 1 11:45:40<br />
Zone 6<br />
Zone 7<br />
Zone 8<br />
Shift 3 A<br />
Press “Back” until <strong>the</strong> main window appears.<br />
Initialise <strong>the</strong> remaining ComStations <strong>L200</strong> in your <strong>ward</strong>, as<br />
described in <strong>the</strong> section “Initialising ComStation <strong>L200</strong>”<br />
(page 64ff).<br />
The settings you have made are available on all ComStations<br />
<strong>L200</strong> in your <strong>ward</strong>.<br />
<strong>System</strong> <strong>EccoLine</strong> <strong>L200</strong> − <strong>User</strong> Manual <strong>for</strong> <strong>the</strong> Ward, 00 8812 19, 08/05 (Rev. 1.1) 85
<strong>System</strong> administrator<br />
86<br />
7.8 Inquiry about software version<br />
The ComStation <strong>L200</strong> and <strong>the</strong> <strong>ward</strong> control unit WCU <strong>L200</strong> are<br />
controlled by software. If required, <strong>the</strong> number and <strong>the</strong> version<br />
of <strong>the</strong> software can be queried.<br />
Proceed as follows:<br />
Press “<strong>System</strong>“.<br />
Press ”Config“.<br />
Press “ComStation” <strong>for</strong> <strong>the</strong> ComStation <strong>L200</strong>.<br />
Press “WCU” <strong>for</strong> <strong>the</strong> <strong>ward</strong> control unit WCU <strong>L200</strong>.<br />
The version in<strong>for</strong>mation required will be displayed.<br />
Back<br />
<strong>Tunstall</strong> <strong>GmbH</strong><br />
ComStation <strong>L200</strong><br />
Software: 74421000<br />
Version: 3.08<br />
<strong>Tunstall</strong> <strong>GmbH</strong><br />
WCU<br />
Software: 7441000<br />
Version: 3.10<br />
Press “Back” until <strong>the</strong> main window appears.<br />
<strong>System</strong> <strong>EccoLine</strong> <strong>L200</strong> − <strong>User</strong> Manual <strong>for</strong> <strong>the</strong> Ward, 00 8812 19, 08/05 (Rev. 1.1)
7.9 Assign group signal lamps<br />
<strong>System</strong> administrator<br />
Groups signal lamps display <strong>the</strong> calls from o<strong>the</strong>r <strong>ward</strong>s. Group<br />
signal lamps are connected to universal interfaces (73 3500 00)<br />
to do this. A maximum of 2 group signal lamps can be connected<br />
to each universal interface:<br />
Group signal<br />
lamp no. X<br />
Group signal<br />
lamp no. Y<br />
to <strong>the</strong> rooms<br />
Universal interface<br />
Each group signal lamp on <strong>the</strong> <strong>ward</strong> has a unique number produced<br />
from its connection to <strong>the</strong> universal interface.<br />
Universal interface Group signal lamp<br />
Number Address Connection Number Connection<br />
2 81<br />
RL (1)<br />
AWL (2)<br />
WC-L (3)<br />
TON (4)<br />
1<br />
2<br />
Call (red)<br />
Presence (green)<br />
Call (red)<br />
Presence (green)<br />
3 82<br />
RL (1)<br />
AWL (2)<br />
WC-L (3)<br />
TON (4)<br />
3<br />
4<br />
Call (red)<br />
Presence (green)<br />
Call (red)<br />
Presence (green)<br />
4 83<br />
RL (1)<br />
AWL (2)<br />
WC-L (3)<br />
TON (4)<br />
5<br />
6<br />
Call (red)<br />
Presence (green)<br />
Call (red)<br />
Presence (green)<br />
5 84<br />
RL (1)<br />
AWL (2)<br />
WC-L (3)<br />
TON (4)<br />
7<br />
8<br />
Call (red)<br />
Presence (green)<br />
Call (red)<br />
Presence (green)<br />
The ComStation <strong>L200</strong> is used to allocate each group signal lamp<br />
to a <strong>ward</strong> (= port on <strong>the</strong> SMU <strong>L200</strong>). Proceed as follows:<br />
Press “<strong>System</strong>“.<br />
Press ”Config“.<br />
<strong>System</strong> <strong>EccoLine</strong> <strong>L200</strong> − <strong>User</strong> Manual <strong>for</strong> <strong>the</strong> Ward, 00 8812 19, 08/05 (Rev. 1.1) 87
<strong>System</strong> administrator<br />
88<br />
Press ”Init“.<br />
The logon window <strong>for</strong> <strong>the</strong> configuration menu will be displayed.<br />
Enter your password by pressing <strong>the</strong> function buttons with <strong>the</strong><br />
relevant characters in order.<br />
Press ”Config 1“.<br />
Press “G-Lamps”<br />
The window <strong>for</strong> allocating <strong>the</strong> group signal lamps (= group<br />
lamps) will be displayed:<br />
Group lamps<br />
Group lamp 1<br />
Group lamp 2<br />
Group lamp 3<br />
Group lamp 4<br />
Group lamp 5<br />
Group lamp 6<br />
Group lamp 7<br />
Group lamp 8<br />
Back Set Delete + −<br />
0<br />
Port on <strong>the</strong><br />
SMU <strong>L200</strong><br />
(= <strong>ward</strong> number)<br />
The “up/down” navigation buttons are used to change <strong>the</strong> row.<br />
“+” and “−” are used to set <strong>the</strong> port number.<br />
“Delete- is used to reset all <strong>the</strong> port numbers to “0”.<br />
Press ”Set“.<br />
The group signal lamps are allocated.<br />
Press “Back” until <strong>the</strong> main window appears.<br />
<strong>System</strong> <strong>EccoLine</strong> <strong>L200</strong> − <strong>User</strong> Manual <strong>for</strong> <strong>the</strong> Ward, 00 8812 19, 08/05 (Rev. 1.1)
A<br />
A, 84<br />
About this <strong>manual</strong>, 3<br />
Acknowledged call, 7 , 46<br />
Acoustic fault indication, 42 , 44<br />
Active, 76<br />
active, 43 , 73<br />
Address, 43 , 75<br />
activation, 69<br />
Address SR, 76<br />
Address,<br />
switching to active, 72<br />
switching to inactive, 72<br />
Addresses, 64<br />
Assist call, 16 , 26 , 27 , 29 , 46<br />
Assist call,, tone sequence, 45<br />
Asterisk, 39<br />
Automatic button, 38 , 44 , 47<br />
B<br />
Back, 43<br />
Bed, 46<br />
Box, 5<br />
C<br />
Call, 26 , 27 , 46 , 84<br />
acknowledge, 24 , 29<br />
acknowledged, 26 , 27 , 29<br />
cancel, 24 , 29<br />
handling, 29<br />
Call ball, 20 , 30<br />
Call button, 20 , 21 , 22 , 25<br />
Call category, 45<br />
definition, 69<br />
Call cord, 20 , 30<br />
Call display, 26 , 45<br />
Call display,, acoustic, 45<br />
Call <strong>for</strong><strong>ward</strong>ing, 24 , 41<br />
Call list, 39 , 45 , 47<br />
Call location, 46<br />
Call switch, 20<br />
Call switch <strong>L200</strong>, 12 , 15<br />
Call switch with cancel switch <strong>L200</strong>/WC, 13 , 30<br />
Call system, 7<br />
Call tone, 24 , 27 , 28 , 45<br />
Call type, 46<br />
definition, 69<br />
Call window, 48<br />
closing, 48<br />
Call,, 16<br />
acknowledge, 7 , 47<br />
acknowledged, 7 , 39 , 46<br />
cancel, 7 , 48 , 49<br />
fresh, 7 , 39 , 46 , 47<br />
handling, 45<br />
Index<br />
Index<br />
raise, 21<br />
tone sequence, 45<br />
Cancel button, 16 , 29 , 30 , 49<br />
Cancel switch <strong>L200</strong>/WC, 13 , 15 , 30<br />
Cleaning, 32<br />
Cleaning NewLine <strong>L200</strong> devices, 32<br />
Clock, 39<br />
Coding switch, 65 , 68<br />
Cold, 1<br />
ComStation address, 66<br />
ComStation <strong>L200</strong>, 1 , 4 , 11 , 23 , 24 , 28 , 31 , 35<br />
, 36 , 64<br />
Display, 37<br />
initialising, 70<br />
ComStation <strong>L200</strong>,<br />
buttons, 38<br />
fault, 42<br />
initialising, 73 , 76 , 80 , 85<br />
logging off, 41<br />
Logging on, 40<br />
main window, 39<br />
setting, 59<br />
Software, 86<br />
ComStation number, 69<br />
Config, 70 , 72 , 74 , 77 , 80 , 82 , 87<br />
Config 1, 77 , 80 , 88<br />
Configuration, 69<br />
Configuration menu, 63 , 72 , 74 , 77 , 80 , 82 , 88<br />
Connection socket ComStation, 14<br />
Connection socket <strong>L200</strong>, 14 , 15 , 22<br />
Connection sockets, 14<br />
Contrast, 59<br />
Cordless telephone, 17<br />
Corridor display Alpha 11, 10 , 15 , 27<br />
Corridor display <strong>L200</strong>, 68<br />
CS−No., 77<br />
<strong>System</strong> <strong>EccoLine</strong> <strong>L200</strong> − <strong>User</strong> Manual <strong>for</strong> <strong>the</strong> Ward, 00 8812 19, 08/05 (Rev. 1.1) 89<br />
D<br />
Damp, 1<br />
Damp environment, 1<br />
Danger sign, 5<br />
Date, 59<br />
Delete, 76 , 80<br />
Direction signal lamp, 10 , 27<br />
Direction signal lamp <strong>L200</strong>, 68<br />
Display, 28<br />
Contrast, 59<br />
Display combination <strong>L200</strong>, 11 , 12 , 25 , 28<br />
Dust, 1<br />
E<br />
<strong>EccoLine</strong> <strong>L200</strong>, 3 , 7<br />
<strong>EccoLine</strong> <strong>L200</strong> system, 7<br />
Electromagnetic compatibility, 1
Index<br />
90<br />
Emergency button, 30<br />
Emergency call, 16 , 26 , 27 , 30 , 46<br />
Emergency call,, tone sequence, 45<br />
Emergency switch, 13 , 16<br />
External call devices, 68<br />
F<br />
Fault, 1 , 31 , 39 , 42 , 43<br />
Fault display, 31<br />
Fault monitoring, 72<br />
Fault RX, 42<br />
Fresh call, 7 , 47<br />
Function button, 38 , 47 , 57<br />
Function display, 39<br />
G<br />
General display, 68<br />
Geräte− und Kabelhalter, 21<br />
green, 26<br />
Green button, 25<br />
Grey button, 30<br />
Group signal lamp, 10 , 26 , 87<br />
Group signal lamp <strong>L200</strong>, 68<br />
H<br />
Heat, 1<br />
Helping <strong>the</strong> caller, 48<br />
Hospital care, 1<br />
Housing, 2<br />
I<br />
inactive, 43 , 73<br />
Info, 42 , 86<br />
Init, 72 , 74 , 77 , 80 , 82 , 88<br />
Init CS, 70<br />
Initialisation, 70<br />
Interface setting, 69<br />
L<br />
Level of knowledge, 1<br />
List continuation display, 37 , 38 , 39<br />
List left, 37<br />
List right, 37<br />
Logging off, 40 , 41<br />
Logging on, 40<br />
M<br />
Main window, 46<br />
Manual, Structure, 4<br />
Menu, 37 , 39<br />
Menu button, 38 , 39<br />
Menu level, 39<br />
N<br />
Navigation button, 38 , 39 , 76<br />
Nurse call terminal <strong>L200</strong>, 10 , 15 , 64<br />
Call display, 26<br />
Nurse call terminal <strong>L200</strong>/D , 64<br />
Nursing staff, 4 , 23<br />
O<br />
Obtaining staff assistance, 48<br />
Obtaining support, 29<br />
Off, 41<br />
P<br />
Password, 63 , 72 , 75 , 77 , 80 , 82 , 88<br />
Patient call, 16 , 46<br />
Patient units, 9<br />
Patients, 4 , 19<br />
Pear push switch, 1 , 15 , 21<br />
Pear push switch incl. call and light switch, 21<br />
Pear push switch incl. red call switch and yellow<br />
light switch, 9<br />
Pear push switch incl. two call switches, 21<br />
Pear push switch incl. two red call switches, 9<br />
Plug, 61<br />
Pneumatic call switch <strong>L200</strong>, 12 , 15<br />
Point, 5<br />
Pointing finger, 5<br />
PR list, 48<br />
PR1, 39<br />
Presence, 24 , 26 , 27 , 39 , 46<br />
Presence button, 25 , 29 , 48<br />
Presence message, meaning, 24<br />
Program, 52 , 57<br />
Pull cord call switch <strong>L200</strong>, 12 , 15<br />
R<br />
R−Config, 72 , 75 , 82<br />
Radio pager, 17<br />
Radio trigger, 17<br />
Range of switches, 12<br />
Reading light, 21<br />
red, 26<br />
Registering staff presence, 24<br />
Resident units, 9<br />
Residents, 4 , 19<br />
Room, 75<br />
Room address, 65<br />
Room number, 43 , 45 , 69 , 74<br />
Room numbers, setting, 69<br />
Room signal lamp, 15 , 24 , 41<br />
Call display, 26<br />
Room signal lamp, 2 sections, 10<br />
Room signal lamp, 3 sections, 10<br />
S<br />
S, 39 , 58<br />
Safety, 1<br />
<strong>System</strong> <strong>EccoLine</strong> <strong>L200</strong> − <strong>User</strong> Manual <strong>for</strong> <strong>the</strong> Ward, 00 8812 19, 08/05 (Rev. 1.1)
Screensaver, 40 , 61<br />
Set, 59 , 60 , 76 , 78 , 80 , 84 , 88<br />
Shift, 36 , 50 , 54 , 57 , 69<br />
activating, 54 , 57<br />
deactivating, 58<br />
setting up, 69 , 82<br />
switching to active, 84<br />
Table, 56<br />
Shift operation, 8<br />
Smoke detector, 16<br />
SMU, 79<br />
Socket, 22<br />
Software<br />
Number, 86<br />
Version, 86<br />
Software version, 86<br />
Staff assist call, 16 , 24 , 29 , 46<br />
Staff presence combination <strong>L200</strong>, 10 , 12 , 15 , 25<br />
, 27<br />
Status, 72 , 76<br />
Structure of <strong>the</strong> <strong>manual</strong>, 4<br />
Sunlight, 2<br />
Supply cable, 1 , 61<br />
Swing room, 8<br />
<strong>System</strong>, 42 , 59 , 70 , 72 , 74 , 77 , 80 , 82 , 86 ,<br />
87<br />
<strong>System</strong> add−ons, 17<br />
<strong>System</strong> administrator, 4 , 31 , 61 , 63<br />
<strong>System</strong> management unit SMU, 79<br />
T<br />
Technical alarm, 17<br />
Terminal <strong>L200</strong>, 64 , 65<br />
Terminal <strong>L200</strong>/D, 64<br />
Tick mark, 5<br />
Time, 27 , 59<br />
Title bar, 37 , 39 , 42 , 44 , 50 , 78<br />
Index<br />
<strong>System</strong> <strong>EccoLine</strong> <strong>L200</strong> − <strong>User</strong> Manual <strong>for</strong> <strong>the</strong> Ward, 00 8812 19, 08/05 (Rev. 1.1) 91<br />
U<br />
Universal interface, 64<br />
Address, 67<br />
Universal interface <strong>L200</strong><br />
Address, 68<br />
Number, 68<br />
V<br />
Version, Software, 86<br />
Volume, 59<br />
W<br />
Ward coupling, 7 , 28 , 36 , 50 , 58 , 79<br />
according to call category, 50<br />
automatic, 50<br />
Ward coupling program, 69<br />
activating, 52<br />
deactivating, 52<br />
setting up, 69 , 79<br />
Ward nurse station, 36<br />
Ward SR, 76<br />
WC assist call, 16 , 46<br />
cancel, 30<br />
WC call, 16 , 46<br />
cancel, 30<br />
WCU <strong>L200</strong>, 61 , 63 , 69 , 70<br />
Software, 86<br />
Wet, 1<br />
white, 26<br />
WIC, 39 , 50 , 52 , 80<br />
WIC−Programm, 51<br />
Z<br />
Zone, 28 , 54 , 82<br />
setting up, 83<br />
Zone nursing, 54
Index<br />
92<br />
<strong>System</strong> <strong>EccoLine</strong> <strong>L200</strong> − <strong>User</strong> Manual <strong>for</strong> <strong>the</strong> Ward, 00 8812 19, 08/05 (Rev. 1.1)
All <strong>the</strong> reassurance you need<br />
<strong>System</strong> <strong>EccoLine</strong> <strong>L200</strong> − <strong>User</strong> Manual <strong>for</strong> <strong>the</strong> Ward, 00 8812 19<br />
t<br />
<strong>Tunstall</strong> <strong>GmbH</strong>, Orkotten 66, 48291 Telgte, Germany, Telephone: +49 25 04 / 7 01−0<br />
Facsimile: +49 25 04 / 7 01−499, www.tunstall.de, e-mail: info@tunstall.de<br />
QUALITY<br />
MANAGEMENT<br />
SYSTEM<br />
DQS−certified according to<br />
DIN EN ISO 9001:2000<br />
Reg.−No. 56386<br />
Reg.−No. 56386