Owners Manual - Zupin
Owners Manual - Zupin
Owners Manual - Zupin

Create successful ePaper yourself
Turn your PDF publications into a flip-book with our unique Google optimized e-Paper software.
R1<br />
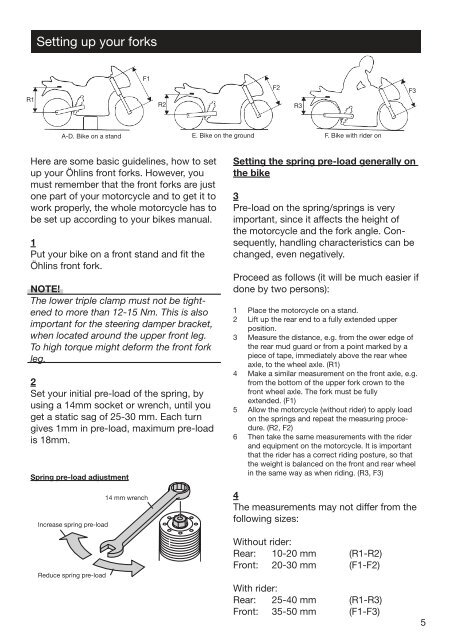
Setting up your forks<br />
A-D. Bike on a stand E. Bike on the ground F. Bike with rider on<br />
Here are some basic guidelines, how to set<br />
up your Öhlins front forks. However, you<br />
must remember that the front forks are just<br />
one part of your motorcycle and to get it to<br />
work properly, the whole motorcycle has to<br />
be set up according to your bikes manual.<br />
1<br />
Put your bike on a front stand and fit the<br />
Öhlins front fork.<br />
NOTE!<br />
The lower triple clamp must not be tightened<br />
to more than 12-15 Nm. This is also<br />
important for the steering damper bracket,<br />
when located around the upper front leg.<br />
To high torque might deform the front fork<br />
leg.<br />
2<br />
Set your initial pre-load of the spring, by<br />
using a 14mm socket or wrench, until you<br />
get a static sag of 25-30 mm. Each turn<br />
gives 1mm in pre-load, maximum pre-load<br />
is 18mm.<br />
Spring pre-load adjustment<br />
Increase spring pre-load<br />
Reduce spring pre-load<br />
F1<br />
14 mm wrench<br />
R2<br />
F2<br />
R3<br />
Setting the spring pre-load generally on<br />
the bike<br />
3<br />
Pre-load on the spring/springs is very<br />
important, since it affects the height of<br />
the motorcycle and the fork angle. Consequently,<br />
handling characteristics can be<br />
changed, even negatively.<br />
Proceed as follows (it will be much easier if<br />
done by two persons):<br />
1 Place the motorcycle on a stand.<br />
2 Lift up the rear end to a fully extended upper<br />
position.<br />
3 Measure the distance, e.g. from the ower edge of<br />
the rear mud guard or from a point marked by a<br />
piece of tape, immediately above the rear whee<br />
axle, to the wheel axle. (R1)<br />
4 Make a similar measurement on the front axle, e.g.<br />
from the bottom of the upper fork crown to the<br />
front wheel axle. The fork must be fully<br />
extended. (F1)<br />
5 Allow the motorcycle (without rider) to apply load<br />
on the springs and repeat the measuring procedure.<br />
(R2, F2)<br />
6 Then take the same measurements with the rider<br />
and equipment on the motorcycle. It is important<br />
that the rider has a correct riding posture, so that<br />
the weight is balanced on the front and rear wheel<br />
in the same way as when riding. (R3, F3)<br />
4<br />
The measurements may not differ from the<br />
following sizes:<br />
Without rider:<br />
Rear: 10-20 mm (R1-R2)<br />
Front: 20-30 mm (F1-F2)<br />
With rider:<br />
Rear: 25-40 mm (R1-R3)<br />
Front: 35-50 mm (F1-F3)<br />
F3<br />
5