MD4 USER'S GUIDE 1.1 Contents - Zupin
MD4 USER'S GUIDE 1.1 Contents - Zupin
MD4 USER'S GUIDE 1.1 Contents - Zupin

Create successful ePaper yourself
Turn your PDF publications into a flip-book with our unique Google optimized e-Paper software.
<strong>1.1</strong> <strong>Contents</strong><br />
<strong>MD4</strong> USER’S <strong>GUIDE</strong><br />
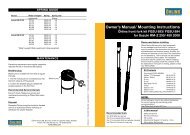
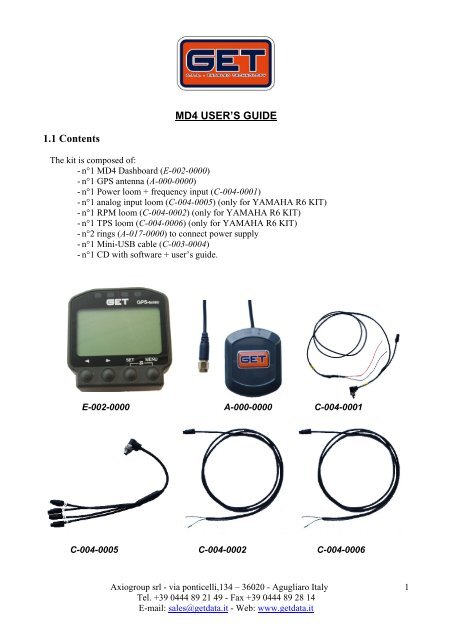
The kit is composed of:<br />
- n°1 <strong>MD4</strong> Dashboard (E-002-0000)<br />
- n°1 GPS antenna (A-000-0000)<br />
- n°1 Power loom + frequency input (C-004-0001)<br />
- n°1 analog input loom (C-004-0005) (only for YAMAHA R6 KIT)<br />
- n°1 RPM loom (C-004-0002) (only for YAMAHA R6 KIT)<br />
- n°1 TPS loom (C-004-0006) (only for YAMAHA R6 KIT)<br />
- n°2 rings (A-017-0000) to connect power supply<br />
- n°1 Mini-USB cable (C-003-0004)<br />
- n°1 CD with software + user’s guide.<br />
E-002-0000 A-000-0000 C-004-0001<br />
C-004-0005 C-004-0002 C-004-0006<br />
Axiogroup srl - via ponticelli,134 – 36020 - Agugliaro Italy<br />
Tel. +39 0444 89 21 49 - Fax +39 0444 89 28 14<br />
E-mail: sales@getdata.it - Web: www.getdata.it<br />
1
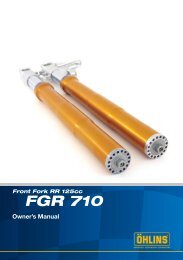
1.2 Connections<br />
E<br />
D C B<br />
Follow the following steps to connect the system:<br />
1- Install <strong>MD4</strong> device onto the vehicle.<br />
2- Connect the Power loom (C-004-0001) to connector A on the rear of the<br />
device. (Attention: tighten with your hands is enough)<br />
3- Connect the analog input loom (C-004-0005) to connector C on the rear of<br />
the device. (Attention: tighten with your hands is enough)<br />
4- Connect the GPS antenna (A-000-0000) to connector D on the rear of the<br />
device. (Attention: tighten with your hands is enough). See section 1.2.1.<br />
5- If present, connect the RPM loom (C-004-0002) to the Power loom (C-004-<br />
0001).<br />
Attention: the RPM loom is different according to the type of use.<br />
6- If present, connect the TPS loom (C-004-0006) to the analog loom in<br />
input #1 (C-004-0005).<br />
Attention: the TPS loom is different according to the type of use.<br />
7- Connect the 2 wires of the Power (see Power label on it) to the motorcycle<br />
battery (see section 1.2.2).<br />
8- On the left of the device, there is the USB port for PC connection.<br />
Axiogroup srl - via ponticelli,134 – 36020 - Agugliaro Italy<br />
Tel. +39 0444 89 21 49 - Fax +39 0444 89 28 14<br />
E-mail: sales@getdata.it - Web: www.getdata.it<br />
A<br />
2
1.2.1 GPS antenna connection<br />
Fix the GPS antenna connector to connector D of the dashboard avoiding overstrength.<br />
Do not use a wrench but simply fix it with your fingers.<br />
Keep the antenna cable away from electromagnetic source, i.e. make sure the<br />
cable is away from the engine, ignition coil, spark plugs and wires.<br />
Electromagnetic disturbances may disturb the GPS signal, decreasing its<br />
performance.<br />
The GPS antenna must be set outside of the vehicle. Any obstacle near the GPS<br />
antenna could cause disturbances, specifically during download. This is shown by a<br />
bad track drawing with inappropriate peaks or spikes.<br />
NEVER roll the antenna cable around other cables such as power, RPM, …to avoid<br />
disturbances.<br />
Una cattiva ricezione dell’antenna può causare errori sul calcolo dei tempi sul giro o il<br />
non rilevamento di traguardi o intertempi.<br />
In case of bad antenna reception, only sensors data will be visible.<br />
Sometimes, GPS satellites operator disable their network, causing reception blackout<br />
on all GPS-based devices.<br />
1.2.2 Connection to motorcycle battery<br />
We recommend to use the small rings to connect the 2 wires to the power loom<br />
(C-004-0001-20) to the battery.<br />
In case of 2-stroke bikes, or if no battery on board, please order the battery kit<br />
including charger.<br />
ATTENTION: The red wire must be connected to the battery POSITIVE<br />
end, Black wire to NEGATIVE end.<br />
Axiogroup srl - via ponticelli,134 – 36020 - Agugliaro Italy<br />
Tel. +39 0444 89 21 49 - Fax +39 0444 89 28 14<br />
E-mail: sales@getdata.it - Web: www.getdata.it<br />
3
1.2.3 RPM and TPS connection<br />
For RPM and TPS, please contact your dealer to make sure what RPM and TPS<br />
are needed for bike model.<br />
Indeed, you may need wires with a conditioning chip to avoid any disturbances.<br />
Please refer to application sheet attached.<br />
1.2.4 Connection procedure A<br />
Cut the wire coating (making sure you do not cut the copper conductor) and<br />
twist the uncoated end of the wire. Then weld with a soldering iron.<br />
1.2.5 Other sensors applications.<br />
Please refer to the specific sensor datasheet included in the delivery.<br />
Axiogroup srl - via ponticelli,134 – 36020 - Agugliaro Italy<br />
Tel. +39 0444 89 21 49 - Fax +39 0444 89 28 14<br />
E-mail: sales@getdata.it - Web: www.getdata.it<br />
4
How to use the <strong>MD4</strong> device (Firmware 1.591)<br />
All steps to download data onto your PC are described in the MX1 user’s guide.<br />
Please print it for ease of use.<br />
Switching on:<br />
Press on SET to switch it on and see the menu page.<br />
In the menu page you will see the following functions:<br />
Watch: To see system status live. Once selected, it shows sensor and<br />
system data live, e.g. Power (VBAT), Speed (SOGK or VEL), n°<br />
of connected satellites (N°SAT), Altitude (ANTA)<br />
Logging: To launch data acquisition. By default, it is a manual launch.<br />
But you can set an automatic start in OPTIONS with RPM or<br />
SPEED values<br />
Tracks: Track settings. Used also to open tracks from the folder<br />
where a max 100 tracks can be recorded (with 5 intermediate<br />
sectors each). Latest tracks are available for download on our<br />
website.<br />
Also shows current track.<br />
• CUR: Current track.<br />
• OPEN TRACK<br />
Axiogroup srl - via ponticelli,134 – 36020 - Agugliaro Italy<br />
Tel. +39 0444 89 21 49 - Fax +39 0444 89 28 14<br />
E-mail: sales@getdata.it - Web: www.getdata.it<br />
5
• DELETE TRACK<br />
• CREATE TRACK: To create a new track directly on the<br />
<strong>MD4</strong>, without PC.<br />
• CLEAR BEST: Remove best lap from device memory.<br />
• REFT: Set a reference time. On each finish line passage,<br />
the device shows the difference between current lap and<br />
reference lap.<br />
Calibrations Channels and sensors calibration.<br />
Alarms: Alarms management.<br />
Files: File management (Open, Delete, …).<br />
Options: Basic settings such as:<br />
• Logging: Acquisition start options. You can choose manual<br />
or via RPM with default threshold at 1.500 laps for start and<br />
500 for stop, or via GPS speed with start threshold at<br />
30KPH and stop at zero KPH. (If speed-based, the<br />
acquisition stops each time the vehicle is at speed = 0.<br />
• Backlite: LCD backlight ON-OFF. Default is OFF, if you<br />
set it ON, backlight will be active every time the system is<br />
on.<br />
• SET INFO: Allows setting a number to identify the system when<br />
downloading data. For instance, if there 3 drivers in the team,<br />
each one will have a number that is shown in the file name.<br />
• SET DATE: Set date and time. Manual mode by default. The<br />
number is enhanced. Use arrows to change the number and<br />
press SET to go to next number. Press MENU when ready to<br />
exit DATE mode. Use arrows to select TIME and proceed in the<br />
same way. Press MENU to exit.<br />
Alternatively, the automatic mode (AUTO) can do for you. Just<br />
set the number of hours ahead (positive +) or behind (negative<br />
-) Greenwich Mean Time (GMT). E.g.: Germany is +1). Next<br />
time you will switch your <strong>MD4</strong> on, time will be update<br />
automatically.<br />
• CREDITS: shows device firmware version. Latest update<br />
available on our website www.getdata.it<br />
• <strong>MD4</strong> RESET: Reseti alarms, finish line, options such as<br />
LOGGING – BACKLITE – BEST TIME, …<br />
Axiogroup srl - via ponticelli,134 – 36020 - Agugliaro Italy<br />
Tel. +39 0444 89 21 49 - Fax +39 0444 89 28 14<br />
E-mail: sales@getdata.it - Web: www.getdata.it<br />
6
Attention: this function is mandatory in case of firmware update.<br />
After selecting <strong>MD4</strong> RESET, press SET on each question.<br />
When the <strong>MD4</strong> is switched on, the right blue led remains on until the device<br />
has established full connection with the satellite network. This takes about 1<br />
minute and is done automatically.<br />
If you are indoor, this led will remain on until you go outdoor.<br />
This led goes off if you start acquisition.<br />
Switching the <strong>MD4</strong> off<br />
Just press on MENU and SET simultaneously.<br />
Switching backlight on for night-time use.<br />
In MENU, use arrows to go to OPTIONS, then SET. Use arrows to go to<br />
BACKLITE and choose ON or OFF with SET.<br />
Press on MENU to go back to menu.<br />
For a better reading during daytime, we recommend to set it off.<br />
“WATCH” function:<br />
All GPS data can be viewed.<br />
As for sensor data, they will be viewed only after setup as follows.<br />
TPS Throttle position (if included in setup)<br />
RPM Round per Minute (if included in setup)<br />
SPEED also known as SOGKM, KMH, KPH<br />
ANTAL altitude<br />
NSAT n° satellites connected to the system<br />
TPS channel calibration:<br />
Press on Menu. With arrows, choose Calibrations and press SET.<br />
Press SET on the channel you connected the TPS wire (AD1).<br />
Press SET on TPS item.<br />
Keeping your throttle to 0 (Check that bike board is on), press SET to insert the<br />
min value.<br />
Keeping the throttle full up 100% (The bike is off but the board is on), press<br />
SET.<br />
Press MENU to go back.<br />
Axiogroup srl - via ponticelli,134 – 36020 - Agugliaro Italy<br />
Tel. +39 0444 89 21 49 - Fax +39 0444 89 28 14<br />
E-mail: sales@getdata.it - Web: www.getdata.it<br />
7
Calibration is done and can be monitored from the Watch page.<br />
Axiogroup srl - via ponticelli,134 – 36020 - Agugliaro Italy<br />
Tel. +39 0444 89 21 49 - Fax +39 0444 89 28 14<br />
E-mail: sales@getdata.it - Web: www.getdata.it<br />
8
RPM channel calibration<br />
Press on MENU.<br />
With arrows, choose Calibrations and press SET.<br />
With arrows, choose IC1 and press SET.<br />
With arrows, set the number of phonic wheel teeth for 2 crankshaft laps in case<br />
of 4-stroke engine, and e press SET. (for YAMAHA R6, it is 4)<br />
Press MENU twice.<br />
Calibration is done and can be monitored from the Watch page.<br />
Attention: In the WATCH page, the limiter value will not be shown and<br />
the leds will not be active. The central red leds that show the limiter value<br />
will be active only in data acquisition mode.<br />
Spark RPM with clip<br />
Press on MENU.<br />
With arrows, choose Calibrations and press SET.<br />
With arrows, choose IC1 and press SET.<br />
Select RPMSPARK and insert relevant value.<br />
For 2-stroke engines: COEFFICIENT 18.4 and OFFSET 184<br />
These values can be changed at any time according to your needs.<br />
Attention: We recommend that the conditioning circuit should be as far as<br />
possible from the ignition coil and spark plug in order to improve the<br />
signal quality.<br />
Do not roll up the extra wire near the spark plug or coil but in a protected<br />
area instead to avoid disturbances.<br />
We also recommend to keep the RPM wire away from the GPS antenna.<br />
Analog channels 1-2-3-4 calibration<br />
Any 0-5 Volt analog sensor can be used on these channels, e.g. suspension<br />
potentiometers, NTC temperature sensors, K-type sensors, Lambda probes<br />
whether sold by GET. You can also buy other sensors on the market but then<br />
you need to use our MX1 software and insert the calibrations found in the<br />
appropriate sensor data sheet<br />
Axiogroup srl - via ponticelli,134 – 36020 - Agugliaro Italy<br />
Tel. +39 0444 89 21 49 - Fax +39 0444 89 28 14<br />
E-mail: sales@getdata.it - Web: www.getdata.it<br />
9
For GET sensors, all calibration values are already set and all you need to do is<br />
select the sensor you want to use.<br />
These default GET sensors are::<br />
TK = Thermocouple sensor for exhaust temperature –20° + 1000°<br />
NTC = Air-Oil-Air temperature sensor -40° + 150°<br />
TPS = Throttle position sensor<br />
POT = Linear potentiometer (e.g. for suspensions)<br />
LISTO = Lambda probe with reading value Lambda (9.2)<br />
LAFR = Lambda probe with reading value AFR fuel e.g. 14.0<br />
RPM = Round per Minute from PICK UP<br />
RPM SPARK = Round per Minute from spark clip<br />
Any other sensor can be added via PC.<br />
Attention: if you wish to perform a channel calibration through our MX1<br />
software, you will have to use the CUSTOM function into the <strong>MD4</strong> and send<br />
the setup from PC to <strong>MD4</strong>.<br />
Position sensor calibration - Potentiometer<br />
Connect the sensor to one available channel: 1-2-3-4.<br />
Press on MENU.<br />
With arrows, choose Calibrations and press SET.<br />
With arrows, select the channel where your sensor is connected (AD1 or AD2<br />
or AD3 or AD4) , and press SET.<br />
With arrows, got to POT and press SET.<br />
“CURRENT” means the sensor electrical value.<br />
With arrows, go to “LEN” to insert the sensor length, e.g. 125 mm. Press SET.<br />
Press SET again to confirm the “zero” position of the sensor. Of course you<br />
need to have your sensor physically at “zero” position.<br />
Press SET to confirm.<br />
Press MENU and select WATCH to check the zero position.<br />
This setup can also be done through our MX1 software. See MX1 instructions.<br />
Axiogroup srl - via ponticelli,134 – 36020 - Agugliaro Italy<br />
Tel. +39 0444 89 21 49 - Fax +39 0444 89 28 14<br />
E-mail: sales@getdata.it - Web: www.getdata.it<br />
10
Track settings (finish line and intermediates)<br />
Press on MENU, then go to TRACKS. Here you can do 3 operations:<br />
CREATE TRACK, OPEN TRACK, DELETE TRACK.<br />
If your track is in the list, choose it through MENU/TRACK/OPEN TRACK. If not in<br />
the list, you will have to create it.<br />
CREATE TRACK (from data acquisition)<br />
Press MENU and go to LOGGING. Check that satellites are connected first<br />
(Blue led is off). Start acquisition by pressing SET.<br />
Drive one track lap (start from box, perform a complete lap but go out the<br />
second lap is completed).<br />
Once ended, press SET to stop acquisition. Press MENU.<br />
Go to TRACK and press SET.<br />
Wait for track view. Finish Line and SP1-2-3-4 sectors also appear.<br />
Press SET when FL is enhanced, and go to the position you want with arrows.<br />
Press SET to confirm.<br />
For other sectors settings, go to SP1.<br />
Press SET and put it where you want with arrows.<br />
Press SET to confirm.<br />
Same thing for other sectors. At the end, press MENU.<br />
From now on, and until a new track is created or loaded, all laps you run will<br />
be split according to these recorded settings, even if files are removed from<br />
memory with “CLEAR MEMORY” from FILE page.<br />
BUT these settings will be erased if you choose the SOFT RESET option from<br />
the OPTIONS page.<br />
ATTENTION: Sectors must be set from 1 to 4 in order.<br />
Axiogroup srl - via ponticelli,134 – 36020 - Agugliaro Italy<br />
Tel. +39 0444 89 21 49 - Fax +39 0444 89 28 14<br />
E-mail: sales@getdata.it - Web: www.getdata.it<br />
11
OPEN TRACK<br />
To load track library, switch you <strong>MD4</strong> on and go the MENU page. Connect the<br />
<strong>MD4</strong> to your computer. Right-click on an <strong>MD4</strong> setup and do Synchronize<br />
library.<br />
On the MX1 software, right-click on TRACK window and choose LIBRARY.<br />
You can also update your library by downloading the new tracks from our<br />
website www.getdata.it download area.<br />
The tracks that we give you have a finish line and 3 or 4 sectors according to<br />
the track.<br />
To download the tracks from our website:<br />
Go to www.getdata.it<br />
Go to DOWNLOAD<br />
Go to TRACKS<br />
Download the zip file into the MX1 folder. This folder is found in:<br />
Your computer<br />
-Disk C<br />
-programs<br />
-MX1.<br />
DELETE TRACK<br />
Just select a track to delete it.<br />
Track setting through PC<br />
Make your track run. Download data on your computer.<br />
Set finish line and sectors (see MX1 software user’s guide), save track and add<br />
it to the library (when asked after saving).<br />
From the TRACK window, right-click and choose Library to change, save and<br />
apply tracks to the current sessions.<br />
Then switch your <strong>MD4</strong> on and go to MENU page. Connect the <strong>MD4</strong> to your<br />
computer. Right-click on an <strong>MD4</strong> setup and do Synchronize library.<br />
Axiogroup srl - via ponticelli,134 – 36020 - Agugliaro Italy<br />
Tel. +39 0444 89 21 49 - Fax +39 0444 89 28 14<br />
E-mail: sales@getdata.it - Web: www.getdata.it<br />
12
Launching data acquisition<br />
You can choose manual launch or via RPM with default threshold at 1.500 laps<br />
for start and 500 for stop, or via GPS speed with start threshold at 30KPH and<br />
stop at zero KPH. (GET recommends either manual start or RPM-based<br />
start since the speed-based start means a stop every time the bike is at a<br />
standstill, i.e. speed = 0).<br />
ATTENTION: RPM or SPEED –based start are available only if the <strong>MD4</strong><br />
is on page MENU or session REPORT. If the <strong>MD4</strong> is on WATCH-<br />
ALARM-CALIBRATION-TRACK-OPTIONS, no automatic start will be<br />
done.<br />
Time, intermediates, best lap and best intermediate alarms<br />
When cutting the finish line, the dashboard gives you the lap time and the<br />
orange led goes on if it is your best lap.<br />
This lap time keeps on until you cut the finish line again.<br />
When cutting the intermediate sector line, the dashboard shows (for 3 seconds)<br />
the how far ahead or behind you are until this point against your best lap.<br />
Here again, the orange led goes on to show you your best intermediate time.<br />
These best times are kept in memory until you press the CLEAR BEST option.<br />
Session report:<br />
At the end of each session, you can see:<br />
Number of track laps<br />
Best lap<br />
Best sectors and Theoretical Best lap (TH)<br />
Min and max values for each recorded channel<br />
Lap times<br />
Axiogroup srl - via ponticelli,134 – 36020 - Agugliaro Italy<br />
Tel. +39 0444 89 21 49 - Fax +39 0444 89 28 14<br />
E-mail: sales@getdata.it - Web: www.getdata.it<br />
13
Reading session reports from FILES.<br />
Press MENU and go to FILES.<br />
Go to OPEN FILE and press SET ( Do not press CLEAR MEMORY!).<br />
Select the date and press SET.<br />
Select your session according to date and time and press SET to see it.<br />
Press SET to browse REPORT pages.<br />
Press MENU to exit.<br />
In case of no sectors, the second page displays “TH NA” (Theoretical Best Not<br />
Available).<br />
Alarm setting:<br />
Press MENU. Go to ALARMS and press SET.<br />
5 alarm settings are available.<br />
Choose one with arrows. Press SET.<br />
With arrows, choose sensor channel. Press SET.<br />
Next to CH (Channel), you find the sensor name as per setup.<br />
O the second line, insert the threshold value THR. Press SET.<br />
Select MORE or LESS or EQUAL. Usually, one selects MORE to know when<br />
threshold value is exceeded. Premere SET per confermare.<br />
Set the signal type by choosing FIXED or BLINK.<br />
Select led colour. Press SET.<br />
Press MENU to end.<br />
To change the gear threshold, choose the IC1 for RPM and set the threshold as<br />
described above (e.g. 16.000 laps). We recommend to set the red signal on<br />
BLINK mode.<br />
ATTENTION: to disable alarms, just press SET. Alarm will be disabled until a<br />
new data acquisition is launched.<br />
Live data on the <strong>MD4</strong>.<br />
During acquisition, you can see lap time, speed “KPH” and any other channel.<br />
Just browse options with arrows.<br />
Axiogroup srl - via ponticelli,134 – 36020 - Agugliaro Italy<br />
Tel. +39 0444 89 21 49 - Fax +39 0444 89 28 14<br />
E-mail: sales@getdata.it - Web: www.getdata.it<br />
14
Data analysis with MX1 software.<br />
Connect the <strong>MD4</strong> to your computer through the USB cable and follow<br />
instructions.<br />
Data download is only available when the <strong>MD4</strong> is on MENU page.<br />
We recommend to switch your bike off before downloading.<br />
PLEASE SEE MX1 SOFTWARE USER’S <strong>GUIDE</strong> FOR DATA<br />
ANALYSIS.<br />
Time accuracy in <strong>MD4</strong>.<br />
Thanks to our MX1 software processing, lap times are recalculated and become<br />
more accurate. As a result, you may find some difference between lap times<br />
shown by the <strong>MD4</strong> and those shown on your computer.<br />
How to update <strong>MD4</strong> firmware<br />
(Your <strong>MD4</strong> current firmware version can be seen after switching your device and then pressing on<br />
the left arrow)<br />
1. Save any data recorded into your <strong>MD4</strong> on your computer.<br />
2. Switch <strong>MD4</strong> device on and connect it to your computer via USB cable.<br />
3. Run “fwupdate” file (Power must keep on during this phase).<br />
4. Select “Update” (you may have to try several times) until “Transfer completed!” appears.<br />
5. Now you can turn power off for a few seconds (removing the MAIN cable for instance).<br />
6. Switch <strong>MD4</strong> device on.<br />
7. When and only when device shows “NO SETUP”, send a setup using into the <strong>MD4</strong><br />
using the MX2 software on your PC (See MX2 user’s guide for more info)<br />
8. Select OPTIONS from the main MENU.<br />
9. Select <strong>MD4</strong> RESET, then choose SET upon “CONFIRM?” request, and then SET<br />
again upon “PRECAL?” request. Select <strong>MD4</strong> RESET again, then choose SET upon<br />
“CONFIRM?” request and then MENU upon “PRECAL?” request.<br />
10. Press MENU.<br />
11. Once firmware is updated, all calibrations will have to be made again.<br />
Axiogroup srl - via ponticelli,134 – 36020 - Agugliaro Italy<br />
Tel. +39 0444 89 21 49 - Fax +39 0444 89 28 14<br />
E-mail: sales@getdata.it - Web: www.getdata.it<br />
15