Download - Zupin
Download - Zupin
Download - Zupin

Create successful ePaper yourself
Turn your PDF publications into a flip-book with our unique Google optimized e-Paper software.
Setting up the bike<br />
4.<br />
Checking sag and ride height.<br />
Front sag:<br />
A - B = 30 ± 10 mm.<br />
Front ride height:<br />
A - C = 80 ± 5 mm.<br />
Rear sag:<br />
A - B = 35 ± 5 mm.<br />
Rear ride height:<br />
A - C = 100 ± 5 mm.<br />
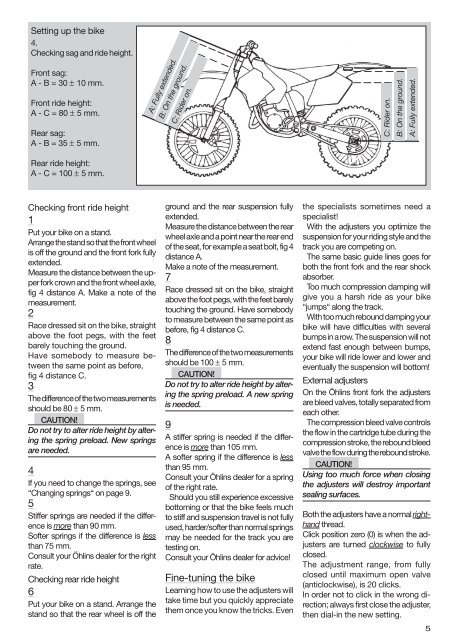
Checking front ride height<br />
1<br />
Put your bike on a stand.<br />
Arrange the stand so that the front wheel<br />
is off the ground and the front fork fully<br />
extended.<br />
Measure the distance between the upper<br />
fork crown and the front wheel axle,<br />
fig 4 distance A. Make a note of the<br />
measurement.<br />
2<br />
Race dressed sit on the bike, straight<br />
above the foot pegs, with the feet<br />
barely touching the ground.<br />
Have somebody to measure between<br />
the same point as before,<br />
fig 4 distance C.<br />
3<br />
The difference of the two measurements<br />
should be 80 ± 5 mm.<br />
CAUTION!<br />
Do not try to alter ride height by altering<br />
the spring preload. New springs<br />
are needed.<br />
4<br />
If you need to change the springs, see<br />
“Changing springs“ on page 9.<br />
5<br />
Stiffer springs are needed if the difference<br />
is more than 90 mm.<br />
Softer springs if the difference is less<br />
than 75 mm.<br />
Consult your Öhlins dealer for the right<br />
rate.<br />
Checking rear ride height<br />
6<br />
Put your bike on a stand. Arrange the<br />
stand so that the rear wheel is off the<br />
A: Fully extended.<br />
B: On the ground.<br />
C: Rider on.<br />
ground and the rear suspension fully<br />
extended.<br />
Measure the distance between the rear<br />
wheel axle and a point near the rear end<br />
of the seat, for example a seat bolt, fig 4<br />
distance A.<br />
Make a note of the measurement.<br />
7<br />
Race dressed sit on the bike, straight<br />
above the foot pegs, with the feet barely<br />
touching the ground. Have somebody<br />
to measure between the same point as<br />
before, fig 4 distance C.<br />
8<br />
The difference of the two measurements<br />
should be 100 ± 5 mm.<br />
CAUTION!<br />
Do not try to alter ride height by altering<br />
the spring preload. A new spring<br />
is needed.<br />
9<br />
A stiffer spring is needed if the difference<br />
is more than 105 mm.<br />
A softer spring if the difference is less<br />
than 95 mm.<br />
Consult your Öhlins dealer for a spring<br />
of the right rate.<br />
Should you still experience excessive<br />
bottoming or that the bike feels much<br />
to stiff and suspension travel is not fully<br />
used, harder/softer than normal springs<br />
may be needed for the track you are<br />
testing on.<br />
Consult your Öhlins dealer for advice!<br />
Fine-tuning the bike<br />
Learning how to use the adjusters will<br />
take time but you quickly appreciate<br />
them once you know the tricks. Even<br />
C: Rider on.<br />
B: On the ground.<br />
A: Fully extended.<br />
the specialists sometimes need a<br />
specialist!<br />
With the adjusters you optimize the<br />
suspension for your riding style and the<br />
track you are competing on.<br />
The same basic guide lines goes for<br />
both the front fork and the rear shock<br />
absorber.<br />
Too much compression damping will<br />
give you a harsh ride as your bike<br />
“jumps“ along the track.<br />
With too much rebound damping your<br />
bike will have difficulties with several<br />
bumps in a row. The suspension will not<br />
extend fast enough between bumps,<br />
your bike will ride lower and lower and<br />
eventually the suspension will bottom!<br />
External adjusters<br />
On the Öhlins front fork the adjusters<br />
are bleed valves, totally separated from<br />
each other.<br />
The compression bleed valve controls<br />
the flow in the cartridge tube during the<br />
compression stroke, the rebound bleed<br />
valve the flow during the rebound stroke.<br />
CAUTION!<br />
Using too much force when closing<br />
the adjusters will destroy important<br />
sealing surfaces.<br />
Both the adjusters have a normal righthand<br />
thread.<br />
Click position zero (0) is when the adjusters<br />
are turned clockwise to fully<br />
closed.<br />
The adjustment range, from fully<br />
closed until maximum open valve<br />
(anticlockwise), is 20 clicks.<br />
In order not to click in the wrong direction;<br />
always first close the adjuster,<br />
then dial-in the new setting.<br />
5