Owners Manual - Zupin
Owners Manual - Zupin
Owners Manual - Zupin

You also want an ePaper? Increase the reach of your titles
YUMPU automatically turns print PDFs into web optimized ePapers that Google loves.
20<br />
Individual adjustments<br />
Individual adjustments<br />
Below you can find the recommended adjustment<br />
range for the top left compression<br />
leg adjuster, with different positions on the<br />
bottom base valve. From soft to hard:<br />
SOFT<br />
HARD<br />
Base 19 clicks, top 17-20 clicks<br />
Base 16 clicks, top 14-18 clicks<br />
Base 12 clicks, top 11-14 clicks<br />
Base 10 clicks, top 10-12 clicks<br />
Base valve:<br />
The left bottom base valve can be adjusted<br />
from 8- 13 clicks, if top compression<br />
is set at 12 clicks open.<br />
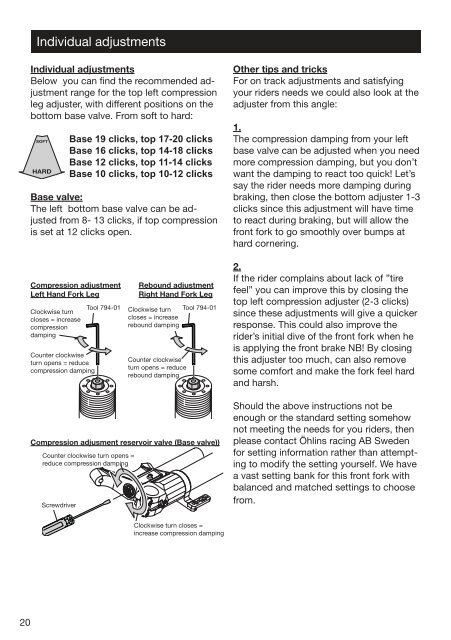
Compression adjustment<br />
Left Hand Fork Leg<br />
Clockwise turn<br />
closes = increase<br />
compression<br />
damping<br />
Counter clockwise<br />
turn opens = reduce<br />
compression damping<br />
Tool 794-01<br />
Rebound adjustment<br />
Right Hand Fork Leg<br />
Clockwise turn<br />
closes = increase<br />
rebound damping<br />
Counter clockwise<br />
turn opens = reduce<br />
rebound damping<br />
Tool 794-01<br />
Compression adjusment reservoir valve (Base valve))<br />
Counter clockwise turn opens =<br />
reduce compression damping<br />
Screwdriver<br />
Clockwise turn closes =<br />
increase compression damping<br />
Other tips and tricks<br />
For on track adjustments and satisfying<br />
your riders needs we could also look at the<br />
adjuster from this angle:<br />
1.<br />
The compression damping from your left<br />
base valve can be adjusted when you need<br />
more compression damping, but you don’t<br />
want the damping to react too quick! Let’s<br />
say the rider needs more damping during<br />
braking, then close the bottom adjuster 1-3<br />
clicks since this adjustment will have time<br />
to react during braking, but will allow the<br />
front fork to go smoothly over bumps at<br />
hard cornering.<br />
2.<br />
If the rider complains about lack of ”tire<br />
feel” you can improve this by closing the<br />
top left compression adjuster (2-3 clicks)<br />
since these adjustments will give a quicker<br />
response. This could also improve the<br />
rider’s initial dive of the front fork when he<br />
is applying the front brake NB! By closing<br />
this adjuster too much, can also remove<br />
some comfort and make the fork feel hard<br />
and harsh.<br />
Should the above instructions not be<br />
enough or the standard setting somehow<br />
not meeting the needs for you riders, then<br />
please contact Öhlins racing AB Sweden<br />
for setting information rather than attempting<br />
to modify the setting yourself. We have<br />
a vast setting bank for this front fork with<br />
balanced and matched settings to choose<br />
from.