Tuning guide – The Brazilian Way - Olimpic Sails
Tuning guide – The Brazilian Way - Olimpic Sails
Tuning guide – The Brazilian Way - Olimpic Sails

Create successful ePaper yourself
Turn your PDF publications into a flip-book with our unique Google optimized e-Paper software.
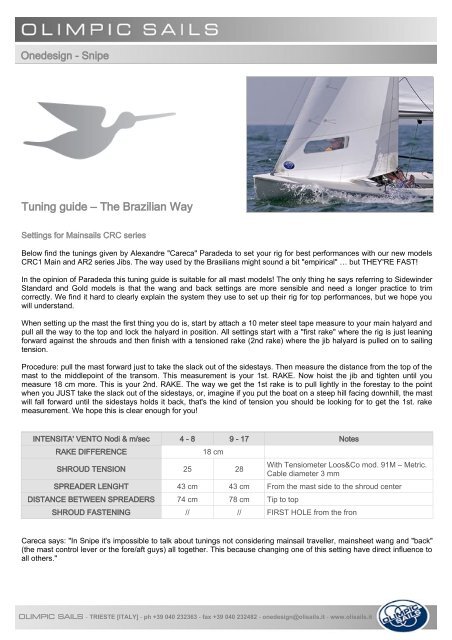
Onedesign - Snipe<br />
<strong>Tuning</strong> <strong>guide</strong> <strong>–</strong> <strong>The</strong> <strong>Brazilian</strong> <strong>Way</strong><br />
Settings for Mainsails CRC series<br />
Below find the tunings given by Alexandre "Careca" Paradeda to set your rig for best performances with our new models<br />
CRC1 Main and AR2 series Jibs. <strong>The</strong> way used by the Brasilians might sound a bit "empirical" … but THEY'RE FAST!<br />
In the opinion of Paradeda this tuning <strong>guide</strong> is suitable for all mast models! <strong>The</strong> only thing he says referring to Sidewinder<br />
Standard and Gold models is that the wang and back settings are more sensible and need a longer practice to trim<br />
correctly. We find it hard to clearly explain the system they use to set up their rig for top performances, but we hope you<br />
will understand.<br />
When setting up the mast the first thing you do is, start by attach a 10 meter steel tape measure to your main halyard and<br />
pull all the way to the top and lock the halyard in position. All settings start with a "first rake" where the rig is just leaning<br />
forward against the shrouds and then finish with a tensioned rake (2nd rake) where the jib halyard is pulled on to sailing<br />
tension.<br />
Procedure: pull the mast forward just to take the slack out of the sidestays. <strong>The</strong>n measure the distance from the top of the<br />
mast to the middlepoint of the transom. This measurement is your 1st. RAKE. Now hoist the jib and tighten until you<br />
measure 18 cm more. This is your 2nd. RAKE. <strong>The</strong> way we get the 1st rake is to pull lightly in the forestay to the point<br />
when you JUST take the slack out of the sidestays, or, imagine if you put the boat on a steep hill facing downhill, the mast<br />
will fall forward until the sidestays holds it back, that's the kind of tension you should be looking for to get the 1st. rake<br />
measurement. We hope this is clear enough for you!<br />
INTENSITA' VENTO Nodi & m/sec 4 - 8 9 - 17 Notes<br />
RAKE DIFFERENCE 18 cm<br />
SHROUD TENSION 25 28<br />
With Tensiometer Loos&Co mod. 91M <strong>–</strong> Metric.<br />
Cable diameter 3 mm<br />
SPREADER LENGHT 43 cm 43 cm From the mast side to the shroud center<br />
DISTANCE BETWEEN SPREADERS 74 cm 78 cm Tip to top<br />
SHROUD FASTENING // // FIRST HOLE from the fron<br />
Careca says: "In Snipe it's impossible to talk about tunings not considering mainsail traveller, mainsheet wang and "back"<br />
(the mast control lever or the fore/aft guys) all together. This because changing one of this setting have direct influence to<br />
all others."<br />
OLIMPIC SAILS - TRIESTE [ITALY] - ph +39 040 232363 - fax +39 040 232482 - onedesign@olisails.it - www.olisails.it
Onedesign - Snipe<br />
Light Wind ( up to 7 knots ) Medium Wind ( 8 <strong>–</strong> 11 knots )<br />
RAKE 6,56 m RAKE 6,54 m<br />
TRAVELLER In the middle TRAVELLER In the middle<br />
MAINSHEET<br />
Very critical tuning. Sheet in just enough<br />
to avoid closing the leech<br />
MAINSHEET<br />
WANG No tension WANG Appena puntato<br />
Just enough to give a bit of tension to the<br />
leeward arm<br />
BACK 3-4 cm avanti (dal segno neutro) BACK No tension but locked<br />
Strong Wind ( 12 <strong>–</strong> 18 knots ) Very Strong Wind ( 18 <strong>–</strong> 25 knots )<br />
RAKE 6,50 m RAKE 6,50 m<br />
TRAVELLER<br />
MAINSHEET<br />
WANG<br />
BACK<br />
Loose it progressively as the wind<br />
increase to avoid loosing only mainsheet.<br />
With wang and traveler loose, the<br />
maisheet helps to keep the jib "under<br />
presure". In this condition the leeward<br />
arm have still to keep some tension.<br />
It's needed to flatten mainsail as the wind<br />
increase. In this condition you don't wish<br />
to open the leech too much, so you don't<br />
have to tighten it too much and close the<br />
leech too early.<br />
Neutral. This position helps keeping<br />
pressure on the jib and not open the<br />
main's leech too much.<br />
Settings for Mainsail RS series<br />
Basic settings for light-medium wind<br />
SIDEWINDER Standard and Black mast<br />
TRAVELLER Loose at about 20 cm from the middle.<br />
MAINSHEET<br />
WANG<br />
BACK<br />
In this condition it does not have influence on the<br />
leech, but only to move in and out the boom. <strong>The</strong><br />
leeward arm is always loose.<br />
It's the "responsible" to keep the main flat,<br />
together with cunningham. <strong>The</strong> main's leech<br />
must be open to make possible to control the<br />
boat.<br />
2-3 cm forward from neutral, to ease the<br />
pressure on helm, lighten the boat and<br />
keep her fast .<br />
Push the mast until you obtain 1 cm bend at spreader level and measure the distance between the top measurement band<br />
(halyard position should be the same as that of mainsail properly hoisted) and the centre of the deck at the stern. Adjust<br />
the shroud length to 6470 cm, hoist the jib and set halyard length to 6510 mm.<br />
Verify that you have obtained the following measurements:<br />
PRE-BEND: 25 mm at spreader level for Sidewinder mast.<br />
SHROUD TENSION: 19 mm (with first version aluminium shroud tensioner). In case the measurements mentioned above<br />
were not obtained shroud length should be modified.<br />
DISTANCE BETWEEN SPREADERS: from 44,5 cm (heavy crews) to 43 cm (light crews). It is measured from the mast<br />
side to the shroud centre.<br />
DISTANCE BETWEEN SPREADERS: From 70 to 80 cm. Measurement should be taken with the mast on the ground,<br />
from the centre of the mast to the centre of the shroud while bringing the spreaders as close as possible. Pay attention<br />
when tightening the screws on the adjustable spreaders: the number of turns should be the same. Make sure that the<br />
spreaders have the same angle.<br />
SHROUD FASTENING: Third hole from the front on Persson hulls; second hole from the front on Lillia hulls.<br />
OLIMPIC SAILS - TRIESTE [ITALY] - ph +39 040 232363 - fax +39 040 232482 - onedesign@olisails.it - www.olisails.it
Onedesign - Snipe<br />
Proctor Miracle mast<br />
Basic concepts are the same as above. However, Proctor masts are more flexible fore and aft, so rake should be reduced<br />
by 2 cm to counterbalance increased bend. When sailing, rig position will be the same.<br />
PRE-BEND: 45 mm at spreader level.<br />
SHROUD TENSION: 19 mm (with first version aluminium shroud tensioner). In case the measurements mentioned above<br />
were not obtained shroud length should be modified.<br />
SPREADERS LENGHT: 43,5 cm.<br />
DISTANCE BETWEEN SPREADERS: 76 cm<br />
SHROUD FASTENING: Third hole from the front on Persson hulls; second hole from the front on Lillia hulls.<br />
Sidewinder Proctor Notes<br />
PRE-BEND 25 cm 45 cm At spreader level<br />
SHROUD TENSION 19 cm 19 cm With first version aluminium shroud tensioner<br />
SPREADER LENGHT Da 44,5 a 43 cm 43,5 cm From the mast side to the shroud centre<br />
DISTANCE BETWEEN<br />
SPREADERS<br />
Da 70 a 80 cm 76 cm Tip to tip<br />
SHROUD FASTENING // //<br />
Third hole from the front on PERSSON hulls,<br />
second hole from the front on LILLIA hulls<br />
<strong>The</strong> measurements listed below refer to Persson and Skipper hulls. For Lillia hulls, which have a different stern, add about<br />
4 cm.<br />
OLIMPIC SAILS - TRIESTE [ITALY] - ph +39 040 232363 - fax +39 040 232482 - onedesign@olisails.it - www.olisails.it