Gallagher TM - Gallagher.eu
Gallagher TM - Gallagher.eu
Gallagher TM - Gallagher.eu

You also want an ePaper? Increase the reach of your titles
YUMPU automatically turns print PDFs into web optimized ePapers that Google loves.
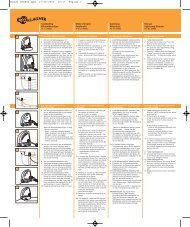
INSTALLATION INSTRUCTIONS<br />
Install your SmartPower Energizer in a convenient, frequently accessed place. The display and<br />
alarms give valuable information that can save time and help prevent costly problems. Mount<br />
the Energizer on a wall, under cover, adjacent to a mains power connection, safe from<br />
children, mechanical damage and if possible away from heavy electrical equipment (e.g.<br />
pumps).<br />
1. Using the template on the “Important Information” sheet, drill 2 x 4mm holes and attach<br />
the top of the Energizer to the wall<br />
2. Install the third screw in the central bottom hole<br />
3. Fence: Connect the fence live wire to the RED OUTPUT ( ) Terminal. Use <strong>Gallagher</strong> Lead<br />
Out Cable and Joint Clamps to bring the live wire into a building.<br />
4. Earth: Connect the Earth System to the GREEN EARTH ( ) Terminal. Use <strong>Gallagher</strong> Lead<br />
Out Cable and Earth Clamps to make a high quality connection between<br />
the earth stakes or earth return wire and Energizer.<br />
5. Plug in the Energizer and switch ON. Allow at least 30 pulses for the Energizer to adapt to<br />
the fence system.<br />
From this point on your SmartPower Energizer is very different from conventional Energizers.<br />
The first thing to note is that the electronic display will begin cycling through 4 different<br />
readings:<br />
1. Stored Energy ( symbol) 3. Fence Voltage (no symbol)<br />
2. Output Voltage ( lightning bolt symbol) 4. Earth Voltage ( earth symbol)<br />
Note 1: Each reading gives you important information about the performance of your fence<br />
system (the red back light illuminates the electronic display for easy reading in dark<br />
conditions).<br />
Note 2: Readings will change as your SmartPower Energizer responds to fence conditions<br />
(this is the Energizer monitoring the fence and adapting its power output<br />
accordingly).<br />
Note 3: If the Earth Alarm sounds, ignore it until the Earth Test is complete.<br />
Earth Test: It is very important to have a high quality Earth System. For an all live wire fence<br />
system save time by installing at least 9 Earth Stakes before you start.<br />
6. Turn the Energizer OFF. At least 40 metres along the fence drive a steel stake into the soil<br />
(enough to reach moist soil) and connect it to the live wire.<br />
7. Turn the Energizer ON and check the Stored Energy reading. Add steel stakes until Stored<br />
Energy reads at least 35 Joules for the MX5000, 17 Joules for the MX2500 or 14 Joules for<br />
the MX1600 (if the Output Alarm (OA) sounds remove a steel stake).<br />
8. Add Earth Stakes until you achieve 200-300 or less volts on the Earth reading – for<br />
explanation refer to the section on “What does Earth Voltage tell you?” Construct the<br />
Earth System as directed in the <strong>Gallagher</strong> Power Fence Manual.<br />
9. Turn the Energizer OFF. Remove the steel stakes from the fence.<br />
Note 4: If the Earth Alarm sounds when you remove the steel stakes contact your <strong>Gallagher</strong><br />
Dealer or National Distributor to change the alarm settings.<br />
– 4 –