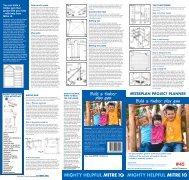
Build a deck deck - Johnson & Rielly Mitre 10
Build a deck deck - Johnson & Rielly Mitre 10
Build a deck deck - Johnson & Rielly Mitre 10

You also want an ePaper? Increase the reach of your titles
YUMPU automatically turns print PDFs into web optimized ePapers that Google loves.
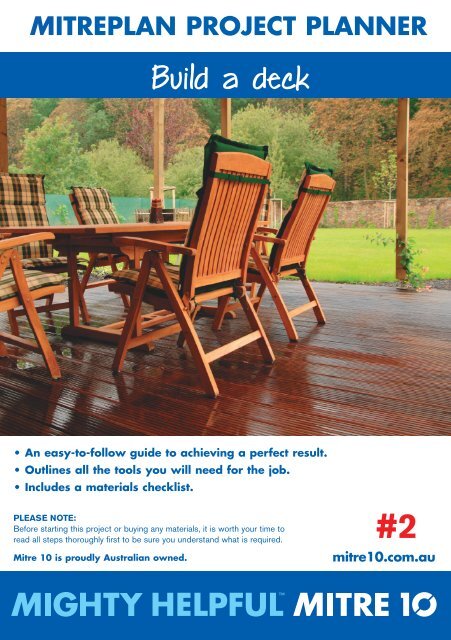
MItrePlAn PrOJeCt PlAnner<br />
• An easy-to-follow guide to achieving a perfect result.<br />
• Outlines all the tools you will need for the job.<br />
• Includes a materials checklist.<br />
PLEASE NOTE:<br />
Before starting this project or buying any materials, it is worth your time to<br />
read all steps thoroughly first to be sure you understand what is required.<br />
<strong>Mitre</strong> <strong>10</strong> is proudly Australian owned.<br />
<strong>Build</strong> a <strong>deck</strong><br />
#2<br />
mitre<strong>10</strong>.com.au
MIGhTY TOOLS fOR<br />
YOuR MITREPLAN<br />
Measuring tape<br />
Pencil<br />
Power drill & bits<br />
Power saw or hand saw<br />
Claw hammer<br />
Carpenter’s square<br />
String line<br />
Spirit level<br />
Wood chisel, 20mm<br />
Sliding bevel<br />
Adjustable wrench<br />
Shovel or<br />
Post hole digger<br />
✓<br />
MIGhTY hELPfuL ChECkLIST<br />
Timber<br />
Your <strong>Mitre</strong> <strong>10</strong> specialist will be pleased to help you<br />
with the correct timber selection but if you stick to<br />
this guide you won’t go wrong.<br />
Stumps: Cypress or treated pine<br />
<strong>10</strong>0 x <strong>10</strong>0mm<br />
Sole plates: 200 x 200 x 50mm redgum<br />
or treated pine<br />
bearers: 2/90 x 45mm F.7. treated pine<br />
or <strong>10</strong>0 x <strong>10</strong>0mm treated radiata pine<br />
joists: 90 x 45mm or<br />
140 x 45mm F.7. treated pine<br />
Decking: Treated radiata pine, merbau or<br />
whatever is currently in stock at <strong>Mitre</strong> <strong>10</strong><br />
Sizes: 70 x 19mm, 70 x 22mm, 90 x 19mm,<br />
90 x 22mm, 140 x 19mm, 140 x 22mm<br />
fixings<br />
50mm x 2.80mm TitaDeck®<br />
galvanised <strong>deck</strong>ing nails<br />
75mm x 3.75mm galvanised<br />
bullet head nails<br />
<strong>10</strong>0mm x 3.75mm galvanised<br />
bullet head nails<br />
Masonry anchors (Dynabolts)<br />
Concrete or rapid set mix<br />
Decking stain if required<br />
Visit mitre<strong>10</strong>.com.au for more S<br />
ORDER<br />
Verbal quotes are indicative only. Written quotes on materials<br />
are available upon request from your <strong>Mitre</strong> <strong>10</strong> store.<br />
<strong>Build</strong>ing a <strong>deck</strong><br />
is easy – with a<br />
MIGhTY hELPfuL<br />
hINTS TO MAkE<br />
ThE jOb EASIER<br />
before starting any work, find out if a<br />
building permit is required.<br />
<strong>Build</strong> a <strong>deck</strong><br />
Step 1: Choosing and preparing your site<br />
When choosing the site for your <strong>deck</strong>, note the position of the<br />
existing features of both your house and garden. Pay special<br />
attention to the location of drains and any external plumbing,<br />
little help from<br />
because once your <strong>deck</strong> has been built, it will be hard to<br />
■ <strong>Build</strong>ing a <strong>deck</strong> will be<br />
access the area under it.<br />
easier <strong>Mitre</strong> if you prepare <strong>10</strong>. all the<br />
tools and materials first.<br />
Take ground preparation and drainage into account by laying<br />
some Agi Pipe or Nylex Strip Drain before you start building to<br />
■ A Be well-designed sure to take drainage <strong>deck</strong> is a relatively avoid any surface water lying about underneath. Just follow the<br />
of the site into consideration<br />
easy way to increase family living space maker’s instructions. Then rake the ground clear. It might be a<br />
before you build. Once your<br />
good idea to add Weed Control Mat at this stage, too.<br />
<strong>deck</strong> around is up, your access home. will It’s be like adding on an<br />
limited. outdoor room that can be a perfect link<br />
for relaxed indoor/outdoor living. And it Step 2: Mark out your site<br />
■ Lay Weed Control Mat<br />
will also add value to your home. If you Accuracy at this<br />
over the area to prevent weed<br />
growth wish, underneath.<br />
you can even cover your <strong>deck</strong> by stage can save a<br />
lot of hassles later<br />
adding a pergola as you build it.<br />
■ Measuring is easy, materials<br />
on so take your<br />
expensive. While design Double is largely check all a matter of time and don’t<br />
measurements personal taste, and the markings <strong>deck</strong> you choose will rush.<br />
fig. 1<br />
before<br />
depend<br />
you<br />
on<br />
cut<br />
such<br />
any piece<br />
factors<br />
of<br />
as the shape Mark out the width<br />
material.<br />
of your land and its relationship to your and length of the<br />
■ To get a straight, even edge<br />
<strong>deck</strong> where it will<br />
home. Decks can be broadly classified IMPORTANT: This project planner has been produced to provide<br />
to your finished <strong>deck</strong>ing, let<br />
join the house.<br />
into three main types:<br />
basic information and our experienced staff are available to answer any<br />
the ends overhang about<br />
questions you Then, may using have. any However, scrap timber, this information build corner is hurdles provided and for drive use<br />
50mm, hillside then <strong>deck</strong>s, trim them which all take advantage on the of understanding them into the that ground, <strong>Mitre</strong> <strong>10</strong> outside is not the liable designated for any loss area, or two damage at each<br />
together uneven with or sloping a saw when blocks. the which is suffered corner or (Fig. incurred 1). Fix nails (including in the but hurdle not top limited pieces to and indirect stretch or a<br />
job is completed.<br />
consequential string loss), line for around any personal them to injury form or a damage box in the to plan’s property dimensions suffered<br />
Low-level <strong>deck</strong>s, that extend out at or floor sustained (Fig. as a 1). result Lines of using 1 and the 1 should information be parallel contained and in the this distance <strong>Mitre</strong>Plan<br />
■ Remember, when using<br />
Project Planner. <strong>Mitre</strong> <strong>10</strong> advises you to call in a qualified tradesperson,<br />
any<br />
level<br />
power<br />
on flat<br />
tool,<br />
land,<br />
your<br />
adding<br />
eyes<br />
spaciousness between them equal, as should lines 2 and 2. Measure between<br />
such as an electrician or plumber, where expert services are required,<br />
should to a family always room be protected or living by area.<br />
the diagonally opposite corners with a tape measure to ensure<br />
and to independently assess any safety precautions that will need to be<br />
wearing suitable goggles.<br />
that lines 3 and 3 are the same length. You may have to adjust<br />
Isolated <strong>deck</strong>s, that are used followed prior the to position using of the the information nails to achieve in this. Once the diagonal<br />
■ around Depending swimming on the size pools and and other this <strong>Mitre</strong>Plan measurements Project Planner. are equal and all lines are parallel, the job will be<br />
construction garden features of your such <strong>deck</strong> as you gazebos, WARNING: square There may and be you by are laws ready or to set the stumps.<br />
may<br />
ponds<br />
need<br />
and<br />
the<br />
rockeries.<br />
approval of your regulations of councils or other statutory<br />
local Shire or council before bodies that you Step must 3: comply Set with the when stumps<br />
you You start. will also have to decide which following this <strong>Mitre</strong>Plan Project Planner.<br />
Space your stump holes every 1800mm out from the house and<br />
way you want your <strong>deck</strong>ing boards to<br />
1500mm apart (Fig. 2). Dig the holes 300 x 300mm square and<br />
run. The design we’ve shown you here<br />
600mm deep. Dig them so that when the stumps are centred in<br />
has the boards running parallel to the them, the outside edges of the stumps are flush with the<br />
house, but, if you prefer, you can easily Your local string MITRE line. <strong>10</strong> Store is:<br />
adapt it for them to run diagonally, or Before setting the stumps in the holes, place a timber sole plate<br />
away from the house.<br />
in the bottom of each hole. Stand the stump on the sole plate<br />
(Fig. 3). You may need to brace the stump temporarily so it<br />
Whichever type of <strong>deck</strong> you choose,<br />
stays upright and straight (Fig. 4).<br />
building it is well within the capacity<br />
Fill the hole with a mixture of approximately 2 bags of concrete<br />
of the average home improver. And<br />
or rapid set mix and approximately 1-2 buckets of water per<br />
you’ll get real enjoyment out of doing hole. Check stump is plumb and in correct position before<br />
it yourself with the help of this step- concrete sets. Allow sufficient time to harden.<br />
by-step guide – and your local <strong>Mitre</strong> <strong>10</strong><br />
specialist.<br />
Step 4: Add the framing<br />
If your house is weatherboard, ideally bearers should be joined<br />
to the existing bearers of your house. If your house is brick then<br />
you can connect a 140 x 145mm F.7. treated pine plate to the<br />
brickwork using suitable masonry anchors at 600mm intervals.
fig. 2<br />
fig. 3<br />
fig. 4<br />
fig. 5<br />
Once the plate has been fixed and bearer height has been<br />
determined, transfer this onto other stumps using a straight<br />
edge and level or string line and level. Mark with a square and<br />
cut off stumps to correct height.<br />
Skew nail (driving nails in at an angle – Fig. 6) at the remaining<br />
bearers onto stumps. Or use nail plates or framing anchors<br />
(Fig. 7). Check all levels and angles once again. Set joists on<br />
top of bearers every 450 – 600mm for hardwood <strong>deck</strong>ing,<br />
every 400mm for pine <strong>deck</strong>ing using the skew nail technique or<br />
galvanised framing anchors.<br />
Step 5: Lay your <strong>deck</strong>ing surface<br />
The <strong>deck</strong>ing surface will be the most visible part of your work, so<br />
take your time and check your progress as you go. Each <strong>deck</strong>ing<br />
board should be square to the others and, together, be square<br />
to the house. While <strong>deck</strong>ing boards are dressed, the odd one<br />
or two may be bowed and care should be taken that the bow<br />
is eased out as you nail them in place. Nail the boards to the<br />
joists using two galvanised <strong>deck</strong>ing nails at each point, placed<br />
approximately 15mm in from the edge of the board. Leave a gap<br />
of about 4mm (Fig. 8) between each board to allow for drainage.<br />
You can use a piece of suitably sized timber as a spacer, placing<br />
it into position against the previous board at each nail point and<br />
pulling the board against it as you nail. Drill each board end<br />
before nailing to avoid splitting. Make sure that joins in the boards<br />
are staggered and always occur over a joist.<br />
To get a straight, even edge to the finished <strong>deck</strong>, let the ends<br />
overhang about 50mm, then trim them all together with a saw<br />
when you’ve completed laying all boards.<br />
fig. 7<br />
fig. 6<br />
fig. 8<br />
Step 6: Finishing your new <strong>deck</strong><br />
If you have chosen a hard durable <strong>deck</strong>ing surface such as<br />
batu or merbau, a <strong>deck</strong>ing finish is optional. Treated radiata<br />
pine <strong>deck</strong>ing already comes in a natural green colour and<br />
doesn’t normally require any added protection unless facing<br />
north or west. But remember, most timbers left to age<br />
naturally will turn to a silver grey colour over a year or so<br />
after completion. So consider painting or staining carefully.<br />
If you require something that will enhance and maintain the<br />
beauty of the timber you’ve chosen, then there are a number<br />
of attractive finishes you can use. Ask the paint staff at your<br />
local <strong>Mitre</strong> <strong>10</strong> store.<br />
Now, all that’s left to do is sit back and enjoy your new <strong>deck</strong><br />
– and admire your own handiwork.<br />
Deck Designs<br />
<strong>Build</strong>ing a timber <strong>deck</strong> in our own backyard is really a<br />
breeze. All <strong>deck</strong>s are made in much the same way, so it’s<br />
easy to adapt the basic techniques to your own site and your<br />
own lifestyle. Here’s just a few examples to get you thinking<br />
– and designing your own.
MIGhTY hELPfuL<br />
hINTS TO MAkE<br />
ThE jOb EASIER<br />
■ <strong>Build</strong>ing a <strong>deck</strong> will be<br />
easier if you prepare all the<br />
tools and materials first.<br />
■ Be sure to take drainage<br />
of the site into consideration<br />
before you build. Once your<br />
<strong>deck</strong> is up, access will be<br />
limited.<br />
■ Lay Weed Control Mat<br />
over the area to prevent weed<br />
growth underneath.<br />
■ Measuring is easy, materials<br />
expensive. Double check all<br />
measurements and markings<br />
before you cut any piece of<br />
material.<br />
■ To get a straight, even edge<br />
to your finished <strong>deck</strong>ing, let<br />
the ends overhang about<br />
50mm, then trim them all<br />
together with a saw when the<br />
job is completed.<br />
■ Remember, when using<br />
any power tool, your eyes<br />
should always be protected by<br />
wearing suitable goggles.<br />
■ Depending on the size and<br />
construction of your <strong>deck</strong> you<br />
may need the approval of your<br />
local Shire or council before<br />
you start.<br />
<strong>Build</strong> a <strong>deck</strong><br />
IMPORTANT: This project planner has been produced to provide<br />
basic information and our experienced staff are available to answer any<br />
questions you may have. However, this information is provided for use<br />
on the understanding that <strong>Mitre</strong> <strong>10</strong> is not liable for any loss or damage<br />
which is suffered or incurred (including but not limited to indirect or<br />
consequential loss), for any personal injury or damage to property suffered<br />
or sustained as a result of using the information contained in this <strong>Mitre</strong>Plan<br />
Project Planner. <strong>Mitre</strong> <strong>10</strong> advises you to call in a qualified tradesperson,<br />
such as an electrician or plumber, where expert services are required,<br />
and to independently assess any safety precautions that will need to be<br />
followed prior to using the information in<br />
this <strong>Mitre</strong>Plan Project Planner.<br />
WARNING: There may be by laws or<br />
regulations of councils or other statutory<br />
bodies that you must comply with when<br />
following this <strong>Mitre</strong>Plan Project Planner.<br />
Your local MITRE <strong>10</strong> Store is: