

WSJT-X_Users_Guide
WSJT-X_Users_Guide
WSJT-X_Users_Guide

You also want an ePaper? Increase the reach of your titles
YUMPU automatically turns print PDFs into web optimized ePapers that Google loves.
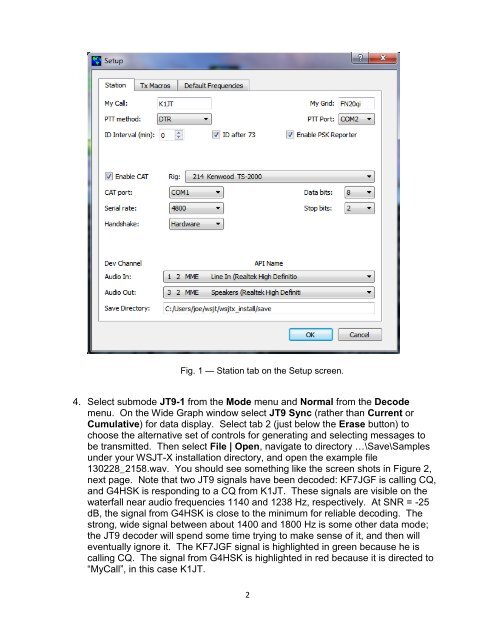
Fig. 1 — Station tab on the Setup screen.<br />
4. Select submode JT9-1 from the Mode menu and Normal from the Decode<br />
menu. On the Wide Graph window select JT9 Sync (rather than Current or<br />
Cumulative) for data display. Select tab 2 (just below the Erase button) to<br />
choose the alternative set of controls for generating and selecting messages to<br />
be transmitted. Then select File | Open, navigate to directory …\Save\Samples<br />
under your <strong>WSJT</strong>-X installation directory, and open the example file<br />
130228_2158.wav. You should see something like the screen shots in Figure 2,<br />
next page. Note that two JT9 signals have been decoded: KF7JGF is calling CQ,<br />
and G4HSK is responding to a CQ from K1JT. These signals are visible on the<br />
waterfall near audio frequencies 1140 and 1238 Hz, respectively. At SNR = -25<br />
dB, the signal from G4HSK is close to the minimum for reliable decoding. The<br />
strong, wide signal between about 1400 and 1800 Hz is some other data mode;<br />
the JT9 decoder will spend some time trying to make sense of it, and then will<br />
eventually ignore it. The KF7JGF signal is highlighted in green because he is<br />
calling CQ. The signal from G4HSK is highlighted in red because it is directed to<br />
“MyCall”, in this case K1JT.<br />
2