

Star Destroyer - Star Wars Origami
Star Destroyer - Star Wars Origami
Star Destroyer - Star Wars Origami

You also want an ePaper? Increase the reach of your titles
YUMPU automatically turns print PDFs into web optimized ePapers that Google loves.
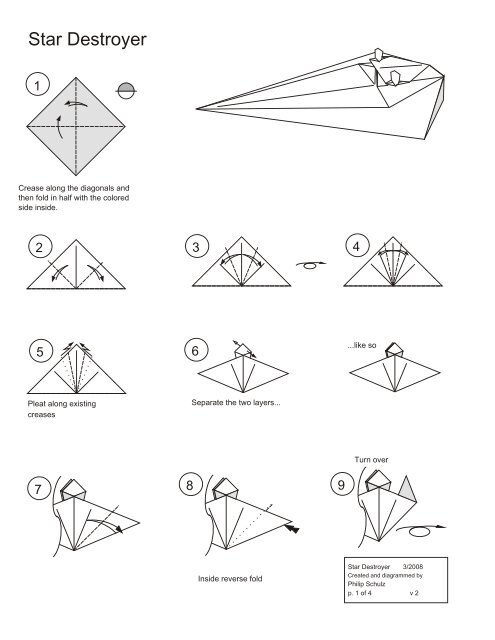
<strong>Star</strong> <strong>Destroyer</strong><br />
1<br />
Crease along the diagonals and<br />
then fold in half with the colored<br />
side inside.<br />
2 3 4<br />
5 6<br />
Pleat along existing<br />
creases<br />
Separate the two layers...<br />
7 8 9<br />
Inside reverse fold<br />
...like so<br />
Turn over<br />
<strong>Star</strong> <strong>Destroyer</strong> 3/2008<br />
Created and diagrammed by<br />
Philip Schulz<br />
p. 1 of 4 v 2
10 11 12<br />
Valley fold and tuck<br />
under flap<br />
13 14<br />
16 17<br />
Mountain crease top flap<br />
parallel to the centerline, so<br />
they touch the diagonal<br />
creases<br />
18 19<br />
Inside reverse fold<br />
Repeat steps 7-10 on<br />
other side<br />
Rabbit ear flap toward you.<br />
Slide the sides to the<br />
parallel creases you just<br />
made...<br />
Inside reverse fold<br />
15<br />
Unflatten the center peak<br />
by squeezing the sides and<br />
then fold to the left<br />
Squash fold the flap flat.<br />
This is undoing step 12<br />
...like so<br />
<strong>Star</strong> <strong>Destroyer</strong> 3/2008<br />
Created and diagrammed by<br />
Philip Schulz<br />
p. 2 of 4 v 2
20<br />
Fold out flaps, making<br />
the bridge...<br />
If the model is too small for<br />
details, you can skip to step<br />
24<br />
...like so<br />
26 27<br />
...like so<br />
Squash fold each flap down,<br />
spreading the inside edges<br />
Turn over so you are looking<br />
at the bottom of the model<br />
21<br />
22 23<br />
24<br />
Valley fold up 90 degrees<br />
25<br />
Fold each flap up, squashing<br />
the inside edges...<br />
<strong>Star</strong> <strong>Destroyer</strong> 3/2008<br />
Created and diagrammed by<br />
Philip Schulz<br />
p. 3 of 4 v 2
28 29<br />
Mountain fold the middle flap back 90<br />
degrees into the inside of the model.<br />
You will have to open up the model.<br />
Pleating the flap will give the model a<br />
3D shape<br />
You are looking into the back of the model.<br />
Tuck the side flaps in the pocket under the<br />
middle flap to lock the shape.<br />
You can adjust the 3D shape of the ship by<br />
changing the angle of the pleat in step 28<br />
and the creases in step 25<br />
<strong>Star</strong> <strong>Destroyer</strong> 3/2008<br />
Created and diagrammed by<br />
Philip Schulz<br />
p. 4 of 4 v 2