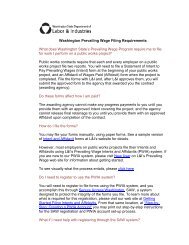
Prevailing Wage Filing Instructions (3516 KB PDF / 10
Prevailing Wage Filing Instructions (3516 KB PDF / 10
Prevailing Wage Filing Instructions (3516 KB PDF / 10

Create successful ePaper yourself
Turn your PDF publications into a flip-book with our unique Google optimized e-Paper software.
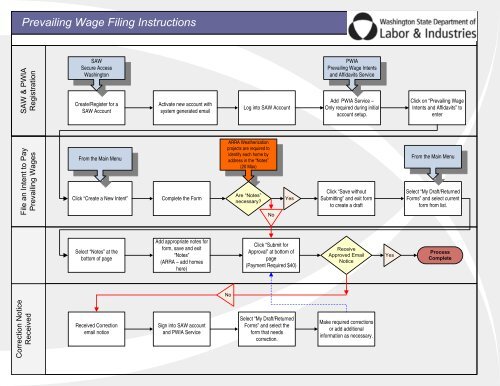
<strong>Prevailing</strong> <strong>Wage</strong> <strong>Filing</strong> <strong>Instructions</strong><br />
SAW & PWIA<br />
Registration<br />
File an Intent to Pay<br />
<strong>Prevailing</strong> <strong>Wage</strong>s<br />
Correction Notice<br />
Received<br />
SAW<br />
Secure Access<br />
Washington<br />
Create/Register for a<br />
SAW Account<br />
From the Main Menu<br />
Click “Create a New Intent”<br />
Select “Notes” at the<br />
bottom of page<br />
Received Correction<br />
email notice<br />
Activate new account with<br />
system generated email<br />
Complete the Form<br />
Add appropriate notes for<br />
form, save and exit<br />
“Notes”<br />
(ARRA – add homes<br />
here)<br />
Sign into SAW account<br />
and PWIA Service<br />
Log into SAW Account<br />
ARRA Weatherization<br />
projects are required to<br />
identify each home by<br />
address in the “Notes”<br />
(20 Max)<br />
No<br />
Are “Notes”<br />
necessary?<br />
No<br />
Yes<br />
Click “Submit for<br />
Approval” at bottom of<br />
page<br />
(Payment Required $40)<br />
Select “My Draft/Returned<br />
Forms” and select the<br />
form that needs<br />
correction.<br />
PWIA<br />
<strong>Prevailing</strong> <strong>Wage</strong> Intents<br />
and Affidavits Service<br />
Add PWIA Service –<br />
Only required during initial<br />
account setup.<br />
Click “Save without<br />
Submitting” and exit form<br />
to create a draft<br />
Receive<br />
Approved Email<br />
Notice<br />
Make required corrections<br />
or add additional<br />
information as necessary.<br />
Yes<br />
Click on “<strong>Prevailing</strong> <strong>Wage</strong><br />
Intents and Affidavits” to<br />
enter<br />
From the Main Menu<br />
Select “My Draft/Returned<br />
Forms” and select current<br />
form from list.<br />
Process<br />
Complete
Process for <strong>Filing</strong> on ARRA Funded Projects:<br />
<strong>Filing</strong> an Affidavit of<br />
<strong>Wage</strong>s Paid<br />
Correction Notice<br />
Received<br />
From the Main Menu<br />
Click “Create Affidavit from<br />
Intent”<br />
Select “Notes” at the<br />
bottom of page<br />
Received Correction<br />
email notice<br />
Select appropriate form<br />
from approved Intent list<br />
and complete the form<br />
This must be a complete list<br />
of the homes weatherized<br />
(20 max)<br />
Add appropiate “Notes” for<br />
from, save and exit “Notes”:<br />
(ARRA – add homes here)<br />
Sign into SAW account<br />
and PWIA service<br />
Are “Notes”<br />
necessary?<br />
No<br />
Yes<br />
Click “Submit for<br />
Approval” at bottom of<br />
page<br />
Select “My Draft/Returned<br />
Forms” and select the<br />
form that needs<br />
correction.<br />
ARRA Weatherization<br />
projects are required to<br />
identify each home by<br />
address in the “Notes”<br />
(20 Max)<br />
Click “Save Without<br />
Submitting” and exit form<br />
to create a draft<br />
Receive Approved<br />
Email Notice<br />
No<br />
Make required corrections<br />
or add additional<br />
information as necessary<br />
Yes<br />
Return to the Main Menu<br />
Select “My Draft/Returned<br />
Forms” and select current<br />
form.<br />
Process<br />
Complete
Registration<br />
<strong>Instructions</strong> for Registering and <strong>Filing</strong> for <strong>Prevailing</strong> <strong>Wage</strong> Intents and Affidavits (PWIA)<br />
Step 1: Create an account with Secure Access Washingtong (SAW) at: https://secureaccess.wa.gov. This is the website to<br />
visit anytime you need to access the PWIA system.<br />
If you already have an account and<br />
forgot your username or password,<br />
you may be able to retrieve it.<br />
First time PWIA users can create a new<br />
account here.<br />
PWIA <strong>Instructions</strong> <strong>10</strong>/22/2009 2
Step 2: Select Start<br />
PWIA <strong>Instructions</strong> <strong>10</strong>/22/2009 3
Step 3: Begin creating an account with SAW by filling out your name, an email address and a secret question and answer. If more than<br />
one person in your office will be using this account, you may want to think about what name and email address to enter. The email<br />
address that you enter here will be the address that receives notices of form approvals, as well as correction notices.<br />
PWIA <strong>Instructions</strong> <strong>10</strong>/22/2009 4
Step 4: Create a username and password. Passwords need to have at least one number and one special character,such as: ! $ or @. For<br />
example John@456<br />
PWIA <strong>Instructions</strong> <strong>10</strong>/22/2009 5
Your password will expire every 120 days if you do not access your SAW account regularly. If your password expires there is a “Forgot<br />
my password button at the first screen.<br />
PWIA <strong>Instructions</strong> <strong>10</strong>/22/2009 6
Step 5: Review and print your new account information. If you need to make a change, select the button labeled “Previous.”<br />
PWIA <strong>Instructions</strong> <strong>10</strong>/22/2009 7
Step 6: Security Check. Enter the letters and numbers that you see in the box. You may use all lower case letters.<br />
PWIA <strong>Instructions</strong> <strong>10</strong>/22/2009 8
Step 7: The system will send an automated email to the email address you listed. Check your email to verify the account.<br />
PWIA <strong>Instructions</strong> <strong>10</strong>/22/2009 9
STEP 6. You will receive an email with the subject: “SecureAccess Washington: Welcome to SecureAccess Washington” Click the link<br />
in this email to activate your new account.<br />
Click on the link to activate your account.<br />
PWIA <strong>Instructions</strong> <strong>10</strong>/22/2009 <strong>10</strong>
Step 7: Log back in to SAW.<br />
PWIA <strong>Instructions</strong> <strong>10</strong>/22/2009 11
Step 8: You are now successfully logged into Secure Access Washington (SAW). Now you need to apply for the <strong>Prevailing</strong> <strong>Wage</strong> Intents<br />
and Affidavits service (PWIA.) Next, click on the Tab “Add a New Service.”<br />
Start here to add PWIA as a service.<br />
PWIA <strong>Instructions</strong> <strong>10</strong>/22/2009 12
Step 9: Select Department of Labor and Industries<br />
Select Department of Labor and<br />
Industries.<br />
PWIA <strong>Instructions</strong> <strong>10</strong>/22/2009 13
Step <strong>10</strong>: Click on the Apply button for <strong>Prevailing</strong> <strong>Wage</strong> Intents and Affidavits.<br />
Apply for the <strong>Prevailing</strong> <strong>Wage</strong><br />
Intents and Affidavits Service here.<br />
PWIA <strong>Instructions</strong> <strong>10</strong>/22/2009 14
Step 11: Fill out the Application Form by entering your contact information and company information. Then click on Register.<br />
PWIA <strong>Instructions</strong> <strong>10</strong>/22/2009 15
Now when you click on My Services, <strong>Prevailing</strong> <strong>Wage</strong> Intents and Affidavits should be an active service.<br />
PWIA <strong>Instructions</strong> <strong>10</strong>/22/2009 16
Under the My Services Tab you will find <strong>Prevailing</strong> <strong>Wage</strong> Intents and Affidavits as an active service. You can now begin filling out Intents<br />
and Affidavits!<br />
PWIA <strong>Instructions</strong> <strong>10</strong>/22/2009 17
<strong>Filing</strong> an Intent:<br />
Step 1: Click on “My Services” and select “<strong>Prevailing</strong> <strong>Wage</strong> Intents and Affidavits” service.<br />
PWIA <strong>Instructions</strong> <strong>10</strong>/22/2009 18
Step 2: Click “Accept” to certify your authorization and information for submitting <strong>Prevailing</strong> <strong>Wage</strong> Intents and Affidavits.<br />
PWIA <strong>Instructions</strong> <strong>10</strong>/22/2009 19
Step 3: Click on “Create a New Intent.”<br />
PWIA <strong>Instructions</strong> <strong>10</strong>/22/2009 20
Step 4: Complete the form by entering project information. Click on “Submit for Approval” and skip to Step 8 unless more<br />
information is required in the “Notes” section. To enter into “Notes,” click on “Save Without Submitting” to add appropriate<br />
information to the form. Save and exit the form to complete the next steps.<br />
IMPORTANT! ARRA Weatherization projects are required to identify each home by address in the “Notes”, 20 max)<br />
1. Enter the company name for your contractors as usual, for example J.D. Electric, or Jim’s Plumbing. For contracts performed by your own employees enter your<br />
Community Action Program (CAP) name.<br />
2. Enter Public Agency Name. This is your CAP name for you and your contractors.<br />
3. Enter “ARRA Weatherization, See List” as the Project Name.<br />
4. Enter your assigned contract number and applicable bid, award, and start dates.<br />
5. Enter CAP name for Prime Contractors if you are self-performing the work (using your own employees only). Your sub-contractors would also use your CAP<br />
name here for filing their intent. If you hired another party to serve as the prime contractor, both the prime and sub-contractor(s) would enter the hired<br />
contractor’s name.<br />
6. Complete the rest of the form as usual.<br />
7. Click on “Save Without Submitting” to list project location(s), up to 20 max, in “Notes “section. Exit the form to complete the next step.<br />
PWIA <strong>Instructions</strong> <strong>10</strong>/22/2009 21
Step 5: Select “Your Draft/Returned Forms.”<br />
PWIA <strong>Instructions</strong> <strong>10</strong>/22/2009 22
Step 6: Select the current draft form.<br />
PWIA <strong>Instructions</strong> <strong>10</strong>/22/2009 23
Step 7: Click on “Notes” at the bottom of the page to enter additional information as required. Save and exit “Notes.” Click on<br />
“Submit for Approval.”<br />
ARRA<br />
IMPORTANT!<br />
Weatherization<br />
ARRA Weatherization<br />
projects are<br />
projects<br />
required<br />
are<br />
to<br />
required<br />
identify<br />
to<br />
each<br />
identify<br />
home<br />
each<br />
by<br />
home<br />
address<br />
by address<br />
in the “Notes”<br />
in the “Notes”<br />
(20 max)<br />
(20 max)<br />
PWIA <strong>Instructions</strong> <strong>10</strong>/22/2009 24
Step 8: Complete payment information and click “Submit.”<br />
PWIA <strong>Instructions</strong> <strong>10</strong>/22/2009 25
Step 9: <strong>Filing</strong> of Intent complete. You will receive an email indicating approval or corrections needed. To respond to<br />
correction email notice complete the following steps.<br />
PWIA <strong>Instructions</strong> <strong>10</strong>/22/2009 26
Step <strong>10</strong>: Review notice for corrections needed.<br />
PWIA <strong>Instructions</strong> <strong>10</strong>/22/2009 27
Step 11: Log into Secure Access Washington (SAW).<br />
PWIA <strong>Instructions</strong> <strong>10</strong>/22/2009 28
Step 12: Click on “My Services” and select “<strong>Prevailing</strong> <strong>Wage</strong> Intents and Affidavits” service.<br />
PWIA <strong>Instructions</strong> <strong>10</strong>/22/2009 29
Step 13: Select “Your Draft/Returned Forms.”<br />
PWIA <strong>Instructions</strong> <strong>10</strong>/22/2009 30
Step 14: Select returned form.<br />
PWIA <strong>Instructions</strong> <strong>10</strong>/22/2009 31
Step 15: Make required corrections or add additional information as necessary. Click “Submit for Approval” at bottom of<br />
page. Continue this process until you receive approved email notice. Then the filing process is complete.<br />
PWIA <strong>Instructions</strong> <strong>10</strong>/22/2009 32
<strong>Filing</strong> an Affidavit:<br />
Step 1: Log into Secure Access Washington (SAW).<br />
PWIA <strong>Instructions</strong> <strong>10</strong>/22/2009 33
Step 2: Click on “My Services” and select “<strong>Prevailing</strong> <strong>Wage</strong> Intents and Affidavits” service.<br />
PWIA <strong>Instructions</strong> <strong>10</strong>/22/2009 34
Step 3: Click “Accept” to certify your authorization and information for submitting <strong>Prevailing</strong> <strong>Wage</strong> Intents and Affidavits.<br />
PWIA <strong>Instructions</strong> <strong>10</strong>/22/2009 35
Step 4: Click on “Generate New Affidavit from an Intent.”<br />
PWIA <strong>Instructions</strong> <strong>10</strong>/22/2009 36
Step 5: Click on the applicable Intent for completed project.<br />
PWIA <strong>Instructions</strong> <strong>10</strong>/22/2009 37
Step 6: Verify project information and click on “Generate Affidavit.”<br />
PWIA <strong>Instructions</strong> <strong>10</strong>/22/2009 38
Step 7: Verify project and employee information. Enter “Date Work Completed” and update “Job Start Date” as appropriate.<br />
Enter hours worked and any other employee updates under “Employee <strong>Wage</strong>s,” as it applies. Click on “Submit for Approval”<br />
and skip to Step 11 unless “Notes” are required. To enter into “Notes,” click on “Save Without Submitting” to add appropriate<br />
information to the form. Save and exit the form to complete the next steps.<br />
IMPORTANT! ARRA Weatherization projects are required to identify each home by address in the “Notes” (20 max)<br />
PWIA <strong>Instructions</strong> <strong>10</strong>/22/2009 39
Step 8: Select “Your Draft/Returned Forms.”<br />
PWIA <strong>Instructions</strong> <strong>10</strong>/22/2009 40
Step 9: Select the current draft form.<br />
PWIA <strong>Instructions</strong> <strong>10</strong>/22/2009 41
Step <strong>10</strong>: Click on “Notes” at the bottom of the page to enter additional information as required. Save and exit “Notes.” Click<br />
on “Submit for Approval.”<br />
IMPORTANT! ARRA Weatherization projects are required to identify each home by address in the “Notes” (20 max)<br />
PWIA <strong>Instructions</strong> <strong>10</strong>/22/2009 42
Step 11: Complete payment information and click “Submit.”<br />
PWIA <strong>Instructions</strong> <strong>10</strong>/22/2009 43
Step 12: <strong>Filing</strong> of Affidavit complete. You will receive an email indicating approval or corrections needed. To respond to<br />
correction email notice complete the following steps.<br />
PWIA <strong>Instructions</strong> <strong>10</strong>/22/2009 44
Step 13: Review notice for corrections needed.<br />
PWIA <strong>Instructions</strong> <strong>10</strong>/22/2009 45
Step 14: Log into Secure Access Washington (SAW).<br />
PWIA <strong>Instructions</strong> <strong>10</strong>/22/2009 46
Step 15: Click on “My Services” and select “<strong>Prevailing</strong> <strong>Wage</strong> Intents and Affidavits” service.<br />
PWIA <strong>Instructions</strong> <strong>10</strong>/22/2009 47
Step 16: Select “Your Draft/Returned Forms.”<br />
PWIA <strong>Instructions</strong> <strong>10</strong>/22/2009 48
Step 17: Select returned form.<br />
PWIA <strong>Instructions</strong> <strong>10</strong>/22/2009 49
Step 18: Make required corrections or add additional information as necessary. Click “Submit for Approval” at bottom of<br />
page. Continue this process until you receive approved email notice. Then the filing process is complete.<br />
PWIA <strong>Instructions</strong> <strong>10</strong>/22/2009 50