
You also want an ePaper? Increase the reach of your titles
YUMPU automatically turns print PDFs into web optimized ePapers that Google loves.
<strong>HOBBICO</strong><br />
<strong>SERIES</strong> <strong>900</strong> <strong>CHARGERS</strong><br />
Model 910-920<br />
INTRODUCTION<br />
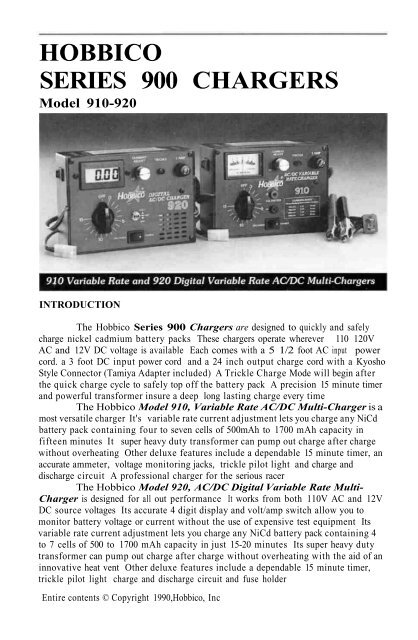
The Hobbico Series <strong>900</strong> Chargers are designed to quickly and safely<br />
charge nickel cadmium battery packs These chargers operate wherever 110 120V<br />
AC and 12V DC voltage is available Each comes with a 5 1/2 foot AC input power<br />
cord. a 3 foot DC input power cord and a 24 inch output charge cord with a Kyosho<br />
Style Connector (Tamiya Adapter included) A Trickle Charge Mode will begin after<br />
the quick charge cycle to safely top off the battery pack A precision 15 minute timer<br />
and powerful transformer insure a deep long lasting charge every time<br />
The Hobbico Model 910, Variable Rate AC/DC Multi-Charger is a<br />
most versatile charger It's variable rate current adjustment lets you charge any NiCd<br />
battery pack containing four to seven cells of 500mAh to 1700 mAh capacity in<br />
fifteen minutes It super heavy duty transformer can pump out charge after charge<br />
without overheating Other deluxe features include a dependable 15 minute timer, an<br />
accurate ammeter, voltage monitoring jacks, trickle pilot light and charge and<br />
discharge circuit A professional charger for the serious racer<br />
The Hobbico Model 920, AC/DC Digital Variable Rate Multi-<br />
Charger is designed for all out performance It works from both 110V AC and 12V<br />
DC source voltages Its accurate 4 digit display and volt/amp switch allow you to<br />
monitor battery voltage or current without the use of expensive test equipment Its<br />
variable rate current adjustment lets you charge any NiCd battery pack containing 4<br />
to 7 cells of 500 to 1700 mAh capacity in just 15-20 minutes Its super heavy duty<br />
transformer can pump out charge after charge without overheating with the aid of an<br />
innovative heat vent Other deluxe features include a dependable 15 minute timer,<br />
trickle pilot light charge and discharge circuit and fuse holder<br />
Entire contents © Copyright 1990,Hobbico, Inc
2 FEATURES<br />
PEAK CHARGING<br />
Peak is the state of charge when a nickel cadmium<br />
battery reaches its maximum capacity During<br />
charging the battery voltage increases slowly As the<br />
battery nears peak the amount of current (amps) it<br />
accepts decreases At peak the battery voltage drops<br />
02 of a volt identifyng a full charge Quick charging<br />
after this point will cause excessive heat and may<br />
damage the battery<br />
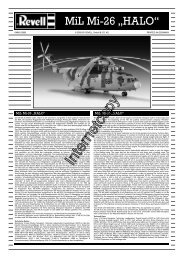
Model 910<br />
Variable Rate Multi-Charger<br />
1 120V AC Input Power Cord (5 5 ft)<br />
2 12V DC Input Power Cord (3 ft)<br />
3 Kyosho Style Output Charge<br />
Cord (24 in)<br />
4 Black Anodi/ed Face Plate<br />
5 Charge/Discharge Switch<br />
6 Precision 15 Minute Timer<br />
7 1 Amp Fuse Holder<br />
8 Tamiva Style Adapter<br />
9 Accurate Easy To Read Ammeter<br />
10 Variable Rate Current Adjustment<br />
11 Trickle Charge Light<br />
12 Voltage Monitoring Jacks<br />
13 Charging Rate Chart<br />
14 7 Cell Boost Switch<br />
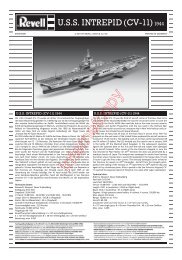
Model 920<br />
Digital Variable Rate<br />
Multi-Charger<br />
1 120V AC Input Power Cord (5 5 ft)<br />
2 12V DC Input Power Cord (3 ft)<br />
3 Kyosho Style Output Charge<br />
Cord (16 in)<br />
4 Black Anodized Face Plate<br />
5 Charge/Discharge Switch<br />
6 Precision 15 Minute Timer<br />
7 1 Amp Fuse Holder<br />
8 Tamiya Style Adapter (not shown)<br />
9 Variable Rate Current Adjustment<br />
10 Trickle Charge Light<br />
11 Heat Vent<br />
12 Precision Digital Volt/Ammeter<br />
13 Voltage/Ammeter Switch<br />
14 7 Cell Boost Switch<br />
920 Charging Rate Chart<br />
Battery Charge Charge<br />
Capacity Rate Time<br />
(mAh) (amperes) (minutes)<br />
1700<br />
1400<br />
1200<br />
600<br />
500<br />
3.5<br />
3.5<br />
3.5<br />
2.0<br />
1.7<br />
32<br />
27<br />
23<br />
15<br />
15
OPERATING INSTRUCTIONS 3<br />
All steps refer to both chargers except where indicated<br />
DISCHARGING:<br />
Note: The charger does not require input power/or discharge cycle operaton<br />
Run the battery in your model until it slows to be sure it is discharged to the proper<br />
level. This point is called discharge cut-off. You may also discharge your batteries in<br />
the following manner:<br />
• Connect the Battery to the Output Connector (3).<br />
• Move the Charge/Discharge Switch (5) to the DISCHARGE position.<br />
• Move the volt/amp (13) select switch to the desired display function. (Model 920)<br />
• Turn the Timer (6) clockwise to begin the Discharge Cycle.<br />
• Monitor the meter closely: if you are measuring current, watch for a significant drop<br />
in amperage. (A 6-cell 1200 mAh pack will drop to 1.5 amps at cut-off). If you are<br />
measuring voltage, the voltage decreases slowly. The pack is at cut-off when each<br />
cell equals. 9 volts average. (A 6-cell 1200 mAh pack will read 5.4 volts at cut-off).<br />
6 cells x .9 volts = 5.4 volts.<br />
DO NOT disharge the batteries below the cut-off point. This may cause the cells to<br />
reverse polarity, damaging the battery pack.<br />
QUICK CHARGING:<br />
Never leave batteries unattended during quick charging (See Care and Maintenance)<br />
• Discharge the Battery Pack (see Discharging instruction above).<br />
• Connect the Input Power, either 120V AC Cord (1) or 12V DC Cord (2).<br />
• If you are using 12V DC. connect the red lead to the positive (+) terminal and<br />
the black lead to the negative (-).<br />
• Connect the Battery to be charged to the Output Cord (3).<br />
• Move the Charger/Discharge Switch (5) to the CHARGE position. .<br />
• Turn Variable Rate Current Adjustment (9) completely counterclockwise (minimum)<br />
• Set the Volt/Amp Switch (13) to Amp setting. (Model 920)<br />
• If you are charging a 7-cell pack, set the 7-cell Boost Switch (14) to negative (-). This<br />
disables the current adjust knob and allows maximum output current to be delivered<br />
to the battery. Note: When using the boost switch, drop charge time by 5 minutes.<br />
• Set the Timer (6) to the desired amount of charge time.<br />
• Turn the Current Adjustment to the desired charge rate. (See Charging Rate Chart)<br />
• Insert Voltmeter leads into the voltage monitoring jacks (12). (Model 910)<br />
• Move the Volt/Amp Switch to volts. (Model 920) The voltage will increase slowly<br />
until it is fully charged (See Peak Charging). After peak. the voltage begins to<br />
dropping. When this occurs, switch to trickle charging or cancel charging.<br />
• The Timer will automatically switch to Trickle Charge at the end of the quick<br />
charge cycle. The Trickle Charge Light will glow at this time.<br />
• If the battery becomes warm to the touch, this is a good indication that it is full<br />
charged.<br />
• You may periodically wish to let the battery trickle charge for a few hours after<br />
quick charging. This will equalize the cells which increases capacity and run time.
4 CARE AND MAINTAINENCE<br />
• Never charge any battery less than 7-cells with the 7-cell boost switch in the<br />
ON position'<br />
• Never leave battenes unattended during quick charge!<br />
• To give your batteries long life never overcharge them Overcharging can<br />
cause the cells to emit a great deal of heat and may damage the battery pack<br />
• Always let your batteries cool before charging and after discharging<br />
• When charging with AC the chargers face plate will become warm This is due<br />
to the heat radiated by the transformer Let the charger cool after each cycle to<br />
protect it from overheating<br />
• When replacing the fuse, only use one of equal value (1 ampere) Using<br />
higher rated fuses may damage the charger and void the warranty.<br />
• If the digital display functions erratically or does not operate, replace the 9 volt<br />
battery under the face plate<br />
<strong>HOBBICO</strong> <strong>SERIES</strong> <strong>900</strong> CHARGER<br />
FIVE YEAR WARRANTY<br />
<strong>HOBBICO</strong> warrants this <strong>HOBBICO</strong> <strong>SERIES</strong> <strong>900</strong> CHARGER to be free from defects<br />
in materials and workmanship for a period of five (5) years from the date of purchase During<br />
that period we will repair or replace at our option any charger that does not meet these<br />
standards You will be required to provide proof of purchase date (receipt or invoice)<br />
If during the five year warranty period the <strong>HOBBICO</strong> <strong>SERIES</strong> <strong>900</strong> CHARGER<br />
shows defects caused by abuse misuse or accident it will be repaired or replaced at our<br />
option at a service charge not greater than 50% of the current retail list price The charger<br />
will be returned to you COD<br />
NOTE:<br />
Under no circumstances will the buyer be entitled to consequential or incidental damages<br />
Warranty coverage is subject to the following conditions;<br />
1. Chargers cannot be modified in any way<br />
2. Worn parts, do to normal use, such as wires, cords, fuses,<br />
and connectors are not covered<br />
3. Damage resulting from reverse polanty connections of source<br />
or charging batteries is not covered<br />
For service to your <strong>HOBBICO</strong> <strong>SERIES</strong> <strong>900</strong> CHARGER either in or out of warranty,<br />
please include a wntten detailed description of the problem and return address Send the unit<br />
post paid to<br />
Hobby Services, 1610 Interstate Drive, Champaign, IL 61821<br />
(217) 398-0007