

AN INGENIOUS YOUNG WOODWORKER ... - Gorilla Glue
AN INGENIOUS YOUNG WOODWORKER ... - Gorilla Glue
AN INGENIOUS YOUNG WOODWORKER ... - Gorilla Glue

You also want an ePaper? Increase the reach of your titles
YUMPU automatically turns print PDFs into web optimized ePapers that Google loves.
Lindsey Dill’s<br />
Fabulous Frames<br />
<strong>AN</strong> <strong>INGENIOUS</strong> <strong>YOUNG</strong> <strong>WOODWORKER</strong><br />
DISCOVERS THE FUN OF JIG-MAKING.<br />
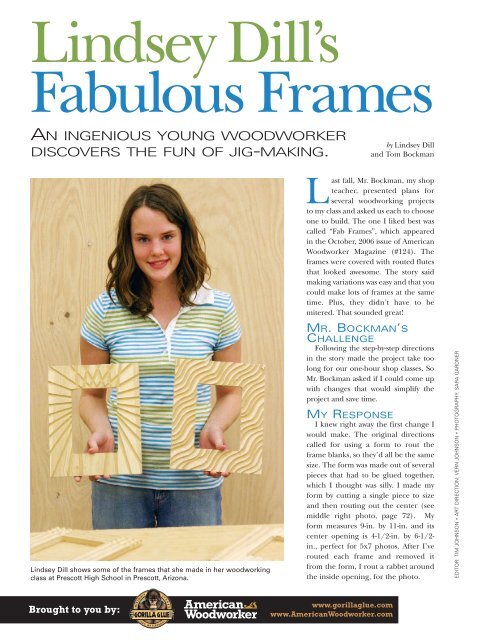
Lindsey Dill shows some of the frames that she made in her woodworking<br />
class at Prescott High School in Prescott, Arizona.<br />
Brought to you by:<br />
®<br />
by Lindsey Dill<br />
and Tom Bockman<br />
Last fall, Mr. Bockman, my shop<br />
teacher, presented plans for<br />
several woodworking projects<br />
to my class and asked us each to choose<br />
one to build. The one I liked best was<br />
called “Fab Frames”, which appeared<br />
in the October, 2006 issue of American<br />
Woodworker Magazine (#124). The<br />
frames were covered with routed flutes<br />
that looked awesome. The story said<br />
making variations was easy and that you<br />
could make lots of frames at the same<br />
time. Plus, they didn’t have to be<br />
mitered. That sounded great!<br />
MR. BOCKM<strong>AN</strong>’S<br />
CHALLENGE<br />
Following the step-by-step directions<br />
in the story made the project take too<br />
long for our one-hour shop classes. So<br />
Mr. Bockman asked if I could come up<br />
with changes that would simplify the<br />
project and save time.<br />
MY RESPONSE<br />
I knew right away the first change I<br />
would make. The original directions<br />
called for using a form to rout the<br />
frame blanks, so they’d all be the same<br />
size. The form was made out of several<br />
pieces that had to be glued together,<br />
which I thought was silly. I made my<br />
form by cutting a single piece to size<br />
and then routing out the center (see<br />
middle right photo, page 72). My<br />
form measures 9-in. by 11-in. and its<br />
center opening is 4-1/2-in. by 6-1/2in.,<br />
perfect for 5x7 photos. After I’ve<br />
routed each frame and removed it<br />
from the form, I rout a rabbet around<br />
the inside opening, for the photo.<br />
www.gorillaglue.com<br />
www.AmericanWoodworker.com<br />
EDITOR: TIM JOHNSON • ART DIRECTION: VERN JOHNSON • PHOTOGRAPHY: SARA GARDNER
Lindsey’s jigs<br />
make it easy to<br />
create frames<br />
with straight,<br />
curved or wavy<br />
patterns.<br />
I thought of my second change after<br />
following the directions to rout the<br />
flutes in a frame blank. The directions<br />
called for using the router table and a<br />
fence to do this job. The fence had to<br />
be precisely set up to rout the first<br />
flutes and then had to be adjusted several<br />
times to rout the remaining flutes.<br />
Bor-ing! And after completing a few<br />
frames, I was frustrated, because I<br />
could only rout flutes in straight lines.<br />
MY FIRST JIG<br />
After discovering that I could make<br />
wavy flutes with a template and a handheld<br />
router, I designed a jig with rows<br />
of evenly spaced holes to index the<br />
template. (see “My First Jig”, page 72).<br />
Cutouts securely hold the frame blank<br />
vertically and horizontally. I use<br />
straight bits or core box bits to create<br />
the flutes.<br />
MY SECOND JIG IS<br />
MORE VERSATILE<br />
What if I could move the frame as<br />
easily as I could now move the template?<br />
Then I could rout flutes diagonally<br />
across the frames. I tried drilling<br />
the jig’s indexing holes in a circle<br />
around the cutouts, but I couldn’t get<br />
the spacing right. So instead of spinning<br />
the template, I decided to spin<br />
the frame. By this time I was tired of<br />
drilling holes, so I figured out how to<br />
get rid of them, too. My second jig has<br />
a rotating circular insert and a Tsquare<br />
fence (see “My Second Jig”,<br />
page 72). This time the routing templates<br />
attach to the fence and the<br />
fence clamps to the jig.<br />
“<br />
Lindsey’s problem-solving and<br />
imaginative solutions have made<br />
her fabulous frames a popular<br />
student project choice.”<br />
–Tom Bockman<br />
Prescott High School<br />
woodworking instructor<br />
”<br />
American Woodworker JULY 2007 71
My First Jig<br />
My first jig allows routing flutes horizontally and vertically. I can rout straight,<br />
curved, V-shaped or wavy flutes, depending on the shape of the template. I like<br />
making the rows slightly asymmetrical, so I follow the template with the corner<br />
of a square-based laminate trimmer.<br />
9" X 11"<br />
CUTOUTS<br />
1/4" DOWEL<br />
My Second Jig<br />
My second jig is more versatile. The T-square<br />
fence clamps at any point, so I can vary the<br />
flutes’ spacing. All of my templates fit, so the<br />
flutes follow any pattern, and the frame rotates,<br />
so I can rout flutes across it at any angle.<br />
72 American Woodworker JULY 2007<br />
PLYWOOD BASE<br />
TEMPLATE<br />
CLAMP NOTCH<br />
1/4" HOLES<br />
SPACED 1/2"<br />
(TYP.)<br />
T-SQUARE<br />
FENCE<br />
TEMPLATE<br />
ROUTING<br />
FORM<br />
FRAME BL<strong>AN</strong>K<br />
To fit in my jigs, the frames all<br />
have to be the same size. I<br />
attach oversize blanks to a precisely-sized<br />
form. After marking<br />
and rough-sawing the frame’s<br />
center cutout, I rout each blank<br />
to match the form.<br />
PLYWOOD BASE<br />
ROTATING<br />
INSERT 18" DIA.