Operating, Maintenance and Repair Instructions for RMA Ball Valve ...
Operating, Maintenance and Repair Instructions for RMA Ball Valve ...
Operating, Maintenance and Repair Instructions for RMA Ball Valve ...

Create successful ePaper yourself
Turn your PDF publications into a flip-book with our unique Google optimized e-Paper software.
<strong>RMA</strong> Kehl GmbH & Co KG<br />
Oststrasse 17<br />
77694 Kehl/Rhein, Germany<br />
Telefon : +49-7851-868-0<br />
Telefax : +49-7851- 868-113<br />
Number of sheets : 12<br />
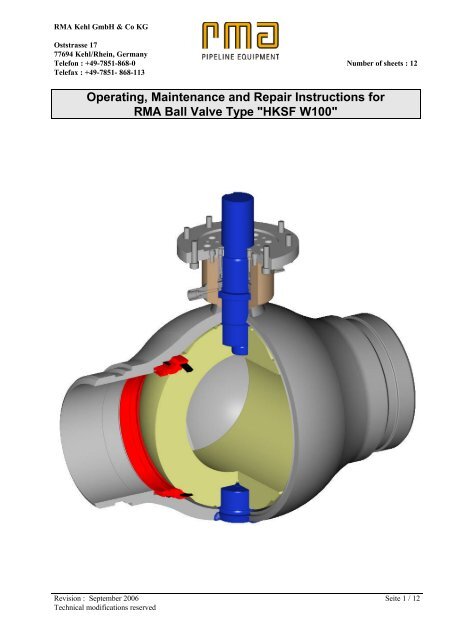
<strong>Operating</strong>, <strong>Maintenance</strong> <strong>and</strong> <strong>Repair</strong> <strong>Instructions</strong> <strong>for</strong><br />
<strong>RMA</strong> <strong>Ball</strong> <strong>Valve</strong> Type "HKSF W100"<br />
Revision : September 2006<br />
Technical modifications reserved<br />
Seite 1 / 12
<strong>Operating</strong>, <strong>Maintenance</strong> <strong>and</strong> <strong>Repair</strong> <strong>Instructions</strong> <strong>for</strong><br />
<strong>RMA</strong> <strong>Ball</strong> <strong>Valve</strong> Type "HKSF W100"<br />
Revision : September 2006<br />
Technical modifications reserved<br />
TABLE OF CONTENTS<br />
1. Applicable documents 3<br />
2. Data <strong>for</strong> intended use 3<br />
3. Construction / Function 4<br />
3.1. <strong>Ball</strong> valve 4<br />
3.2. Sealant <strong>and</strong> / or lubrication system 4<br />
4. References to the storage 5<br />
5. Unpacking <strong>and</strong> examination 5<br />
6. Data to the safe installation 6<br />
6.1. Preparations 6<br />
6.2. H<strong>and</strong>ling 6<br />
6.3. Installation 7<br />
6.4. Water pressure test 8<br />
6.5. Leak test 9<br />
7. <strong>Maintenance</strong> 10<br />
8. <strong>Repair</strong>s 10<br />
8.1. Preparations 10<br />
8.2. <strong>Repair</strong> of the external coating 10<br />
9. Sketch ball valve with individual parts 11<br />
Sheet 2 / 12
<strong>Operating</strong>, <strong>Maintenance</strong> <strong>and</strong> <strong>Repair</strong> <strong>Instructions</strong> <strong>for</strong><br />
<strong>RMA</strong> <strong>Ball</strong> <strong>Valve</strong> Type "HKSF W100"<br />
1. Applicable documents<br />
If ball valves are equipped with gears, the gear manufacturer’s operating instructions are to be<br />
respected.<br />
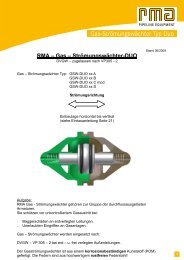
2. Data <strong>for</strong> intended use<br />
The valve is an extremely sturdy, fully welded ball valve <strong>for</strong> use in piping systems <strong>for</strong> the shut-off<br />
position of fluids.<br />
The valve consists of a body with pipe connections, a spherical stopper, seals <strong>and</strong> operating spindle.<br />
The ball valve is a shut-off device <strong>and</strong> should only be used in the FULLY-OPEN or FULLY-<br />
CLOSED positions. Flow reduction with a ball valve is prohibited.<br />
The valve is only in positions FULLY-OPEN or FULLY-CLOSED when the end stops are engaged.<br />
The permissible operational data (in particular operating temperature <strong>and</strong> pressure) are to be inferred<br />
from the marking <strong>and</strong> the associated data sheets.<br />
The valve <strong>for</strong>ms a closed system. By the action of the seals the technical tightness is in the long<br />
term ensured within the operating conditions.<br />
The fluid existing in the body can be set free over drain or vent ports. In these places danger exists<br />
<strong>for</strong>m the blow-off pressure <strong>and</strong> by mixing flammable materials with air causing explosive atmospheres.<br />
The valve may be used according to its equipment category in the explosion prevention zones 1,<br />
2 <strong>and</strong> 3.<br />
The permissible environment <strong>and</strong> fluid temperature are considered according to the data of the<br />
operator within the construction.<br />
Revision : September 2006<br />
Technical modifications reserved<br />
II 2G X<br />
Letter "X": Since the operating temperature of the valve is determined by the temperature<br />
of the fluid, the temperature class or largest surface temperature, it<br />
must be specified by the operator, whereby the safety temperature distances<br />
from En13463-1 are to be kept.<br />
<strong>Operating</strong> temperature °C 1 ) Temperature class<br />
to 80 T6<br />
to 95 T5<br />
to 130 T4<br />
1 ) Into the table a safety margin was considered by<br />
5°C (EN of 13463-1 chapter 13.3.3)<br />
Sheet 3 / 12
<strong>Operating</strong>, <strong>Maintenance</strong> <strong>and</strong> <strong>Repair</strong> <strong>Instructions</strong> <strong>for</strong><br />
<strong>RMA</strong> <strong>Ball</strong> <strong>Valve</strong> Type "HKSF W100"<br />
3. Construction / Function<br />
3.1. <strong>Ball</strong> valve<br />
The body of the valve is fully welded.<br />
The ball is supported by a journal at top <strong>and</strong> bottom (trunnion mounted).<br />
The sealing system is primarily metallic, secondarily soft.<br />
On both sides of the ball valve passage are floating arranged seat rings. These can adjust themselves<br />
as necessary to the ball. This metallic seal is pressed by feathers / springs to the ball,<br />
contact is pressure-dependent. <strong>Ball</strong> <strong>and</strong> seat rings are polished <strong>and</strong> lapped.<br />
The fittings comprise a full bore with a smooth round passage <strong>and</strong> is there<strong>for</strong>e piggable.<br />
The ball valve can be equipped with flanges, welding or other specified ends.<br />
3.2. Sealant <strong>and</strong> / or lubrication system<br />
According to customers’ requirements, <strong>RMA</strong> ball valves can be provided with sealing compound<br />
systems at the seating rings <strong>and</strong> / or the spindle sleeve.<br />
Access is made possible by means of a nipple (e.g. Alemite-Screw AEX 7/8“), either directly at<br />
the ball valve or through vertically prolonged pipes.<br />
The systems are pressure-proof up to 1000 bar <strong>and</strong> are equipped with double-nonreturn valves.<br />
On request, they are pre-filled with a special sealing grease.<br />
For these purposes the folowing greases can be used:<br />
For emergency sealing : Equa- Lube Eighty<br />
For emergency sealing <strong>and</strong> greasing : Ceritol.SAS 325<br />
Revision : September 2006<br />
Technical modifications reserved<br />
Sheet 4 / 12
<strong>Operating</strong>, <strong>Maintenance</strong> <strong>and</strong> <strong>Repair</strong> <strong>Instructions</strong> <strong>for</strong><br />
<strong>RMA</strong> <strong>Ball</strong> <strong>Valve</strong> Type "HKSF W100"<br />
4. References to the storage<br />
The ball valves should remain during the entire storage time in their original packaging. In order to<br />
avoid damage, the protective caps at the weld / flange ends are to be left in place until installation.<br />
The ball valves must always be stored in the FULLY-OPEN Position.<br />
The valves should be stored in a closed <strong>and</strong> dry building.<br />
5. Unpacking <strong>and</strong> examination<br />
The ball valves are to be unpacked with the necessary care. After unpacking the ball valves are<br />
to be examined <strong>for</strong> transportation damage. The ball valves are supplied in FULLY-OPEN Position<br />
<strong>and</strong> with protective caps at both ends.<br />
Revision : September 2006<br />
Technical modifications reserved<br />
Sheet 5 / 12
<strong>Operating</strong>, <strong>Maintenance</strong> <strong>and</strong> <strong>Repair</strong> <strong>Instructions</strong> <strong>for</strong><br />
<strong>RMA</strong> <strong>Ball</strong> <strong>Valve</strong> Type "HKSF W100"<br />
6. Data to the safe installation<br />
6.1. Preparations<br />
It must be guaranteed that when assembling <strong>and</strong> disassembly no combustible atmosphere is present<br />
or develops.<br />
Be<strong>for</strong>e the installation check the size, the pressure <strong>and</strong> the materials used correspond to the<br />
specified requirements.<br />
Impurities, which <strong>for</strong>med during longer storage times, are to be removed be<strong>for</strong>e the installation.<br />
6.2. H<strong>and</strong>ling<br />
When lifting the ball valve, the slings must be wrapped around the body only <strong>and</strong> not around the<br />
spindle lever.<br />
Lifting:<br />
Revision : September 2006<br />
Technical modifications reserved<br />
Sheet 6 / 12
<strong>Operating</strong>, <strong>Maintenance</strong> <strong>and</strong> <strong>Repair</strong> <strong>Instructions</strong> <strong>for</strong><br />
<strong>RMA</strong> <strong>Ball</strong> <strong>Valve</strong> Type "HKSF W100"<br />
6.3. Installation<br />
Ensure the ball valves are as in the delivered state to weld <strong>and</strong> / or build into position FULLY-<br />
OPEN to avoid damage of the ball <strong>and</strong> the seat rings.<br />
During the welding procedure the temperature at the body within the range A (see sketch) should<br />
not exceed 120° C. The valve may be welded only in the FULLY-OPEN position. Only arc welding<br />
methods may be used.<br />
After welding <strong>and</strong> be<strong>for</strong>e first operation of the ball valve the line system must be rinsed thoroughly<br />
to remove impurities <strong>for</strong> example welding debris (cinder, scale, rust, etc.) which could damage the<br />
sealing elements.<br />
The valve must be attached by electrostatically compatable hose <strong>and</strong> / or tubing systems or be<br />
connected directly electrostatically conductive (Resistance < 10 6 Ω) with the earth potential. Intended<br />
electrical interfaces (cathodic corrosion protection) may not be short circuited.<br />
Outside piping <strong>for</strong>ces <strong>and</strong> tensions are to be avoided by appropriate line constructions <strong>and</strong> / or by<br />
appropriate installation positions.<br />
Revision : September 2006<br />
Technical modifications reserved<br />
Sheet 7 / 12
<strong>Operating</strong>, <strong>Maintenance</strong> <strong>and</strong> <strong>Repair</strong> <strong>Instructions</strong> <strong>for</strong><br />
<strong>RMA</strong> <strong>Ball</strong> <strong>Valve</strong> Type "HKSF W100"<br />
6.4. Water pressure test<br />
We recommend to put the ball in FULLY-OPEN position be<strong>for</strong>e filling the line with water.<br />
After filling the line with water, put the ball into HALF-OPEN position to have a pressure be<strong>for</strong>e<br />
<strong>and</strong> behind the seat rings.<br />
Immediately after the water pressure test the following is to be done:<br />
1. The valve is placed into the FULLY-OPEN position.<br />
2. Drain the valve by the drain connection. If a drain valve is present, open it completely.<br />
If there is only a vent/drain plug then turn it 2 or 3 turns <strong>and</strong> wait until the pressure has<br />
dropped entirely, remove the plug <strong>and</strong> remove the water.<br />
When the valve is pressureless, to drain the cavity you have to put pressure into the<br />
body through the drain valve (Nitrogen, not over the max. design pressure ! ). Then<br />
close the drain valve, take away the nitrogen connection <strong>and</strong> open the drain valve to<br />
remove the water.<br />
3. Close the drain connection again.<br />
4. Lubricate the valve through the sealant injectors <strong>for</strong> the seat rings (not the spindle) to<br />
remove existing dirt.<br />
5. Turn the valve once (Close – Open).<br />
6. Turn the valve into the final FULLY-OPEN position.<br />
Revision : September 2006<br />
Technical modifications reserved<br />
Sheet 8 / 12
<strong>Operating</strong>, <strong>Maintenance</strong> <strong>and</strong> <strong>Repair</strong> <strong>Instructions</strong> <strong>for</strong><br />
<strong>RMA</strong> <strong>Ball</strong> <strong>Valve</strong> Type "HKSF W100"<br />
6.5. Leak test<br />
The tightness can be examined with two methods.<br />
1. Leak test from piping to valve body.<br />
1. The valve is placed into the FULLY-OPEN or FULLY-CLOSED position.<br />
2. Drain the valve by the drain connection. If a drain valve is present, open it completely.<br />
If there is only a vent/drain plug then turn it 2 or 3 turns <strong>and</strong> wait until the pressure<br />
has dropped entirely, remove the plug.<br />
3. Check the leakage (a sufficient time is needed to have a pressure balance).<br />
4. Apply pressure (Nitrogen) into the valve body (pressure balance between valve body<br />
<strong>and</strong> pipe line).<br />
5. Close the drain connection again.<br />
6. Lubricate the valve through the sealant injectors <strong>for</strong> the seat rings (not the spindle) to<br />
remove existing dirt.<br />
7. Turn the valve once (Close – Open).<br />
8. Turn the valve into the final FULLY-OPEN or FULLY-CLOSED position.<br />
2. Leak test from valve body to piping.<br />
1. The valve is placed into the final FULLY-OPEN or FULLY-CLOSED position.<br />
2. Drain the valve by the drain connection. If a drain valve is present, open it completely.<br />
If there is only a vent/drain plug then turn it 2 or 3 turns <strong>and</strong> wait until the pressure<br />
has dropped entirely, remove the plug.<br />
3. Apply pressure (Nitrogen) into the valve body (not more than the max. operating pressure).<br />
4. Check the decrease of pressure (leakage).<br />
5. Pressurise the valve body to the pressure in the pipe line (pressure balance between<br />
valve body <strong>and</strong> pipe line).<br />
6. Close the drain connection again.<br />
7. Lubricate the valve through the sealant injectors <strong>for</strong> the seat rings (not the spindle) to<br />
remove existing dirt.<br />
8. Turn the valve once (Close – Open).<br />
9. Turn the valve into the final FULLY-OPEN or FULLY-CLOSED position.<br />
Revision : September 2006<br />
Technical modifications reserved<br />
Sheet 9 / 12
<strong>Operating</strong>, <strong>Maintenance</strong> <strong>and</strong> <strong>Repair</strong> <strong>Instructions</strong> <strong>for</strong><br />
<strong>RMA</strong> <strong>Ball</strong> <strong>Valve</strong> Type "HKSF W100"<br />
7. <strong>Maintenance</strong><br />
If the measures as described were accomplished after the water pressure test as under chapter<br />
6.4, the valve is maintenance-free. The bearings are self-lubricating <strong>and</strong> wear resistant. The<br />
gears supplied are greased <strong>for</strong> life <strong>and</strong> there<strong>for</strong>e require no maintenance.<br />
8. <strong>Repair</strong>s<br />
8.1. Preparations<br />
It must be guaranteed that within the work area no combustible atmosphere is present or develops.<br />
8.2. <strong>Repair</strong> of the external coating<br />
When the external coating PUR <strong>for</strong> underground (Protegol 32-55) is damaged, it may be repaired<br />
using the repair kit “ Protegol 32-55L ” which is specially designed <strong>and</strong> supplied by the manufacturer<br />
<strong>for</strong> this purpose. The manufacturer's corresponding technical instructions are to be respected.<br />
Due to the fast reaction time, the repair kit is supplied in small canisters of 0.5 kg (supplied by<br />
<strong>RMA</strong>).<br />
In case of other coatings, especially <strong>for</strong> above ground, please ask from case to case.<br />
Revision : September 2006<br />
Technical modifications reserved<br />
Sheet 10 / 12
<strong>Operating</strong>, <strong>Maintenance</strong> <strong>and</strong> <strong>Repair</strong> <strong>Instructions</strong> <strong>for</strong><br />
<strong>RMA</strong> <strong>Ball</strong> <strong>Valve</strong> Type "HKSF W100"<br />
9. Sketch ball valve with individual parts<br />
Revision : September 2006<br />
Technical modifications reserved<br />
Sheet 11 / 12
<strong>Operating</strong>, <strong>Maintenance</strong> <strong>and</strong> <strong>Repair</strong> <strong>Instructions</strong> <strong>for</strong><br />
<strong>RMA</strong> <strong>Ball</strong> <strong>Valve</strong> Type "HKSF W100"<br />
Revision : September 2006<br />
Technical modifications reserved<br />
Sheet 12 / 12