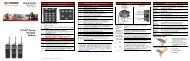
P7200 Portable, OpenSky Quick Guide - Harris Corporation
P7200 Portable, OpenSky Quick Guide - Harris Corporation
P7200 Portable, OpenSky Quick Guide - Harris Corporation

You also want an ePaper? Increase the reach of your titles
YUMPU automatically turns print PDFs into web optimized ePapers that Google loves.
<strong>Quick</strong> <strong>Guide</strong><br />
MM-009816-001<br />
Rev. F, Apr/11<br />
<strong>OpenSky</strong> ® <strong>P7200</strong><br />
<strong>Portable</strong> Radios<br />
Power On/Off<br />
Volume Knob<br />
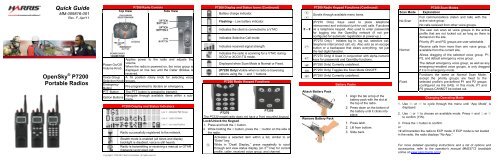
<strong>P7200</strong> Radio Controls<br />
Top View Side View<br />
Applies power to the radio and adjusts the<br />
volume.<br />
When the radio is powered on, the voice group is<br />
displayed on line two until the Caller ID/Alias is<br />
received.<br />
A 16 position rotary knob for selecting voice<br />
groups.<br />
Voice Group<br />
Selection Knob<br />
Emergency<br />
Pre-programmed to declare an emergency.<br />
Button<br />
PTT Button The PTT button is pressed to transmit.<br />
Navigate through available items within a sub-<br />
Option Buttons<br />
menu.<br />
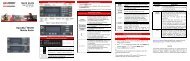
<strong>P7200</strong> Display and Status Indicators<br />
Radio successfully registered to the network.<br />
Stealth mode is enabled (all tones and display<br />
backlight is disabled, voice is still heard).<br />
Radio is transmitting or receiving a manual or OTAR<br />
(Network) encrypted call.<br />
Copyright © 2006-2011 <strong>Harris</strong> <strong>Corporation</strong>. All rights reserved.<br />
<strong>P7200</strong> Display and Status Icons (Continued)<br />
Battery charge indicator.<br />
Flashing – Low battery indicator.<br />
Indicates the client is connected to a VTAC.<br />
Indicates Selective Call mode.<br />
Indicates received signal strength.<br />
Indicates the radio is scanning for a VTAC during<br />
XCOV or XCOV-TG mode.<br />
Displayed when Scan Mode is Normal or Fixed.<br />
(P7230 Only) Visible when is radio is traversing<br />
options using the and buttons.<br />
<strong>P7200</strong> Radio Keypad Functions<br />
P7250<br />
P7270<br />
The P7230 model radio does not have a front mounted keypad.<br />
Lock/Unlock the Keypad<br />
1. Press and hold the button.<br />
2. While holding the button, press the button on the side of<br />
the radio.<br />
Activates a selected item within a list, similar to an<br />
“Enter” key.<br />
While in “Dwell Display,” press repeatedly to scroll<br />
through and view status display (on 2 nd line) for current<br />
profile, caller, received voice group, and channel.<br />
<br />
<br />
0 – 9<br />
<br />
<br />
<br />
<br />
<br />
<strong>P7200</strong> Radio Keypad Functions (Continued)<br />
Scrolls through available menu items.<br />
(P7270 Only) Keys used to place telephone<br />
interconnect and individual (unit-to-unit) calls. Functions<br />
as a telephone keypad. Also used to enter passwords<br />
for logging into the <strong>OpenSky</strong> network (if not preconfigured<br />
for automatic registration at power-up.)<br />
(P7270 Only) * Initiates log in, log out, selective call,<br />
telephone interconnect call, etc. Also acts as an escape<br />
button or a backspace that clears everything, not just<br />
the last digit/character.<br />
(P7270 Only) # Used in conjunction with alpha-numeric<br />
keys for passwords and <strong>OpenSky</strong> functions.<br />
(P7250 Only) Currently undefined.<br />
(P7250 Only) Toggles the Scan Mode ON/OFF.<br />
(P7250 Only) Currently undefined.<br />
Attach Battery Pack<br />
Remove Battery Pack<br />
Battery Packs<br />
1. Align the tab at top of the<br />
battery pack with the slot at<br />
the top of the radio.<br />
2. Press down on the bottom of<br />
the battery until it clicks into<br />
place.<br />
1. Press latch.<br />
2. Lift from bottom.<br />
3. Slide back.<br />
<strong>P7200</strong> Scan Modes<br />
Scan Mode Explanation<br />
No Scan<br />
Normal<br />
Fixed<br />
Full communications (listen and talk) with the<br />
active voice group.<br />
No calls received from other voice groups.<br />
The user can scan all voice groups in the active<br />
profile that are not locked out as long as there is<br />
demand on the site.<br />
Priority (P1 and P2) groups are user selectable.<br />
Receive calls from more than one voice group, if<br />
available from the current site.<br />
Allows dragging of the selected voice group, P1,<br />
P2, and default emergency voice group.<br />
The default emergency voice group, as well as any<br />
emergency-enabled voice groups, is only dragged<br />
if it is in emergency mode.<br />
Functions the same as Normal Scan Mode,<br />
except the priority groups are fixed to the<br />
selected profile’s pre-defined P1 and P2 groups<br />
(configured via the UAS). In this mode, P1 and<br />
P2 groups CANNOT be locked out.<br />
Changing Operating Mode<br />
1. Use or to cycle through the menu until “App Mode” is<br />
displayed.<br />
2. Use or to choose an available mode. Press and or <br />
to confirm (Y/N).<br />
3. Press the button to confirm.<br />
or<br />
1# will transition the radio to ECP mode. If ECP mode is not loaded<br />
in the radio, the radio displays “No App.”<br />
For more detailed operating instructions and a list of options and<br />
accessories, refer to the operator’s manual MM23772 (available<br />
online at www.pspc.harris.com).
<strong>P7200</strong> Alert Tones<br />
1 low tone/2<br />
Call Queued<br />
processing.<br />
high tones. Call queued for<br />
Call Denied<br />
Client<br />
Connect<br />
Client<br />
Disconnect<br />
Grant (or Go-<br />
Ahead)<br />
Call<br />
Removed<br />
3 short tones. Radio is out of coverage area or<br />
requested voice group is active.<br />
2 short beeps. <strong>Portable</strong> is connected to the V-TAC<br />
in XCOV or XCOV-TG.<br />
2 short beeps (lower pitch than Client Connect<br />
Tone). Radio has disconnected from the V-TAC.<br />
1 short beep. Sounds when resources become<br />
available for a call request placed in the queue (if<br />
enabled) upon channel access.<br />
1 long low-pitched tone. Access to the channel has<br />
been lost (out of coverage area or preempted by<br />
higher-priority call).<br />
Low Battery 1 mid tone followed by 1 low tone. Low battery.<br />
Selective<br />
Alert<br />
Received<br />
Emergency<br />
Tone<br />
4 short tones. Only played once to indicate a<br />
selective alert has been received.<br />
3 long tones. Sounds when an emergency is<br />
declared.<br />
Emergency 1 long low-pitched tone. Sounds when an<br />
Cleared Tone emergency is cleared.<br />
Selective Call<br />
Ring Tone<br />
A ringing tone similar to a telephone. Ringing is<br />
repeated every four seconds until the call is<br />
accepted or rejected by the radio being called or<br />
until the network drops the call if unanswered after<br />
one minute.<br />
Public Safety and Professional Communications<br />
221 Jefferson Ridge Parkway | Lynchburg, VA USA 24501<br />
www.pspc.harris.com | 1-800-528-7711<br />
<strong>P7200</strong> Alert Tones (Continued)<br />
Roam Tone 2 short tones, 1 high-pitched and 1 low-pitched.<br />
Out of Range<br />
Tone<br />
Man Down<br />
Tone<br />
*0<br />
*1<br />
Tri-tone beep. If enabled via programming, sounds<br />
when the radio is not within operational range of<br />
the base station.<br />
1 long tone, 1 short beep. The radio has assumed<br />
a horizontal position (requires external switch<br />
connected to UDC port).<br />
P7270 Keypad Functions<br />
Log-off command: *0## (logs the user off the<br />
system).<br />
Manual log-in command: *1 #<br />
## (required for encryption).<br />
*2 Status Message: *2 #.<br />
*4<br />
Enter Scene of Incident (SOI) Mode:<br />
*4### where ccc is the SOI channel<br />
number and bb is the number assigned to each<br />
frequency band.<br />
Press *40# to exit SOI Mode.<br />
*5 RTT Message: *5 #.<br />
*7<br />
*8<br />
*9<br />
*32<br />
*33<br />
*61<br />
Initiate Selective Alert: *7#[Choose<br />
Message]#.<br />
Initiate Selective Call:*8#(PTT to dial).<br />
Public Switched Telephone Network (PSTN)<br />
Call command: *9 # (PTT<br />
to dial).<br />
Begin Manual Encryption command: *32# .<br />
End Manual Encryption command. *33#. Radio<br />
displays “Unsecure” to indicate manual<br />
encryption has ended.<br />
Initiate XCOV Mode command: *61# Extended<br />
coverage for individual users.<br />
P7270 Keypad Functions (Continued)<br />
*62<br />
Initiate XCOV-TG Mode command: *62#<br />
Extended coverage for voice groups.<br />
*63 Initiate XCOV-PROF Mode command: *63#.<br />
*60<br />
Exit XCOV Mode command: *60#<br />
Returns to the normal mode.<br />
P7270 <strong>Quick</strong> Buttons<br />
1# Transition to ECP Mode.<br />
2# Stealth Mode On/Off.<br />
3# Scan Mode On/Off.<br />
4# Lights/Tones On/Off.<br />
6# XCOV or XCOV-TG Attach/Detach.<br />
Green Receiving.<br />
Tri-Color LED<br />
Red Transmitting.<br />
Flashing rapidly, radio is receiving an emergency<br />
Orange call. Flashing every ½ second, the selected voice<br />
group is in emergency state (not transmitting).<br />
Change the Active Profile<br />
1. Press the or buttons until “ProfileMenu” is displayed. The<br />
name of the currently active profile is displayed.<br />
2. Use or to scroll through the list of available profiles.<br />
3. Press to activate the selected profile.<br />
Change the Selected Voice Group<br />
Turn the Group Selection knob on top of the radio to select desired<br />
voice group.<br />
Receive a Voice Call<br />
No action is required on the part of the user.<br />
A radio receiving a System All Call displays “All Call” instead of the<br />
alias. A radio not transmitting on a voice group in emergency status<br />
will drop all other calls to scan into an All Call.<br />
Transmit a Voice Call<br />
1. Select the desired voice group.<br />
2. Depress and hold the PTT button, wait a couple of seconds. If<br />
programmed by the administrator, a grant tone will be sounded.<br />
3. Begin speaking into the microphone in a normal voice.<br />
For maximum clarity, hold the radio approximately 2-inches from<br />
your mouth. Take care not to cover up the microphone while<br />
speaking.<br />
4. Release the PTT button when finished speaking.<br />
Transmit a Selective Call<br />
Manually Dialing a Selective Call<br />
1. Enter *8, the User ID number of the user being called, and the #<br />
key (no dashes or spaces). This feature must be enabled by the<br />
administrator.<br />
*8#PTT<br />
A shortened User ID number can be dialed using the following<br />
guidelines:<br />
If the radio being called is in the same region and agency –<br />
enter only the last four digits.<br />
If the radio being called is in the same region, but a different<br />
agency – enter the last seven digits.<br />
If the radio being called is in another region or if the area is<br />
unknown – enter all ten digits.<br />
2. Press PTT (and release) to ring the user being called.<br />
NOTICE!<br />
The material contained herein is subject to U.S. export approval. No<br />
export or re-export is permitted without written approval from the U.S.<br />
Government. Rated: EAR99; in accordance with U.S. Dept. of Commerce<br />
regulations 15CFR774, Export Administration Regulations.<br />
Transmit a Selective Call (Continued)<br />
Selective Call Using Speed Dial<br />
1. Scroll through the Menu options using the or button until<br />
“Speed Dial” appears in the second line of the display.<br />
2. Using the or keys, scroll through the pre-programmed<br />
speed-dial numbers until the desired number appears in the<br />
display and press the PTT button.<br />
Receive a Selective Call<br />
Press the , , or button to accept the selective call.<br />
Terminate a Selective Call<br />
Terminate a Selective Call by pressing the or #. “HANGUP” will<br />
appear in the display followed by the active voice group.<br />
Declare an Emergency<br />
1. Press the red emergency button on the radio to enter emergency<br />
mode. Emergency is raised after the Emergency Raise Delay<br />
(default is 1 second).<br />
2. The microphone is hot (open mic) for a programmed amount of<br />
time in order to send your voice out on the emergency voice<br />
group.<br />
3. All of the radios in the emergency voice group hear your call and<br />
see the emergency voice group displayed on their radio.<br />
Clear an Emergency<br />
If enabled via programming, clear an emergency by:<br />
1. Pressing and holding while simultaneously pressing the<br />
emergency button.<br />
2. Release both buttons.<br />
Stealth Mode<br />
1. Press the or button to scroll through menus until<br />
“StealthMenu” appears in the display.<br />
2. Press the or button once to activate Stealth Mode, exit the<br />
Stealth Menu, and return to the Dwell Display.<br />
Or<br />
On P7270 radios, 2# can be used to enter Stealth Mode.<br />
P7250 Radios - Press any key to disable Stealth Mode.<br />
P7270 Radios - Exit using 2# or via the Stealth Mode menu.