
You also want an ePaper? Increase the reach of your titles
YUMPU automatically turns print PDFs into web optimized ePapers that Google loves.
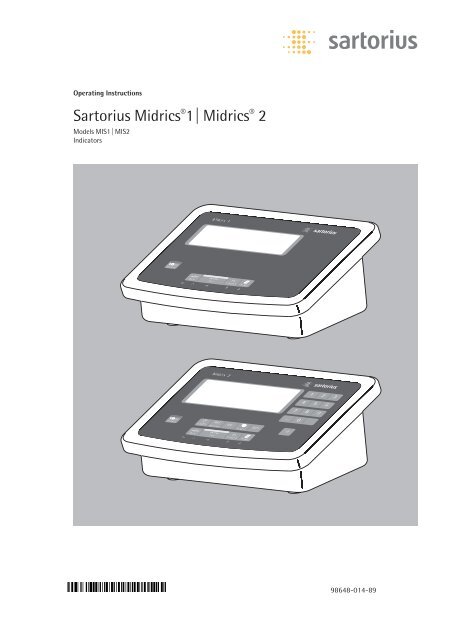
Operating Instructions<br />
<strong>Sartorius</strong> Midrics ® 1| Midrics ® 2<br />
Models MIS1 | MIS2<br />
Indicators<br />
98648-014-89<br />
98648-014-89
Intended Use<br />
The Midrics ® 1 and 2 indicators are<br />
robust indicators for demanding, daily<br />
quality control. They meet the highest<br />
requirements placed on the accuracy<br />
and reliability of weighing results in the<br />
following areas:<br />
– The food industry<br />
– The pharmaceutical industry<br />
– The chemical industry<br />
– The electronics and metal industries.<br />
Midrics ® indicators:<br />
– Are robust and durable, thanks to their<br />
stainless steel housing<br />
– Are easy to clean and disinfect<br />
– Are easy to operate, thanks to the<br />
following features:<br />
– Large, backlit display-elements<br />
– Large keys with positive click action<br />
– Can be operated independently of the<br />
weighing platform location<br />
– Have fast response times<br />
– Have a range of interfaces for flexible<br />
use<br />
– Offer optional password-protection<br />
to prevent unauthorized alteration of<br />
operating parameters<br />
Further features (Midrics ® 2):<br />
– Possibility to input tare values via the<br />
number block<br />
– Possibility to assign weigh products<br />
with 4 identifiers (ID)<br />
– Built-in applications program<br />
(applications) for:<br />
– Counting<br />
– Neutral measurement<br />
– Weighing in percent<br />
– Averaging<br />
– Checkweighing<br />
– Classification<br />
– Net-total formulation<br />
– Totalizing<br />
– Automatic initialization when the scale<br />
is switched on<br />
– Automatic taring when a load is placed<br />
on the weighing platform<br />
– Optional remote control using an<br />
external computer<br />
2 Midrics 1/2<br />
The following symbols are used in<br />
these instructions:<br />
§ Indicates required steps<br />
$ Indicates steps required only under<br />
certain conditions<br />
> Describes what happens after you have<br />
performed a particular step<br />
– Indicates an item in a list<br />
!Indicates a hazard
Contents<br />
2 Intended Use<br />
4 Warning and Safety Information<br />
5 General View of the Device<br />
5 Display and Keypad<br />
5 Rear View<br />
6 Start-up<br />
7 Connecting the Weighing Platform<br />
9 Analog/Digital Converter (ADC)<br />
10 Menu Structure for ADC<br />
Configuration<br />
12 Service Menu<br />
13 Activating the Service Mode<br />
14 Configuring the A/D Converter<br />
17 Key ) - > 2 sec Function Allocation<br />
18 Enter Geographical Data<br />
19 Enter Calibration and Linearization<br />
Platform<br />
19 Changing the weight unit<br />
20 External Linearization<br />
21 Calibration, Adjustment<br />
23 Set Preload<br />
23 Clear Preload<br />
23 Calibration/Adjustment Without<br />
Weights<br />
24 Enter Serial Number of the Weighing<br />
Platform<br />
25 Operating Design<br />
25 Keypad<br />
25 Keypad Input<br />
26 Input Through the Digital I/O Port<br />
27 Display in the Measuring Range<br />
27 Display of Weighed Values and<br />
Calculated Values<br />
28 Security During Weighing<br />
29 Menu Operating Design<br />
29 Error Messages<br />
29 Data Output<br />
29 Saving Data<br />
30 Configuration<br />
30 Setting the Language<br />
31 Entering or Changing the Password<br />
32 Operating Menu Overview<br />
(Parameters)<br />
49 Operation<br />
49 Weighing W<br />
49 Device Parameters<br />
50 Tare Function in Weighing<br />
51 Numeric Input for Weighing<br />
52 Weighing with Variable Tare Values<br />
53 Calibration, Adjustment<br />
55 Data ID Codes (Identifiers)<br />
57 Applications<br />
58 Counting<br />
61 Neutral Measurement<br />
64 Averaging<br />
67 Weighing in Percent<br />
70 Checkweighing<br />
73 Classification<br />
76 Totalizing<br />
79 Net-total Formulation<br />
82 Configuring Printouts<br />
83 Configuring Data Interface Ports as<br />
Printer Ports<br />
83 Configuring Printouts<br />
84 GMP-compliant Printout<br />
85 Sample Printout<br />
88 Data Interface Port (Optional)<br />
88 COM1<br />
88 UniCOM<br />
89 Error Messages<br />
90 Care and Maintenance<br />
90 Recycling<br />
91 Overview<br />
91 Specifications<br />
92 Dimensions<br />
93 Accessories<br />
96 Declarations of Conformity<br />
99 EC type Approval Certificate<br />
100 Test Certificate<br />
101 Plates and Markings<br />
103 Index<br />
Appendix<br />
General Password<br />
Guide to Verification<br />
Midrics 1/2<br />
3
Warning and Safety Information<br />
Safety<br />
§ To prevent damage to the equipment,<br />
read these operating instructions<br />
thoroughly before the device is used.<br />
!Do not use this equipment in hazardous<br />
areas/locations.<br />
The requirements pertaining to<br />
applicable installation regulations<br />
must be followed when using electrical<br />
equipment in systems and environmental<br />
conditions with increased safety<br />
requirements.<br />
!Disconnect the indicator from the<br />
power supply before connecting<br />
or disconnecting peripheral devices.<br />
!The indicator may only be opened by<br />
trained service technicians.<br />
!If there is visible damage to the device<br />
or power cord:<br />
Unplug the equipment and make sure<br />
it cannot be used for the time being.<br />
!Extreme electromagnetic conditions<br />
may influence the display value. After<br />
the end of this influence, the device<br />
can be used for its designated purpose<br />
again.<br />
– Information on operational quality<br />
is available on request from <strong>Sartorius</strong><br />
(in line with norms pertaining to<br />
immunity).<br />
Installation<br />
– Proceed with extreme caution when<br />
using pre-wired RS-232 connecting<br />
cables purchased from other manufacturers.<br />
The pin assignments may not be<br />
compatible with <strong>Sartorius</strong> equipment.<br />
Check the pin assignment against the<br />
cabling diagrams and disconnect any<br />
lines that are not assigned. The operator<br />
shall be solely responsible for any<br />
damage or injuries that occur when<br />
using cables not supplied by <strong>Sartorius</strong>.<br />
– If you use Option L8 (24-volt industrial<br />
power supply module) for connection to<br />
a low-voltage source, be sure to comply<br />
with the requirements for Safety Extra<br />
Low Voltage (SELV) and Protective<br />
Extra Low Voltage (PELV).<br />
– Use only standard cables that have<br />
protective grounding conductors.<br />
The protective conductor must not be<br />
disconnected for any reason.<br />
– There must be 3 cm space behind the<br />
device so that the power cord does not<br />
buckle.<br />
4 Midrics 1/2<br />
– Check regularly that the power cord has<br />
not been damaged.<br />
– Use only <strong>Sartorius</strong> accessories and<br />
options as these are perfectly tailored<br />
for use with this device. The operator<br />
shall be solely responsible for installation<br />
and testing of any modifications<br />
to <strong>Sartorius</strong> equipment, including<br />
connection of cables or equipment not<br />
supplied by <strong>Sartorius</strong>. Information on<br />
operational quality (in line with norms<br />
pertaining to immunity) is available<br />
on request.<br />
NOTE:<br />
This equipment has been tested and<br />
found to comply with the limits<br />
pursuant to part 15 of FCC Rules.<br />
These limits are designed to provide<br />
reasonable protection against harmful<br />
interference. This equipment generates,<br />
uses and can radiate radio frequency<br />
energy and, if not installed and used<br />
in accordance with these instructions,<br />
may cause harmful interference to<br />
radio communications. For information<br />
on the specific limits and class of this<br />
equipment, please refer to the Declaration<br />
of Conformity. Depending on the<br />
particular class, you are either required<br />
or requested to correct the interference.<br />
If you have a Class A digital device,<br />
you need to comply with the FCC statement<br />
as follows:<br />
“Operation of this equipment in a<br />
residential area is likely to cause harmful<br />
interference in which case the user<br />
will be required to correct the interference<br />
at his own expense.” If you have<br />
a Class B digital device, please read<br />
and follow the FCC information given<br />
below:<br />
“[…] However, there is no guarantee<br />
that interference will not occur in a<br />
particular installation. If this equipment<br />
does cause harmful interference to<br />
radio or television reception, which can<br />
be determined by turning the equipment<br />
off and on, the user is encouraged<br />
to try to correct the interference by one<br />
or more of the following measures:<br />
– Reorient or relocate the receiving<br />
antenna.<br />
– Increase the separation between<br />
the equipment and receiver.<br />
– Connect the equipment into an<br />
outlet on a circuit different from<br />
that to which the receiver is<br />
connected.<br />
– Consult the dealer or an experienced<br />
radio/TV technician for help.”<br />
Before you operate this equipment,<br />
check which FCC class (Class A or Class<br />
B) it has according to the Declaration of<br />
Conformity included. Be sure to observe<br />
the information of this Declaration.<br />
IP protection:<br />
– MIS models are rated to IP65<br />
– The indicator’s IP65 protection rating<br />
is ensured only if the rubber gasket is<br />
installed and all connections are<br />
fastened securely (including the caps<br />
on unused sockets). Weighing platforms<br />
must be installed and tested by a certified<br />
technician.<br />
– If you install an interface port or<br />
battery connection after setting up<br />
your indicator, keep the protective cap<br />
in a safe place for future use. The cap<br />
protects the interface connector from<br />
vapors, moisture and dust or dirt.<br />
Use in legal metrology:<br />
– When the indicator is connected to<br />
a weighing platform and this equipment<br />
is to be verified, ensure that the<br />
applicable regulations regarding verification<br />
are observed. When connecting<br />
non-<strong>Sartorius</strong> platforms, see the Appendix<br />
“Guide to verification of weighing<br />
instruments”. When connecting<br />
a <strong>Sartorius</strong> weighing platform, observe<br />
the permitted weighing ranges as listed<br />
in the Declaration of Conformity.<br />
– If any of the verification seals are<br />
damaged, ensure the regulations and<br />
standards applicable in your country are<br />
observed in such cases. In some countries,<br />
the equipment must be re-verified.
General View of the Device<br />
Midrics ® 1<br />
Midrics ® 2<br />
1<br />
2<br />
3<br />
4<br />
5<br />
6<br />
1<br />
2<br />
3<br />
4<br />
5<br />
6<br />
14<br />
15<br />
16<br />
17<br />
7<br />
8<br />
9<br />
10<br />
11<br />
12<br />
13<br />
18<br />
19<br />
Display and Keypad<br />
1 Display<br />
(For a detailed diagram, please see<br />
the chapter “Operating design”)<br />
2 ON/Standby key<br />
3 Zeroing key<br />
4 Tare key<br />
5 Function key (e.g. switch gross/net)<br />
6 Print key (data output)<br />
7 Clear key (function applicationdependent)<br />
8 Reference value key (function<br />
application dependent)<br />
9 Transfer key (function application<br />
dependent)<br />
10 Toggle key (function application<br />
dependent)<br />
11 Info key for calling up identifiers<br />
and manual tare values<br />
12 Numeric keypad<br />
13 Identifier key for entering operator<br />
recognitions<br />
Rear View<br />
14 Connector for weighing platform<br />
15 Menu access switch<br />
16 Optional: second interface (UniCOM)<br />
17 Optional: RS-232 interface (COM1)<br />
18 Power supply connection cable<br />
19 Ground connection<br />
(potential equalization)<br />
Midrics 1/2<br />
5
Start-up<br />
Unpacking<br />
§ Unpack the device and check it immediately<br />
for any visible damage.<br />
$ If you detect any damage, proceed as<br />
directed in the chapter entitled “Care<br />
and Maintenance“, under “Safety<br />
Inspection“.<br />
$ Save the box and all parts of the packaging<br />
for any future transport. Unplug<br />
all connected cables before packing the<br />
equipment.<br />
Check package contents<br />
– Indicator<br />
– Operating instructions (this document)<br />
– Options (special accessories) as listed on<br />
the bill of delivery; possible options are:<br />
Real-time clock with battery back-up<br />
Interface (RS-232, RS-485, analog<br />
interface 4-20 mA, digital I/O)<br />
Internal rechargeable battery<br />
External rechargeable battery<br />
24V module<br />
Installation instructions<br />
Avoid adverse influences at the place<br />
of installation:<br />
– Heat (heater or direct sunlight; operational<br />
temperature: -10 º C to +40 º C)<br />
– Drafts from open windows and doors<br />
– Extreme vibrations during weighing<br />
– Aggressive chemical vapors<br />
– Extreme moisture (according to IP protection<br />
class)<br />
6 Midrics 1/2<br />
Start up the device<br />
$ If necessary, acclimatize the device:<br />
see next column<br />
§ Connect the weighing platform and<br />
the indicator, see page 7 (any type of<br />
weighing platform or weighing cell that<br />
meets the required specifications can be<br />
connected to the indicator)<br />
§ Establish a connection to the power<br />
supply see the page after next<br />
§ Warm up the device: see the page after<br />
next (warm up time)<br />
§ Configure the analog/digital converter<br />
(ADC) see page 9<br />
§ Carry out an alignment: For calibration<br />
see page 21; for linearization see<br />
page 20<br />
Acclimatize the device<br />
Condensation can form on the surfaces<br />
of a cold device when it is brought into<br />
a substantially warmer area. Therefore,<br />
on transferring the device to a warmer<br />
area make sure it is acclimatized for<br />
about 2 hours at room temperature<br />
(unplugged from power).
Connecting the Weighing Platform<br />
Connection of an analog <strong>Sartorius</strong> platform MAPP, MAPS, or a commercially available<br />
strain-gauge load cell.<br />
!The load cell should be connected by a certified technician who has received specialized<br />
training from <strong>Sartorius</strong>. Any installation work that does not conform to the instructions<br />
in this manual results in forfeiture of all claims under the manufacturer’s warranty.<br />
!Disconnect the equipment from the power supply before starting connection work.<br />
§ Set up the weighing platform (see operating instructions for the weighing platform)<br />
§ Place the cable from the weighing platform next to the indicator<br />
§ Open the Midrics indicator:<br />
Loosen the 4 cap nuts on the front panel. Remove the front panel.<br />
§ Connect the weighing platform connection cable to the indicator<br />
Note:<br />
The cable gland is installed at the factory. Please use extreme caution when performing<br />
any work on the equipment that affects this gland.<br />
Use a torque wrench.<br />
Tighten the cable gland to: 5 Nm<br />
§ Strip the insulation of the cable and connect it as follows:<br />
– Route the cable through the cable gland.<br />
– Close and tighten the cable gland in accordance with the applicable regulations.<br />
– Strip the insulation from the cable (according to the diagram). The shielding (1) must<br />
have contact with the clamps (2).<br />
– Expose approximately 15 cm (3 inches) of the cable wires (3), so that they can be<br />
installed.<br />
– Route the cable through the cable gland.<br />
– Make sure the shield has contact with the clamps. The cable is grounded by the shield.<br />
§ Connect the cable to the weighing platform as follows:<br />
– Strip the insulation from the cable. Expose approximately 5 cm (3 inches) of the cable<br />
wires (3), so that they can be installed.<br />
– Strip approximately 1 cm (1/2 inch) of the insulation from the wires and affix ferrules to<br />
the wire ends.<br />
– Place a ferrite ring over all the wires.<br />
Midrics 1/2<br />
7
8 Midrics 1/2<br />
– Screw the wires tightly into the clamps<br />
Indicator Pin Assignment:<br />
No. Signal description Meaning<br />
1 BR_POS Bridge supply voltage (+)<br />
2 SENSE_POS Sense (+) for bridge supply voltage<br />
3 OUT_POS Measuring voltage positive<br />
4 OUT_NEG Measuring voltage negative<br />
5 SENSE_NEG Sense (-) for bridge supply voltage<br />
6 BR_NEG Bridge supply voltage (–)<br />
!Refer to the data sheet or operating instructions of the weighing platform for details on<br />
the assignment of wire colors/signals. Ensure any lines that are not assigned are insulated<br />
correctly.<br />
!When connecting a load receptor that uses 4-conductor technology (the cable of the<br />
weighing platform to be connected only has 4 lines), connect clamp pairs 1 and 2<br />
(BR_ and SENSE_POS), and 5 and 6 (SENSE_NEG and BR_NEG) with a wire jumper.<br />
§ Close the Midrics indicator:<br />
Re-attach the front panel and secure it with the 4 cap nuts<br />
Establishing a Connection to the Power Supply<br />
§ Check the voltage rating and plug design.<br />
$ Power is supplied via the installed power cord that is supplied. The power supply is integrated<br />
into the indicator. The device can be operated with a voltage of 100 V to 240 V.<br />
The printed voltage rating (see type label) must match the voltage in the place of installation.<br />
If the stated supply voltage or the plug design of the power cord does not comply<br />
with the standard you use, please inform your nearest <strong>Sartorius</strong> representative or your<br />
dealer.<br />
The power connection must be made in accordance with the regulations applicable in<br />
your country.<br />
Connecting the device, rated to Class 1, to power supply (mains supply):<br />
The device must be plugged into a properly installed wall outlet which has a protective<br />
grounding conductor (PE). The power plug or a different, suitable disconnecting device<br />
for the power must be easily accessible.<br />
Safety Measures<br />
If you use an electrical outlet that does not have a protective grounding conductor,<br />
ensure that an equivalent protective conductor is installed by a certified electrician<br />
(as specified in the applicable regulations for installation in your country). The protective<br />
effect must not be negated by using an extension cord without a protective grounding<br />
conductor.<br />
Warm-up Time<br />
To return precise results, the device must warm up for at least 30 minutes after initial<br />
connection to the power supply. Only after this time will the device have reached the<br />
required operating temperature.<br />
Using a verified device in legal metrology:<br />
$ Ensure that there is a warm-up time of at least 6 hours after initial connection to the<br />
power supply.
Analog/Digital Converter<br />
(ADC)<br />
Purpose<br />
Adjust the parameters of the analog/<br />
digital converter to the connected load<br />
cell or weighing platform.<br />
After ADC configuration the ADC is<br />
defined as a scale in connection with<br />
the load sensor.<br />
Set-up Information<br />
– ADC configuration is only possible<br />
when the menu access switch is open.<br />
Close the menu access switch after ADC<br />
configuration, as otherwise there will<br />
not be any display of the conditions<br />
“overload” (“H”) and “underload” (“L”).<br />
– When the service mode is active, the<br />
ADC configuration takes place in the<br />
Setup menu under “WP-1” under the<br />
menu item ADC-CON.<br />
– Enter the maximum capacities in a suitable<br />
weight unit, without any decimal<br />
places (decimal places will be truncated<br />
by the rounding function).<br />
!If you return to the highest level of the<br />
menu without saving the configuration<br />
parameter beforehand (menu item save)<br />
any settings that have been made will<br />
be deleted.<br />
– Entries made in the ADC configuration<br />
will not be affected by a menu reset<br />
(returning the set-up parameters to<br />
their factory settings).<br />
!Note:<br />
Once the A/D converter configuration<br />
has been locked, the indicator can no<br />
longer be used to influence weighing<br />
results. The scope of functions available<br />
in the weighing instrument is defined<br />
by the A/D converter. Weighing functions<br />
that can be activated include<br />
reading weight values, taring, calibration,<br />
reading the tare value, saving/<br />
deleting the tare entry<br />
Description of the Individual Menu<br />
Items for the A/C Converter<br />
Configuration<br />
Standard or verifiable configuration<br />
(menu items STAND. / VERIF.)<br />
In ADC configuration it is first selected,<br />
whether the weighing platform should<br />
be configured as a standard or verifiable<br />
(for use in legal metrology) weighing<br />
platform.<br />
– Standard configuration (STAND.)<br />
– Verifiable configuration (VERIF.).<br />
Accuracy Class (menu item CLASS)<br />
Only displayed in verifiable configuration.<br />
Only menu items 3/4 (accuracy class<br />
l/m) can be selected. If the menu item is<br />
not already marked as being active with<br />
a circle (o), the ) key must be pressed<br />
once to activate it.<br />
Range Selection (menu item RANGES)<br />
Depending on the setting under this<br />
menu item, the menu points RANGE 1,<br />
RANGE 2 and RANGE 3 will either be<br />
displayed or will not be displayed for<br />
further configurations.<br />
– Single range mode (SINGLE)<br />
The entire weighing capacity is divided<br />
into decimal numbers dependent on<br />
the smallest scale interval d and the<br />
maximum weight. The readability corresponds<br />
to the scale interval d.<br />
– Multi-interval scale (MULT.INT.)<br />
The function “multi-interval scale”<br />
divides the weighing capacity into a<br />
maximum of three intervals with differing<br />
readability. The corresponding<br />
change takes place automatically at the<br />
defined interval limits. After taring, the<br />
best possible resolution (smallest scale<br />
intervals) is available even when there is<br />
a load on the weighing platform.<br />
– Multiple range mode (MULT.R.)<br />
A multiple-range scale has two or<br />
three weighing ranges. When the range<br />
limit for the lower weighing range is<br />
exceeded, the scale switches into the<br />
next highest weighing range (lower<br />
resolution). The scale only switches<br />
back to the higher resolution when the<br />
weighing platform has been completely<br />
unloaded.<br />
Scale Interval d<br />
The scale interval d indicates the resolution<br />
of the weighing instrument.<br />
The scale interval can only be entered in<br />
increments of 1, 2, 5, 10, 20, etc.<br />
When “verifiable configuration” is used,<br />
this menu item is not displayed.<br />
When using verifiable or verified weighing<br />
platforms (classes l and m), the<br />
scale interval d is the same as the<br />
verification scale interval e.<br />
Verification Scale Interval e<br />
The verification scale interval e indicates<br />
the resolution of the weighing<br />
instrument in legal metrology. The scale<br />
interval can only be entered in increments<br />
of 1, 2, 5, 10, 20, etc.<br />
When “standard configuration” is used,<br />
this menu item is not displayed.<br />
Maximum Capacity (max. cap.)<br />
The maximum capacity is the maximum<br />
load that may be placed on the weighing<br />
platform. When heavier weights are<br />
used the weighing instrument displays<br />
overload “H”.<br />
The scale intervals of the weighing<br />
instrument are calculated using the<br />
maximum capacity and the scale interval<br />
d (e.g. max. capacity = 15.000 kg,<br />
smallest scale interval = 0.005 kg yields<br />
3000 scale intervals).<br />
In legal metrology the total number of<br />
intervals must be no more than 3125<br />
e, and when using multi-interval scales<br />
there must not be more than 3125 e<br />
intervals per range.<br />
Midrics 1/2<br />
9
Range 1, Range 2, Range 3<br />
(RANGE 1, RANGE 2, RANGE 3)<br />
The range limits are entered for the<br />
individual ranges. The accuracy changes<br />
when these limits are exceeded.<br />
The following applies when entering<br />
limits:<br />
Range 1 < Range 2 < Range 3<br />
< Max. cap.<br />
This means that the weighing range can<br />
be divided into a maximum of 4 ranges.<br />
The resolution changes at intervals of<br />
1, 2, 5, 10, 20 etc., where the lowest<br />
resolution is the smallest scale interval<br />
entered. Set ranges that are not<br />
required for use to zero.<br />
10 Midrics 1/2<br />
Available weighing units (menu item<br />
UNITS)<br />
This menu item is used to select the<br />
weighing units that have been cleared<br />
for use in weighing. All units marked<br />
with a circle (o) have been cleared for<br />
use, multiple selection is possible.<br />
If you need to use this indicator as a<br />
legal measuring instrument (legal for<br />
trade), be sure you have selected a<br />
permissible unit.<br />
Save parameters (menu item SAVE)<br />
The ADC configuration data is saved<br />
once at the end of defining the settings<br />
using the SAVE function.<br />
Testing and configuration<br />
for operation in legal metrology<br />
A metrology plate is included in the<br />
scope of supply of the indicator.<br />
Once ADC configuration is complete,<br />
record the metrological data for all<br />
ranges on the metrology plate. Attach<br />
the plate underneath the display and<br />
cover with the supplied waterproof foil.<br />
Under menu item 1.7, check that only<br />
authorized weight units can be selected.<br />
Menu Structure for ADC Configuration<br />
The setup menu for WP1 (“WP-1”) can be extended to include the following additional setting options for ADC configuration:<br />
ADC CON ADC configuration<br />
STAND. Standard configuration<br />
RANGES Range selection<br />
SINGLE WEIGHTS Single range mode<br />
D Scale interval<br />
Enter value<br />
MAX Max. cap.<br />
Enter value<br />
MULT.INT WEIGHTS Multi-interval scale<br />
D Scale interval<br />
Enter value<br />
RANGE 1 Range limit 1<br />
Enter value<br />
RANGE 2 Range limit 2<br />
Enter value<br />
RANGE 3 Range limit 3<br />
Enter value<br />
MAX Max. cap.<br />
Enter value<br />
MULT.R. WEIGHTS Multiple-range scale<br />
D Scale interval<br />
Enter value<br />
RANGE 1 Range limit 1<br />
Enter value<br />
RANGE 2 Range limit 2<br />
Enter value<br />
RANGE 3 Range limit 3<br />
Enter value<br />
MAX Max. cap.<br />
Enter value
UNITS Available weight units<br />
FREE User-defined unit<br />
G Gram<br />
KG Kilogram<br />
CT Carat<br />
LB Pound<br />
OZ Ounce<br />
OZT Troy ounce<br />
TLH Hong Kong taels<br />
TLS Singapore taels<br />
TLT Taiwan taels<br />
GN Grain<br />
DWT Pennyweights<br />
MG Milligram<br />
/LB Parts per pound<br />
TLC Chinese taels<br />
MOM Mommes<br />
K Austrian carat<br />
TOL Tola<br />
BAT Baht<br />
MS Mesgahl<br />
T Ton<br />
LB/OZ Pounds per ounce<br />
SAVE<br />
NO<br />
YES<br />
VERIF. Verifiable configuration<br />
CLASS Accuracy class<br />
3/4<br />
RANGES Range selection<br />
SINGLE WEIGHTS Single range mode<br />
E Verifiable scale interval<br />
Enter value<br />
MAX Max. cap.<br />
Enter value<br />
UNITS See above<br />
SAVE<br />
MULT.INT WEIGHTS Multi-interval scale<br />
E Verifiable scale interval<br />
Enter value<br />
RANGE 1 Range limit 1<br />
Enter value<br />
RANGE 2 Range limit 2<br />
Enter value<br />
RANGE 3 Range limit 3<br />
Enter value<br />
MAX Max. cap.<br />
Enter value<br />
MULT.R. WEIGHTS Multiple-range scale<br />
E Verifiable scale interval<br />
Enter value<br />
RANGE 1 Range limit 1<br />
Enter value<br />
RANGE 2 Range limit 2<br />
Enter value<br />
RANGE 3 Range limit 3<br />
Enter value<br />
MAX Max. cap.<br />
Enter value<br />
NO<br />
YES<br />
Midrics 1/2<br />
11
Service Menu<br />
Purpose<br />
The service menu enables access to<br />
additional menu items in the setup<br />
menu, which are not displayed when<br />
the service mode is not active.<br />
The most important calibration and<br />
adjustment work for the indicator and<br />
for the connected weighing platform<br />
can be carried out in the service menu.<br />
When the Service mode is active, an “S”<br />
is shown in the top right-hand corner<br />
of the display. To deactivate the Service<br />
mode, restart the indicator (turn the<br />
indicator off and back on again).<br />
12 Midrics 1/2<br />
The following additional functions are<br />
available in the service mode:<br />
The following are the menu items<br />
displayed behind the menu items date<br />
(“DATE”) and code (“CODE”):<br />
– Service date “S DATE”<br />
(Entry of the next service date)<br />
– Memory number “MEM NO”<br />
(Entry of a transaction code for an<br />
external Alibi memory)<br />
– Serial number of the indicator<br />
”SER NO”<br />
– Model description “model”<br />
(Entry of the device serial number)
Activating the Service Mode<br />
e Switch the device on and immediately (during the initialization of the device) press ...<br />
) ... briefly to display the menu<br />
k k Select the Setup menu item<br />
setup<br />
) Confirm the setup menu item 1 )<br />
wp-1<br />
k Select the code menu item<br />
(press key k until the code appears on the display)<br />
code<br />
) Confirm the code menu item and enter the service password (see Appendix)<br />
Use keys ( ) k p<br />
) Saving the service password<br />
When the service mode is activated an “S”appears in the top right-hand corner of the<br />
display.<br />
( Return to “Code” in the service mode.<br />
code<br />
( Return to “Setup” in the service mode.<br />
1 ) If a password is requested at this point, enter the service password (see Appendix) and<br />
continue once the service password has been accepted.<br />
Midrics 1/2<br />
13
)<br />
wp-1<br />
)<br />
14 Midrics 1/2<br />
Configuring the A/D Converter<br />
Open the menu access switch<br />
§ Remove the cap that covers the menu access switch on the left-hand side of the back<br />
of the indicator<br />
§ To do this, move the switch to the left (towards the interface connectors).<br />
(“open position”)<br />
Activate the service mode (see page 13)<br />
Select weighing platform and confirm: Press the ) key<br />
To select the menu item ADC configuration, press the k key several times until ADC-<br />
CON appears. To confirm the menu item ADC configuration, press ).<br />
k repeatedly<br />
ADC-CON<br />
)<br />
STAND.<br />
SAVE<br />
Select whether a standard configuration (STAND) or a verifiable configuration (VERIF.)<br />
should be carried out (in this example, standard configuration).<br />
See the next page for a detailed description of the procedure<br />
Once you have completed the configuration, save the data using the menu item SAVE.<br />
The A/D converter can now be treated like any standard weighing platform<br />
in connection with the load sensor.<br />
Close the menu access switch<br />
Once ADC configuration has been completed, an adjustment of the weighing platform<br />
(calibration/adjustment and linearization) must be carried out (see page 21<br />
“Calibration/adjustment” and page 23 “Calibration without weights”)
Example 1:<br />
Enter or change values for standard configuration in single range<br />
mode in the unit set under 1.7.x.<br />
ADC-CON<br />
Select menu item ADC CON<br />
) Confirm menu item ADC CON<br />
(if necessary k) to select the menu item STAND<br />
Stand.<br />
Standard configuration<br />
) Confirm menu item STAND.<br />
Ranges<br />
Range selection<br />
) Confirm menu item RANGES<br />
(if necessary press k repeatedly) Select menu item SINGLE<br />
SINGle<br />
Single range mode<br />
( Confirm menu item SINGLE<br />
Weights<br />
Weights<br />
) Confirm menu item WEIGHTS<br />
d<br />
Scale interval<br />
) Confirm menu item D<br />
( ) k p Enter a value (e.g. 0.002 kg)<br />
(if necessary press ) repeatedly) until display D appears<br />
k Select menu item MAX.<br />
max.<br />
Maximum capacity<br />
) Confirm menu item MAX.<br />
( ) k p Enter a value (e.g. 30 kg)<br />
(if necessary press ) repeatedly) until display MAX appears<br />
( Menu item UNITS is displayed<br />
(if necessary press the ) key) to select available<br />
weighing units (UNITS)<br />
k Menu item SAVE is displayed<br />
Save<br />
) k ) Save the entered value (YES)<br />
or do not save (NO)<br />
Example 2:<br />
Enter or change values for standard configuration in a multiinterval<br />
scale in the unit set under 1.7.x.<br />
(the same applies for multiple range mode).<br />
ADC-CON<br />
Select menu item ADC CON<br />
) Confirm menu item ADC CON<br />
(if necessary press and select the menu item STAND.<br />
) k p)<br />
Stand.<br />
Standard configuration<br />
) Confirm menu item STAND.<br />
Ranges<br />
Range selection<br />
) Confirm menu item RANGES<br />
(if necessary press k repeatedly) Select menu item MULT. INT<br />
Mult.Int<br />
Multi-interval scale<br />
( Confirm menu item MULT. INT<br />
Weights<br />
Weights<br />
) Confirm menu item WEIGHTS<br />
d<br />
Scale interval (e.g. 0.002 kg)<br />
) Confirm menu item D<br />
( ) k p Enter a value (e.g. 0.002 kg)<br />
(if necessary press ) repeatedly) until display D appears<br />
k Select menu item RANGE 1<br />
Enter values for the following in<br />
the same way:<br />
Range 1<br />
Range 2<br />
max.<br />
Range limit 1 (e.g. 6 kg)<br />
Range limit 2 (e.g. 15 kg)<br />
Maximum capacity (e.g. 30 kg)<br />
Continue as shown in example<br />
1 after entering the maximum<br />
capacity<br />
Midrics 1/2<br />
15
Example 3:<br />
Enter or change values for verifiable configuration in single range<br />
mode in the unit set under 1.7.x.<br />
ADC-CON<br />
16 Midrics 1/2<br />
Select menu item ADC CON<br />
) Confirm menu item ADC CON<br />
(if necessary press and select the menu item VERIF.<br />
) k p)<br />
Verif.<br />
Verifiable configuration<br />
) Confirm menu item VERIF.<br />
Class<br />
Accuracy class<br />
(if necessary press ) ) () To confirm accuracy class 3/4<br />
Ranges<br />
Range selection<br />
) Confirm menu item RANGES<br />
(if necessary press k repeatedly) Select menu item SINGLE<br />
SINGle<br />
Multi-interval scale<br />
( Confirm menu item SINGLE<br />
Weights<br />
Weights<br />
) Confirm menu item WEIGHTS<br />
E<br />
Verifiable scale interval<br />
) Confirm menu item E<br />
( ) k p Enter a value (e.g. 0.002 kg)<br />
(if necessary press ) repeatedly) until display E appears<br />
k Select menu item MAX.<br />
max.<br />
Enter values for the following in<br />
the same way:<br />
Maximum capacity (e.g. 30 kg)<br />
Continue as shown in example<br />
1 after entering the maximum<br />
capacity<br />
Example 4:<br />
Enter or change values for verifiable configuration in a multi-interval<br />
scale in the unit set under 1.7.x.<br />
(the same applies for multiple range mode).<br />
ADC-CON<br />
Select menu item ADC CON<br />
) Confirm menu item ADC CON<br />
(if necessary press<br />
) k p) and select the menu item VERIF.<br />
Verif.<br />
Verifiable configuration<br />
) Confirm menu item VERIF.<br />
Class<br />
Accuracy class<br />
(if necessary press ) ) () To confirm accuracy class 3/4<br />
Mult.Int<br />
Range selection<br />
) Confirm menu item RANGES<br />
(if necessary press k repeatedly) Select menu item MULT. INT<br />
Mult.Int<br />
Multi-interval scale<br />
( Confirm menu item MULT. INT<br />
Weights<br />
Weights<br />
) Confirm menu item WEIGHTS<br />
E<br />
Verifiable scale interval<br />
) Confirm menu item E<br />
( ) k p Enter a value (e.g. 0.002 kg)<br />
(if necessary press ) repeatedly) until display E appears<br />
k Select menu item RANGE 1<br />
Enter values for the following in<br />
the same way:<br />
Range 1<br />
Range limit 1 (e.g. 6 kg)<br />
Range limit 2 (e.g. 15 kg)<br />
Maximum capacity (e.g. 30 kg)<br />
Continue as shown in example<br />
1 after entering the maximum<br />
capacity
Key ) - > 2 sec Function<br />
Allocation<br />
Purpose<br />
The key ) - > 2 sec is usually used<br />
for the calibration/adjustment function.<br />
The following additional functions can<br />
be allocated to the key when the service<br />
mode is activated:<br />
– External linearization with default<br />
weights (menu item 1.9.6)<br />
Menu structure for key ) - > 2 sec function allocation<br />
– External linearization with the linearization<br />
weights (menu item 1.9.7) entered<br />
under menu item 1.18<br />
– Setting the preload (menu item 1.9.8)<br />
– Clearing the preload (menu item 1.9.9)<br />
!Once linearization has been completed,<br />
or after a preload has been set or<br />
cleared the function of the key )- > 2<br />
sec must be reallocated back to its normal<br />
function in the Setup menu (e.g.<br />
external calibration/adjustment with<br />
default weights)<br />
1. 9. Calibration, adjustment<br />
1. 9. 1 External calibration/adjustment with default weights (service mode not required)<br />
1. 9. 3 External calibration/adjustment with user-defined weights (entered under 1-18), (service mode not required)<br />
1. 9. 6 External linearization with default weights<br />
1. 9. 7 External linearization with user-defined weights (entered under 1-18)<br />
1. 9. 8 Set preload<br />
1. 9. 9 Clear preload<br />
1. 9. 10 Key blocked<br />
Midrics 1/2<br />
17
Entering Geographical<br />
Data<br />
Purpose<br />
Entering geographical data allows<br />
the external calibration of weighing<br />
equipment at a place (e.g. at the manufacturer<br />
or vendor’s place of business)<br />
that is not the same as the place of<br />
installation. If the weighing equipment<br />
is calibrated at the place of installation,<br />
it is not necessary to enter geographical<br />
data.<br />
The sensitivity of weighing equipment<br />
changes depending on the place of<br />
installation as it is dependent on the<br />
on-site gravitational force – or, more<br />
precisely, on gravitational acceleration.<br />
Saving geographical data makes it possible<br />
to change the place of installation<br />
of the weighing equipment after external<br />
adjustment has been carried out.<br />
The calibration of weighing equipment<br />
is valid at the place of installation and<br />
within a specific tolerance zone. At<br />
3000 e this zone extends ±100 km from<br />
the set geographical latitude and ±200<br />
m from the set elevation above sea<br />
level.<br />
An exception to this is the setting for<br />
“Germany (Zone D)”:<br />
If during external calibration of weighing<br />
equipment within Germany the<br />
geographical data<br />
– 51.00° geographical latitude<br />
– 513 m elevation above sea level<br />
are entered, the weighing equipment<br />
can be used throughout Germany.<br />
Gravitational acceleration for “Germany<br />
(Zone D)” is 9.810 m/s?.<br />
On delivery the geographical data for<br />
“Germany (Zone D)” are entered in the<br />
output device.<br />
It is recommended to use the geographical<br />
data settings for “Germany (Zone<br />
D)” when calibrating and delivering the<br />
weighing equipment within Germany.<br />
Entering exact geographical data will<br />
lead to a higher level of accuracy but<br />
will also restrict the tolerance zone.<br />
Menu Structure for Entering the Geographical Data<br />
18 Midrics 1/2<br />
Set-up Information<br />
– It is only possible to enter geographical<br />
data when the menu access switch is<br />
open.<br />
– Geographical data can be entered when<br />
the service mode in the Setup menu for<br />
“WP 1” is activated. The settings are<br />
made in the corresponding Setup menu<br />
under menu item 1.20.<br />
– Either the geographical latitude in<br />
degrees (menu item 1.20.1) and elevation<br />
in m above sea level (menu item<br />
1.20.2), or the value for gravitational<br />
acceleration (menu item 1.20.3) can be<br />
entered.<br />
Gravitational acceleration takes precedence<br />
over the geographical latitude<br />
and elevation of the location: If it has<br />
been entered, input fields for latitude<br />
and elevation show the values 99999.99<br />
and 9999999 respectively. If only elevation<br />
and latitude have been entered,<br />
0000000 is displayed for gravitational<br />
acceleration.<br />
! If you return to the highest level of<br />
the Setup menu without saving the<br />
configuration parameter beforehand<br />
(menu item 1.20.4) any settings that<br />
have been made will be deleted.<br />
Procedure<br />
– Open the menu access switch. If the<br />
device is part of a verified weighing<br />
facility, this will only be possible if the<br />
verification seal is broken. The weighing<br />
equipment must then be verified again.<br />
– Activating the service mode<br />
– Select the weighing platform<br />
– Enter the geographical data for the<br />
place of calibration under menu items<br />
1.20.1 to 1.20.3 and save them under<br />
menu item 1.20.4. The data can be<br />
obtained from the relevant land registry<br />
or Ordnance Survey.<br />
– Carry out external calibration<br />
(see page 20)<br />
– After the calibration, enter the geographical<br />
data for the place of installation<br />
under menu items 1.20.1 to 1.20.3<br />
and save them under menu item 1.20.4.<br />
– Close the menu access switch.<br />
– The weighing equipment can now be<br />
operated at the place of installation,<br />
and within the abovementioned tolerance<br />
zone.<br />
Note:<br />
The set geographical values are displayed<br />
during the calibration procedure if the<br />
display of the data has been activated<br />
in the Setup menu under “utilit”<br />
menu item 8.12.2 (factory setting:<br />
8.12.1,<br />
display deactivated).<br />
When the display of the geographical<br />
data is activated the calibration procedure<br />
is as follows:<br />
If the elevation and geographical<br />
latitude are used, after the start of the<br />
calibration procedure “CAL” the word<br />
“ALTITUDE” will appear briefly followed<br />
by the set elevation (in meters above<br />
sea level). The display is confirmed<br />
using the ) key (and cancelled using<br />
the ( key). Then, the word<br />
“LATITUDE” will be displayed briefly,<br />
followed by<br />
the set geographical latitude in degrees.<br />
This can also be confirmed using the<br />
) key (and cancelled using the (<br />
key). After this, you will be prompted<br />
to place the calibration weight on the<br />
platform. If gravitational acceleration<br />
has been entered instead of elevation<br />
and geographical latitude, the word<br />
“GRAVITY” will appear briefly, followed<br />
by the set value for gravitational acceleration.<br />
The display is confirmed using<br />
the ) key (and cancelled using the<br />
( key).<br />
1. 20. Calibration location (geographical latitude and elevation; or alternatively the gravitational acceleration<br />
at the place of installation)<br />
1. 20. 1 Latitude in degrees<br />
1. 20. 2 Elevation in meters above sea level<br />
1. 20. 3 Gravitational acceleration<br />
1. 20. 4 Save values for 1. 20
Enter Calibration<br />
and Linearization Weights<br />
Purpose<br />
Entering the calibration and linearization<br />
weights<br />
Set-up information<br />
– The service mode must be activated in<br />
order for linearization weights to be<br />
entered under menu items 1.18.2 to<br />
1.18.5.<br />
– Calibration and linearization weights<br />
are entered in the Setup menu under<br />
“WP 1”. The settings are made in the<br />
corresponding Setup menu under menu<br />
item 1.18.<br />
– The service mode must be activated in<br />
order for external user-defined calibration<br />
weights to be entered under menu<br />
item 1.18.1.<br />
Menu structure for entering the calibration and linearization weights<br />
1. 18. Entering the calibration and linearization weights<br />
1. 18. 1 Entering external user-defined calibration weight (service mode not required)<br />
1. 18. 2 Enter lin. weight 1<br />
1. 18. 3 Enter lin. weight 2<br />
1. 18. 4 Enter lin. weight 3<br />
1. 18. 5 Enter lin. weight 4<br />
Changing the weight unit<br />
- Start with the indicator unplugged.<br />
- Set the Menu Switch to the “Open” position.<br />
- Plug the indicator in and, during the Display Test “88888888”, press down the<br />
( key.<br />
- The display will show “ADC-CON”, followed by “S-CODE”, and then the cursor<br />
will appear over a blank line.<br />
- Enter the “Service Code” [202122] and press ).<br />
- When the display shows “STAND.” with a lower-case “s” in the top right-hand<br />
corner, press ).<br />
- When the display shows “UNIT”, press ).<br />
- The display will show the current Unit of Measurement. (To change this, use<br />
the k key to select the required Unit of Measurement); press ).<br />
- When the display shows “Ranges”, press ).<br />
- When the display shows “SINGLE”, press ).<br />
- When the display shows “MAX.”, press ).<br />
- Enter the Maximum Weight Value and press ).<br />
- When the display shows “D”, press ).<br />
- Enter the Resolution and press ).<br />
- When the display shows “Save”, press ).<br />
- If the display shows “NO”, use the k key to select “Yes” and press ).<br />
The display will show “BUSY” and then return to the weighing mode.<br />
- Once set-up is complete, set the Menu Switch to the “Closed” position.<br />
Procedure<br />
– Activate the service mode (only necessary<br />
if linearization weights are going<br />
to be entered)<br />
– Select the weighing platform.<br />
– Enter the external user-defined calibration<br />
weight under menu item 1.18.1<br />
– Enter the external linearization weight<br />
under menu items 1.18.2 to 1.18.5.<br />
Midrics 1/2<br />
19
External Linearization<br />
Set-up information<br />
!External linearization when weighing in<br />
legal metrology is only possible when<br />
the menu access switch is open.<br />
– The external linearization function must<br />
be allocated to the key ) –> 2 (menu<br />
item 1.9.6 or 1.9.7).<br />
Procedure<br />
20 Midrics 1/2<br />
!After external linearization, close the<br />
menu access switch and reallocate the<br />
original function back to the key )<br />
–> 2 sec (e.g. external calibration/<br />
adjustment with user-defined weights)<br />
under menu item 1.9.<br />
( Zero the weighing platform.<br />
) > 2 sec Start linearization.<br />
After approximately 2 seconds you will be prompted to place the first linearization<br />
weight on the platform.<br />
Place the required amount on the platform. After a short time the difference between<br />
the measured value and the true weight of the sample will be displayed.<br />
) Save the linearization weight (cancel using the ( key).<br />
You will then be prompted to place the second linearization weight on the platform.<br />
Repeat the procedure for all required linearization weights.<br />
After the last linearization weight has been saved you will be prompted to remove any<br />
load from the weighing pan.<br />
Unload the weighing pan. After a short period of time the zero point will automatically<br />
be adopted and the indicator will automatically switch back into weighing mode.
Calibration, Adjustment<br />
Purpose<br />
The accuracy of the measurement<br />
results must be checked. This is carried<br />
out using calibration and adjustment.<br />
Perform calibration to determine the<br />
difference between the value displayed<br />
and the actual weight on the platform.<br />
Calibration does not entail making any<br />
changes within the weighing equipment.<br />
During adjustment, the difference<br />
between the measured value displayed<br />
and the true weight of a sample is corrected,<br />
or is reduced to an allowable<br />
level within maximum permissible error<br />
limits.<br />
Features<br />
The configured weighing platform<br />
determines which of the following<br />
features are available:<br />
Example<br />
External calibration and manual adjustment with standard weights<br />
– External adjustment with the weight<br />
of the factory setting – standard weight<br />
(1.9.1), not for use in verified weighing<br />
instruments<br />
– External calibration with a user-defined<br />
weight (1.9.3), not for use in verified<br />
weighing instruments<br />
– Block the key ) –> 2 sec to prevent<br />
use of the functions described above<br />
(1.9.10):<br />
– Calibration with automatic adjustment<br />
(1.10.1), not for use in verified weighing<br />
instruments<br />
– Calibration with the option of activating<br />
the adjustment function manually<br />
(1.10.2)<br />
– Adjustment prompt – flashing W symbol<br />
(1.15.2).<br />
– Block external adjustment (1.16.2)<br />
Pre-settings in Setup:<br />
1.9.1; 1.10.2<br />
( Unload and zero the scale<br />
) >2 sec Start calibration (e.g. when adjustment prompt (W Symbol) flashes)<br />
c.ext.def<br />
This display appears for 2 seconds<br />
– Display of elevation and geographical<br />
latitude, or gravitational acceleration<br />
after CAL has been displayed at the<br />
start of the calibration procedure (menu<br />
item 8.12.2). These values will only be<br />
displayed if they have been entered and<br />
activated in the service menu.<br />
For each of the parameters elevation,<br />
geographical latitude and gravitational<br />
acceleration, the term is displayed first<br />
(Altitude, Latitude or Gravity) for 1 second,<br />
and then the corresponding value<br />
is displayed continuously until you<br />
press the ) key.<br />
Note<br />
When using verified weighing instruments,<br />
the external calibration function<br />
can only be used when the menu access<br />
switch is open once the verification seal<br />
has been broken. The device must then<br />
be verified again.<br />
You will then be prompted to place the calibration/adjustment weight on the platform<br />
(e.g. 10 kg)<br />
Midrics 1/2<br />
21
22 Midrics 1/2<br />
Position the calibration/adjustment weight on the weighing platform<br />
The difference between the measured value and the true weight of the sample will be<br />
disayed with plus/minus signs.<br />
External calibration A printout will be generated if the calibration is not carried out and the procedure<br />
Nom + 10000 g can be stopped by pressing the ( key.<br />
Diff. - 2 g<br />
--------------------<br />
) Activate calibration manually (press the ( key to stop calibration/adjustment)<br />
The calibration weight is displayed once calibration is finished.<br />
-------------------- A GMP-compliant printout is generated<br />
14.01.2013 13:00<br />
Type MIS2<br />
Ser.no. 12345678<br />
Vers. 1.1007.12.1<br />
BVers. 01-25-09<br />
--------------------<br />
External calibration<br />
Nom + 10000 g<br />
Diff. - 2 g<br />
External calibration<br />
Diff. + 0 g<br />
--------------------<br />
14.01.2013 13:02<br />
Name:<br />
--------------------<br />
Unload the weighing equipment
Set Preload<br />
Set-up Information<br />
!It is only possible to set a preload when<br />
the menu access switch is open.<br />
– The function set preload (menu item<br />
1.9.8) must be allocated to the key )<br />
- > 2 sec (see page 17).<br />
!After setting a preload, close the menu<br />
access switch and reallocate the original<br />
function back to the key ) - > 2 sec<br />
(e.g. external calibration/adjustment<br />
with user-defined weights) under menu<br />
item 1.9.<br />
Calibration/Adjustment<br />
without Weights<br />
In the service menu, calibration without<br />
weights can be carried out by entering<br />
the characteristic data of the load cells<br />
(e.g. hopper weighing area with known<br />
characteristic data of the load cells)<br />
Set-up information<br />
!Calibration without weights may not<br />
be carried out on weighing equipment<br />
used in legal metrology.<br />
– Calibration without weights is only possible<br />
when the menu access switch is<br />
open in the service menu.<br />
Menu Structure for Calibration without Weights<br />
Clear Preload<br />
Set-up Information<br />
!It is only possible to clear a preload<br />
when the menu access switch is open.<br />
– The function clear preload (menu item<br />
1.9.9) must be allocated to the key )<br />
- > 2 sec (see page 17).<br />
!After clearing a preload, close the menu<br />
access switch and reallocate the original<br />
function back to the key ) - > 2 sec<br />
(e.g. external calibration/adjustment<br />
with user-defined weights) under menu<br />
item 1.9.<br />
– The parameters necessary for calibration<br />
without weights are entered in the<br />
Setup menu under “WP 1” when the<br />
service mode is activated. The settings<br />
are made in the corresponding Setup<br />
menu under menu item 1.19.<br />
– The parameter “Nominal capacity” must<br />
be entered in the unit that is set under<br />
1.7.x.<br />
– The parameter “Sensitivity” is entered<br />
in mV/V (take value from e.g. the data<br />
sheet).<br />
– Note:<br />
The data entered are saved by selecting<br />
menu item “1.19.8”. After saving, the<br />
data will no longer be able to be read.<br />
1.19 Calibration without weights (entering the characteristic data of the load cell(s))<br />
1.19.1 Nominal capacity<br />
1.19.3 Sensitivity in mV/V for cell 1 (or average value for all load cells)<br />
1.19.4 Sensitivity in mV/V for cell 2<br />
1.19.5 Sensitivity in mV/V for cell 3<br />
1.19.6 Sensitivity in mV/V for cell 4<br />
1.19.7 Dead load (zero point/offset)<br />
1.19.8 Save values for 1.19<br />
Procedure<br />
– Open the menu access switch<br />
– Activating the service mode<br />
– Select the weighing platform<br />
– Enter the nominal load of the load<br />
cell(s) under menu item 1.19.1. If the<br />
weighing platform has multiple load<br />
cells, the nominal capacity must be<br />
multiplied accordingly (e.g. 4 load cells,<br />
each of which has a capacity of 50 kg,<br />
will produce a nominal capacity<br />
of 200 kg)<br />
– Enter the sensitivity of the load cells in<br />
mV/V under menu item 1.19.3.<br />
– If the weighing platform has multiple<br />
load cells, either the individual values<br />
for the load cells will be entered in<br />
1.19.3 to 1.19.6, or the average value<br />
for all the cells will be entered in 1.19.3.<br />
– Enter the dead load of a hopper construction<br />
in mV/V in 1.19.7.<br />
– Save the values for calibration without<br />
weighing under menu item 1.19.8.<br />
– Close the menu access switch<br />
Midrics 1/2<br />
23
Enter Serial Number of the Weighing Platform<br />
setup<br />
24 Midrics 1/2<br />
Click on the menu item Setup<br />
) Select Setup device parameters<br />
wp-1<br />
k Click on the menu item Code<br />
(press key k until the code appears in the display)<br />
code<br />
) Select the menu item Code, enter the service password (see Appendix) and<br />
save, then return to menu item Code (see also page 13).<br />
code<br />
k Click on menu item Ser no<br />
(press key k until the SER no (serial number) appears in the display)<br />
ser-no<br />
) Select menu Item SER no and enter the serial number of the weighing platform<br />
) ( ( Return to “Setup” in the service mode.
Operating Design<br />
Keys<br />
Operation of the Midrics ® 1 or Midrics ®<br />
2 scale involves just a few keys.<br />
These keys have one function during<br />
measurement and another during<br />
configuration. Some of the keys have<br />
one function when pressed briefly<br />
and another activated by pressing<br />
and holding the key for longer than<br />
2 seconds.<br />
If a key is inactive, this is indicated<br />
as follows when it is pressed:<br />
– The error code “———-” is displayed<br />
for 2 seconds. The display then returns<br />
to the previous screen content.<br />
Configure the operating menu for<br />
the desired application program first<br />
(printer settings, etc.). Then you can<br />
begin weighing.<br />
Operating elements: Midrics ® 2<br />
Input<br />
Keypad Input<br />
Labeled Keys<br />
Some keys have a second function,<br />
activated by pressing and holding<br />
the key for at least 2 seconds.<br />
Whether a function is available<br />
depends on the operating state<br />
and menu settings.<br />
e On/standby<br />
(in standby mode, OFF is displayed).<br />
( – Zero the scale<br />
– Cancel calibration/adjustment<br />
) – Tare the scale<br />
k Toggle between 1 st and 2 nd weight<br />
unit, or gross and net values,<br />
or normal and 10-fold higher<br />
resolution, depending on operating<br />
menu settings<br />
p – To print: press briefly<br />
(< two seconds).<br />
Midrics 2 only:<br />
d ID key for entering product<br />
information<br />
Midrics 2 only:<br />
I View application data or manual<br />
tare values, depending on the key<br />
pressed subsequently (e.g., ))<br />
Midrics 2 only:<br />
w Toggle between display modes<br />
within an application program<br />
Midrics 2 only:<br />
O Save a value or start an application<br />
program.<br />
Midrics 2 only:<br />
r Modify a reference value<br />
Midrics 2 only:<br />
c – Quit an application or delete<br />
an input character<br />
Midrics 2 only:<br />
0, 1, 2 … 9<br />
Enter numbers, letters and other<br />
characters<br />
Midrics 1/2<br />
25
Numeric Input Through the Keypad<br />
(Midrics 2 only)<br />
§ To enter numbers (one digit at a time):<br />
Press 0, 1, 2 …9<br />
§ To save input:<br />
press the required key (e.g., )<br />
to save manual tare input)<br />
§ To delete a digit:<br />
Press c<br />
Loading a Tare Value from<br />
the Weighing Platform<br />
You can store the weight on<br />
the weighing platform; for example,<br />
as a tare weight, by pressing<br />
the ) key<br />
Input Through the<br />
Digital Input Port<br />
You can connect a remote hand switch<br />
or foot switch to the input control line,<br />
for use with all application programs.<br />
Assign one of the following functions<br />
to this switch in the operating<br />
menu, under “Control IO/ -> Control<br />
input":<br />
CTRL IO<br />
CTRL INP<br />
8<br />
CTRL OUT<br />
26 Midrics 1/2<br />
8.4 Universal IN<br />
…<br />
…<br />
…<br />
For a detailed list of menu items, please see<br />
the chapter entitled “Configuration."
Operating Design<br />
17<br />
16<br />
15<br />
14<br />
Display in Weighing Mode<br />
The illustration above shows all display<br />
segments and the symbols and other<br />
elements used during normal weighing<br />
operation.<br />
1. Bar graph<br />
– Shows the percentage of the<br />
weighing platform's capacity that<br />
is “used up" by the load on the<br />
scale (gross value), or<br />
– Shows the measured value in<br />
relation to a target value<br />
(with the Checkweighing or<br />
Classification application)<br />
2. Printing in progress<br />
13<br />
3. Display of the range on multiple-range<br />
instruments<br />
4. Indicates a net or gross value in<br />
the main display (when data is stored<br />
in tare memory)<br />
5. Identifies the value on the main<br />
display as calculated (value not valid<br />
in legal metrology)<br />
6. Battery symbol showing status of<br />
rechargeable battery (empty outline<br />
indicates battery is drained)<br />
7. GMP-compliant printing in progress<br />
(optional; with interface and “clock"<br />
options)<br />
8. Weight unit of the value displayed<br />
1 2<br />
3<br />
12<br />
11<br />
9. Numeric display; e.g., showing<br />
reference value (Midrics 2 only)<br />
Midrics 2:<br />
10. Symbol indicating data transfer:<br />
– Interface initialized<br />
– Flashes during data transfer<br />
11. Symbols for reference updating (Midrics<br />
2 only)<br />
– Auto: Depending on the weight<br />
value, a reaction is triggered<br />
in the application<br />
– Opt: Automatic reference<br />
updating has been performed<br />
(Counting application)<br />
12. Weight value or calculated value<br />
(main display)<br />
13. Application symbols for Midrics ® 2<br />
applications:<br />
A Counting<br />
B Weighing in Percent<br />
V Averaging (Animal Weighing)<br />
H Checkweighing<br />
W Classification<br />
L Totalizing<br />
R Net-total Formulation<br />
10<br />
Checkweighing towards Zero<br />
(filling to a target)<br />
9<br />
4<br />
5<br />
6<br />
7<br />
8<br />
Verified models only:<br />
14. The “zero-setting" symbol is displayed<br />
after the active scale or weighing<br />
platform has been zeroed<br />
15. Stability symbol<br />
16. Plus or minus sign for the value<br />
displayed<br />
17. Busy symbol; indicates that an internal<br />
process is in progress<br />
There are two display modes:<br />
– Normal operation (weighing mode)<br />
– Operating menu (for configuration)<br />
Weighing Mode: Display<br />
of Measured and Calculated<br />
Values (Main Display)<br />
Application, printing and battery<br />
symbols:<br />
The application symbol indicates<br />
the selected program; for example:<br />
A Counting application symbol<br />
S Printing mode active<br />
T GMP printing mode active<br />
The battery symbol b indicates<br />
the charge level of the external<br />
rechargeable battery.<br />
Midrics 1/2<br />
27
Bar graph<br />
The bar graph shows the percentage of the<br />
weighing platform's capacity that is “used<br />
up" by the load on the scale (gross value).<br />
0% Lower limit<br />
100% Upper limit<br />
The following symbols indicate tolerance<br />
levels for Checkweighing:<br />
28 Midrics 1/2<br />
Bar graph with 10% markings<br />
Minimum in Checkweighing<br />
Target in Checkweighing<br />
Maximum<br />
Plus/minus sign:<br />
+ or - for weight value or calculated<br />
value, o when the weighing platform<br />
is zeroed or tared.<br />
Measured value/result line<br />
This field shows weight values and<br />
calculated values (alphanumeric characters)<br />
Unit and stability<br />
When the weighing system reaches<br />
stability, the weight unit or the unit for<br />
a calculated value is displayed here.<br />
Tare in memory, calculated values:<br />
The following symbols may be displayed<br />
here:<br />
! Calculated value (not permitted<br />
to be used in legal-for-trade<br />
applications)<br />
NET Net value<br />
(gross weight minus tare)<br />
B/G Gross value<br />
(net value plus tare)<br />
Data in tare memory, calculated values,<br />
designation of the active weighing<br />
platform<br />
pt Identification of manual tare<br />
input when viewing tare<br />
information<br />
Saving Data in Weighing Mode<br />
All of the application parameters<br />
saved (e.g., reference values) remain in<br />
memory and are still available after<br />
– the Midrics has been switched off<br />
and back on again, or<br />
– you return to the originally selected<br />
application from a second one (e.g.,<br />
when you switch from Averaging back<br />
to Counting, all parameters saved<br />
for Counting are available)
Display of menu settings: Text menu (example) Display of menu settings: Numeric menu (example)<br />
Operating Menu Navigation<br />
The keys below the readout let you<br />
navigate the menu and define parameters<br />
for configuration.<br />
Opening the Menu<br />
Press the e key to switch the Midrics<br />
off and then on again; while all segments<br />
are displayed, press the ) key briefly.<br />
Navigating the Menu<br />
( Close the active submenu and<br />
return to the next higher menu level<br />
(“back")<br />
) – Press briefly:<br />
Select and save a menu item<br />
– Press and hold (> 2 seconds):<br />
Exit the menu<br />
k Show the next item on the same<br />
menu level (the display scrolls<br />
through all items in series)<br />
p Print the menu settings starting<br />
from the current position, or print<br />
Info data<br />
Alphanumeric Input in the Menu<br />
( – Press briefly:<br />
Activate character to the left<br />
of the current character<br />
(when first character is active:<br />
exit input mode without saving<br />
changes)<br />
– Press and hold (> 2 seconds):<br />
Exit input mode without saving<br />
changes<br />
) – Press briefly:<br />
Confirm currently active character<br />
and move cursor 1 position to<br />
the right (after the last character:<br />
save input)<br />
– Press and hold (> 2 sec ):<br />
Save current input and display<br />
the menu item<br />
k – Cursor in first position,<br />
no characters entered yet:<br />
Delete character(s) and enter 0<br />
– Change the displayed character;<br />
scroll forward (sequence:<br />
0 through 9, decimal point,<br />
minus sign, A to Z, space)<br />
p – Cursor in first position,<br />
no characters entered yet: Delete<br />
entire string and enter a space<br />
– Change the displayed character;<br />
scroll backwards (sequence:<br />
space, Z to A, minus sign, decimal<br />
point, 9 through 0)<br />
Numeric input in Midrics 2 operating<br />
menu:<br />
Enter values (date and time, etc.) using<br />
the 10-key numeric keypad<br />
Display of Menu Settings<br />
The illustrations above show examples<br />
of the main display during menu<br />
configuration.<br />
1 Selected menu item on the text<br />
level (e.g. printer, for configuring<br />
the connected printer)<br />
2 Menu history (indicates the highest<br />
menu level)<br />
3 Indication that there are other<br />
submenus<br />
4 Highest level in numeric menu<br />
5 Second level in numeric menu<br />
6 Third level in numeric menu<br />
Errors<br />
– If a key is inactive, “-------" or<br />
“No function" is displayed briefly<br />
(2 seconds)<br />
– Temporary errors are displayed for<br />
2 seconds in the measured value/result<br />
line (e.g., Inf 09); fatal errors are<br />
displayed steadily (e.g., Err 101) until<br />
the Midrics is reset (switched off and<br />
then on again).<br />
For a detailed description,<br />
see “Error Codes" on page 89.<br />
Data Output<br />
Printer<br />
You can connect two strip or label<br />
printers to the Midrics 1 or Midrics 2<br />
and have printouts generated at the<br />
press of a key or automatically. You can<br />
also configure separate summarized<br />
printouts, and print a list of the active<br />
menu settings. See “Configuring<br />
Printouts" on page 82 for details.<br />
Backup<br />
Application parameters (such as<br />
reference values) are saved when you<br />
change application programs or switch<br />
off the Midrics. You can assign a password<br />
to prevent unauthorized users<br />
from changing settings in the “Device<br />
parameters" menu under:<br />
Setup<br />
Password<br />
See also pages 31 and 48.<br />
Midrics 1/2<br />
29
Configuration<br />
You can configure the Midrics scale<br />
by selecting parameters in the operating<br />
menu. The parameters are combined<br />
in the following groups (this is the<br />
highest menu level):<br />
– Application parameters<br />
– Fn key function<br />
– Device parameters (“Setup")<br />
– Device-specific information (“Info")<br />
– Language<br />
When the scale is used in legal<br />
metrology, not all parameters can<br />
be accessed.<br />
Factory-set parameters are identified<br />
by an asterisk (“*") in the list starting<br />
on page 33.<br />
You can choose from six language<br />
settings for the display of information:<br />
– German<br />
– English (factory setting)<br />
– English with U.S. date/time format<br />
– French<br />
– Italian<br />
– Spanish<br />
Printing parameter settings:<br />
§ Open the operating menu and<br />
press the p key<br />
Scope of printout:<br />
Depends on the active menu level<br />
Setting the Language<br />
30 Midrics 1/2<br />
Setting the Language<br />
Example: Selecting “U.S. Mode" for the language<br />
e<br />
)<br />
k<br />
)<br />
k<br />
U.S. Mode<br />
)<br />
U.S. Mode<br />
(<br />
Switch on the scale<br />
While all segments are lit,<br />
press the ) key<br />
The first item in the main menu is shown:<br />
APPL<br />
Switch to the LANG. menu item<br />
(press k repeatedly until LANG.<br />
is shown)<br />
Select LANG. to open the submenu<br />
for setting the language<br />
The currently active language setting<br />
is shown<br />
Press k repeatedly until U.S. Mode<br />
is displayed<br />
Confirm this menu item<br />
Exit this menu level and configure<br />
other settings as desired, or<br />
) (press and hold) Exit the operating menu
Entering or Changing the Password<br />
Example:<br />
Assign a password (in this example, AB2) to protect the application program settings APPL<br />
and the device parameters SETUP from unauthorized changes<br />
e<br />
)<br />
k<br />
)<br />
k<br />
)<br />
p, p<br />
)<br />
1. Switch on the scale<br />
2. While all segments are lit,<br />
press the ) key<br />
The first item in the main<br />
menu is shown: APPL<br />
3. Select the SETUP menu item<br />
(press k repeatedly until<br />
SETUP is displayed)<br />
4. Open the SETUP menu<br />
5. Select the PASSWORD menu<br />
item (press k repeatedly<br />
until PASSWORD is displayed)<br />
6. Open the PASSWORD menu<br />
7. Enter the first character<br />
using the p and k keys<br />
(in this example: A)<br />
8. Save the character<br />
p, p, p 9. Enter the second character<br />
using the p and k keys<br />
(in this example: B)<br />
)<br />
10. Save the character<br />
k, k, k, 11. Enter the third character<br />
using the p and k keys<br />
(in this example: 2)<br />
)<br />
(<br />
)<br />
12. Save the password<br />
13. Exit this menu level<br />
to configure other menu<br />
settings, or<br />
14. Exit the operating menu<br />
(press and hold the ) key)<br />
To modify or delete a password:<br />
Overwrite the old password<br />
with the new password, or enter<br />
a space as the password and<br />
press ) to confirm<br />
Midrics 1/2<br />
31
Configuration<br />
Operating Menu Overview<br />
You can configure the Midrics to meet<br />
individual requirements by entering<br />
user data and setting selected parameters<br />
in the operating menu.<br />
1 st level 2 nd level Function<br />
display display<br />
Menu<br />
appl Select and configure application programs<br />
W Basic weighing function<br />
Z Counting<br />
Z nm_ Neutral Measurement<br />
V Averaging (animal weighing)<br />
O Checkweighing<br />
W Classification<br />
L Weighing in percent<br />
R Net-total formulation<br />
L Totalizing<br />
Fn-Key Define the function of the k key<br />
off No function<br />
gro net Gross/net toggling<br />
2.unit Toggle between weight units<br />
res 10 10-fold increased resolution<br />
Setup Adapt Midrics to user requirements<br />
wp1 Settings for weighing instrument on WP1<br />
com1 Settings for the RS-232 interface<br />
UNICOM Settings for the optional second interface<br />
ctrl 10 Assign a function to the control inputs/output<br />
32 Midrics 1/2<br />
Menu levels are identified by texts, and numeric codes identify the individual settings.<br />
prtprot Configure the printout<br />
Utilit Operating parameters<br />
time Set the time<br />
Date Set the date<br />
password Enter a password to protect menu settings<br />
Info View device-specific information (service date, serial number, etc.)<br />
Lang Select language for calibration, adjustment and GMP printouts<br />
deutsch German<br />
english English<br />
u.s. mode English with U.S. date/time format<br />
franc. French<br />
ital. Italian<br />
espanol Spanish<br />
= Setting/function available on Midrics 2 only
Operating Menu<br />
* Factory setting<br />
= Setting/function available on Midrics 2 only<br />
Menu<br />
appl Application Programs<br />
W Basic weighing function<br />
3.5. Minimum load for automatic taring and automatic printing<br />
3.5.1* 1 digit<br />
3.5.2 2 digits<br />
3.5.3 5 digits<br />
3.5.4 10 digits<br />
3.5.5 20 digits<br />
3.5.6 50 digits<br />
3.5.7 100 digits<br />
3.5.8 200 digits<br />
3.5.9 500 digits<br />
3.5.10 1000 digits<br />
3.7. Automatic taring: first weight tared<br />
3.7.1* Off<br />
3.7.2 On<br />
9.1. Factory settings for all application programs<br />
9.1.1 Yes<br />
9.1.2* No<br />
Z Counting<br />
3.5. Minimum load for automatic taring and automatic printing<br />
Numeric menu as for Weighing<br />
3.6. Minimum load for initialization<br />
3.6.1* 1 digit<br />
3.6.2 2 digits<br />
3.6.3 5 digits<br />
3.6.4 10 digits<br />
3.6.5 20 digits<br />
3.6.6 50 digits<br />
3.6.7 100 digits<br />
3.6.8 200 digits<br />
3.6.9 500 digits<br />
3.6.10 1000 digits<br />
3.7. Automatic taring: first weight tared<br />
3.7.1* Off<br />
3.7.2 On<br />
3.8. Start application and load most recent application data when the Midrics is switched on<br />
3.8.1 Automatic (on)<br />
3.8.2* Manual (off)<br />
3.9. Resolution for calculation of reference value<br />
3.9.1* Display resolution<br />
3.9.2 Display resolution + 1 decimal place<br />
3.9.3 Display resolution + 2 decimal places<br />
3.9.4 Internal resolution<br />
3.11. Parameter for saving weight values (“storage parameter")<br />
3.11.1* At stability<br />
3.11.2 At increased stability<br />
3.12. Reference sample updating (“APW update")<br />
3.12.1 Off<br />
3.12.3* Automatic<br />
3.25. Tare function<br />
3.25.1* Add input value (weight value) for taring<br />
3.25.2 Tare value can be overwritten<br />
9.1. Factory settings for all application programs<br />
9.1.1 Yes<br />
9.1.2* No<br />
Midrics 1/2<br />
33
Configuration<br />
appl<br />
34 Midrics 1/2<br />
Z nm Neutral Measurement<br />
3.5. Minimum load for automatic taring and automatic printing<br />
Numeric menu as for Weighing<br />
3.6. Minimum load for initialization<br />
Numeric menu as for Counting<br />
3.7. Automatic taring: first weight tared<br />
3.7.1* Off<br />
3.7.2 On<br />
3.8. Start application and load most recent application data when the Midrics is switched on<br />
3.8.1 Automatic (on)<br />
3.8.2* Manual (off)<br />
3.9. Resolution for calculation of reference value<br />
3.9.1* Display resolution<br />
3.9.2 Display resolution + 1 decimal place<br />
3.9.3 Display resolution + 2 decimal places<br />
3.9.4 Internal resolution<br />
3.10. Decimal places in displayed result<br />
3.10.1* None<br />
3.10.2 1 decimal place<br />
3.10.3 2 decimal places<br />
3.10.4 3 decimal places<br />
3.11. Parameter for saving weight values<br />
3.11.1* At stability<br />
3.11.2 At increased stability<br />
3.25. Tare function<br />
3.25.1* Add input value (weight value) for taring<br />
3.25.2 Tare value can be overwritten<br />
9.1. Factory settings for all application programs<br />
9.1.1 Yes<br />
9.1.2* No<br />
V Averaging (Animal Weighing)<br />
3.5. Minimum load for automatic taring and automatic printing<br />
Numeric menu as for Weighing<br />
3.6. Minimum load for automatic start<br />
Numeric menu as for Counting<br />
3.7. Automatic taring: first weight tared<br />
3.7.1* Off<br />
3.7.2 On<br />
3.8. Start application and load most recent application data when the Midrics is switched on<br />
3.8.1 Automatic (on)<br />
3.8.2* Manual (off)<br />
3.18. Start of averaging routine<br />
3.18.1* Manual<br />
3.18.2 Automatic<br />
3.19. Animal activity<br />
3.19.1 0.1% of the animal/object<br />
3.19.2* 0.2% of the animal/object<br />
3.19.3 0.5% of the animal/object<br />
3.19.4 1% of the animal/object<br />
3.19.5 2% of the animal/object<br />
3.19.6 5% of the animal/object<br />
3.19.7 10% of the animal/object<br />
3.19.8 20% of the animal/object<br />
3.19.9 50% of the animal/object<br />
3.19.10 100 % of the animal/object<br />
3.20. Automatic printout of results<br />
3.20.1* Off<br />
3.20.2 On
appl<br />
V Averaging (Animal Weighing)<br />
3.21. Static display of result after load removed<br />
3.21.1* Display is static until unload threshold reached<br />
3.21.2 Display is static until c is pressed<br />
3.25. Tare function<br />
3.25.1* Add input value (weight value) for taring<br />
3.25.2 Tare value can be overwritten<br />
9.1. Factory settings for all application programs<br />
9.1.1 Yes<br />
9.1.2* No<br />
O Checkweighing<br />
3.5. Minimum load for automatic taring and automatic printing<br />
Numeric menu as for Weighing<br />
3.6. Minimum load for initialization<br />
Numeric menu as for Counting<br />
3.7. Automatic taring: first weight tared<br />
3.7.1* Off<br />
3.7.2 On<br />
3.8. Start application and load most recent application data when the Midrics is switched on<br />
3.8.1 Automatic (on)<br />
3.8.2* Manual (off)<br />
3.25. Tare function<br />
3.25.1* Add input value (weight value) for taring<br />
3.25.2 Tare value can be overwritten<br />
4.2. Checkweighing range<br />
4.2.1* 30 to 170%<br />
4.2.2 10% to infinity<br />
4.3. Activate control line for “Set” as:<br />
4.3.1* “Set” output<br />
4.3.2 Ready to operate (for process control systems)<br />
4.4. Activation of outputs<br />
4.4.1 Off<br />
4.4.2 Always active<br />
4.4.3 Active at stability<br />
4.4.4* Active within checkweighing range<br />
4.4.5 Active at stability within the checkweighing range<br />
4.5. Parameter input<br />
4.5.1* Min, max, target<br />
4.5.2 Only target with percent limits<br />
4.6. Automatic printing<br />
4.6.1* Off<br />
4.6.2 On<br />
4.6.3 Only values within tolerance<br />
4.6.4 Only values outside tolerance<br />
4.7. Checkweighing towards Zero<br />
4.7.1* Off<br />
4.7.2 On<br />
9.1. Factory settings for all application programs<br />
9.1.1 Yes<br />
9.1.2* No<br />
W Classification<br />
3.5. Minimum load for automatic taring and automatic printing<br />
Numeric menu as for Weighing<br />
3.6. Minimum load for initialization<br />
Numeric menu as for Counting<br />
3.7. Automatic taring: first weight tared<br />
3.7.1* Off<br />
3.7.2 On<br />
Midrics 1/2<br />
35
Configuration<br />
appl<br />
36 Midrics 1/2<br />
W Classification<br />
3.8. Start application and load most recent application data when the Midrics is switched on<br />
3.8.1 Automatic (on)<br />
3.8.2* Manual (off)<br />
3.25. Tare function<br />
3.25.1* Add input value (weight value) for taring<br />
3.25.2 Tare value can be overwritten<br />
4.3. Activate control line for “Set” as:<br />
4.3.1* “Set” output<br />
4.3.2 Ready to operate (for process control systems)<br />
4.7. Activation of outputs<br />
4.7.1 Off<br />
4.7.2 Always active<br />
4.7.3* Active at stability<br />
4.8. Number of classes<br />
4.8.1* 3 classes<br />
4.8.2 5 classes<br />
4.9. Parameter input<br />
4.9.1* Weight values<br />
4.9.2 Percentage<br />
4.10. Automatic printing<br />
4.10.1* Off<br />
4.10.2 On<br />
9.1. Factory settings for all application programs<br />
9.1.1 Yes<br />
9.1.2* No<br />
L Weighing in Percent<br />
3.5. Minimum load for automatic taring and automatic printing<br />
Numeric menu as for Weighing<br />
3.6. Minimum load for initialization<br />
Numeric menu as for Counting<br />
3.7. Automatic taring: first weight tared<br />
3.7.1* Off<br />
3.7.2 On<br />
3.8. Start application and load most recent application data when the Midrics is switched on<br />
3.8.1 Automatic (on)<br />
3.8.2* Manual (off)<br />
3.9. Resolution for calculation of reference value<br />
3.9.1* Display resolution<br />
3.9.2 Display resolution + 1 decimal place<br />
3.9.3 Display resolution + 2 decimal places<br />
3.9.4 Internal resolution<br />
3.10. Decimal places in displayed result<br />
3.10.1* None<br />
3.10.2 1 decimal place<br />
3.10.3 2 decimal places<br />
3.10.4 3 decimal places<br />
3.11. Parameter for saving weight values<br />
3.11.1* At stability<br />
3.11.2 At increased stability<br />
3.15. Display<br />
3.15.1* Residue<br />
3.15.2 Loss<br />
3.25. Tare function<br />
3.25.1* Add input value (weight value) for taring<br />
3.25.2 Tare value can be overwritten<br />
9.1. Factory settings for all application programs<br />
9.1.1 Yes<br />
9.1.2* No
appl<br />
R Net-total Formulation (2 nd Tare Memory)<br />
3.5. Minimum load for automatic taring and automatic printing<br />
Numeric menu as for Weighing<br />
3.6. Minimum load for automatically saving/transferring values<br />
Numeric menu as for Counting<br />
3.7. Automatic taring: first weight tared<br />
3.7.1* Off<br />
3.7.2 On<br />
3.17. Printout when value is saved in totalizing memory<br />
3.17.1 Automatic printout of results off<br />
3.17.2* Generate printout with complete standard configuration each time O is pressed<br />
3.17.3 Generate printout with complete standard configuration only the first time O is pressed<br />
3.25. Tare function<br />
3.25.1* Add input value (weight value) for taring<br />
3.25.2 Tare value can be overwritten<br />
9.1. Factory settings for all application programs<br />
9.1.1 Yes<br />
9.1.2* No<br />
L Totalizing<br />
3.5. Minimum load for automatic taring and automatic printing<br />
Numeric menu as for Weighing<br />
3.6. Minimum load for automatically saving/transferring values<br />
Numeric menu as for Counting<br />
3.7. Automatic taring: first weight tared<br />
3.7.1* Off<br />
3.7.2 On<br />
3.8. Start application and load most recent application data when the Midrics is switched on<br />
3.8.1 Automatic (on)<br />
3.8.2* Manual (off)<br />
3.16. Values saved automatically<br />
3.16.1* Off<br />
3.16.2 On<br />
3.17. Individual component data printed when value is added to totalizing memory<br />
3.17.1 Automatic printout of results off<br />
3.17.2* Individual printout of a totalizing item when O is pressed<br />
3.17.3 Components of transaction printed when O is pressed<br />
9.1. Factory settings for all application programs<br />
9.1.1 Yes<br />
9.1.2* No<br />
fn-key k Key Assignment<br />
off * No k key function<br />
gro net Gross/net toggling<br />
2. unit Show 2 nd Weight unit<br />
res 10 10-fold increased resolution Display: max. 5 seconds<br />
Midrics 1/2<br />
37
Configuration<br />
Setup Device Parameters<br />
38 Midrics 1/2<br />
Password prompt displayed if a password is configured<br />
wp-1 1 Weighing platform 1<br />
(Display designation of this menu level: 1)<br />
1.1. Adapt weighing instrument to ambient conditions (adapt filter)<br />
1.1.1 Very stable conditions<br />
1.1.2* Stable conditions<br />
1.1.3 Unstable conditions<br />
1.1.4 Very unstable conditions<br />
1.2. Application filter<br />
1.2.1* Final readout<br />
1.2.2 Filling mode<br />
1.2.3 Low filtering<br />
1.2.4 Without filtering<br />
1.3. Stability range<br />
1.3.1 4 digit<br />
1.3.2 1 digit<br />
1.3.3 1 digit 1)<br />
1.3.4* 2 digits 1)<br />
1.3.5 4 digits 1)<br />
1.3.6 8 digits 1)<br />
1.4. Stability symbol delay<br />
1.4.1 No delay<br />
1.4.2* Short delay<br />
1.4.3 Average delay<br />
1.4.4 Long delay<br />
1.5. Taring 1)<br />
1.5.1 Without stability<br />
1.5.2* After stability<br />
1.6. Auto zero<br />
1.6.1* On<br />
1.6.2 Off<br />
1.7. Weight Unit 1 2)<br />
1.7.1 Grams / o<br />
1.7.2 Grams / g<br />
1.7.3 Kilograms / kg<br />
1.7.4 Carats / ct 1)<br />
1.7.5 Pounds / lb 1)<br />
1.7.6 Ounces / oz 1)<br />
1.7.7 Troy ounces / ozt 1)<br />
1.7.8 Hong Kong taels / tlh 1)<br />
1.7.9 Singapore taels / tls 1)<br />
1.7.10 Taiwanese taels / tlt 1)<br />
1.7.11 Grains /GN 1)<br />
1.7.12 Pennyweights / dwt 1)<br />
1.7.14 Parts per pound / lb 1)<br />
1.7.15 Chinese taels / tlc 1)<br />
1.7.16 Mommes / mom 1)<br />
1.7.17 Austrian carats / k 1)<br />
1.7.18 Tola / tol 1)<br />
1.7.19 Baht / bat 1)<br />
1.7.20 Mesghal / MS 1)<br />
1.7.21 Tons / t<br />
1.7.22 Pounds: ounces (lb:oz) 1)<br />
1.8. Display accuracy 1 1)<br />
1.8.1* All digits<br />
1.8.2 Reduced by 1 decimal place for load change<br />
1.8.14 10-fold increased resolution<br />
1.8.15 Resolution increased by 2 scale intervals (e.g., 5 g to 1 g)<br />
1.8.16 Resolution increased by 1 scale interval<br />
(e.g., from 2 g to 1 g or from 10 g to 5 g)<br />
1) Not available on instruments verified for use in legal metrology<br />
2) Depends on weighing platform model
Setup wp-1 1<br />
1.9. Calibration and adjustment<br />
1.9.1* External calibration/adjustment; default weight<br />
1.9.3 External calibration/adjustment; weight can be selected under menu item 1.18.1<br />
1.9.8. Set preload<br />
1.9.9. Clear preload<br />
1.9.10 No function when you press and hold ) > 2 sec<br />
1.10. Calibration/adjustment sequence<br />
1.10.1 Calibration with automatic adjustment<br />
1.10.2* Calibration with adjustment triggered manually<br />
1.11. Zero-setting range<br />
1.11.1 1 percent/max. cap.<br />
1.11.2* 2 percent/max.cap.<br />
1.12. Initial zero-setting range<br />
1.12.2 2 percent/max. cap.<br />
1.12.3 5 percent/max.cap. (setting depends on model)<br />
1.12.4* 10 percent/max.cap.<br />
1.13. Tare/zero at power on<br />
1.13.1* On<br />
1.13.2 Off, load previous tare value<br />
1.13.3 Only zero at power on<br />
1.16. External calibration/adjustment 1)<br />
1.16.1* Accessible<br />
1.16.2 2) Blocked<br />
1.17. Calibration weight unit<br />
1.17.1 Grams<br />
1.17.3* Tons<br />
1.17.4 Pounds 1)<br />
1.18. Enter calibration weight<br />
1.18.1 External user-defined weight (enter value; e.g.: 10,000 kg)<br />
3.1. Weight unit 2 3)<br />
3.1.1 Grams / o<br />
3.1.2 Grams / g<br />
3.1.3* Kilograms / kg<br />
3.1.4 Carats /ct 1)<br />
3.1.5 Pounds /lb 1)<br />
3.1.6 Ounces /oz 1)<br />
3.1.7 Troy ounces / ozt 1)<br />
3.1.8 Hong Kong taels / tlh 1)<br />
3.1.9 Singapore taels / tls 1)<br />
3.1.10 Taiwanese taels / tlt 1)<br />
3.1.11 Grains / GN 1)<br />
3.1.12 Pennyweights / dwt 1)<br />
3.1.14 Parts per pound / lb 1)<br />
3.1.15 Chinese taels / tlc 1)<br />
3.1.16 Mommes / mom 1)<br />
3.1.17 Austrian carats /k 1)<br />
3.1.18 Tola / tol 1)<br />
3.1.19 Baht / bat 1)<br />
3.1.20 Mesghal / MS 1)<br />
3.1.21 Tons / t<br />
3.1.22 Pounds:ounces (lb:oz) 1)<br />
3.2. Display accuracy 2 1)<br />
3.2.1* All digits<br />
3.2.2 Reduced by 1 decimal place for load change<br />
3.2.14 10-fold increased resolution<br />
3.2.15 Resolution increased by 2 scale intervals (e.g., 5 g to 1 g)<br />
3.2.16 Resolution increased by 1 scale interval (e.g., 2 g to 1 g or from 10 g to 5 g)<br />
3.3. Weight unit 3 3) (settings as for 3.1, “Weight unit 2”)<br />
3.4. Display accuracy 3) (settings as for 3.2, “Display accuracy 2”)<br />
9.1. Restore factory settings in WP1 numeric menu<br />
9.1.1 Yes<br />
9.1.2* No<br />
1) = Not available on instruments verified for use in legal metrology<br />
2) = Factory setting on instrument verified for use in legal metrology<br />
3) = Menu depends on weighing platform model<br />
Midrics 1/2<br />
39
Setup Com1 2<br />
1) Menu depends on weighing platform model<br />
3) not with setting 5.6.1 (7 bits)<br />
40 Midrics 1/2<br />
off * Off<br />
datProt Data protocol<br />
Interface port 1 (optional)<br />
(Display designation of this menu level: 2)<br />
sbi* SBI: standard version<br />
5.1. Baud rate<br />
5.1.1 150 baud<br />
5.1.2 300 baud<br />
5.1.3 600 baud<br />
5.1.4* 1200 baud<br />
5.1.5 2400 baud<br />
5.1.6 4800 baud<br />
5.1.7 9600 baud<br />
5.1.8 19,200 baud<br />
5.2. Parity<br />
5.2.2 Space 2)<br />
5.2.3 Odd<br />
5.2.4 Even<br />
5.2.5 None 3)<br />
5.3. Number of stop bits<br />
5.3.1* 1 stop bit<br />
5.3.2 2 stop bits<br />
5.4. Handshake mode<br />
5.4.1 Software handshake<br />
5.4.3* Hardware handshake, 1 character after CTS<br />
5.6. Number of data bits<br />
5.6.1* 7 data bits<br />
5.6.2 8 data bits<br />
6.1. Data output: manual/automatic<br />
6.1.1 Manual without stability<br />
6.1.2* Manual after stability<br />
6.1.4 Automatic without stability<br />
6.1.5 Automatic with stability<br />
6.1.7 Protocol for computer (PC)<br />
6.3. Time-dependent automatic data output<br />
6.3.1* 1 display update<br />
6.3.2 2 display updates<br />
6.3.4 10 display updates<br />
6.3.7 100 display updates<br />
7.2. Data output: line format for printout<br />
7.2.1 For raw data: 16 characters<br />
7.2.2* For other applications: 22 characters<br />
9.1. Restore factory settings in numeric menu COM1: SBI<br />
9.1.1 Yes<br />
9.1.2* No<br />
xbpi-232 XBPI-232<br />
2) not with setting 5.6.2 (8 bits)
Setup Com1 2<br />
datProt<br />
SMA SMA interface function<br />
5.1. Baud rate<br />
5.1.1 150 baud<br />
5.1.2 300 baud<br />
5.1.3 600 baud<br />
5.1.4 1200 baud<br />
5.1.5 2400 baud<br />
5.1.6 4800 baud<br />
5.1.7* 9600 baud<br />
5.1.8 19,200 baud<br />
5.2. through 5.6.<br />
Numeric menu as for SBI<br />
Printer Printer configuration<br />
YDP01IS YDP01IS<br />
line* Strip printer<br />
label Label printer<br />
lab ff Label printer with manual feed<br />
YDP02 YDP02 variants<br />
5.1. Baud rate<br />
5.1.4* 1200 baud<br />
5.1.5 2400 baud<br />
5.1.6 4800 baud<br />
5.1.7 9600 baud<br />
5.2. Parity<br />
5.2.2 Space<br />
5.2.3* Odd<br />
5.2.4 Even<br />
5.3. Number of stop bits<br />
5.2.2 Space<br />
5.3.1* 1 stop bit<br />
5.3.2 2 stop bits<br />
5.4. Handshake mode<br />
5.4.1 Software handshake<br />
5.4.3* Hardware handshake, 1 character after CTS<br />
YDP03 YDP03-0CE<br />
5.1. Baud rate<br />
5.1.4* 1200 baud<br />
5.1.5 2400 baud<br />
5.1.6 4800 baud<br />
5.1.7 9600 baud<br />
5.1.8 19,200 baud<br />
5.2. through 5.4.<br />
Numeric menu as for COM02<br />
YDP02IS YDP02IS<br />
line* Strip printer<br />
label Label printer<br />
Midrics 1/2<br />
41
Setup Com1 2<br />
1) not with setting 5.6.2 (8 bit)<br />
2) not with setting 5.6.1 (7 bits)<br />
42 Midrics 1/2<br />
Printer<br />
Uni-pri Universal interface<br />
5.1. Baud rate<br />
5.1.1 150 baud<br />
5.1.2 300 baud<br />
5.1.3 600 baud<br />
5.1.4 1200 baud<br />
5.1.5 2400 baud<br />
5.1.6 4800 baud<br />
5.1.7* 9600 baud<br />
5.1.8 19,200 baud<br />
5.2. Parity<br />
5.2.2 Space 1)<br />
5.2.3 Odd<br />
5.2.4 Even<br />
5.2.5* None 2)<br />
5.3. Number of stop bits<br />
5.3.1* 1 stop bit<br />
5.3.2 2 stop bits<br />
5.4. Handshake mode<br />
5.4.1* Software handshake<br />
5.4.3 Hardware handshake, 1 character after CTS<br />
5.6. Number of data bits<br />
5.6.1 7 data bits<br />
5.6.2* 8 data bits<br />
YDP04IS* YDP04IS<br />
line* Strip printer<br />
label Label printer<br />
lab ff Label printer with manual feed<br />
Yam01is YAM01IS as electronic memory for print data<br />
Memory Verifiable data memory<br />
Yam01is YAM01IS external data memory<br />
Off Disabled
Setup unicom 3<br />
off * Off<br />
datprot Data protocol<br />
Interface port 2 (Optional)<br />
(Display designation of this menu level: 3)<br />
sbi* SBI: standard version<br />
5.1. through 9.1.<br />
Numeric menu as for COM1<br />
bpi-232 XBPI-232<br />
bpi-485 XBPI-485<br />
0 to 31 Network address: From 0 to 31 inclusive<br />
sma SMA interface function<br />
5.1. through 5.6.<br />
Numeric menu as for COM1<br />
ETHEr Ethernet<br />
src-ip Source IP: 192.168.0.1*<br />
src.name Source name (16 characters maximum)<br />
lis.port Listen on port: 49155*<br />
subnet Subnet mask: 255.255.255.0*<br />
gate-ip Gateway IP: 0.0.0.0*<br />
dest-ip Destination IP: 0.0.0.0*<br />
dest.por Destination port: 49155*<br />
Protocol TCP*<br />
UDP<br />
Mode SBI (server)* 6.1. Manual output/automatic<br />
6.1.1 Manual without stability<br />
6.1.2 * Manual after stability<br />
6.1.4 Automatic without stability<br />
6.1.5 Automatic with stability<br />
6.1.7 Data record for computer printout<br />
7.2. Data output: line format for printout<br />
7.2.1 For raw data: 16 characters<br />
7.2.2* For other apps.: 22 characters<br />
SBI-C/S 6.1. Manual output/automatic<br />
6.1.1 Manual without stability<br />
6.1.2 * Manual after stability<br />
6.1.4 Automatic without stability<br />
6.1.5 Automatic with stability<br />
6.1.7 Data record for computer printout<br />
6.3. Time-dependent automatic data output<br />
6.3.1 * 1 display update<br />
6.3.2 2 display updates<br />
6.3.4 10 display updates<br />
6.3.7 100 display updates<br />
7.2. Data output: line format for printout<br />
7.2.1 For raw data: 16 characters<br />
Midrics 1/2<br />
43
Setup uniCom1 3 Second interface (optional)<br />
44 Midrics 1/2<br />
Printer Printer configuration<br />
YDP01IS YDP01IS<br />
line* Strip printer<br />
label Label printer<br />
lab ff Label printer with manual feed<br />
YDP02 YDP02<br />
5.1. through 5.4.<br />
Numeric menu as for COM1<br />
YDP03 YDP03-0CE<br />
5.1. through 5.4.<br />
Numeric menu as for COM1<br />
YDP02IS YDP02IS<br />
line* Strip printer<br />
label Label printer<br />
Uni-pri Universal interface<br />
5.1. through 5.6.<br />
Numeric menu as for COM1<br />
YDP04IS* YDP04IS<br />
line* Strip printer<br />
label Label printer<br />
lab ff Label printer with manual feed<br />
yam01is YAM01IS as electronic memory for print data<br />
Analog Analog data output port for PLC operation<br />
8.12. Analog output: value<br />
8.12.1* Net value<br />
8.12.2 Gross value<br />
8.13. Analog output: error indicator<br />
8.13.1* High level (20 mA)<br />
8.13.2 Low level (0/4 mA). When menu is open or during calibration:<br />
0/4 mA on this interface.<br />
8.14. Analog output: mode<br />
8.14.1* 1) Zero to maximum capacity<br />
8.14.2 Minimum/maximum values<br />
8.15. Analog output: min./max.<br />
8.15.1 2) Min. (0/4 mA) input in kg<br />
8.15.2 Max. (20 mA) input in kg<br />
Memory Verifiable data memory<br />
yam01is YAM01IS external data memory<br />
1) When setting 8.14.1 is active, analog data output only works for XBPI weighing instruments<br />
2) not with setting 8.14.1
Setup ctrl io 5<br />
ctr inp Control inputs<br />
Control inputs/outputs<br />
(Display designation of this menu level: 5)<br />
For YDO01M-232CO; Option A1<br />
8.4. Function for external control inputs (TTL)<br />
8.4.1* Trigger p key function<br />
8.4.2 Trigger p key (> 2 sec) function<br />
8.4.3 Trigger ) key function<br />
8.4.4 Trigger ) key (> 2 sec) function<br />
8.4.5 Trigger k key function<br />
8.4.7 Trigger O key function Midrics 2 only<br />
8.4.8 Combined zero/tare function<br />
8.4.9 Trigger ( key function<br />
8.4.10 Trigger p key function<br />
8.4.11 Trigger c key function Midrics 2 only<br />
8.4.12 Trigger I key function Midrics 2 only<br />
For YDO01M-IO; Option A5<br />
8.17. External input 1<br />
8.17.1 Trigger p key function<br />
<br />
8.17.12 Trigger I key function Midrics 2 only<br />
8.18. External input 2<br />
8.26.1 Trigger p key function<br />
<br />
8.18.12 Trigger I key function Midrics 2 only<br />
8.19. External input 3<br />
8.27.1 Trigger p key function<br />
<br />
8.19.12 Trigger I key function Midrics 2 only<br />
8.20. External input 4<br />
8.28.1 Trigger p key function<br />
<br />
8.20.12 Trigger I key function Midrics 2 only<br />
8.21. External input 5<br />
8.21.1 Trigger p key function<br />
<br />
8.21.12 Trigger I key function Midrics 2 only<br />
ctr out Control outputs<br />
For YDO01M-IO; Option A5<br />
8.24. External output 1<br />
8.24.1* Weighing instrument ready to operate<br />
8.24.2 Weighing instrument stable<br />
8.24.3 Weighing instrument overflow (“H")<br />
8.24.4 Weighing instrument underflow (“L")<br />
8.24.5 Value in tare memory<br />
8.24.8 Lighter Midrics 2 only<br />
8.24.9 Equal Midrics 2 only<br />
8.24.10 Heavier Midrics 2 only<br />
8.24.11 Set<br />
8.25. External output 2<br />
8.25.1 Weighing instrument ready to operate<br />
<br />
8.25.11 Set<br />
8.26. External output 3<br />
8.26.1 Weighing instrument ready to operate<br />
<br />
8.26.11 Set<br />
8.27. External output 4<br />
8.27.1 Weighing instrument ready to operate<br />
<br />
8.27.11 Set<br />
8.28. External output 5<br />
8.28.1 Weighing instrument ready to operate<br />
<br />
8.28.11 Set<br />
Midrics 1/2<br />
45
Configuration<br />
Setup prtprot 7<br />
1) More than one can be selected<br />
46 Midrics 1/2<br />
Printouts<br />
(Display designation of this menu level: 7)<br />
7.4. Header input<br />
7.4.1 (blank) Header line 1 (max. 20 characters); example: “MEYER'S"<br />
7.4.2 (blank) Header line 2 (max. 20 characters); example: “STEEL"<br />
7.4.3 (ID 1) ID code name for ID 1 (max. 40 characters)<br />
7.4.4 (ID 2) ID code name for ID 2 (max. 40 characters)<br />
7.4.5 (ID 3) ID code name for ID 3 (max. 40 characters)<br />
7.4.6 (ID 4) ID code name for ID 4 (max. 40 characters)<br />
7.5. COM1 interface<br />
7.5.1* 1 printout<br />
7.5.2 2 printouts<br />
7.6. Optional “UniCOM” interface<br />
7.6.1* 1 printout<br />
7.6.2 2 printouts<br />
7.7. COM1 interface:<br />
Configure standard printout (press p, O)<br />
7.7.1* 1) Header lines 1, 2 (input: see code 7.4.x)<br />
7.7.2* 1) Date and time<br />
7.7.3* 1) Initialization data for the application program<br />
7.7.4* 1) Weighing instrument designation<br />
7.7.5* 1) Result from the application program<br />
7.7.6* 1) ID codes 1 to 4<br />
7.7.7 1) 2 additional blank lines<br />
7.7.8 1) 3 additional blank lines<br />
7.8. Optional “UniCOM” interface<br />
Configure standard printout (press p, O)<br />
7.8.1* 1) Header lines 1, 2 (input: see code 7.4.x)<br />
7.8.2* 1) Date and time<br />
7.8.3* 1) Initialization data for the application program<br />
7.8.4* 1) Weighing instrument designation<br />
7.8.5* 1) Result from the application program<br />
7.8.6* 1) ID codes 1 to 4<br />
7.8.7 1) 2 additional blank lines<br />
7.8.8 1) 3 additional blank lines<br />
7.9. COM1 interface:<br />
Print results when c pressed in<br />
Totalizing and Net-total applications<br />
7.9.1* 1) Header lines 1, 2 (input: see code 7.4.x)<br />
7.9.2* 1) Date and time<br />
7.9.4* 1) Weighing instrument designation<br />
7.9.5* 1) Result from the application program<br />
7.9.6* 1) ID codes 1 to 4<br />
7.9.7 1) 2 additional blank lines<br />
7.9.8 1) 3 additional blank lines
Setup<br />
prtprot 7<br />
7.10. Optional “UniCOM” interface<br />
Print results when c pressed in<br />
Totalizing and Net-total applications<br />
7.10.1* 1) Header lines 1, 2 (input: see code 7.4.x)<br />
7.10.2* 1) Date and time<br />
7.10.4* 1) Weighing instrument designation<br />
7.10.5* 1) Result from the application program<br />
7.10.6* 1) ID codes 1 to 4<br />
7.10.7 1) 2 additional blank lines<br />
7.10.8 1) 3 additional blank lines<br />
7.13. GMP data record or printout<br />
7.13.1* Off<br />
7.13.2 On for one result<br />
7.13.3 On for multiple results<br />
7.14. Date/time printout line: Time not printed<br />
7.14.1* Off<br />
7.14.2 On<br />
7.15. One-time automatic printout at stability<br />
7.15.1* Off<br />
7.15.2 On<br />
7.16. FlexPrint<br />
7.16.1* Off<br />
7.16.2 On<br />
7.17. Decimal separator<br />
7.17.1* Period<br />
7.17.2 Comma<br />
7.18. Memory printouts<br />
7.18.1 Printouts selection<br />
7.18.1.1 All records<br />
7.18.1.2 Specification of 7.18.2<br />
7.18.2 Number of records (1-255, Default is 1)<br />
9.1. Restore factory settings of the numeric menu for data protocol<br />
9.1.1 Yes<br />
9.1.2* No<br />
utilit 8 Operation<br />
(Display designation of this menu level: 8)<br />
8.3. Keys<br />
8.3.1* All available<br />
8.3.2 All blocked<br />
8.3.3 Keys 0, 1, 2, etc. blocked Midrics 2 only<br />
8.3.5 ( key blocked<br />
8.3.6 ) key blocked<br />
8.3.7 k key block<br />
8.3.9 p key block<br />
8.3.12 c key blocked Midrics 2 only<br />
8.3.13 r key blocked Midrics 2 only<br />
8.3.14 O key blocked Midrics 2 only<br />
8.3.15 W key blocked Midrics 2 only<br />
8.3.16 I key blocked Midrics 2 only<br />
8.3.18 d key blocked Midrics 2 only<br />
8.7. Automatic shutoff of display and control unit<br />
8.7.1 Automatic shutoff acc. to menu item 8.9.<br />
8.7.2* No automatic shutoff<br />
8.8. Display lighting<br />
8.8.1* On<br />
8.8.2 Off<br />
8.8.3 Automatic shutoff acc. to menu item 8.9.<br />
8.9. Timer mode<br />
8.9.1* After 1 + 1 minute not in use<br />
(after 1 min.: warning 2) is displayed for 1 minute)<br />
8.9.2 After 2 + 2 minutes not in use<br />
(after 2 min.: warning 2) is displayed for 2 minutes)<br />
8.9.3 After 5 + 5 minutes not in use<br />
(after 5 min.: warning 2) is displayed for 5 minutes)<br />
8.12. Show geographical data before calibration<br />
8.12.1* No<br />
8.12.2 Yes<br />
9.1. Restore factory settings of the numeric operating menu<br />
9.1.1 Yes<br />
9.1.2* No<br />
1) More than one can be selected 2) Warning: the W symbol and weighing platform numbers 1 and 2 flash simultaneously<br />
Midrics 1/2<br />
47
Setup time Time (optional)<br />
Format for setting the time (example): 10.07.41 (hours.minutes.seconds)<br />
48 Midrics 1/2<br />
date Date (optional)<br />
Format for setting the date (example): 01.05.07 (day.month.year);<br />
U.S. mode: (month.day.year)<br />
code Password<br />
Set, change and delete password here.<br />
Max. 8 characters); example: 12345678<br />
Info Device information<br />
Service Service information<br />
10.04.02 1 Service date<br />
term Display and control unit (“terminal”)<br />
1: MW2P1 Model<br />
2: 10405355 Serial number<br />
3: 01.24.01 Software version<br />
4: 00.37.01 Appl. software<br />
5: 52 Geographical latitude (in degrees) 1)<br />
6: 1 50 Geographical altitude (in meters) 1)<br />
7: 8.91 Acceleration of gravity m/s2 1)<br />
Flex-Inf Flex Print<br />
applset File name 2)<br />
ID 123 ID 2)<br />
v 123 Version 2)<br />
Lang. Language for calibration/adjustment<br />
and GMP printouts<br />
deutsch German<br />
english* English<br />
u.s. mode English with U.S. date/time format<br />
franc. French<br />
ital. Italian<br />
espanol Spanish<br />
1) Output: either latitude and altitude or acceleration of gravity (depends on the input before verification)<br />
2) These three parameters are shown for each file loaded
Operation<br />
Basic Weighing Function<br />
Weighing W<br />
The basic weighing function is always<br />
accessible and can be used alone or in<br />
combination with application programs,<br />
such as Counting, Checkweighing,<br />
Weighing in Percent, etc.<br />
Features<br />
– Zero the scale (<br />
– Store the weight on the platform<br />
as tare by pressing )<br />
Midrics 2 only:<br />
– Use the numeric keys to enter a tare<br />
weight (press ) to save)<br />
– Tare container weight automatically<br />
– Delete tare values by entering 0<br />
(press ) to save)<br />
– Press k to toggle the display between:<br />
– Gross and net values, or<br />
– Normal and 10-fold increased<br />
resolution (displayed for max.<br />
5 seconds)<br />
Midrics 2 only:<br />
– Individual ID codes for weight values<br />
– Print weight values:<br />
– Manually, by pressing p<br />
– Automatically (see “Data Output<br />
Functions")<br />
– With GMP-compliant format<br />
(see “Data Output Functions")<br />
– Restore factory settings by selecting<br />
the corresponding menu setting<br />
Automatic Taring<br />
The first weight on the scale that<br />
exceeds the preset minimum load is<br />
stored in the tare memory at stability.<br />
The values for subsequent loads<br />
are stored as weight values. The scale<br />
returns to the initial state when the<br />
load is less than 50% of the minimum<br />
load.<br />
Minimum Load<br />
To tare container weights automatically,<br />
set the minimum load in the operating<br />
menu.<br />
You can choose from 10 settings,<br />
defined in scale intervals (digits),<br />
ranging from:<br />
1 digit (no minimum load)<br />
to<br />
1000 digits<br />
The “digits" here refer to the scale<br />
intervals in the connected weighing<br />
platform. Example: If the scale interval<br />
(d) is 1000 g and the minimum load<br />
is set to 1000 digits (=1000 scale<br />
intervals), a load of at least 1000 g<br />
is required for autotaring.<br />
Automatic Printing<br />
The first weight value that exceeds<br />
the minimum load is printed.<br />
Device Parameters<br />
Keys<br />
The keypad can be blocked.<br />
There are four settings to choose from:<br />
– All keys unblocked<br />
– All keys blocked except e and M<br />
– Numeric keypad blocked<br />
– One specified key blocked<br />
(see the menu in the chapter entitled<br />
“Configuration" for options)<br />
Display<br />
You can have the display backlighting<br />
shut off automatically when not in use<br />
Automatic Shutoff<br />
You can have the display and control<br />
unit shut off automatically.<br />
Timer Mode<br />
There are three timer settings for<br />
the shutoff functions: two, four and<br />
ten minutes.<br />
Settings<br />
See the chapter entitled<br />
“Configuration."<br />
Midrics 1/2<br />
49
Example with Midrics 2:<br />
Switch on; zero; tare container weight; place sample in container;<br />
toggle display to gross weight, second weight unit or 10-fold higher resolution; print results.<br />
e<br />
(<br />
)<br />
50 Midrics 1/2<br />
1. Switch on the scale<br />
All display segments are shown<br />
for about 1 second (self-test)<br />
Display with no load on scale<br />
2. Zero the scale<br />
Display with no load on scale<br />
3. Place container on weighing<br />
platform<br />
Container weight is displayed<br />
4. Tare the scale<br />
Display (net) when tared with<br />
container<br />
5. Place sample in container<br />
(in this example, 120.2 g)<br />
k<br />
k<br />
p<br />
ACE HARDWARE<br />
GOETTINGEN<br />
24.02.2013 15:10<br />
--------------------<br />
G# + 170.2 g<br />
T + 50.0 g<br />
N + 120.2 g<br />
--------------------<br />
Display with tared scale and<br />
sample in container<br />
6. Toggle display; readout<br />
depends on your settings:<br />
Gross weight (in this example,<br />
50 g for container +120.2 g<br />
substrate)<br />
or<br />
display in 2nd weight unit<br />
(in this example, kg) or<br />
Weight displayed in second<br />
weight unit<br />
(in this example, kg)<br />
or<br />
Weight displayed with<br />
10-fold increased resolution<br />
7. Return to previous display<br />
(if 10-fold increased resolution<br />
is shown, display returns to<br />
previous readout automatically<br />
after 10 seconds.)<br />
8. Print results
Example with Midrics 2<br />
Tare the scale by placing a container on the weighing platform<br />
e<br />
)<br />
1. Switch on the scale<br />
The automatic self-test runs.<br />
Once a readout is shown,<br />
the Midrics is automatically<br />
zeroed and ready to operate.<br />
Press ( to reset the unloaded<br />
weighing platform to zero<br />
at any time.<br />
2. Place empty container on<br />
the platform<br />
3. Tare the scale.<br />
Note: If the automatic tare<br />
function is active, you do not<br />
need to press ) to tare the<br />
scale; the tare weight is stored<br />
automatically when you place<br />
the container on the platform.<br />
Wait until a zero value is<br />
displayed together with the<br />
NET symbol.<br />
4. Place sample on the platform<br />
Wait until the weight unit<br />
symbol is displayed<br />
(indicating stability) and<br />
read the weight value<br />
Example with Midrics 2:<br />
Enter the tare value using the keypad; print the results<br />
e<br />
250<br />
)<br />
k<br />
k<br />
p<br />
--------------------<br />
G# + 2.250 kg<br />
T + 0.000 kg<br />
PT2 + 0.250 kg<br />
N + 2.000 kg<br />
--------------------<br />
1. Switch on the scale<br />
The automatic self-test runs.<br />
Once a readout is shown,<br />
the Midrics is automatically<br />
zeroed and ready to operate.<br />
Press ( to reset the unloaded<br />
weighing platform to zero<br />
at any time.<br />
2. Enter the tare weight in the<br />
current weight unit using<br />
the keypad (in this example,<br />
250 g).<br />
3. Save the tare weight.<br />
4. Place the sample (in this<br />
example, 2000 g) in<br />
its container on the scale.<br />
Read the result<br />
5. Toggle the display from net<br />
to gross weight values.<br />
The display shows the gross<br />
weight (in this example,<br />
250 g for the container plus<br />
2000 g for the sample).<br />
6. Return to the previous display.<br />
7. Print the results.<br />
Midrics 1/2<br />
51
Example with Midrics 2:<br />
Weigh with varying tare values; print the results; delete tare values<br />
e<br />
)<br />
250<br />
)<br />
52 Midrics 1/2<br />
1. Switch on the scale<br />
The automatic self-test runs.<br />
Once a readout is shown,<br />
the Midrics is automatically<br />
zeroed and ready to operate.<br />
Press ( to reset the unloaded<br />
weighing platform to zero<br />
at any time.<br />
2. Place empty container on<br />
the platform<br />
3. Tare the instrument<br />
Note: If the automatic tare<br />
function is active, you do not<br />
need to press ) to tare the<br />
scale; the tare weight is stored<br />
automatically when you place<br />
the container on the platform.<br />
Wait until a zero value is<br />
displayed together with the<br />
NET symbol.<br />
4. Place the sample in its<br />
packaging (second tare value)<br />
in the container.<br />
5. Enter the tare weight of the<br />
packaging in the current<br />
weight unit using the keypad<br />
(in this example, 250 g).<br />
6. Save the package weight<br />
you entered (the two tare<br />
values are added together).<br />
Read the net weight<br />
p 7. Print the results.<br />
G# + 6.433 kg<br />
T + 4.183 kg<br />
PT2 + 0.250 kg<br />
N + 2.000 kg<br />
--------------------<br />
0 8. Clear the tare memory:<br />
Enter a zero (“0") using the<br />
keypad<br />
) 9. Save the value entered (0).<br />
This deletes tare values;<br />
the display shows the gross<br />
value.<br />
p<br />
G# + 6.433 kg<br />
T + 0.000 kg<br />
N + 6.433 kg<br />
--------------------<br />
10. Print the results.
Calibration and Adjustment<br />
Purpose<br />
Perform calibration to determine the difference<br />
between the value displayed and<br />
the actual weight on the platform. Calibration<br />
does not entail making<br />
any changes within the weighing instrument.<br />
Perform adjustment to eliminate any difference<br />
determined, or to reduce<br />
it to a level that is within the applicable<br />
tolerance limits.<br />
Configuration for Use in Legal Metrology<br />
To configure the Midrics for use in<br />
legal metrology, adjust the switch on the<br />
back of the display and control unit (A/D<br />
converter configuration: Verif. selected<br />
for legal-for-trade applications). The<br />
switch is covered by a<br />
protective cap.<br />
Position:<br />
§ Switch on the right: For use in<br />
legal metrology<br />
§ Switch on the left: External calibration/<br />
adjustment accessible<br />
Features<br />
You can configure the parameters<br />
listed below in the operating menu.<br />
Which of the features listed here are<br />
available depends on the connected<br />
weighing platform.<br />
– External calibration/adjustment blocked<br />
in verified weighing instruments<br />
– External calibration/adjustment with the<br />
default weight value or standard weight<br />
(not available on verified<br />
instruments). Configure under:<br />
Setup<br />
wp-1<br />
1.9.: (Calibration and adjustment)<br />
1 ) = Setting cannot be changed on scales<br />
verified for use in legal metrology<br />
2 ) = Factory setting on instruments verified<br />
for use in legal metrology<br />
– Specify the weight for external<br />
calibration/adjustment:<br />
Setup<br />
wp-1<br />
1.18.: (Enter calibration weight)<br />
– Block the ) key to prevent use of the<br />
two functions described above (1.9.10):<br />
Setup<br />
wp-1<br />
1.9.: (Calibration and adjustment)<br />
– Calibrate first; then adjust<br />
automatically or manually (not on<br />
verified weighing instruments):<br />
Setup<br />
wp-1<br />
1.10.: (Calibration/adjustment sequence)<br />
– Block external calibration/adjustment:<br />
Setup<br />
wp-1<br />
1.16.: (External calibration)<br />
Note<br />
On verified weighing instruments,<br />
the external calibration/adjustment function<br />
is available only when the menu<br />
access switch is in the “open" position,<br />
which entails breaking the<br />
verification seal. The equipment must be<br />
re-verified after the seal has been broken.<br />
Setting or clearing<br />
the Preload<br />
The preload can be set only when the<br />
menu access switch is open (see<br />
diagram).<br />
§ The “set preload" function must be<br />
assigned to the ) key (menu item<br />
1.9.8).<br />
§ After setting the preload, close the menu<br />
access switch and reset the ) key to<br />
its previous function (e.g., external calibration/adjustment<br />
with user-defined<br />
weights) under menu item 1.9.<br />
The preload can be cleared only when the<br />
menu access switch is open.<br />
§ The “clear preload" function must be<br />
assigned to the ) key (menu item<br />
1.9.9).<br />
§ After clearing the preload, close the<br />
menu access switch and reset the )<br />
key to its previous function (e.g., external<br />
calibration/adjustment with user-defined<br />
weights) under menu item 1.9.<br />
Preparation<br />
§ Switch on the scale: Press e<br />
§ While all segments are lit,<br />
press the ) key<br />
§ Select the Setup menu: Press k<br />
repeatedly until Setup is displayed<br />
§ Open the Setup menu:<br />
Press the ) key<br />
$ Select weighing platform 1, “WP1”:<br />
Press the ) key, or<br />
$ Select interface 1, “COM1" or interface<br />
2, “COM2" (depending on the interface<br />
used): Press the ) key<br />
Setup<br />
wp-1 1<br />
1.9. Calibration and<br />
adjustment<br />
1.9.1* Ext. calibration/adjustment;<br />
default weight<br />
1.9.3 Ext. calibration/adjustment;<br />
user-defined weight (menu<br />
code 1.18.1)<br />
1.9.8. Set preload<br />
1.9.9. Clear preload<br />
1.9.10 No function when you<br />
press and hold ) > 2 sec<br />
1.10. Calibration/adjustment<br />
sequence<br />
1.10.1 Calibration with automatic<br />
adjustment<br />
1.10.2* Calibration with adjustment<br />
triggered manually<br />
1.11. Zero-setting range<br />
1.11.1 1 percent/max. cap.<br />
1.11.2* 2 percent/max. cap.<br />
1.12. Initial zero-setting range<br />
1.12.2 2 percent/max. cap.<br />
1.12.3 5 percent/max. load<br />
1.12.4* 10 percent/max. load<br />
1.13. Tare/zero at power on<br />
1.13.1* On<br />
1.13.2 Off; load previous<br />
tare value<br />
1.13.3 Only zero at power on<br />
1.16. External calibration/<br />
adjustment 1)<br />
1.16.1* Accessible<br />
1.16.2 2) Blocked<br />
1.17.<br />
1.17.1 Grams<br />
1.17.2* Kilograms<br />
1.17.4 Pounds 1 )<br />
1.18. Enter calibration weight<br />
1.18.1 External user-defined<br />
weight; (enter value;<br />
e.g.: 10,000 g)<br />
§ Save settings and exit operating menu:<br />
( key (repeatedly)<br />
Midrics 1/2<br />
53
Example:<br />
External calibration and manual adjustment with default weights<br />
(weighing parameters: factory settings)<br />
(<br />
J<br />
54 Midrics 1/2<br />
1. Zero the scale.<br />
2. Start calibration<br />
(e.g., after calibration prompt:<br />
flashing WP symbol).<br />
c.ext.def is shown for<br />
two seconds.<br />
You are prompted to place<br />
the required weight on the<br />
platform (e.g., 10,000 kg)<br />
3. Position the calibration weight<br />
on the weighing platform<br />
The difference between<br />
measured value and the true<br />
mass is shown with a plus<br />
or minus sign.<br />
Ext. calibration Printout is generated,<br />
Nom. + 10000 g if adjustment was not<br />
Diff. + 1 g performed and the procedure<br />
was cancelled by pressing (.<br />
)<br />
4. Start adjustment<br />
(or cancel calibration/adjustment<br />
by pressing ().<br />
After adjustment,<br />
the calibration weight value<br />
is displayed.<br />
-------------------- A GMP-compliant printout<br />
24.10.2012 10:15 is generated.<br />
Typ MW1P1<br />
Ser.no. 12345678<br />
Vers. 1.0103.11.2<br />
BVers. 01-26-06<br />
--------------------<br />
Ext. calibration<br />
Nom. + 10000 g<br />
Diff. + 1 g<br />
Ext. adjustment<br />
Diff. + 0 g<br />
--------------------<br />
24.10.2012w 10:15<br />
Name:<br />
--------------------
Data ID Codes<br />
Midrics 2 only:<br />
You can assign codes (such as product<br />
name, batch number, etc.) for identification<br />
of measured values on printouts.<br />
Features<br />
– Assign up to four ID codes.<br />
– Assign both a name and a value<br />
for each ID code.<br />
– The name is left-justified and the<br />
value is right-justified on the printout.<br />
If the entire code is too long for one<br />
line, additional lines are printed.<br />
– Enter ID code names in the operating<br />
menu under:<br />
Setup:<br />
prtprot: 7.4.<br />
Enter up to 20 characters for the<br />
ID code name. No more than<br />
11 characters are displayed during<br />
input; all 20 characters are printed.<br />
– Enter up to 40 characters for the<br />
value of the ID code. Press the ID key<br />
to activate the input mode.<br />
– You can delete characters from the<br />
ID code by pressing the c key.<br />
– If both the name and value fields are<br />
empty, no ID code is printed.<br />
– In the operating menu, you can<br />
configure when and whether ID codes<br />
are printed (see “Configuring Printouts”<br />
on page 82).<br />
Factory Settings for the<br />
ID Code Names:<br />
ID1: ID1<br />
ID2: ID2<br />
ID3: ID3<br />
ID4: ID4<br />
Factory Settings for the<br />
ID Code Values:<br />
No default values set.<br />
Example with Midrics 2:<br />
Enter ID code names.<br />
Enter “Batch no." and “Cust." as names for ID codes 1 and 2.<br />
e<br />
)<br />
k<br />
)<br />
)<br />
)<br />
)<br />
1. Switch on the scale<br />
2. While all segments are lit, press the ) key<br />
The first item in the main menu is shown: APPL<br />
3. Select the Setup menu to access<br />
scale configuration functions<br />
(press k repeatedly until Setup is displayed)<br />
4. Open the Setup menu<br />
5. Select the prtprot menu item to access<br />
ID code settings<br />
(press k repeatedly until prtprot is displayed)<br />
6. Select the menu item for header and ID code settings<br />
7. Press k repeatedly until 7.4.1 is displayed.<br />
8. Press ) to activate alphanumeric input.<br />
Midrics 1/2<br />
55
p, p, p 9. Enter the first character using<br />
the p and k keys<br />
(in this example, the first<br />
character is “C")<br />
)<br />
(<br />
)<br />
Example with Midrics 2:<br />
Enter ID code values.<br />
Enter “123" as the value for ID code 2.<br />
56 Midrics 1/2<br />
10. Save the character<br />
11. Proceed as described above to<br />
enter subsequent characters.<br />
After entering the last<br />
character, press ) to save<br />
the code.<br />
12. Exit the active submenu<br />
to configure other menu<br />
settings, or<br />
13. Press and hold ) to exit<br />
the operating menu<br />
d 1. Activate ID input.<br />
123 2. Enter the desired value for<br />
ID code 2<br />
(in this example: 123).<br />
O 3. Press O to conclude input.<br />
p<br />
4. Place sample on the platform<br />
5. Print the weight value<br />
ID2 123 ID code 2<br />
24.02.2006 10:09<br />
-------------------<br />
Ser.no 12345678<br />
G# + 1083 g<br />
T + 0000 g<br />
N + 1083 g<br />
d, c<br />
d, d, c<br />
Example with Midrics 2:<br />
Enter a value for ID code 1 directly.<br />
123<br />
d<br />
p<br />
6. Deleting ID codes:<br />
ID codes are deleted one<br />
at a time; for example,<br />
when the weighing operations<br />
have been completed<br />
Delete ID code 1<br />
Delete ID code 2<br />
1. Enter the desired value<br />
for ID code 1<br />
(in this example: 123).<br />
2. Store the value as ID 1<br />
3. Place sample on the platform<br />
4. Print the weight value<br />
ID1 123 ID 1<br />
24.02.2006 10:09<br />
-------------------<br />
Ser.no 12345678<br />
G# + 1083 g<br />
T + 0000 g<br />
N + 1083 g<br />
5. Delete the ID code:<br />
see Item 6 in the previous<br />
example
Application Programs<br />
Applications: Overview<br />
Midrics 1 Midrics 2<br />
Keypad 5 keys 11 keys +<br />
numeric keypad<br />
Display<br />
Applications<br />
14-segment 14-segment<br />
plus<br />
application symbols<br />
Basic weighing X X<br />
Averaging (animal weighing) X<br />
Print/send data record to peripheral device X X<br />
Label printing X<br />
Counting X<br />
Totalizing X<br />
Checkweighing X<br />
Batching to a target value<br />
Functions<br />
X<br />
Zero-setting X X<br />
Taring X X<br />
Date and time Optional Optional<br />
ID codes (4 codes, 40 char. each) X<br />
Midrics 1/2<br />
57
Application: Counting Z<br />
With the Counting program you can<br />
determine the number of parts that<br />
each have approximately equal weight.<br />
Features<br />
– Enter the reference piece weight<br />
“wRef" via the keypad<br />
– Save the reference weight “wRef"<br />
from the weighing platform<br />
– Enter the reference sample quantity<br />
“nRef" via the keypad<br />
– Automatic reference sample updating<br />
– Activate info-mode by pressing I<br />
– Toggle the display between quantity<br />
and weight by pressing W<br />
– Define the resolution (level of accuracy)<br />
applied when a calculated reference<br />
sample weight is stored<br />
– Automatic taring of container weight.<br />
Configuration:<br />
Appl Z: 3.7.<br />
(autotare first weight)<br />
– Automatic initialization when the Midrics<br />
is switched on. The display and<br />
control unit is initialized with the<br />
most recently used values for reference<br />
sample quantity “nRef" and reference<br />
sample weight “wRef". Configuration:<br />
Appl Z: 3.8.<br />
(start app. with last values)<br />
– Closing application program;<br />
deleting parameters:<br />
The value for reference sample weight<br />
remains active in the reference memory<br />
until you delete it by pressing the<br />
c key, overwrite it or until you select<br />
a different application. It also remains<br />
saved after the scale has been switched<br />
off.<br />
58 Midrics 1/2<br />
– Restore factory settings. Configuration:<br />
Appl Z: 9.1.<br />
Before the quantity on the platform<br />
can be calculated, the reference sample<br />
(average weight of one piece) must<br />
be entered in the application. This is<br />
known as “initializing" the application.<br />
There are three ways to enter this value:<br />
– Calculation:<br />
– Place the number of parts defined<br />
as the reference sample quantity<br />
on the weighing platform and press<br />
O to calculate the reference<br />
sample weight<br />
– Alternatively, you can place any<br />
number of parts on the weighing<br />
platform, enter the number of<br />
parts using the keypad, and then<br />
press the r key to calculate<br />
the average piece weight<br />
How the reference weight is calculated<br />
depends on the application<br />
setting for resolution (“Resolution<br />
for calculation of reference value").<br />
The value is either rounded off in<br />
accordance with the display resolution,<br />
or saved with 10-fold or 100fold<br />
increased resolution or with the<br />
maximum internal resolution of the<br />
weighing platform.<br />
– Keypad input: Enter a reference sample<br />
weight (i.e., the weight of one piece)<br />
using the keypad and press O to<br />
save it.<br />
After initialization, you can use the<br />
weighing platform to count parts.<br />
The initial application values are valid<br />
until deleted by pressing the c key,<br />
or until overwritten by new values.<br />
They also remain saved after you switch<br />
off the scale.<br />
– Tare function:<br />
1) If you store a tare (weight value) by<br />
pressing the ) key, you can later<br />
enter a tare value manually. The tare<br />
value you enter is added to the stored<br />
tare value.<br />
Setting: menu code 3.25.1<br />
(factory default)<br />
2) A tare value entered manually<br />
overwrites a stored tare value (weight<br />
value). If you enter a tare value manually,<br />
a tare value (weight value) stored<br />
later overwrites the manually entered<br />
value.<br />
Setting: menu code 3.25.2<br />
Operating menu setting:<br />
Appl Z: 3.25.
Preparation<br />
§ Switch on the scale: Press e<br />
§ While all segments are lit,<br />
press the ) key<br />
§ Select the Application menu: Press k<br />
repeatedly until APPL is displayed<br />
§ Open the Application menu:<br />
Press the ) key<br />
§ Select the Counting application:<br />
Press the k key repeatedly until the<br />
desired menu item is displayed<br />
and press ) to open the submenu<br />
Application Parameters: Counting<br />
3.5. Minimum load for automatic<br />
taring and automatic printing<br />
3.5.1* 1 digit<br />
3.5.2 2 digits<br />
3.5.3 5 digits<br />
3.5.4 10 digits<br />
3.5.5 20 digits<br />
3.5.6 50 digits<br />
3.5.7 100 digits<br />
3.5.8 200 digits<br />
3.5.9 500 digits<br />
3.5.10 1000 digits<br />
3.6. Minimum load for initialization<br />
3.6.1* 1 digit<br />
3.6.2 2 digits<br />
3.6.3 5 digits<br />
3.6.4 10 digits<br />
3.6.5 20 digits<br />
3.6.6 50 digits<br />
3.6.7 100 digits<br />
3.6.8 200 digits<br />
3.6.9 500 digits<br />
3.6.10 1000 digits<br />
3.7. Automatic taring: first weight tared<br />
3.7.1* Off<br />
3.7.2 On<br />
3.8. Start application and load most<br />
recent application data when the<br />
Midrics is switched on<br />
3.8.1 Automatic (on)<br />
3.8.2* Manual (off)<br />
3.9. Resolution for calculation<br />
of reference value<br />
3.9.1* Display resolution<br />
3.9.2 Display resolution<br />
+1 decimal place<br />
3.9.3 Display resolution<br />
+2 decimal places<br />
3.9.4 Internal resolution<br />
3.11 Parameter for saving weight values<br />
3.11.1* At stability<br />
3.11.2 At increased stability<br />
3.12. Average piece weight updating<br />
3.12.1 Off<br />
3.12.3* Automatic<br />
3.25. Tare function<br />
3.25.1* Add input value<br />
(weight value) for<br />
taring<br />
3.25.2 Tare value can be<br />
overwritten<br />
* = Factory setting<br />
§ Press ) to save your settings and<br />
( (repeatedly) to exit the operating<br />
menu<br />
Minimum Load<br />
To tare container weights automatically,<br />
set the minimum load in the operating<br />
menu.<br />
The minimum load required for<br />
initialization of the weighing platform<br />
is configured in the operating menu<br />
under:<br />
appl Z: 3.6.<br />
– The error code Inf 29 is displayed<br />
– The weighing platform is not initialized<br />
– The preset reference sample quantity<br />
is saved<br />
You can choose from 10 settings,<br />
ranging from<br />
1 digit<br />
to<br />
1000 digits<br />
Example: If the scale interval (d) is<br />
1000 g and the minimum load is set<br />
to 1000 digits (=1000 scale intervals),<br />
a load of at least 1000 g is required<br />
for autotaring.<br />
Resolution for Calculation of<br />
Reference Value<br />
The resolution applied for calculating<br />
the reference weight is defined in the<br />
operating menu under:<br />
appl Z: 3.9.<br />
The resolution for calculating the<br />
reference sample weight is increased if<br />
“+1 decimal place", “+2 decimal places"<br />
or “With internal resolution" is selected.<br />
With the “+1 decimal place" setting,<br />
the net value is determined to one<br />
additional decimal place (i.e., display<br />
accuracy + 10); the “+2 decimal places"<br />
increases display accuracy + 100, and<br />
so on up to the maximum resolution<br />
available.<br />
Parameter for Saving Weight Values<br />
The weight on the platform is saved<br />
as a reference when the platform has<br />
stabilized. If you select “At increased<br />
stability," the average piece weight<br />
stored will be more accurate and the<br />
results more reproducible, but the<br />
response time of the weighing instrument<br />
might be longer.<br />
Reference Sample Updating<br />
The average piece weight (APW) is<br />
updated automatically only when the<br />
following 4 criteria are met:<br />
1. The current piece count exceeds the<br />
original piece count by at least two.<br />
2. The current piece count is no more than<br />
double the original piece count.<br />
3. The new piece count is less than 1000.<br />
4. The scale is stable in accordance with<br />
the defined stability parameter.<br />
Auto: Indicates that APW update is<br />
active.<br />
opt: Indicates that the reference sample<br />
is currently being updated.<br />
During an updating operation, 0pt and<br />
the updated piece count are displayed<br />
briefly in the measured value line.<br />
Midrics 1/2<br />
59
Example:<br />
Determining the number of uncounted parts.<br />
Settings (changes in the factory settings required for this example):<br />
Setup: Application: Counting<br />
Setup: PRTPROT (printout): 7.7.x (COM1) (see “Configuration” for options)<br />
)<br />
O<br />
60 Midrics 1/2<br />
1. Place empty container on<br />
the platform<br />
2. Tare the scale<br />
Note: If the automatic tare<br />
function is enabled, you do<br />
not need to press the )<br />
key to tare the scale; the tare<br />
weight is saved automatically<br />
when you place the container<br />
on the platform<br />
3. Place a number of parts in<br />
the container for the reference<br />
quantity (in this example,<br />
10 pcs)<br />
4. Activate calculation of the<br />
reference sample weight<br />
If the weight is too light,<br />
Inf29 appears on the main<br />
display.<br />
p<br />
Set the minimum load<br />
to a lower number of digits or<br />
increase the reference sample<br />
quantity and the number of<br />
parts in the container.<br />
5. Add more parts to the<br />
container<br />
Read the result<br />
Opt is displayed if automatic<br />
reference sample updating<br />
is enabled<br />
6. Print the results<br />
nRef + 38 pcs Configured printout:<br />
wRef + 0.003280 kg see page 82<br />
G# + 0.373 kg<br />
T + 0.248 kg<br />
N + 0.125 kg<br />
Qnt 38 pcs<br />
--------------------
Application: Neutral Measurement Z nM<br />
With this application you can use your<br />
weighing platform to measure the<br />
length, surface and volume of parts that<br />
have roughly the same specific weight.<br />
The o symbol is displayed<br />
as the weight unit.<br />
Features<br />
Enter the reference weight “wRef"<br />
via the keypad<br />
– Save the reference weight “wRef"<br />
from the weighing platform<br />
– Enter the factor for calculation “nRef"<br />
via the keypad<br />
– Activate info-mode by pressing I<br />
(> sec)<br />
– Toggle the display between measurement<br />
and weight by pressing W<br />
– Define the level of accuracy (display<br />
resolution) applied when a calculated<br />
reference weight is saved<br />
– Automatic taring of container weight.<br />
Configuration:<br />
Appl Z nM: 3.7.<br />
(autotare first weight)<br />
– Automatic initialization when the Midrics<br />
is switched on. The scale<br />
is initialized with the most recently used<br />
calculation factor “nRef"<br />
and reference weight “wRef".<br />
Configuration:<br />
Appl Z nM: 3.8.<br />
(start app. with last values)<br />
– Closing application program;<br />
deleting parameters:<br />
The value for reference sample weight<br />
remains active in the reference memory<br />
until you delete it by pressing the<br />
c key, overwrite it or until you select<br />
a different application. This value also<br />
remains saved after the scale has been<br />
switched off.<br />
– Restore factory settings. Configuration:<br />
Appl Z nM: 9.1.<br />
In order to calculate the length,<br />
surface or volume of a given sample,<br />
the average weight of a reference<br />
quantity of the sample must be known<br />
(in the example below, the reference<br />
is 1 meter of electrical cable).<br />
There are three ways to enter the<br />
reference weight in the program:<br />
– Calculation:<br />
– Place the reference quantity (defined<br />
by the calculation factor) on the<br />
connected weighing platform and<br />
calculate the reference sample<br />
weight by pressing the O key.<br />
– Place any amount of the sample<br />
material on the connected weighing<br />
platform, enter the calculation<br />
factor through the keypad, and<br />
press the O key to calculate the<br />
reference sample weight.<br />
How the reference weight is calculated<br />
depends on the application setting for<br />
resolution (“Resolution for calculation<br />
of reference value"). The value is either<br />
rounded off in accordance with the display<br />
resolution, or saved with 10-fold<br />
or 100-fold increased resolution or<br />
with the maximum internal resolution<br />
of the weighing platform.<br />
– Keypad input: Enter the reference<br />
weight (i.e., the weight of one meter of<br />
electrical cable) using the keypad and<br />
press O to save it.<br />
The initial application values are valid<br />
until deleted by pressing the c key,<br />
or until overwritten by new values.<br />
They also remain saved after you switch<br />
off the scale.<br />
Preparation<br />
§ Switch on the scale: Press e.<br />
§ While all segments are lit,<br />
press the ) key<br />
§ Select the Application menu: Press k<br />
repeatedly until APPL is displayed<br />
§ Open the Application menu:<br />
Press the ) key<br />
§ Select the Neutral Measurement<br />
application:<br />
Press the k key repeatedly until<br />
the desired menu item is displayed and<br />
press ) to open the submenu<br />
– Tare function:<br />
1) If you store a tare (weight value) by<br />
pressing the ) key, you can later<br />
enter a tare value manually. The tare<br />
value you enter is added to the stored<br />
tare value.<br />
Setting: menu code 3.25.1<br />
(factory default)<br />
2) A tare value entered manually<br />
overwrites a stored tare value (weight<br />
value). If you enter a tare value manually,<br />
a tare value (weight value) stored<br />
later overwrites the manually entered<br />
value.<br />
Setting: menu code 3.25.2<br />
Operating menu setting:<br />
Appl Z nM: 3.25<br />
Application Parameters: Neutral Measurement<br />
3.5. Minimum load for automatic<br />
taring and automatic printing<br />
3.5.1* 1 digit<br />
3.5.2 2 digits<br />
3.5.3 5 digits<br />
3.5.4 10 digits<br />
3.5.5 20 digits<br />
3.5.6 50 digits<br />
3.5.7 100 digits<br />
3.5.8 200 digits<br />
3.5.9 500 digits<br />
3.5.10 1000 digits<br />
3. 6. Minimum load for initialization<br />
3.6.1* 1 digit<br />
3.6.2 2 digits<br />
3.6.3 5 digits<br />
3.6.4 10 digits<br />
3.6.5 20 digits<br />
3.6.6 50 digits<br />
3.6.7 100 digits<br />
3.6.8 200 digits<br />
3.6.9 500 digits<br />
3.6.10 1000 digits<br />
3.7. Automatic taring: first weight tared<br />
3.7.1* Off<br />
3.7.2 On<br />
3.8. Start application and load most<br />
recent application data when the<br />
Midrics is switched on<br />
3.8.1 Automatic (on)<br />
3.8.2* Manual (off)<br />
3.9. Resolution for calculation of<br />
reference value<br />
3.9.1* Display resolution<br />
3.9.2 Display resolution<br />
+1 decimal place<br />
3.9.3 Display resolution<br />
+ 2 decimal places<br />
3.9.4 Internal resolution<br />
3.10. Decimal places in displayed result<br />
3.10.1* None<br />
3.10.2 1 decimal place<br />
3.10.3 2 decimal places<br />
3.10.4 3 decimal places<br />
3.11. Parameter for saving weight values<br />
3.11.1* At stability<br />
3.11.2 At increased stability<br />
3.25. Tare function<br />
3.25.1* Add input value<br />
(weight value) for<br />
taring<br />
3.25.2 Tare value can be<br />
overwritten<br />
* = Factory setting<br />
§ Press ) to save your settings and (<br />
(repeatedly) to exit the operating menu.<br />
Midrics 1/2<br />
61
Minimum Load<br />
The minimum load required for<br />
initialization of the weighing platform<br />
is configured in the operating menu<br />
under:<br />
Appl Z nM: 3.6.<br />
Once the limit is exceeded by the load,<br />
initialization can begin. If the load is<br />
too light, the following will occur when<br />
you try to save a value:<br />
– The error code Inf 29 is displayed<br />
– The weighing platform is not initialized<br />
– The preset calculation factor is saved<br />
The minimum load required for automatic<br />
taring of the container weight on<br />
the platform (“autotare first weight")<br />
is configured in the operating menu<br />
under:<br />
Appl Z nM: 3.5.<br />
You can choose from 10 settings,<br />
ranging from<br />
1 digit<br />
to<br />
1000 digits<br />
Example: If the scale interval (d) is<br />
1000 g and the minimum load is set<br />
to 1000 digits (=1000 scale intervals),<br />
a load of at least 1000 g is required<br />
for autotaring.<br />
Resolution for Calculation of<br />
Reference Value<br />
The resolution applied for calculating<br />
the reference value is defined in the<br />
operating menu under:<br />
Appl Z nM: 3.9.<br />
The resolution for calculating the<br />
reference sample is increased if<br />
“+1 decimal place", “+2 decimal places"<br />
or “With internal resolution" is selected.<br />
With the “+1 decimal place" setting,<br />
the net value is determined to one<br />
additional decimal place (i.e., display<br />
accuracy + 10); “+2 decimal places"<br />
increases display accuracy + 100, and<br />
so on up to the maximum resolution<br />
available.<br />
62 Midrics 1/2<br />
Parameter for Saving Weight Values<br />
The reference weight is saved when<br />
the platform has stabilized. “Stability"<br />
is defined as the point at which<br />
fluctuation of a measured value lies<br />
within a defined tolerance range.<br />
The narrower the tolerance range, the<br />
more stable the platform is at stability.<br />
In the operating menu, under:<br />
Appl Z nM: 3.11.<br />
you can define whether the value<br />
is saved when “standard stability" is<br />
reached, or only at “increased stability"<br />
(narrower tolerance range). If you select<br />
“At increased stability," the reference<br />
weight saved will be more accurate and<br />
the results more reproducible, but the<br />
response time of the weighing instrument<br />
might be longer.<br />
Decimal Places for Display of Results<br />
In neutral measurement, not only<br />
whole numbers but also decimal<br />
numbers (for example, 1.25 o electrical<br />
cabling) can be displayed.<br />
The number of decimal places displayed<br />
in neutral measurement is configured<br />
in the operating menu under:<br />
Appl Z nM: 3.10.
Example:<br />
Measuring 25 m electrical cable.<br />
Settings (changes in the factory settings required for this example):<br />
Setup: Application: Neutral Measurement<br />
Setup: PRTPROT (printout): 7.7.x (COM1) (see “Configuration” for options)<br />
)<br />
248<br />
O<br />
1. Place empty container on<br />
the platform<br />
2. Tare the scale<br />
Note: If the automatic tare<br />
function is enabled, you do<br />
not need to press the )<br />
key to tare the scale; the tare<br />
weight is saved automatically<br />
when you place the container<br />
on the platform<br />
3. Enter the weight of 1 meter<br />
of cable using the keypad<br />
(in this example, 248 g)<br />
4. Save value entered as<br />
reference weight.<br />
p<br />
5. Place the desired amount of<br />
cable in the container<br />
Read the result<br />
6. Print the result<br />
nRef + 1 o Configured printout:<br />
wRef + 0.248 kg see page 82<br />
G# + 6.794 kg<br />
T + 0.541 kg<br />
N + 6.253 kg<br />
Qnt 25 o<br />
--------------------<br />
Midrics 1/2<br />
63
Application: Averaging (Animal Weighing) V<br />
With the Averaging application,<br />
you can use your weighing platform<br />
for calculating weights as the average<br />
of a number of individual weighing<br />
operations. This function is used<br />
to determine weights under unstable<br />
ambient conditions or for weighing<br />
unstable samples (such as live animals).<br />
Features<br />
– Averaging starts manually or<br />
automatically. Configuration:<br />
appl V: 3.18.<br />
With manual start selected, the averaging<br />
routine begins when you press<br />
a key (provided the start conditions<br />
are met. With automatic start selected,<br />
averaging begins when you place the<br />
first load on the platform (provided<br />
the start conditions are met).<br />
– Enter the number of subweighing<br />
operations using the keypad<br />
– Press the r key to select the desired<br />
number of subweighing operations<br />
– Activate info mode by pressing I<br />
– Toggle the display between last result<br />
and current weight by pressing w<br />
– Automatic printout of results.<br />
Configuration:<br />
appl V: 3.20.<br />
– Automatic taring of container weight.<br />
Configuration:<br />
appl V: 3.7.<br />
– Automatic start of averaging when<br />
the Midrics is turned on and a sample<br />
placed on the platform (provided start<br />
conditions are met). Configuration:<br />
appl V: 3.8.<br />
– Closing application program;<br />
deleting parameters:<br />
The number of measurements remains<br />
active in the memory until you delete it<br />
by pressing the c key, overwrite it or<br />
until you select a different application.<br />
– Restore factory settings. Configuration:<br />
appl V: 9.1.<br />
64 Midrics 1/2<br />
A number of measurements are<br />
required, as this forms the basis for<br />
calculation of an average weight.<br />
You can enter the desired number<br />
of measurements, also referred<br />
to as subweighing operations, using<br />
the keypad.<br />
The number you enter is saved until<br />
it is overwritten by another number.<br />
It also remains in memory when<br />
you switch to a different application<br />
program, or switch off the scale.<br />
There are three ways to start the<br />
averaging routine:<br />
– Manual start with preset number of<br />
measurements:<br />
Place the sample on the platform and<br />
press the O key<br />
– Manual start with user-defined number<br />
of measurements:<br />
Place the sample on the platform<br />
and enter the number of weighing<br />
operations using the keypad.<br />
Press the r key to save the number<br />
entered and begin weighing<br />
– Automatic start with preset number<br />
of measurements:<br />
Measurement begins when you place<br />
the first sample on the platform,<br />
provided the start conditions are met.<br />
– Tare function:<br />
1) If you store a tare (weight value) by<br />
pressing the ) key, you can later<br />
enter a tare value manually. The tare<br />
value you enter is added to the stored<br />
tare value.<br />
Setting: menu code 3.25.1<br />
(factory default)<br />
2) A tare value entered manually<br />
overwrites a stored tare value (weight<br />
value). If you enter a tare value manually,<br />
a tare value (weight value) stored<br />
later overwrites the manually entered<br />
value.<br />
Setting: menu code 3.25.2<br />
Operating menu setting:<br />
Appl V: 3.25<br />
Preparation<br />
§ Switch on the scale: Press e.<br />
§ While all segments are lit,<br />
press the ) key<br />
§ Select the Application menu: Press k<br />
repeatedly until APPL is displayed<br />
§ Open the Application menu:<br />
Press the ) key<br />
§ Select the Animal Weighing application:<br />
Press the k key repeatedly until<br />
the desired menu item is displayed and<br />
press ) to open the submenu
Application Parameters: Averaging (Animal<br />
Weighing)<br />
3.5. Minimum load for automatic taring<br />
and automatic printing<br />
3.5.1* 1 digit<br />
3.5.2 2 digits<br />
3.5.3 5 digits<br />
3.5.4 10 digits<br />
3.5.5 20 digits<br />
3.5.6 50 digits<br />
3.5.7 100 digits<br />
3.5.8 200 digits<br />
3.5.9 500 digits<br />
3.5.10 1000 digits<br />
3.6. Minimum load for automatic start<br />
3.6.1* 1 digit<br />
3.6.2 2 digits<br />
3.6.3 5 digits<br />
3.6.4 10 digits<br />
3.6.5 20 digits<br />
3.6.6 50 digits<br />
3.6.7 100 digits<br />
3.6.8 200 digits<br />
3.6. 9 500 digits<br />
3.6.10 1000 digits<br />
3.7. Automatic taring: first weight tared<br />
3.7.1* Off<br />
3.7.2 On<br />
3.8. Start application and load most<br />
recent application data when the<br />
Midrics is switched on<br />
3.8.1 Automatic (on)<br />
3.8.2* Manual (off)<br />
3.18. Start of averaging routine<br />
3.18.1* Manual<br />
3.18.2 Automatic<br />
3.19. Animal activity<br />
3.19.1 0.1% of the animal/object<br />
3.19.2* 0.2% of the animal/object<br />
3.19.3 0.5% of the animal/object<br />
3.19.4 1% of the animal/object<br />
3.19.5 2% of the animal/object<br />
3.19.6 5% of the animal/object<br />
3.19.7 10% of the animal/object<br />
3.19.8 20% of the animal/object<br />
3.19.9 50% of the animal/object<br />
3.19.10 100% of the animal/object<br />
3.20. Automatic printout of results<br />
3.20.1* Off<br />
3.20.2 On<br />
3.21. Static display of result after<br />
load removed<br />
3.21. 1* Display is static until<br />
unload threshold reached<br />
3.21. 2 Display is static until<br />
c is pressed<br />
3.25. Tare function<br />
3.25.1* Add input value (weight<br />
value) for taring<br />
3.25.2 Tare value can be<br />
overwritten<br />
* = Factory setting<br />
§ Press ) to save your settings and<br />
( (repeatedly) to exit the operating<br />
menu.<br />
Minimum Load<br />
The minimum load required for<br />
initialization of the averaging routine<br />
is configured in the operating menu<br />
under:<br />
appl V: 3.6.<br />
Setting a minimum load for averaging<br />
can be especially useful if you configure<br />
automatic start of measurement.<br />
The minimum load required for automatic<br />
taring of the container weight on<br />
the platform (“autotare first weight"),<br />
or for automatic printout of results,<br />
is configured in the operating menu<br />
under:<br />
appl V: 3.5.<br />
You can choose from the following<br />
10 levels for this setting:<br />
1 digit<br />
to<br />
1000 digits<br />
Example: If the scale interval (d) is<br />
1000 g and the minimum load is set<br />
to 1000 digits (=1000 scale intervals),<br />
a load of at least 1000 g is required<br />
for autotaring.<br />
Starting the Measurements<br />
The averaging routine does not begin<br />
until any fluctuation in the weight<br />
value remains below a defined threshold<br />
over three consecutive measurements.<br />
The tolerance limit is defined as<br />
a percentage of the animal or object<br />
weight (for example, 0.1%;<br />
0.2%; ...; 50%; 100%), configured in<br />
the operating menu under:<br />
appl V: 3.19.<br />
If the “Animal activity" parameter is<br />
set to 2%, for example, and the animal<br />
or object weighs 10 kg, measurement<br />
does not begin until the fluctuation in<br />
weight value remains below 200 g<br />
during three consecutive measurements.<br />
Display<br />
A calculated average value is shown<br />
continuously on the main display. The<br />
! symbol (indicating a calculated<br />
value) is also displayed.<br />
You can toggle between this display<br />
and a readout of the current weight on<br />
the scale by pressing the w key.<br />
In the operating menu, under:<br />
appl V: 3.21.<br />
you can select “Display is static until<br />
unload threshold reached" to have the<br />
display switch automatically to the<br />
weight readout when you unload the<br />
weighing platform (i.e., when the load<br />
is less than half the minimum load).<br />
The result of the most recent averaging<br />
operation is not saved.<br />
If you select “Display is static until<br />
c is pressed," the calculated average<br />
remains displayed even after the<br />
weighing platform is unloaded, until<br />
you press the c key or begin a new<br />
measurement.<br />
Midrics 1/2<br />
65
Example:<br />
Measuring the weight of one mouse.<br />
Settings (changes in the factory settings required for this example):<br />
Setup: Application: Animal weighing<br />
Setup: PRTPROT (printout): 7.7.x (COM1) (see “Configuration” for options)<br />
)<br />
20<br />
r<br />
66 Midrics 1/2<br />
Place empty container on<br />
the platform<br />
1. Tare the scale.<br />
Note: If the automatic tare<br />
function is enabled, you do<br />
not need to press the )<br />
key to tare the scale; the tare<br />
weight is saved automatically<br />
when you place the container<br />
on the platform.<br />
2. Place 1 st animal in container<br />
3. Enter the number of<br />
subweighing operations using<br />
the keypad (in this example,<br />
20 measurements)<br />
4. Save the value entered and<br />
begin averaging<br />
p<br />
The averaging routine does<br />
not begin until the fluctuation<br />
in weight value remains below<br />
a defined threshold over three<br />
consecutive measurements.<br />
The number of subweighing<br />
operations remaining is shown<br />
in the numeric display.<br />
Read the result of averaging<br />
5. Print the results.<br />
Note: If automatic printout<br />
of results is enabled, you do<br />
not need to press the p key;<br />
the results are printed automatically.<br />
mDef + 20 Configured printout:<br />
see page 82<br />
T + 0.292 kg<br />
x-Net + 0.183 kg<br />
--------------------<br />
When you unload the<br />
weighing platform, the display<br />
switches to the weight readout<br />
automatically, unless configured<br />
otherwise in the operating<br />
menu. The weighing<br />
instrument is ready for the<br />
next measurement.
Application: Weighing in Percent L<br />
With the Weighing in Percent<br />
application, you can have the value of<br />
the weight on the platform displayed<br />
as a percentage calculated in relation<br />
to a defined reference weight.<br />
The L symbol is displayed in place<br />
of the weight unit.<br />
Features<br />
– Enter the reference weight “Wxx%"<br />
for 100% using the keypad<br />
– Save the current weight value as<br />
reference percentage (“pRef")<br />
– Enter the reference percentage “pRef"<br />
via the keypad<br />
– Display result as loss (difference)<br />
or residue<br />
– Display up to 3 decimal places.<br />
Configuration:<br />
appl L: 3.10.<br />
– Activate info-mode by pressing I<br />
– Toggle the display between percentage<br />
and weight by pressing the w key.<br />
– Automatic taring of container weight.<br />
Configuration:<br />
appl L: 3.7.<br />
– Automatic initialization when the Midrics<br />
is switched on. The application is<br />
initialized with the most recently saved<br />
data. Configuration:<br />
appl L: 3.8.<br />
– Closing application program;<br />
deleting parameters:<br />
The value for reference sample weight<br />
remains active in the reference memory<br />
until you delete it by pressing the<br />
c key, overwrite it or until you select<br />
a different application.<br />
– Restore factory settings. Configuration:<br />
appl L: 9.1.<br />
To determine the weight of a sample<br />
relative to a reference weight, you need<br />
to define the reference weight value.<br />
There are three ways to enter this value<br />
in the application program:<br />
– Calculation:<br />
– Place the reference quantity<br />
(defined by the reference percentage)<br />
on the connected weighing platform<br />
and press O.<br />
– Place any amount of the sample<br />
material on the connected weighing<br />
platform, enter the reference<br />
percentage through the keypad,<br />
and press the r key to initialize<br />
the application.<br />
How the reference weight is calculated<br />
depends on the application setting for<br />
resolution (“Resolution for calculation<br />
of reference value"). The value is either<br />
rounded off in accordance with the display<br />
resolution, or saved with 10-fold<br />
or 100-fold increased resolution or<br />
with the maximum internal resolution<br />
of the weighing platform.<br />
– Enter the reference weight for 100%<br />
via the keypad and press the O key<br />
to initialize the application.<br />
The initial application values are valid<br />
until deleted by pressing the c key<br />
or until overwritten by new values.<br />
They also remain saved after you switch<br />
off the scale.<br />
– Tare function:<br />
1) If you store a tare (weight value) by<br />
pressing the ) key, you can later<br />
enter a tare value manually. The tare<br />
value you enter is added to the stored<br />
tare value.<br />
Setting: menu code 3.25.1<br />
(factory default)<br />
2) A tare value entered manually<br />
overwrites a stored tare value (weight<br />
value). If you enter a tare value manually,<br />
a tare value (weight value) stored<br />
later overwrites the manually entered<br />
value.<br />
Setting: menu code 3.25.2<br />
Operating menu setting:<br />
Appl L: 3.25<br />
Preparation<br />
§ Switch on the scale: Press e<br />
§ While all segments are lit,<br />
press the ) key<br />
§ Select the Application menu: Press k<br />
repeatedly until APPL is displayed<br />
§ Open the Application menu:<br />
Press the ) key<br />
§ Select the Weighing in Percent<br />
application:<br />
Press the k key repeatedly until<br />
the desired menu item is displayed and<br />
press ) to open the submenu<br />
Application Parameters: Weighing in Percent<br />
3.5. Minimum load for automatic<br />
taring and automatic printing<br />
3.5.1* 1 digit<br />
3.5.2 2 digits<br />
3.5.3 5 digits<br />
3.5.4 10 digits<br />
3.5.5 20 digits<br />
3.5.6 50 digits<br />
3.5.7 100 digits<br />
3.5.8 200 digits<br />
3.5.9 500 digits<br />
3.5.10 1000 digits<br />
3.6. Minimum load for initialization<br />
3.6.1* 1 digit<br />
3.6.2 2 digits<br />
3.6.3 5 digits<br />
3.6.4 10 digits<br />
3.6.5 20 digits<br />
3.6.6 50 digits<br />
3.6.7 100 digits<br />
3.6.8 200 digits<br />
3.6.9 500 digits<br />
3.6.10 1000 digits<br />
3.7. Automatic taring:<br />
first weight tared<br />
3.7.1* Off<br />
3.7.2 On<br />
3.8. Start application and load most<br />
recent application data when the<br />
Midrics is switched on<br />
3.8.1 Automatic (on)<br />
3.8.2* Manual (off)<br />
3.9. Resolution for calculation<br />
of reference value<br />
3.9.1* Display resolution<br />
3.9.2 Display resolution<br />
+1 decimal place<br />
3.9.3 Display resolution<br />
+2 decimal places<br />
3.9.4 Internal resolution<br />
3.10. Decimal places in displayed result<br />
3.10.1* None<br />
3.10.2 1 decimal place<br />
3.10.3 2 decimal places<br />
3.10.4 3 decimal places<br />
3.11 Parameter for saving weight values<br />
3.11.1* At stability<br />
3.11.2 At increased stability<br />
3.15. Display of calculated value<br />
3.15.1* Residue<br />
3.15.2 Loss<br />
3.25. Tare function<br />
3.25.1* Add input value<br />
(weight value) for taring<br />
3.25.2 Tare value can be<br />
overwritten<br />
* = Factory setting<br />
§ Press ) to save your settings and (<br />
(repeatedly) to exit the operating menu.<br />
Midrics 1/2<br />
67
Minimum Load<br />
The minimum load required for<br />
initialization of the weighing platform<br />
is configured in the operating menu<br />
under:<br />
Appl L: 3.6.<br />
Once the limit is exceeded by the load,<br />
initialization can begin. If the load<br />
is too light, the following will occur<br />
when you try to save a value:<br />
– The error code Inf 29 is displayed<br />
– The weighing platform is not initialized<br />
– The preset reference percentage is saved<br />
The minimum load required for automatic<br />
taring of the container weight<br />
on the platform (“autotare first weight")<br />
is configured in the operating menu<br />
under:<br />
Appl L: 3.5.<br />
You can choose from 10 settings,<br />
ranging from<br />
1 digit<br />
to<br />
1000 digits<br />
Example: If the scale interval (d) is<br />
1000 g and the minimum load is set<br />
to 1000 digits (=1000 scale intervals),<br />
a load of at least 1000 g is required<br />
for autotaring.<br />
Resolution for Calculation of<br />
Reference Value<br />
The resolution applied for calculating<br />
the reference value is defined in the<br />
operating menu under:<br />
Appl L: 3.9.<br />
The resolution for calculating the<br />
reference sample weight is increased<br />
if “+1 decimal place", “+2 decimal places"<br />
or “With internal resolution"<br />
is selected. With the “+1 decimal place"<br />
setting, the net value is determined<br />
to one additional decimal place (i.e.,<br />
display accuracy + 10); “+2 decimal<br />
places" increases display accuracy<br />
+ 100, and so on up to the maximum<br />
resolution available.<br />
68 Midrics 1/2<br />
Parameter for Saving Weight Values<br />
The reference weight is saved when<br />
the platform has stabilized. “Stability"<br />
is defined as the point at which<br />
fluctuation of a measured value lies<br />
within a defined tolerance range. The<br />
narrower the tolerance range, the more<br />
stable the platform is at stability.<br />
In the operating menu, under:<br />
Appl L: 3.11.<br />
you can define whether the value<br />
is saved when “standard stability" is<br />
reached, or only at “increased stability"<br />
(narrower tolerance range.) If you select<br />
“At increased stability," the reference<br />
weight saved will be more accurate and<br />
the results more reproducible, but the<br />
response time of the weighing instrument<br />
might be longer.<br />
Display of Results<br />
With the Weighing in Percent application,<br />
the result can be displayed as<br />
the residue or the loss. Configuration:<br />
Appl L: 3.15.<br />
Equations:<br />
Residue= (current weight –<br />
100% weight) / * 100<br />
Loss= (current weight –<br />
100% weight) /<br />
100% weight * 100
Example:<br />
Weighing in 100% of a sample material.<br />
Settings (changes in the factory settings required for this example):<br />
Setup: Application: Weighing in percent<br />
Setup: PRTPROT (printout): 7.7.x (COM1) (see “Configuration” for options)<br />
)<br />
O<br />
1. Place empty container on<br />
the platform<br />
2. Tare the scale<br />
Note: If the automatic tare<br />
function is enabled, you do<br />
not need to press the )<br />
key to tare the scale; the tare<br />
weight is saved automatically<br />
when you place the container<br />
on the platform<br />
3. Add reference material in<br />
accordance with reference<br />
percentage<br />
(in this example, 85 g, = 10%)<br />
4. Activate calculation of<br />
the reference weight.<br />
The calculation is based on<br />
the active net weight value<br />
and the reference percentage<br />
entered.<br />
If the weight is too light,<br />
the error code Inf 29 is shown<br />
on the main display.<br />
p<br />
Reduce the minimum load<br />
setting.<br />
5. Continuing filling the<br />
container until the target<br />
amount is reached<br />
(in this example, 100%)<br />
6. Print the result<br />
pRef + 20 % Configured printout:<br />
wRef + 0.085 kg see page 82<br />
G# + 1.080 kg<br />
T + 0.675 kg<br />
N + 0.423 kg<br />
Prc + 100 %<br />
-------------------<br />
Midrics 1/2<br />
69
Application: Checkweighing O<br />
With the Checkweighing application,<br />
you can check whether the sample on<br />
the weighing platform matches a target<br />
value, or lies within a given tolerance<br />
range. Checkweighing also makes it<br />
easy to fill sample materials to specified<br />
target weight.<br />
Features<br />
– Enter the nominal or target weight<br />
(setpoint) and the tolerance range<br />
delimiters either using the keypad or<br />
by saving the weight value from<br />
a load on the platform.<br />
– Enter the tolerance limits as absolute<br />
values (Min and Max) or as percentages<br />
of the target. Configuration:<br />
Appl O: 4.5.<br />
– The target value can be taken over<br />
as a weighed value from a weighing<br />
platform, and the tolerance limits are<br />
defined by the percentage of deviation<br />
from the target value (menu code<br />
4.5.2). The following percentages can<br />
be selected as the deviation: 0.1%,<br />
0.2%, 0.5%, 1%, 1.5%, 2%, 3%, 5% or<br />
10%.<br />
– The target value, lower tolerance<br />
limit (minimum) and upper tolerance<br />
limit (maximum) can be taken over as<br />
weighed values from the weighing<br />
platform.<br />
– Target and tolerance limits checked<br />
during input; values must conform to:<br />
Upper limit > Target > Lower limit ><br />
1 digit.<br />
– Checkweighing range: either 30%<br />
to 170% of the target, or from 10%<br />
to infinity.<br />
– Results are shown on the main display<br />
and the bar graph and sent to control<br />
output ports for further processing.<br />
– Toggle the main display between<br />
weight and tolerances limits by pressing<br />
w. If the weight on the readout is<br />
outside the tolerance range, “LL" (too<br />
low) or “HH" (too high) is displayed.<br />
– Activate info mode by pressing I<br />
– Automatic printout of results.<br />
Configuration:<br />
Appl O: 4.6.<br />
– Automatic taring of container weight.<br />
Configuration:<br />
Appl O: 3.7.<br />
– Automatic initialization with the<br />
most recently saved application data<br />
when you switch on the Midrics.<br />
Configuration:<br />
Appl O: 3.8.<br />
70 Midrics 1/2<br />
– Closing application program;<br />
deleting parameters:<br />
The value for reference sample weight<br />
remains active in the reference memory<br />
until you delete it by pressing the<br />
c key, overwrite it or until you select<br />
a different application.<br />
– Restore factory default settings.<br />
Configuration:<br />
Appl O: 9.1.<br />
Checkweighing entails comparing<br />
the current weight value to a defined<br />
target. You can enter the value for this<br />
target using the keypad, or by saving<br />
the weight value displayed.<br />
You can also define upper and lower<br />
tolerance limits based on this target.<br />
You can do this by:<br />
– Entering absolute values using the<br />
keypad or placing the desired amount<br />
of weight on the platform and saving<br />
the value, or<br />
– Entering each value as a percentage<br />
of the target weight<br />
The initial application values are valid<br />
until deleted by pressing the c key or<br />
until overwritten by new values. They<br />
also remain saved after you switch off<br />
the scale.<br />
– Tare function:<br />
1) If you store a tare (weight value) by<br />
pressing the ) key, you can later<br />
enter a tare value manually. The tare<br />
value you enter is added to the stored<br />
tare value.<br />
Setting: menu code 3.25.1<br />
(factory default)<br />
2) A tare value entered manually<br />
overwrites a stored tare value (weight<br />
value). If you enter a tare value manually,<br />
a tare value (weight value) stored<br />
later overwrites the manually entered<br />
value.<br />
Setting: menu code 3.25.2<br />
Operating menu setting:<br />
Appl O: 3.25<br />
Preparation<br />
§ Switch on the scale: Press e<br />
§ While all segments are lit,<br />
press the ) key<br />
§ Select the Application menu: Press k<br />
repeatedly until APPL is displayed<br />
§ Open the Application menu:<br />
Press the ) key<br />
§ Select the Checkweighing application:<br />
Press the k key repeatedly until<br />
the desired menu item is displayed and<br />
press ) to open the submenu<br />
Application Parameters: Checkweighing<br />
3.5. Minimum load for automatic taring<br />
and automatic printing<br />
3.5.1* 1 digit<br />
3.5.2 2 digits<br />
3.5.3 5 digits<br />
3.5.4 10 digits<br />
3.5.5 20 digits<br />
3.5.6 50 digits<br />
3.5.7 100 digits<br />
3.5.8 200 digits<br />
3.5.9 500 digits<br />
3.5.10 1000 digits<br />
3.7. Automatic taring: first weight tared<br />
3.7. 1* Off<br />
3.7.2 On<br />
3.8. Start application and load most<br />
recent application data when the<br />
Midrics is switched on<br />
3.8.1 Automatic (on)<br />
3.8.2* Manual (off)<br />
4.2. Checkweighing range<br />
4.2.1* 30% to 170%<br />
4.2.2 10% to infinity<br />
3.25. Tare function<br />
3.25.1* Add input value<br />
(weight value) for<br />
taring<br />
3.25.2 Tare value can be<br />
overwritten<br />
4.3. Activate control line for “Set" as:<br />
4.3.1* “Set" output<br />
4.3.2 Ready to operate<br />
4.4. Activation of outputs<br />
4.4.1 Off<br />
4.4.2 Always active<br />
4.4.3 Active at stability<br />
4.4.4* Active within check range<br />
4.4.5 Active at stability within<br />
the check range<br />
4.5. Parameter input<br />
4.5.1* Min, max, target<br />
4.5.2 Only target with<br />
percent limits<br />
4.6. Automatic printing<br />
4.6.1* Off<br />
4.6.2 On<br />
4.6.3 Only values within<br />
tolerance<br />
4.6.4 Only values outside<br />
tolerance<br />
4.7. Checkweighing toward zero<br />
4.7.1* Off<br />
4.7.2 On<br />
* = Factory setting<br />
§ Press ) to save your settings and (<br />
(repeatedly) to exit the operating menu.
Minimum Load<br />
The minimum load required for<br />
automatic taring of the container<br />
weight on the platform (first weight),<br />
or for automatic printout of results,<br />
is configured in the operating menu<br />
under:<br />
Appl O: 3.5.<br />
You can choose from 10 settings,<br />
ranging from<br />
1 digit (no minimum load)<br />
to<br />
1000 digits<br />
Example: If the scale interval (d) is<br />
1000 g and the minimum load is set<br />
to 1000 digits (=1000 scale intervals),<br />
a load of at least 1000 g is required<br />
for autotaring.<br />
Display<br />
The result of a measurement is shown<br />
either as a weight value or in relation<br />
to the target.<br />
– Weight display mode:<br />
The measured value line always shows<br />
the weight value, even if it lies outside<br />
the tolerance range.<br />
The bar graph is displayed with symbols<br />
indicating lower limit, target and upper<br />
limit. The bar shows a logarithmic<br />
display of the current load if the weight<br />
is anywhere from 0 to the minimum<br />
load, and a linear display for weights<br />
beyond that range.<br />
– Tolerance limit display mode:<br />
As “Weight display" above, with the<br />
exception that:<br />
– LL is shown on the main display<br />
if the weight value is lower than<br />
the target, and<br />
– HH is shown on the main display<br />
if the weight value is higher than<br />
the target<br />
Digital Input/Output Interface +<br />
Optional I/O<br />
The Checkweighing application supports<br />
the digital input/output interface.<br />
The 4 control outputs are activated<br />
as follows (see also the diagram on the<br />
right):<br />
– Lighter<br />
– Equal<br />
– Heavier<br />
– Set<br />
or with YDO01M-IO<br />
Configuration in the operating menu:<br />
CTR OUT<br />
8.24<br />
8.24.1 Weighing instrument<br />
ready to operate<br />
8.24.2 Weighing instrument<br />
stable<br />
8.24.3 Weighing instrument<br />
overflow (“H")<br />
8.24.4 Weighing instrument<br />
underflow (“L")<br />
8.24.5 Value in tare memory<br />
8.24.8 Lighter<br />
8.24.9 Equal<br />
8.24.10 Heavier<br />
8.24.11 Set<br />
Under:<br />
Appl O: 4.4.<br />
you can define whether these<br />
control ports are<br />
– off,<br />
– always on,<br />
– active at stability,<br />
– active within the checking range, or<br />
– active at stability within the checking<br />
range<br />
The “SET" output normally changes<br />
its voltage level when the load is near<br />
the target weight. Alternatively, you<br />
can assign the “Operative" function<br />
(indicating “Ready-for-use") to this<br />
port. Configuration:<br />
Appl O: Section 4.3.<br />
For example, you can use this function<br />
to show the weighed or measured<br />
result on a simple external indicator.<br />
All data output ports have a high<br />
voltage level when:<br />
– the application has not been initialized,<br />
– the weighing instrument is not at<br />
stability and one of the “at stability ..."<br />
parameters is selected<br />
– The weight is not within the<br />
checkweighing range<br />
– Activation of port lines: always on<br />
Lighter<br />
Equal<br />
Heavier<br />
Set<br />
Ready for use<br />
Checkweighing range<br />
30 % Target weight 170%<br />
Lower Upper<br />
tolerance limit tolerance limit<br />
– Activation of port lines: always on<br />
Digital Input/Output Interface<br />
– control output: set<br />
Lighter<br />
Equal<br />
Heavier<br />
Set<br />
Ready for use<br />
Checkweighing range<br />
30 % Target weight 170%<br />
Lower Upper<br />
tolerance limit tolerance limit<br />
Digital Input/Output Interface<br />
– control output: set<br />
– Activation of port lines:<br />
within checkweighing range<br />
Output Port Specifications<br />
– When not in use, the voltage<br />
level is high: >3.7 V/+4 mA<br />
– When activated, the voltage level is low:<br />
Example: 1<br />
Checkweighing samples with a target weight of 1250 g and a tolerance range from –10 g to +30 g<br />
Settings (changes in the factory settings required for this example):<br />
Setup: Application: Checkweighing<br />
Setup: PRTPROT (printout): 7.7.x (COM1) (see “Configuration” for options)<br />
O<br />
O<br />
1240<br />
O<br />
72 Midrics 1/2<br />
1. Enter the initial target and<br />
tolerance limit values<br />
2. Place a sample equal to the<br />
target weight (in this example,<br />
1250 g) on the platform<br />
3. Save target value<br />
4. Enter value for lower limit<br />
(in this example, 1240 g)<br />
5. Save value for the lower limit<br />
1280<br />
O<br />
p<br />
6. Enter value for the upper limit<br />
(in this example, 1280 g)<br />
Save value for upper limit<br />
7. Weigh samples<br />
Setp + 1.250 kg Target<br />
Min + 1.240 kg Minimum<br />
Max + 1.280 kg Maximum<br />
G# + 1.256 kg Gross weight<br />
T + 0.000 kg Tare weight<br />
N + 1.256 kg Net weight<br />
8. Print the results<br />
Note: If automatic printout<br />
of results is enabled, you do<br />
not need to press the p key;<br />
the results are printed automatically.<br />
Lim + 0.48 % Percentage of deviation<br />
from target*<br />
W.Diff+ 0.006 kg Absolute deviation from target<br />
-------------------<br />
* Only in “Tolerance limits”<br />
display mode:<br />
If the weight is lighter than<br />
the target, the display shows:<br />
LL<br />
If the weight is heavier than<br />
the target, the display shows:<br />
HH
Application: Classification W<br />
With the Classification application,<br />
you can determine whether the weight of<br />
a given sample lies within the limits of a<br />
defined weight class.<br />
Features<br />
– Classification with 3 or 5 weight classes.<br />
Configure in Setup under:<br />
Appl W: 4.8.<br />
– Enter the upper class limits using<br />
the keypad or by saving weight values<br />
from a load on the platform<br />
– Enter the upper limits of weight classes<br />
as absolute values or as a percentage of<br />
deviation from the upper limit of Class.<br />
Configuration:<br />
Appl W: 4.9.<br />
– Activate info mode by pressing I<br />
– Toggle the main display between classes<br />
and weight values by pressing w.<br />
– Automatic printout of results.<br />
Configuration:<br />
Appl W: 4.10.<br />
– Automatic taring of container weight.<br />
Configuration:<br />
Appl W: 3.7.<br />
– Automatic initialization with the<br />
most recently saved application data<br />
when you switch on the Midrics.<br />
Configuration:<br />
Appl W: 3.8.<br />
– Closing application program;<br />
deleting parameters:<br />
The value for reference sample weight<br />
remains active in the reference memory<br />
until you delete it by pressing the<br />
c key, overwrite it or until you select<br />
a different application.<br />
– Restore factory default settings.<br />
Configuration:<br />
Appl W: 9.1.<br />
The lower limit of Class 1 is defined<br />
by the preset minimum load. The other<br />
classes are configured by defining<br />
their upper limits. There are two ways<br />
to enter the delimiters for classes 1<br />
through 3 (or 5):<br />
– By saving the weight value displayed:<br />
Each upper value, with the exception of<br />
the highest, is entered using the keypad<br />
or by saving the weight value of a load<br />
on the weighing platform.<br />
– By entering a percentage:<br />
The upper value of Class 1 is entered<br />
using the keypad or by saving the<br />
value indicated. Upper limits for the<br />
other classes are defined by entering a<br />
percentage of deviation from the upper<br />
limit of Class 1, using the keypad.<br />
Example: Enter 100 g as the upper limit<br />
of Class 1. Then enter 15%.<br />
When working with 3 classes, this yields<br />
the following weight classes:<br />
Class 0: up to the minimum load<br />
Class 1: > minimum load, up to 100 g<br />
Class 2: >100 g to 115 g<br />
Class 3: > 115 g, up to maximum load<br />
When working with 5 classes, this yields<br />
the following weight classes:<br />
Class 0: up to the minimum load<br />
Class 1: > minimum load, up to 100 g<br />
Class 2: >100 g to 115 g<br />
Class 3: >115 g to 130 g<br />
Class 4: >130 g to 145 g<br />
Class 5: > 145 g, up to maximum load<br />
The initial application values are valid<br />
until deleted by pressing the c key<br />
or until overwritten by new values.<br />
They also remain saved after you switch<br />
off the scale.<br />
– Tare function:<br />
1) If you store a tare (weight value) by<br />
pressing the ) key, you can later<br />
enter a tare value manually. The tare<br />
value you enter is added to the stored<br />
tare value.<br />
Setting: menu code 3.25.1<br />
(factory default)<br />
2) A tare value entered manually<br />
overwrites a stored tare value (weight<br />
value). If you enter a tare value manually,<br />
a tare value (weight value) stored<br />
later overwrites the manually entered<br />
value.<br />
Setting: menu code 3.25.2<br />
Operating menu setting:<br />
Appl W: 3.25<br />
Preparation<br />
§ Switch on the scale: Press e<br />
§ While all segments are lit,<br />
press the ) key<br />
§ Select the Application menu: Press k<br />
repeatedly until APPL is displayed<br />
§ Open the Application menu:<br />
Press the ) key<br />
§ Select the Classification application:<br />
Press the k key repeatedly until the<br />
desired menu item is displayed and<br />
press ) to open the submenu<br />
Application Parameters: Classification<br />
3.5. Minimum load for automatic taring<br />
and automatic printing<br />
3.5.1* 1 digit<br />
3.5.2 2 digits<br />
3.5.3 5 digits<br />
3.5.4 10 digits<br />
3.5.5 20 digits<br />
3.5.6 50 digits<br />
3.5.7 100 digits<br />
3.5.8 200 digits<br />
3.5.9 500 digits<br />
3.5.10 1000 digits<br />
3.6. Minimum load for initialization<br />
and defining the class 1 lower limit<br />
3.6.1* 1 digit<br />
3.6.2 2 digits<br />
3.6.3 5 digits<br />
3.6.4 10 digits<br />
3.6.5 20 digits<br />
3.6.6 50 digits<br />
3.6.7 100 digits<br />
3.6.8 200 digits<br />
3.6.9 500 digits<br />
3.6.10 1000 digits<br />
3.7. Automatic taring: first weight<br />
tared<br />
3.7.1* Off<br />
3.7.2 On<br />
3.8. Start application and load most<br />
recent application data when the<br />
Midrics is switched on<br />
3.8.1 Automatic (on)<br />
3.8.2* Manual (off)<br />
3.25. Tare function<br />
3.25.1* Add input value<br />
(weight value) for<br />
taring<br />
3.25.2 Tare value can be<br />
overwritten<br />
4.3. Activate control line for “Set" as:<br />
4.3.1* “Set" output<br />
4.3.2 Ready to operate (for<br />
process control systems)<br />
4.7. Activation of outputs<br />
4.7.1 Off<br />
4.7.2 Always active<br />
4.7.3* Active at stability<br />
4.8. Number of classes<br />
4.8.1* 3 classes<br />
4.8.2 5 classes<br />
4.9. Parameter input<br />
4.9.1* Weight values<br />
4.9.2 Percentage<br />
4.10. Automatic printing<br />
4.10.1* Off<br />
4.10.2 On<br />
* = Factory setting<br />
§ Press ) to save your settings and (<br />
(repeatedly) to exit the operating menu.<br />
Midrics 1/2<br />
73
Minimum Load<br />
The minimum load for the first class<br />
is configured in the operating menu,<br />
under:<br />
Appl W: 3.6.<br />
Once the limit is exceeded by the load,<br />
initialization can begin.<br />
Once the application is initialized,<br />
a weight value below the minimum<br />
load is designated Class 0; no class<br />
is displayed.<br />
The minimum load required for<br />
automatic taring of the container<br />
weight on the platform (first weight),<br />
or for automatic printout of results,<br />
is configured in the operating menu<br />
under:<br />
Appl W: 3.5.<br />
You can choose from 10 settings,<br />
ranging from<br />
1 digit<br />
to<br />
1000 digits<br />
Example: If the scale interval (d) is<br />
1000 g and the minimum load is set<br />
to 1000 digits (=1000 scale intervals),<br />
a load of at least 1000 g is required<br />
for autotaring.<br />
Display<br />
The result of a given measurement<br />
is shown as either a weight value or the<br />
class number.<br />
– Weight display<br />
The current weight is shown in the<br />
measured value line and the current<br />
class in the text line.<br />
– Display of classes<br />
The current class is shown in the<br />
measured value line, and the current<br />
weight in the text line.<br />
74 Midrics 1/2<br />
Digital Input/Output Interface<br />
(CTTL Signal)<br />
The Classification application supports<br />
the digital input/output interface.<br />
The 4 control outputs are activated as<br />
follows (see also the diagram on the<br />
right):<br />
– With 3 classes:<br />
– Class 1<br />
– Class 2<br />
– Class 3<br />
– Set<br />
– With 5 classes:<br />
– Classes 1/2<br />
– Classes 2/3/4<br />
– Classes 4/5<br />
– Set<br />
Under:<br />
Appl W: 4.7.<br />
you can define whether these<br />
control ports are<br />
– off,<br />
– always on,<br />
– activated at stability,<br />
The “SET" output normally changes<br />
its voltage level when the current<br />
weight exceeds the minimum load.<br />
Alternatively, you can assign the<br />
“Operative" function (indicating<br />
“Ready-for-use") to this port. Configuration:<br />
Appl W: 4.3.<br />
or with YDO01M-IO<br />
Configuration in the operating menu:<br />
CTR OUT<br />
8.24<br />
8.24.1 Weighing instrument<br />
ready to operate<br />
8.24.2 Weighing instrument<br />
stable<br />
8.24.3 Weighing instrument<br />
overflow (“H")<br />
8.24.4 Weighing instrument<br />
underflow (“L")<br />
8.24.5 Value in tare memory<br />
8.24.8 Lighter<br />
8.24.9 Equal<br />
8.24.10 Heavier<br />
8.24.11 Set<br />
Class 1<br />
Class 2<br />
Class 3<br />
Set<br />
Operative<br />
Min. load Max. load<br />
Class<br />
1 2 3<br />
Digital Input/Output Interface<br />
Control lines when working with<br />
3 classes<br />
Classes 1/2<br />
Classes 2/3/4<br />
Classes 4/5<br />
Set<br />
Operative<br />
Min. load Max. load<br />
Class<br />
1 2 3 4 5<br />
Digital Input/Output Interface<br />
Control lines when working with<br />
5 classes
Example:<br />
Defining three classes.<br />
Settings (changes in the factory settings required for this example):<br />
Setup: Application: Classification<br />
Setup: PRTPROT (printout): 7.7.x (COM1); printout for app; then select desired line items (see “Configuration” for options)<br />
O<br />
110<br />
O<br />
130<br />
O<br />
1. Begin input of class delimiters<br />
2. Enter the upper limit for<br />
Class 1 via the keypad<br />
(in this example, 110 g)<br />
3. Save the upper limit for<br />
Class 1<br />
4. Enter the upper limit for<br />
Class 2 via the keypad<br />
(in this example: 130 g)<br />
5. Save the upper limit for<br />
Class 2<br />
p<br />
6. Place the sample on the<br />
weighing platform<br />
Read the result<br />
7. Print the result<br />
Note: If automatic printout<br />
of results is enabled, you do<br />
not need to press the p key;<br />
the results are printed automatically.<br />
Lim1 + 0.110 kg Configured printout:<br />
Lim2 + 0.130 kg see page 82<br />
G# + 0.118 kg<br />
T + 0.000 kg<br />
N + 0.118 g<br />
Class 2<br />
-------------------<br />
Midrics 1/2<br />
75
Application: Totalizing L<br />
With the Totalizing application, you<br />
can add weight values together in the<br />
totalizing memory. In addition to weight<br />
values, the number of individual values<br />
added to memory is also saved (transaction<br />
counter).<br />
Features<br />
– Totalize up to 999 individual weights<br />
Save values automatically:<br />
– Save both net values and calculated<br />
values (if available). Configuration:<br />
Appl L: 3.16.<br />
– Save weight values and calculated<br />
values from Counting, Weighing<br />
in Percent or Checkweighing.<br />
Configuration:<br />
Appl L: 3.22.<br />
– Current transaction number displayed<br />
in the text line (indicating the items<br />
already added)<br />
– Weighing in up to a defined target,<br />
with the totalization memory content<br />
+ current weight displayed in the<br />
text line.<br />
– Save weight values manually or<br />
automatically<br />
– Activate info-mode by pressing I<br />
– Automatic printout when value saved<br />
– Automatic taring of container weight.<br />
Configuration:<br />
Appl L: 3.7.<br />
– Content of totalizing memory stored<br />
in battery-backed (non-volatile) memory<br />
when the Midrics 2 is switched off.<br />
– Closing application program; deleting<br />
parameters:<br />
The value for reference sample weight<br />
remains active in the reference memory<br />
until you delete it by pressing the<br />
c key, overwrite it or until you select<br />
a different application.<br />
– Restore factory settings:<br />
Appl L: 9.1.<br />
76 Midrics 1/2<br />
The Midrics has a totalizing memory for<br />
adding individual net and gross values.<br />
You can save weight values in totalizing<br />
memory manually or automatically.<br />
Configuration:<br />
Appl L: 3.16.<br />
– Add a weight value manually by<br />
pressing O<br />
The net value from the active platform<br />
is added to the value already saved in<br />
totalization memory and the transaction<br />
counter value is increased by one.<br />
When a value is added manually, the<br />
program does not check whether<br />
the platform has been unloaded since<br />
the last time the O key was pressed.<br />
– Value saved automatically when<br />
the weighing platform is stable and the<br />
defined minimum load is exceeded.<br />
If the defined minimum load is not<br />
exceeded, you can save the item<br />
manually by pressing the O key.<br />
The scale must be unloaded before<br />
the sample is placed on the platform.<br />
The weighing platform is considered<br />
to be unloaded when the load is less<br />
than 50% of the minimum load.<br />
The number of items added to memory<br />
is displayed in the text line.<br />
Press the c key to clear the totalizing<br />
memory. A printout is generated<br />
automatically.<br />
– Tare function:<br />
1) If you store a tare (weight value) by<br />
pressing the ) key, you can later<br />
enter a tare value manually. The tare<br />
value you enter is added to the stored<br />
tare value.<br />
Setting: menu code 3.25.1<br />
(factory default)<br />
2) A tare value entered manually<br />
overwrites a stored tare value (weight<br />
value). If you enter a tare value manually,<br />
a tare value (weight value) stored<br />
later overwrites the manually entered<br />
value.<br />
Setting: menu code 3.25.2<br />
Operating menu setting:<br />
Appl L: 3.25<br />
Preparation<br />
§ Switch on the scale: Press e<br />
§ While all segments are lit,<br />
press the ) key<br />
§ Select the Application menu:<br />
Press k repeatedly until APPL<br />
is displayed<br />
§ Open the Application menu:<br />
Press the ) key<br />
§ Select the Totalizing application:<br />
Press the k key repeatedly until<br />
the desired menu item is displayed<br />
and press ) to open the submenu
Application Parameters: Totalizing<br />
3.5. Minimum load for automatic<br />
taring and automatic printing<br />
3.5.1* 1 digit<br />
3.5.2 2 digits<br />
3.5.3 5 digits<br />
3.5.4 10 digits<br />
3.5.5 20 digits<br />
3.5.6 50 digits<br />
3.5.7 100 digits<br />
3.5.8 200 digits<br />
3.5.9 500 digits<br />
3.5.10 1000 digits<br />
3.6. Minimum load for automatically<br />
saving/transferring values<br />
3.6.1* 1 digit<br />
3.6.2 2 digits<br />
3.6.3 5 digits<br />
3.6.4 10 digits<br />
3.6.5 20 digits<br />
3.6.6 50 digits<br />
3.6.7 100 digits<br />
3.6.8 200 digits<br />
3.6.9 500 digits<br />
3.6.10 1000 digits<br />
3.7. Automatic taring:<br />
first weight tared<br />
3.7.1* Off<br />
3.7.2 On<br />
3.8. Start application and load most<br />
recent application data when the<br />
Midrics is switched on<br />
3.8.1 Automatic (on)<br />
3.8.2* Manual (off)<br />
3.16. Values saved automatically<br />
3.16.1* Off<br />
3.16.2 On<br />
3.17. Automatic individual or component<br />
printout when value stored<br />
3.17.1 Off<br />
3.17.2* Generate printout with<br />
complete standard<br />
configuration each time<br />
O is pressed<br />
3.17.3 Generate printout with<br />
complete standard<br />
configuration only the<br />
first time O is pressed<br />
3.23. Value(s) to be saved<br />
3.23.1* Net<br />
3.23.2 Calculated<br />
3.23.3 Net and calculated<br />
3.25. Tare function<br />
3.25.1* Add input value (weight<br />
value) for taring<br />
3.25.2 Tare value can be overwritten<br />
* = Factory setting<br />
§ Press ) to save your settings and (<br />
(repeatedly) to exit the operating menu.<br />
Minimum Load<br />
The minimum load required for automatic<br />
taring of the container weight on the<br />
platform (“autotare first weight") is configured<br />
in the operating menu under:<br />
Appl L: 3.5.<br />
The minimum amount that a component<br />
must weigh before it can be saved in<br />
totalizing memory is configured in the<br />
operating menu under:<br />
Appl L: 3.6.<br />
You can choose from 10 settings,<br />
ranging from<br />
1 digit<br />
to<br />
1000 digits<br />
Example: If the scale interval (d) is 1000 g<br />
and the minimum load is set to 1000 digits<br />
(=1000 scale intervals), a load of at least<br />
1000 g is required for autotaring.<br />
Data Record or Printout<br />
In the operating menu, under:<br />
Appl L: 3.17.<br />
you can configure whether a printout<br />
is generated manually, by pressing p,<br />
or automatically when a weight value<br />
is saved in the totalizing memory.<br />
If you select 3.17.1 for this setting,<br />
printouts can be generated only manually,<br />
by pressing p (individual printout).<br />
If you select 3.17.2 (printout of a component<br />
on request), the component printout<br />
is generated.<br />
The total data record is printed<br />
when you clear the totalizing memory<br />
(by pressing the c key).<br />
Midrics 1/2<br />
77
Example:<br />
Totalizing weight values.<br />
Settings (changes in the factory settings required for this example):<br />
Setup: Application: Totalizing<br />
Setup: PRTPROT: 7.7.x (COM1 interface)<br />
then select the desired line items<br />
Setup: PRTPROT: 7.9.x (“Print when CF pressed")<br />
then select the desired line items<br />
O<br />
78 Midrics 1/2<br />
1. Place the first weight on the<br />
weighing platform<br />
Weight value is displayed<br />
2. Save the first weight value<br />
in totalizing memory<br />
G# + 0.250 kg The component data is<br />
T + 0.000 kg printed automatically<br />
N + 0.250 kg (configured printout)<br />
n 1<br />
The transaction counter<br />
value is increased by 1.<br />
3. Remove the first weight from<br />
the weighing platform<br />
O<br />
4. Place the weight on the<br />
weighing platform<br />
Weight value is displayed<br />
5. Save the second weight value<br />
in totalizing memory<br />
G# + 1.346 kg The component data<br />
T + 0.346 kg is printed automatically<br />
N + 1.000 kg (configured printout)<br />
n 2<br />
W<br />
c<br />
The transaction counter<br />
value is increased by one,<br />
and now shows “2"<br />
6. Toggle the display between<br />
individual and total value<br />
7. End totalizing<br />
*G + 1.346 g The total data record is<br />
*N + 1.250 g printed as configured.<br />
n 2<br />
-------------------
Application: Net-total Formulation R<br />
With the Net-total Formulation<br />
application, you can weigh in different<br />
components up to a defined total.<br />
Each component is saved in a net-total<br />
memory.<br />
Features<br />
– Weigh in up to 999 components<br />
in series<br />
– Net-total formulation cannot be<br />
combined with other applications<br />
– Current component number displayed<br />
in the text line (indicating the component<br />
to be added)<br />
– Toggle the display between “component<br />
mode" and “additive mode"<br />
by pressing w.<br />
– Component mode: Display the<br />
weight of the component currently<br />
on the platform (for 1 second after it<br />
is saved; then the platform is tared)<br />
– Additive mode: Display the weight<br />
of all components on the platform<br />
(after it is saved, the net weight<br />
of the last component added is<br />
displayed briefly)<br />
– Activate info-mode by pressing I<br />
– Automatic printout each of component<br />
as it is saved. Configuration:<br />
appl R: 3.17.<br />
If menu item 3.17.2 is set, the entire<br />
component printout is generated every<br />
time a component is saved. If menu<br />
item 3.17.3 is set, the full printout<br />
is generated only once, for the first<br />
component:<br />
Blank line, date, time, ID1 through ID4,<br />
header lines 1 and 2. For subsequent<br />
components, each “component" item<br />
(“Comp xx") is followed by a blank line.<br />
– Automatic taring of container weight.<br />
Configuration:<br />
appl R: 3.7.<br />
– Restore factory default settings.<br />
Configuration:<br />
appl R: 9.1.<br />
Preparation<br />
§ Switch on the scale: Press e<br />
§ While all segments are lit,<br />
press the ) key<br />
§ Select the Application menu: Press k<br />
repeatedly until APPL is displayed<br />
§ Open the Application menu:<br />
Press the ) key<br />
§ Select the Net-total Formulation<br />
application:<br />
Press the k key repeatedly until<br />
the desired menu item is displayed and<br />
press ) to open the submenu<br />
Application Parameters:<br />
Net-Total Formulation<br />
3.5. Minimum load for automatic<br />
taring and automatic printing<br />
3.5.1* 1 digit<br />
3.5.2 2 digits<br />
3.5.3 5 digits<br />
3.5.4 10 digits<br />
3.5.5 20 digits<br />
3.5.6 50 digits<br />
3.5.7 100 digits<br />
3.5.8 200 digits<br />
3.5.9 500 digits<br />
3.5.10 1000 digits<br />
3.6. Minimum load for automatically<br />
saving/transferring values<br />
3.6.1* 1 digit<br />
3.6.2 2 digits<br />
3.6.3 5 digits<br />
3.6.4 10 digits<br />
3.6.5 20 digits<br />
3.6.6 50 digits<br />
3.6.7 100 digits<br />
3.6.8 200 digits<br />
3.6.9 500 digits<br />
3.6.10 1000 digits<br />
3.7. Automatic taring:<br />
first weight tared<br />
3.7.1* Off<br />
3.7.2 On<br />
3.17. Automatic individual or component<br />
printout when value stored<br />
3.17.1 Off<br />
3.17.2* Generate printout with<br />
complete standard<br />
configuration each time<br />
O is pressed<br />
3.17.3 Generate printout with<br />
complete standard<br />
configuration only the<br />
first time O is pressed<br />
3.25. Tare function<br />
3.25.1* Add input value (weigh<br />
value) for taring<br />
3.25.2 Tare value can be<br />
overwritten<br />
* = Factory setting<br />
§ Press ) to save your settings and (<br />
(repeatedly) to exit the operating menu.<br />
Minimum Load<br />
The minimum amount that a component<br />
must weigh before it can be saved<br />
in net-total memory is configured in<br />
the operating menu under:<br />
appl R: 3.6.<br />
Once the limit is exceeded by the load,<br />
the value can be saved. If the load<br />
is too light, the following will occur<br />
when you try to save a value:<br />
– The error code Inf 29 is displayed<br />
– The weighing platform is not initialized<br />
The minimum load required for automatic<br />
taring of the container weight<br />
on the platform (“autotare first weight")<br />
is configured in the operating menu<br />
under:<br />
appl R: 3.5.<br />
You can choose from 10 settings,<br />
ranging from<br />
1 digit<br />
to<br />
1000 digits<br />
Example: If the scale interval (d) is<br />
1000 g and the minimum load is set<br />
to 1000 digits (=1000 scale intervals),<br />
a load of at least 1000 g is required<br />
for autotaring.<br />
Tare function:<br />
1) If you store a tare (weight value)<br />
by pressing the ) key, you can later<br />
enter a tare value manually. The tare<br />
value you enter is added to the stored<br />
tare value.<br />
Setting: menu code 3.25.1<br />
(factory default)<br />
2) A tare value entered manually overwrites<br />
a stored tare value (weight value).<br />
if you enter a tare value manu-ally, a<br />
tare value (weight value) stored later<br />
overwrites the manually entered value.<br />
Setting: menu code 3.25.2<br />
Operating menu setting:<br />
appl R: 3.25.<br />
Midrics 1/2<br />
79
Example:<br />
Weighing in 3 components of a formulation recipe.<br />
Settings (changes in the factory settings required for this example):<br />
Setup: Application: Net-total Formulation<br />
Setup: PRTPROT: 7.7.x (COM1 interface) “Printout when value is saved”;<br />
then select the desired line items<br />
Setup: PRTPROT: 7.9.x “Print when CF pressed"<br />
then select the desired line items<br />
)<br />
O<br />
80 Midrics 1/2<br />
1. Place empty container on the platform<br />
2. Tare the scale<br />
Note: If the automatic tare function is enabled, you do not need to press the ) key to tare the scale;<br />
the tare weight is saved automatically when you place the container on the platform<br />
Prompt to fill and save the first component is displayed<br />
3. Add the first component to the container (in this example, 1100 g)<br />
The weight of the first component is displayed<br />
4. Store the weight of the first component<br />
Cmp001+ 1.100 kg The component weight is printed automatically
Application: Net-total Formulation R<br />
O<br />
The weighing platform is tared<br />
and the component counter<br />
value is increased by one.<br />
Prompt to fill and save the<br />
second component is shown.<br />
5. Add the second component<br />
to the container<br />
(in this example, 525 g)<br />
The weight of the second<br />
component is displayed<br />
6. Store the weight of the third<br />
component<br />
Cmp002+ 0.525 kg The component weight is<br />
printed automatically<br />
w<br />
The weighing platform is tared<br />
and the component counter<br />
value is increased by one.<br />
Prompt to fill and save the<br />
third component is displayed.<br />
7. Toggle to the “additive mode"<br />
to view the total weight of all<br />
components.<br />
The value displayed equals<br />
the weight of all components<br />
added up to now plus the<br />
current weight.<br />
8. Add the third component to<br />
the container, bringing the<br />
total up to the desired target<br />
(in this example, 2000 g).<br />
The total weight is displayed<br />
O 9. Store the weight of the third<br />
component<br />
Cmp003+ 0.375 kg The component weight<br />
is printed automatically<br />
c<br />
The component counter<br />
value is increased by one.<br />
Prompt to fill and save<br />
a fourth component is shown.<br />
10. End weighing-in operation<br />
Results are printed<br />
automatically (configured<br />
total printout)<br />
n + 3 Number of components<br />
Tot.cp+ 2.000 kg Contents of component<br />
memory<br />
Cont.T+ 0.296 kg Content of tare memory<br />
(container weight<br />
-------------------<br />
Midrics 1/2<br />
81
Configuring Printouts<br />
Purpose<br />
You can specify which data items are<br />
included on printouts. When using<br />
the Totalizing or Net-total Formulation<br />
application, you can also define<br />
which parameters are included in the<br />
“Total" data record when the c key is<br />
pressed.<br />
In the Setup menu under “Printout"<br />
you can configure an individual,<br />
component or total data record that<br />
contains all data items activated for the<br />
application program currently in use.<br />
The printout should be formatted only<br />
after the desired application has been<br />
configured, as some of the positions are<br />
application-dependent.<br />
Features<br />
– Quantity and content of data record<br />
lists:<br />
6 lists, each with a length of up to<br />
30 data items<br />
– Individual printout, printer 1<br />
– Component printout, printer 1<br />
– Total printout, printer 1<br />
– Individual printout, printer 2<br />
– Component printout, printer 2<br />
– Total printout, printer 2<br />
– You can configure individual, component<br />
and total printouts separately<br />
– Generate an individual printout:<br />
Press p<br />
Automatic printout from application<br />
when active in operating menu:<br />
– Animal weighing/averaging<br />
– Checkweighing<br />
– Classification<br />
– Generate component printout:<br />
Totalizing/Net-total formulation:<br />
Press the O key (Applications: Totalizing:<br />
Printing: Component printout)<br />
– Generate total printout:<br />
For Totalizing or Net-total Formulation;<br />
press the c key<br />
– When you change application programs<br />
in the operating menu, the selected<br />
data record lists are deleted.<br />
The new selection list is generated<br />
according to the active application<br />
programs.<br />
– You can delete individual items<br />
from the list<br />
82 Midrics 1/2<br />
– “Form feed" item in the printout footer:<br />
For advancing to the start of the next<br />
label in print mode “YDP01IS: Label" or<br />
“YDP04IS: Label: Manual form feed"<br />
– ISO/GMP-compliant printout:<br />
The operating menu configuration under<br />
“ISO/GMP-compliant printout"<br />
is also active for configured printouts.<br />
Preparation<br />
§ Switch on the scale: Press e<br />
§ While all segments are lit,<br />
press the ) key<br />
§ Select the Setup menu: Press k<br />
repeatedly until Setup is displayed<br />
§ Open the Setup menu:<br />
Press the ) key<br />
§ Press k repeatedly until prtprot<br />
is displayed<br />
§ Press the ) key<br />
prtprot (Printout; for details on menu items,<br />
see page 46)<br />
7<br />
9<br />
7.4 Header input<br />
Identifier names ID1 to ID4<br />
7.5 COM1 interface<br />
7.6 Optional UniCOM interface<br />
7.7 COM1 interface<br />
Configure standard printout<br />
(press p, O)<br />
7.8 Configure standard printout<br />
for optional UniCOM<br />
interface (p, O keys)<br />
7.9 COM1 interface<br />
Print results when c<br />
pressed in applications<br />
7.10 Printout of results on<br />
optional UniCOM interface<br />
when c pressed in<br />
applications<br />
7.13 ISO/GMP-compliant printout<br />
7.14 Date/time printout line:<br />
Time not printed<br />
7.15 One-time automatic<br />
printout at stability<br />
7.16 FlexPrint<br />
7.17 Decimal separator<br />
9.1 Factory settings<br />
§ Press ) to save your settings and (<br />
(repeatedly) to exit the operating menu.
Configuring the Data<br />
Interface as a Printer Port<br />
(printer)<br />
You can connect one or two strip<br />
printers or one or two label printers<br />
to the Midrics. Configure the COM1<br />
and UniCOM interfaces as printer ports<br />
under the “Printer" menu item.<br />
There are several actions that<br />
generate the command for sending<br />
data to the printer port:<br />
– Pressing the p key. If the operating<br />
menu is active, all menu settings under<br />
the active menu level are printed.<br />
– On receipt of the SBI command<br />
“Esc k P _".<br />
– In some applications, pressing<br />
a given key (e.g., to save a value or<br />
start a routine), also generates a print<br />
command. In this case, a configurable<br />
printout is generated with applicationspecific<br />
data.<br />
The P and b symbols are displayed<br />
while data is being sent to the<br />
printer port.<br />
Configuring Printouts<br />
Printouts are configured in the operating<br />
menu under the “Printouts" menu item<br />
(prtprot). Printouts should be formatted<br />
only after the desired application has been<br />
configured, as some of the positions are<br />
application-dependent.<br />
You can configure a different printout<br />
for each interface. Each printout contains<br />
your choice of the information blocks<br />
described in the following; to enable or<br />
disable a block in the printout, select it<br />
or deselect it in the operating menu.<br />
Midrics 2 only:<br />
For the Totalizing and Net-total<br />
Formulation applications, you can also<br />
configure summarized printouts (results)<br />
independent of individual component<br />
value printouts.<br />
Block 1: Headers and Identifier Names<br />
You can define 2 header lines, each with<br />
up to 20 characters (e.g., for printing your<br />
company's name).<br />
Enter the header lines under menu items<br />
7.4.1 and 7.4.2. Forty characters each are<br />
available for identifier names ID1 through<br />
ID4. Enter these names using menu items<br />
7-4-3 through 7-4-6. Blank header lines<br />
are not printed.<br />
Example: format of Block 1:<br />
ACE HARDWARE<br />
GOETTINGEN<br />
ID1 123<br />
ID4 789<br />
In this example, the company name<br />
is centered on the printout. This was<br />
achieved by entering 3 spaces at the<br />
beginning of the first, and 4 spaces at<br />
the beginning of the second line.<br />
Block 2: Date/Time<br />
(not on Midrics 1)<br />
Example: format of Block 2:<br />
21.01.2013 16:02<br />
To achieve a standardized time stamp<br />
(e.g., for documentation in a fully<br />
automated system), you can disable the<br />
printout of the time in this information<br />
block by selecting “Device parameters:<br />
Config. printout: Date/time: Date only"<br />
(7.12.2; factory setting: 7.12.1., “Date<br />
block includes time on printout"). When<br />
the “Time not printed" setting is active,<br />
the time stamp can be inserted by a<br />
higher-level controller or central computer<br />
to maintain consistent time stamping. This<br />
setting is especially important for communication<br />
between scale and computer.<br />
Separating Block:<br />
Dotted line, blank line (for the Weighing<br />
application).<br />
This block is automatically inserted before<br />
further information blocks are printed.<br />
--------------------<br />
Block 3: Initialization Data<br />
Which data is included in this block depends<br />
on the active application. It can include,<br />
for example, reference sample quantity,<br />
reference piece weight, target weight, etc.<br />
The block is terminated with a blank line.<br />
This block can only by activated for the<br />
standard printout; it cannot be selected<br />
for the printout of results.<br />
Example: format of Block 3 (Counting<br />
application)<br />
nRef 10 pcs<br />
wRef + 0.035 kg<br />
Midrics 1/2<br />
83
GMP-compliant Printouts<br />
When the corresponding menu item is<br />
active, the measured result is bracketed<br />
on the printout by a GMP header and<br />
a GMP footer (GMP = “Good Manufacturing<br />
Practice").<br />
The GMP header precedes the first<br />
measured result. The GMP footer is printed<br />
either after each measured result (“ISO/<br />
GLP/GMP: For 1 application result," menu<br />
item 7.11.2), or after the last result in a<br />
series of measurements (“ISO/GMP/GLP:<br />
For several application results," menu<br />
item 7.11.3). To end a series of measured<br />
results, press and hold the p key (> 2<br />
seconds). In this case,<br />
the A symbol is displayed after the<br />
GMP header is printed and remains in the<br />
display until the GMP footer is printed.<br />
A GMP-compliant printout is generated<br />
automatically at the conclusion of<br />
calibration/adjustment routines, as well as<br />
when you set or clear a preload.<br />
If you use a label printer for GMPcompliant<br />
printouts and menu item 7.11.3<br />
is active, the header and footer are printed<br />
on two different labels. To generate<br />
GMP-compliant printouts on labels, select<br />
menu item 7.11.2.<br />
84 Midrics 1/2<br />
Examples of GMP headers and<br />
one example of a footer are shown<br />
in the following.<br />
Weighing platform WP1:<br />
-------------------- Dotted line<br />
14.01.2013 09:43 Date and time 1)<br />
Typ MW1P1 Midrics model<br />
Ser.no. 12345678 Midrics serial no.<br />
Vers. 1.1007.12.1 Software release for application<br />
BVers. 01-25-01 Software release for basic version<br />
-------------------- Dotted line<br />
GMP footer:<br />
-------------------- Dotted line<br />
14.01.2013 09:45 Date and time 1)<br />
Name: Field for operator signature<br />
Blank line<br />
-------------------- Dotted line<br />
1) Interface YDO01M-332CLK (Option A31) required
Sample Printouts<br />
For details on the individual information<br />
blocks, see “Configuring Printouts" above.<br />
For details on configuring the header lines,<br />
refer to the chapter describing the<br />
particular application.<br />
Weighing Application<br />
There is no data for the “initialization<br />
data" block. If this block is enabled for<br />
the printout, a blank line is output.<br />
HEADER LINE 1<br />
HEADER LINE 2<br />
14.01.2006 09:43<br />
--------------------<br />
G# + 1.402 kg<br />
T + 0.200 kg<br />
N + 1.202 kg<br />
--------------------<br />
With weighing platform serial number:<br />
--------------------<br />
Ser.no. 80705337<br />
G# + 1.402 kg<br />
T + 0.200 kg<br />
N + 1.202 kg<br />
--------------------<br />
Counting Application<br />
The “Initialization data" block contains<br />
the reference sample quantity and reference<br />
piece weight. The “Results" block<br />
contains gross, net and tare weights, as<br />
well as the calculated piece count.<br />
-------------------nRef<br />
10 pcs<br />
wRef + 0.035 kg<br />
G# + 1.402 kg<br />
T + 0.212 kg<br />
N + 1.190 kg<br />
Qnt 34 pcs<br />
--------------------<br />
Neutral Measurement Application<br />
The “Initialization data" block contains the<br />
reference sample quantity and reference<br />
weight. The “Results" block contains gross,<br />
net and tare weights, as well as the calculated<br />
piece count.<br />
--------------------<br />
Ref 2 o<br />
wRef + 1.200 kg<br />
G# + 14.700 kg<br />
T + 0.300 kg<br />
N + 14.400 kg<br />
Qnt 12 o<br />
--------------------<br />
Weighing in Percent Application<br />
The “Initialization data" block contains the<br />
reference percentage and reference weight.<br />
The results block shows gross, net and tare<br />
weights, as well as the percentage, which<br />
is shown as either the loss or the residual<br />
amount.<br />
Percentage = residue:<br />
--------------------<br />
pRef 100 %<br />
Wxx% + 2.100 kg<br />
G# + 1.859 kg<br />
T + 0.200 kg<br />
N + 1.659 kg<br />
Prc 79 %<br />
--------------------<br />
Percentage = loss:<br />
-------------------pRef<br />
100 %<br />
Wxx% + 2.100 kg<br />
G# + 0.641 kg<br />
T + 0.200 kg<br />
N + 0.441 kg<br />
D 21 %<br />
--------------------<br />
Checkweighing Application<br />
The “Initialization data" block contains<br />
the nominal, minimum and<br />
maximum weights. The “Results" block<br />
always contains the gross, net and tare<br />
weights. The other results can be displayed<br />
in one of two ways:<br />
– Weight display<br />
The deviation from the nominal weight<br />
is given both as a percentage and as an<br />
absolute (weight) value, whether the<br />
result lies within the “OK" range or not.<br />
– Result = Threshold status:<br />
If the result lies within the tolerance<br />
limits, the printout shows the deviation<br />
from the nominal weight both as<br />
a percentage and as an absolute<br />
(weight) value, just as in the “Weight"<br />
printout mode described above.<br />
If the result is outside the tolerance limits,<br />
the last line of the printout<br />
indicates the status as follows:<br />
Result in within limits; “Weight"<br />
or “Threshold" printout:<br />
--------------------<br />
Setp + 1.300 kg<br />
Min + 1.235 kg<br />
Max + 1.365 kg<br />
G# + 1.312 kg<br />
T + 0.000 kg<br />
N + 1.312 kg<br />
Lim + 0.92 %<br />
Diff.W+ 0.012 kg<br />
--------------------<br />
Result outside limits;<br />
“Threshold” printout:<br />
--------------------<br />
Setp + 1.300 kg<br />
Min + 1.235 kg<br />
Max + 1.365 kg<br />
G# + 1.400 kg<br />
T + 0.000 kg<br />
N + 1.400 kg<br />
Stat HH<br />
--------------------<br />
Midrics 1/2<br />
85
Classification Application<br />
The “Initialization data" block contains<br />
the upper limits of Classes 1 through 4.<br />
The “Results" block contains gross, net<br />
and tare weights, as well as the class<br />
that the sample belongs to (1 through<br />
5, where Class 5 means that the upper<br />
limit of Class 4 was exceeded).<br />
--------------------<br />
Lim1 + 10.000 kg<br />
Lim2 + 11.000 kg<br />
Lim3 + 12.000 kg<br />
Lim4 + 13.000 kg<br />
G# + 9.700 kg<br />
T + 0.000 kg<br />
N + 9.700 kg<br />
Class 1<br />
--------------------<br />
Animal Weighing Application<br />
The “Initialization data" block contains<br />
the number of measured values that<br />
averaging is based on. The “Results"<br />
block contains the tare weight and the<br />
mean value.<br />
--------------------<br />
mDef 8<br />
T + 0.000 kg<br />
x-Net + 4.202 kg<br />
--------------------<br />
Net-total Formulation Application<br />
The “Initialization data" block is blank.<br />
If this block is enabled for the printout,<br />
a blank line is output.<br />
Which data is contained in the “Results"<br />
block value depends on the program<br />
operating status at the time of printing.<br />
The following options are available:<br />
– Total/results printout<br />
After c is pressed (tare memory<br />
is cleared)<br />
– Individual/components printout<br />
After O is pressed (component<br />
is stored in tare memory)<br />
– Standard<br />
After p is pressed (component<br />
is not stored in tare memory)<br />
86 Midrics 1/2<br />
‘Total' printout:<br />
--------------------<br />
n 2<br />
S-Comp+ 3.200 kg<br />
Cont.T+ 0.200 kg<br />
--------------------<br />
Component printout (menu item 3.17.3)<br />
When the components printout is<br />
configured, the header is printed only<br />
once, followed by all components.<br />
If you are using a label printer, make sure<br />
a single label is large enough for the<br />
list of all components. For printer models<br />
YDP01IS and YDP04IS, you can configure<br />
manual form feed in the operating menu.<br />
If the corresponding setting is active,<br />
you can activate “form feed" manually.<br />
With the YDP02IS printer, form feed is<br />
automatic after each print command<br />
(fixed setting).<br />
Example with 2 components<br />
HEADER LINE 1<br />
HEADER LINE 2<br />
14.01.2013 09:43<br />
--------------------<br />
Cmp001+ 1.200 kg<br />
Cmp002+ 2.000 kg<br />
Individual printout (menu item 3.17.2)<br />
The entire standard printout is generated<br />
for each component.<br />
Example for the second component:<br />
HEADER LINE 1<br />
HEADER LINE 2<br />
14.01.2013 09:46<br />
--------------------<br />
Cmp002+ 2.000 kg<br />
Standard printout<br />
Example before the second component<br />
is stored:<br />
G# + 3.400 kg<br />
T + 0.200 kg<br />
T2 + 1.200 kg<br />
N + 2.000 kg<br />
Totalizing Application<br />
The “Initialization data" block is empty.<br />
If this block is enabled for the printout,<br />
a blank line is output.<br />
Which data is contained in the “Results"<br />
block value depends on the program<br />
operating status at the time of printing.<br />
The following options are available:<br />
– Printout of results<br />
After c is pressed (totalizing memory<br />
is cleared)<br />
– Individual/component printout<br />
of one transaction<br />
After O is pressed (component<br />
is stored in tare memory)<br />
– Standard printout<br />
After p is pressed (component<br />
is not stored in tare memory)<br />
‘Total' printout:<br />
--------------------<br />
*G 9.200 kg<br />
*N + 8.600 kg<br />
n 3<br />
--------------------<br />
Component printout<br />
(menu item 3.17.3)<br />
The header is printed only once;<br />
all transactions are printed one after<br />
the other. For printing on a label<br />
printer, see also “Component printout,<br />
Net-total."<br />
Example with 2 transactions:<br />
HEADER LINE 1<br />
HEADER LINE 2<br />
14.01.2013 09:43<br />
--------------------<br />
G# + 1.400 kg<br />
T + 0.200 kg<br />
N + 1.200 kg<br />
n 1<br />
G# + 3.400 kg<br />
T + 0.200 kg<br />
N + 3.200 kg<br />
n 2
Individual printout (menu item 3.17.2)<br />
The entire standard printout is generated<br />
for each component.<br />
Example: Print second transaction:<br />
HEADER LINE 1<br />
HEADER LINE 2<br />
14.01.2013 09:43<br />
-------------------<br />
G# + 2.400 kg<br />
T + 0.200 kg<br />
N + 2.200 kg<br />
n 2<br />
Standard printout<br />
The transaction counter value is not<br />
printed.<br />
Example: Print second transaction:<br />
G# + 2.400 kg<br />
T + 0.200 kg<br />
N + 2.200 kg<br />
Print menu parameters:<br />
All active menu item settings below the<br />
active menu level are printed.<br />
--------------------<br />
MENU<br />
SETUP.<br />
WP1<br />
--------------------<br />
1<br />
1.1<br />
1.1.2<br />
1.2.1<br />
1.3.2<br />
...<br />
1.18<br />
1.18.1<br />
CAL.<br />
10,000 kg<br />
etc.<br />
Midrics 1/2<br />
87
Data Interface (Optional)<br />
For COM1<br />
Standard equipment: RS-232 Computer with serial RS-232 input port<br />
SBI/XBPI protocol, Option A11: printer:<br />
YDP04IS<br />
YDP02IS<br />
YDP12IS<br />
YDP03-0CE<br />
YAM01IS external Alibi memory<br />
YBT01 external Bluetooth adapter<br />
YRD02Z second display<br />
USB adapter cable for connecting a computer over USB: YCC01IS<br />
Option: “RS-232 clock:" Option A31 As for the RS-232 standard, but includes date/time<br />
For UniCOM<br />
Male connector: For RS-232 / RS-422 / RS-485 analog output port / digital I/O<br />
Ethernet: RJ45 socket<br />
UniCOM (can be selected optionally)<br />
RS-232: Option A1, YDO01M-232CO Computer with serial RS-232 input port, SBI/XBPI protocol and SMA<br />
YAM01IS external Alibi memory<br />
YBT01 external Bluetooth adapter<br />
YRD02Z second display<br />
USB adapter cable for connecting a computer over USB: YCC01-USBM2<br />
YRD14Z red-green-red display (uses digital control lines)<br />
Digital control lines (TTL/5V) to YSB01 relay box<br />
RS-422: Option A2, YDO01M-485/422 Point-to-point connection with SBI/XBPI protocol as SMA Ethernet<br />
RS-485: Option A3, YDO01M-485/422 Network, up to 32 weighing instruments, XBPI bus<br />
Analog output port: Controllers with analog input<br />
Option A9, YDO01M-20MA<br />
Digital I/O, 5 IN/5 OUT: For connection to a controller<br />
Option A5, YDO01M-IO Digital IN: Voltage: 0–30V DC; current: 1 to 2 mA<br />
Digital OUT: Voltage: >30V DC; current: 100 mA<br />
For specific signals, please refer to the detailed descriptions of the options<br />
88 Midrics 1/2
Error Messages<br />
Error messages are shown in the main display. Error messages are shown permanently; Information messages are shown for 2 seconds.<br />
After this the program automatically returns to the weighing mode.<br />
Display Cause Remedy<br />
ERR101 Key is stuck Release key or<br />
Key pressed whilst switching on Contact your customer service partner<br />
ERR 320 Operating program memory faulty Contact your customer service partner<br />
ERR 340 Incorrect operating parameter (EEPROM) Switch scale off and then on again,<br />
if Err 340 is permanently displayed:<br />
Contact your customer service partner<br />
ERR 341 Loss of data Contact your customer service partner<br />
ERR 343 Loss of data in storage for Contact your customer service partner<br />
external Alibi memory transaction number<br />
Err 2627 The time entered or stored in the Alibi Set output format correctly<br />
memory is incorrect<br />
Inf 01 Data output not compatible with Set output format correctly<br />
output format<br />
Inf 02 Calibration condition was not met Do not carry out calibration until after 0 display<br />
e.g. not tared or Unload the weighing equipment<br />
weighing pan loaded Tare with the ) key<br />
Inf 03 Calibration could not be completed Keep to warm-up time and<br />
within a certain time calibrate again<br />
Inf 07 Last operating function is not permissible For setting changes please<br />
use in legal metrology Contact your customer service partner<br />
Inf 08 Load on the scale is too heavy for scale to be Please check if point 1.12 “Zero-setting<br />
zeroed. range” was adhered to in your configuration.<br />
Inf 09 Taring not possible for gross zero Zero the scale<br />
Inf 10 Taring not possible with occupied tare memory Taring only possible after deletion of the<br />
application program<br />
Inf 22 Reference takeover error, Place a heavier weight on the platform<br />
weight too small<br />
Inf 23 Error in initializing an application Contact your customer service partner<br />
Inf 29 Minimum load not achieved Reduce minimum load<br />
(under Application, menu item 3.6)<br />
Inf 71 Saving of measured value (or input) not possible None<br />
(e.g. control limit too small or too large)<br />
Inf 72 Saving of measured value not possible None<br />
(e.g. maximum for item counter reached)<br />
Inf 73 Stored data is deleted or cannot be read Contact your customer service partner<br />
Inf 74 Function is locked None<br />
(e.g. menu is locked)<br />
Inf 98 No weighing platform connected Contact your customer service partner<br />
Inf 99 No weighing platform connected Contact your customer service partner<br />
NO WP No weighing platform connected Connecting weighing platform<br />
Midrics 1/2<br />
89
Care and Maintenance<br />
Service<br />
Regular maintenance of your equipment<br />
by your customer service partner<br />
ensures continued weighing accuracy.<br />
The frequency of the maintenance<br />
intervals depends on the operating<br />
conditions and user’s tolerance<br />
requirements.<br />
Repairs<br />
!Disconnect the power supply to the<br />
defective equipment immediately<br />
(unplug the power cord from the mains<br />
supply). Repairs should only be carried<br />
out by qualified personnel authorized<br />
by <strong>Sartorius</strong>, using original spare parts.<br />
Any attempt by unqualified personnel<br />
to carry out repair work may cause danger<br />
for the user. Note: During the guarantee<br />
period, return the entire indicator.<br />
!Replace defective or damaged cables or<br />
cable glands as a unit.<br />
!Do not open the equipment while<br />
power is on. After disconnecting the<br />
power supply, wait at least 10 seconds<br />
before opening. As the mating surfaces<br />
of the housing components affect<br />
the IP protection, open and close the<br />
equipment correctly.<br />
Cleaning<br />
The devices conform to the guidelines<br />
of the EHEDG (European Hygienic<br />
Equipment Design Group) on suitable<br />
measures to avoid contamination.<br />
They can therefore be easily cleaned<br />
and disinfected.<br />
!Disconnect the power supply to the<br />
defective equipment immediately<br />
(unplug the power cord from the mains<br />
supply). If necessary, disconnect the<br />
data cable.<br />
!No liquid may enter the device.<br />
!Do not use aggressive cleaning agents<br />
(solvents or similar).<br />
!Spraying with water or blowing off with<br />
compressed air is not permissible.<br />
§ Clean the indicator with a cloth lightly<br />
moistened with soap solution.<br />
$ For use in the food industry, use the<br />
usual cleaning agents.<br />
§ Wipe down the indicator with a soft,<br />
dry cloth after cleaning.<br />
90 Midrics 1/2<br />
Cleaning the stainless steel surfaces<br />
All stainless steel parts should be<br />
cleaned at regular intervals.<br />
Only use conventional household<br />
cleaning agents which are suitable for<br />
stainless steel. Stainless steel should<br />
be cleaned simply by rubbing.<br />
After this, rinse thoroughly until all residue<br />
is removed. After this, let the device<br />
dry. For additional protection, protective<br />
oil may be applied.<br />
Only use solvents for cleaning stainless<br />
steel parts.<br />
Clean the protective cover<br />
$ Replace damaged protective cover.<br />
§ Press the protective cover over the edge<br />
of the front and rear side of the device<br />
until it is fixed in place.<br />
Safety inspection<br />
Safe operation of the device can no<br />
longer be guaranteed if:<br />
– The device or the mains connecting<br />
lead shows visible damage.<br />
– The integrated mains unit no longer<br />
functions.<br />
– The device has been stored for long<br />
periods under unfavorable conditions<br />
(e.g. extreme dampness).<br />
If safe operation of the equipment can<br />
no longer be guaranteed:<br />
§ Disconnect the power supply to the<br />
device (unplug the power cord from the<br />
mains supply) and make sure the device<br />
cannot be used for the time being.<br />
§ Inform <strong>Sartorius</strong> customer service<br />
department.<br />
Maintenance measures may only be<br />
carried out by specialist personnel:<br />
– Who have access to the required maintenance<br />
documents and manuals<br />
– Who have attended appropriate training<br />
courses<br />
!The warranty seals on the device<br />
indicate that the device may only be<br />
opened and maintained by authorized<br />
specialist personnel, so that the correct<br />
and safe operation of the device is<br />
ensured and the warranty remains valid.<br />
Recycling<br />
Information and Instructions on<br />
Disposal and Repairs<br />
Packaging that is no longer required must<br />
be disposed of at the local waste disposal<br />
facility. The packaging is made of environmentally<br />
friendly materials that can be<br />
used as secondary raw materials.<br />
The equipment, including<br />
accessories and batteries,<br />
does not belong in your<br />
regular household waste.<br />
The European legislation<br />
requires that electrical and<br />
electronic equipment be<br />
collected and disposed<br />
of separately from other communal waste<br />
with the aim of recycling it.<br />
In Germany and many other countries,<br />
<strong>Sartorius</strong> AG takes care of the return and<br />
legally compliant disposal of its electrical<br />
and electronic equipment on its own.<br />
These products may not be placed with the<br />
household waste or brought to collection<br />
centers run by local public disposal<br />
operations – not even by small commercial<br />
operators.<br />
For disposal in Germany and in the<br />
other member nations of the European<br />
Economic Area (EEA), please contact<br />
our Service technicians on location or our<br />
Service Center in Goettingen, Germany:<br />
<strong>Sartorius</strong> Weighing Technology GmbH<br />
Service Center<br />
Weender Landstrasse 94–108<br />
37075 Goettingen, Germany<br />
SWT GÖ: WEEE-Reg.-Nr.<br />
DE 49923090<br />
In countries that are not members<br />
of the European Economic Area (EEA) or<br />
where no <strong>Sartorius</strong> subsidiaries or dealerships<br />
are located, please contact your<br />
local authorities or a commercial disposal<br />
operator.<br />
Prior to disposal and/or scrapping<br />
of the equipment, any batteries should<br />
be removed and disposed of in local<br />
collection boxes.<br />
<strong>Sartorius</strong> will not take back equipment<br />
contaminated with hazardous materials<br />
(ABC contamination) – either for repair or<br />
disposal. Please refer to the accompanying<br />
leaflet/manual or visit our Internet website<br />
(www.sartorius.com) for comprehensive<br />
information that includes our service<br />
addresses to contact if you plan to send<br />
your equipment in for repairs or proper<br />
disposal.
Overview<br />
Maximum readability 15,000 display steps (not in legal metrology)<br />
Accuracy class l, m (in the design...-CE)<br />
Number of scale values 3,000e or 2+ 3.000e according to EN 45501<br />
Digital protective interface According to EN45501<br />
Data interfaces 2, optional<br />
Display 14-segment backlit display<br />
Housing:<br />
Material Stainless steel, AISI 304 (1.4301)<br />
Protection class: According to EN60529 IP65<br />
Ambient conditions:<br />
Operating temperature range -10°C to +40°C (+14°F to 104°C)<br />
Humidity Maximum relative humidity 80% for temperature up to 31°C (~88°F);<br />
linear decrease down to 50% for relative humidity at 40°C (+104°F)<br />
Protection class of the housing<br />
in accordance with EN 60529 IP 65<br />
Pollution degree 2 Normally only nonconductive pollution occurs. Temporary conductivity caused<br />
by condensation is to be expected.<br />
Ratings:<br />
Power supply 100-240 VAC (-15/+10%), 50-60 Hz, 17 W/23 VA max.<br />
Transient overvoltage Overvoltage category II acc. to IEC 60364-4-443<br />
Operation using protective extra low voltage See instruction manual for Option L8 (24-volt module)<br />
DC supply 22.8 ... 26.7 V (optional: 21.6 ... 26.7 V); 12 VA max.<br />
AC supply 22.8 ... 26.7 V, 50-60 Hz, 12 VA max.<br />
Operation with rechargeable battery See <strong>Sartorius</strong> Installation Instructions for Option L9<br />
Operation via built-in or external rechargeable battery (only available as an option<br />
that must be ordered with the scale)<br />
Emissions Acc. to EN613-1 (IEC 61326-1)<br />
Group 1, Class B, suitable for use in domestic establishments and establishments<br />
directly connected to a low-voltage power-supply network that supplies buildings used<br />
for domestic purposes<br />
Immunity to interference: Acc. to EN61326-1):<br />
Immunity test requirements for equipment intended for use in industrial locations (Table 2)<br />
Electrical safety Acc. to EN 61010-1 (IEC 1010-1), EN 60950 (IEC 950)<br />
Temperature range -10°C to +40°C.<br />
Power supply 100 – 2 40 VAC (–15/+10 %), 50 – 60 Hz, max. 17 W/23 VA<br />
DC Supply optional 24 VDC (± 5%), max. 12 VA<br />
AC Supply optional 24 VAC (± 5%), 50–60 Hz, max. 12 VA<br />
Battery operation Via internal battery (only available as an option directly with order)<br />
Interference According to EN61326-1 Class B (IEC 61326-1)<br />
Interference resistance According to EN61326-1, industrial areas (IEC61326-1)<br />
Electrical safety According to EN61010-1 (IEC1010-1)<br />
Midrics 1/2<br />
91
Dimensions (Scale Drawings)<br />
All dimensions given in millimeters<br />
92 Midrics 1/2
YDP03-0CE<br />
YDP04IS<br />
YDP12IS<br />
Accessories<br />
Printer and printer accessories<br />
Verifiable data printer with date, time and<br />
statistics program, YCC02-D09F 6 connection cable required YDP03-0CE<br />
5+ 50 m paper rolls for data printer 6906937<br />
Replacement ink ribbon cartridge for printer 6906918<br />
Verifiable strip/label printer with thermal printing unit YDP04IS-0CEUV<br />
Paper width up to 60 mm , with external mains unit 100-240 Volt<br />
Connection cable required YCC02-D09M6<br />
Verifiable strip/label printer with thermal printing unit. YDP12IS-0CEUV<br />
Paper width up to 108 mm with external power supply 100-240 Volt<br />
and mains lead (EU +US); only for use with flexible print design,<br />
connection cable required YCC02-D09M6<br />
Labels for YPD04IS-0CEUV + YDP12IS-0CEUV<br />
Labels 58x30 mm (1000 labels) 69Y03092<br />
Labels 58x76 mm (500 labels) 69Y03092<br />
Labels 58x100 mm (380 labels) 69Y03094<br />
Labels for YDP12IS-0CEUV<br />
Labels 101x127 mm (305 labels) 69Y03195<br />
Printer paper YDP04IS-0CEUV for YDP12IS-0CEUV<br />
3 paper rolls, 60 mm + 75 m, thermo paper 69Y03090<br />
Printer paper for YDP04IS-0CEUV<br />
1 paper rolls, 101 mm + 75 m, thermo paper 69Y03196<br />
Verifiable strip/label printer with thermal printing unit. YDP12IS-<br />
Printer with 108 mm paper width, with external power supply 0CEUVTH<br />
100-240 Volt and mains unit (EU+US), only for use with flexible<br />
print design, connection cable required.. YCC02-D09M6<br />
3 ink rolls for YDP12IS-0CEUVTH 69Y03234<br />
Midrics 1/2<br />
93
Accessories<br />
Product Order No.<br />
COM1<br />
RS-232 YDO01M-232<br />
RS-232+CLOCK YDO01M-232CLK<br />
Optional interface (UniCOM)<br />
Interface module (RS232 + TTL) YDO01M-232CLK<br />
Interface module (RS485) galvanically isolated YDO01M-485<br />
Digital I/O 5/5 optoisol. YDO01M-IO<br />
Analog power outlet, 0-20 mA, 4-20 mA, 0 up to 10 Volt, 16 bit YDA01C-20MA<br />
Ethernet YD001M-EN<br />
External interface adapter<br />
Connecting cable from RS-232 data interface to USB port on PC 2) YCC01-USBM2<br />
Electrical accessories<br />
External red/green/red display with 12 pole, round plug (IP67) YRD14Z<br />
connecting cable YCC02-R12F6 or option M36 required<br />
Secondary display, connecting cable YCC02-D25F6 or option M31 required YRD02Z<br />
Relay box to connect weighing instruments to external controls, with 4 (5) relay outputs (250 V/ 3 A) YSB01<br />
and 1 optocoupler input (0-30V), connecting cable YCC02-RELAIS02 required<br />
Miscellaneous:<br />
Guard covers (+2) YDC01SW<br />
Cable gland for cables with diameter 4.5 to 9 mm, IP67, M16 + 1.5 YAS04CIS<br />
Kit for installation in control panel 3) YAS03MI<br />
Software<br />
<strong>Sartorius</strong> WinScale Scale driver for Windows 95/98/2000/NT with display of current measured value YSW03<br />
and verifiable PC-data memory. RS-232 connecting cable YCC-R12F6 (Option M6) required<br />
PC program set SartoConnect for reading weighed values using a PC YSC01L<br />
(including connecting cable Scale/PC 12/9 pin, 1.5 m)<br />
connecting cable YCC02-R12F6 (Option M36) required<br />
Power supply<br />
24 Volt module YAS02MI<br />
Battery (external, operating time 10 h, charging time 8 h) with charger YRB08Z<br />
Connecting cable with cable gland for YRB08Z, open cable ends on 2 pin, jack plug, 0.8 m YCC02-RB03<br />
94 Midrics 1/2
Product Order No.<br />
Cables<br />
Connecting cable with cable gland for printer YDP12/04IS, YCC02-D09M6<br />
open cable ends on 9 pin, D-SUB-plug, 6 m<br />
Connecting cable with cable gland for printer YDP03 or PC YCC02-D09M6<br />
open cable ends on 9 pin, D-SUB-plug, 6 m<br />
Connecting cable with cable gland for accessories YCC02D25F6<br />
open cable ends on 25 pin, D-SUB-plug, 6 m<br />
Connecting cable with cable gland for accessories and IS platforms, YCC02R12F6<br />
open cable ends on 12 pin. round plug socket, 6 m<br />
Connecting cable with cable gland, YCC02RELAIS02<br />
open cable ends on open cable ends, 6 m<br />
Cable for YDA01C-20MA current interface, with open cable ends e.g., order 5 + 5 m cable 6906926<br />
Mechanical accessories<br />
Screw-fixed sheet metal plate for the indicator platform (separate display). Stainless steel 1.4301 (V2A) YDH12CWS<br />
only for platform dimensions 320 + 240 mm (DC), 400 + 300 mm (ED) and 500 + 400 mm (FE)<br />
Plug and socket set to connect a weighing platform to the indicator (separable connection) YAS99I<br />
Stainless steel wall bracket YDH01CIS<br />
Stainless steel tilting wall bracket YDH02CIS<br />
Painted floor-mounted column, height 1.1 m YDH03CIP<br />
Stainless steel floor-mounted column, height 1.1 m YDH03CIS<br />
Stainless steel floor-mounted column base (4 supports) YBP03CIS<br />
Plate for attaching a printer to the floor-mounted column or bench stand YPP01CWS<br />
Midrics 1/2<br />
95
Declarations of Conformity<br />
In 1985, the Council of the European<br />
Community approved a resolution concerning<br />
a new approach to the technical<br />
harmonization and standardization<br />
of national regulations. monitoring<br />
of compliance with the directives and<br />
standards concerning the C mark is<br />
governed through the implementation<br />
of the EC Directives adopted by the<br />
respective national laws. In December<br />
1993, the scope of validity for all EC<br />
Directives was extended to the Member<br />
States of the European Union and the<br />
Signatories of the Agreement on the<br />
European Economic Area.<br />
<strong>Sartorius</strong> complies with the EC Directives<br />
and European Standards in order<br />
to supply its customers with instruments<br />
which feature the latest technology,<br />
and which will provide many years<br />
of trouble-free service.<br />
The C mark may only be affixed to<br />
weighing instruments and associated<br />
equipment if compliance with the following<br />
Directives has been established:<br />
89/336/EEG ”Electromagnetic<br />
Compatibility (EMC)”<br />
Associated European Standards:<br />
1. Electromagnetic compatibility:<br />
1.1 References to 89/336/EEC: Official<br />
Journal of the European Communities,<br />
No. 2001/C105/03<br />
EN 61326-1 Electrical devices for<br />
measuring technology,<br />
control technology and<br />
laboratory use<br />
EMC requirements<br />
Part 1: General requirements<br />
Interference resistance<br />
Industrial areas, continuous,<br />
unmonitored<br />
operation<br />
Interference emissions:<br />
Residential areas,<br />
Class B<br />
Note:<br />
Modifications to the indicator<br />
(not permissible for verifiable devices)<br />
and the connection of cables or devices<br />
not supplied by <strong>Sartorius</strong> are the<br />
responsibility of the operator. Details<br />
of operating quality (according to the<br />
above standards) can be obtained from<br />
<strong>Sartorius</strong>.<br />
96 Midrics 1/2<br />
73/23/EEC “Electrical equipment<br />
designed for use within certain<br />
voltage limits”<br />
Associated European Standards:<br />
EN 60950 Safety of IT equipment,<br />
including electrical<br />
office machines<br />
EN 61010 EN 61010 Safety<br />
requirements for electrical<br />
equipment for measurement,<br />
control, and<br />
laboratory use<br />
Part 1: General requirements<br />
For the use of electrical equipment in<br />
installations and under ambient conditions<br />
requiring higher safety standards,<br />
the provisions specified in the applicable<br />
regulations for installation in your<br />
country must be complied with.<br />
Weighing instruments for use in legal<br />
metrology: Directive 90/384/EEC<br />
“Non-automatic weighing instruments”<br />
This directive regulates the determination<br />
of weight in legal metrology.<br />
For the respective Declaration of Type<br />
Conformity for <strong>Sartorius</strong> weighing<br />
instruments verified for use as legal<br />
measuring instruments see the instructions<br />
for the particular weighing<br />
platform connected or the „Guide to<br />
Verification of Weighing Instruments“.<br />
This Directive also regulates EC verification<br />
by the manufacturer, provided that<br />
an EC Type Approval Certificate has<br />
been issued and the manufacturer has<br />
been accredited by a Body registered at<br />
the Commission of the European Community<br />
for performing such verification.<br />
The legal basis for EC verification<br />
is EC Directive No. 90/384/EEC for<br />
non-automatic weighing instruments,<br />
and the accreditation of the Quality<br />
Management System of <strong>Sartorius</strong> AG by<br />
Lower Saxony Regional Administrative<br />
Department of Legal Metrology (Niedersächsische<br />
Landesverwaltungsamt –<br />
Eichwesen) dated February 15, 1993.<br />
For additional information on the C<br />
mark on <strong>Sartorius</strong> equipment, see<br />
<strong>Sartorius</strong> Publication No.<br />
W--0052-e93081.<br />
“Installation” Service<br />
“Installation” Service in Germany<br />
Our “Installation” service package provides<br />
the following services:<br />
– Installation<br />
– Start-up<br />
– Inspection<br />
– Instruction<br />
If the installation of the weighing<br />
instrument is to be carried out by<br />
<strong>Sartorius</strong>, please request this service<br />
from a customer service employee.<br />
Re-verification in Germany<br />
The validity of the verification ends<br />
when the next but one calendar year<br />
has elapsed. When the weighing instrument<br />
is used for the control of filling<br />
quantities according to the regulation<br />
on prepackaging, the verification<br />
ends when the next calendar year has<br />
elapsed. At present, re-verification is<br />
the responsibility of Weights and Measures<br />
officials. Re-verification should be<br />
requested in good time from the local<br />
Weights and Measures office.<br />
If necessary, please observe any<br />
statutory amendments.<br />
Re-verification in other European<br />
countries<br />
The period of validity of the verification<br />
is determined by the regulations of the<br />
particular country in which the weighing<br />
instrument is used. For information<br />
on legal regulations currently applicable<br />
in your country, and to obtain names of<br />
the persons responsible, please contact<br />
the local <strong>Sartorius</strong> customer service<br />
center. Further information concerning<br />
verification can be obtained from our<br />
customer service centers.
Midrics 1/2<br />
97
98 Midrics 1/2
Midrics 1/2<br />
99
100 Midrics 1/2
Midrics 1/2<br />
101
102 Midrics 1/2
Index<br />
Page<br />
Accessories 93-95<br />
Acclimatizing 6<br />
Accuracy class 9<br />
Activating the service mode 13<br />
ADC configuration 9-11, 14-16<br />
ADC: See analog/digital converter<br />
Analog/Digital converter 9<br />
Application programs 57<br />
Automatic shutdown 47<br />
Averaging 34, 64<br />
Bar graph 28<br />
Basic weighing function 49<br />
C mark 96-98<br />
Calibration 21, 23, 39, 53<br />
Checkweighing 35, 70<br />
Classification 35, 73<br />
Cleaning stainless steel surfaces 90<br />
Cleaning 90<br />
COM1 interface: Settings 40-42, 88<br />
Configuring data output 38-48<br />
Configuring the printer 41, 42, 44<br />
Connecting weighing platform 7<br />
Connection cable 7<br />
Connections 88<br />
Counting 33, 58<br />
Data interfaces 88<br />
Data protocols: Settings 39, 40<br />
Declarations of Conformity 96<br />
Device parameters 38<br />
Dimensions 92<br />
Display levels 9<br />
Display 5<br />
Displayed messages 27<br />
EC conformity mark 97<br />
EC type approval certificate 99<br />
Enter geographical data 18<br />
Entering calibration weights 19<br />
Entering linearization weights 19<br />
Error messages 89<br />
Establishing a connection to the power supply 6, 8<br />
External linearization 20<br />
External push key 45<br />
General password Appendix<br />
General view of the device 5<br />
GMP-compliant printout 84<br />
Identifiers 55<br />
Information specific to the instrument 48<br />
Installation instructions 6<br />
Intended use 2<br />
IP protection 4, 91<br />
Key functions 5, 17, 25, 26<br />
Maximum load 9<br />
Minimum load 9<br />
Page<br />
Navigation in the menu 29<br />
Net-total formulation 36, 79<br />
Neutral measurement 34, 61<br />
Operating design 25<br />
Operating menu - overview 32<br />
Operation 40<br />
Optimizing the unit weight 59<br />
Overview of parameters 38<br />
Password 31<br />
Password 31, 32, 48<br />
Password Appendix<br />
Plates and Markings 101<br />
Preload 23<br />
Pre-settings 30<br />
Printouts: Sample printout 85<br />
Printing 82<br />
Printouts: Sample printout 85-87<br />
Printouts: Settings 46, 47<br />
Ranges 9<br />
Rear view 5<br />
Recycling 90<br />
Repairs 90<br />
Safety information 4<br />
Safety inspection 90<br />
Sample printout 85<br />
Scale drawing 92<br />
Scope of supply 6<br />
Service menu 12<br />
Service 90<br />
Setting the date 32, 48<br />
Setting the language 30, 32, 48<br />
Setting the time 32, 48<br />
Specifications 91, 92<br />
Standard configuration 9<br />
Start-up 6<br />
Tare weight key -> 2 sec 17<br />
Test certificate 100<br />
Totalizing 37, 76<br />
Universal interface 32, 43, 44, 88<br />
Unpacking 6<br />
Use in legal metrology 4, 10<br />
Verifiable configuration 9<br />
Verification scale interval 9<br />
Warm-up time 6, 8<br />
Warnings 4<br />
Weighing animals 34, 64<br />
Weighing in percent 36, 67<br />
Weighing platform settings 24, 38, 39<br />
Weighing 49<br />
Weight units, useable 10<br />
Midrics 1/2<br />
103
Appendix: “Guide to Verification of Weighing Instruments”<br />
Verification of Compatibility<br />
for Modules used with Non-automatic<br />
Weighing Instruments<br />
The documents required to verify a<br />
weighing instrument for legal metrology<br />
can be created using the data, documents<br />
and programs available from the<br />
<strong>Sartorius</strong> website.<br />
The printout of the completed forms<br />
is valid as a model for verification of the<br />
weighing instrument produced by the<br />
scale manufacturer. Once this has been<br />
properly completed and signed by the<br />
weighing instrument manufacturer, it is<br />
submitted to the weights and measures<br />
officer together with the Declaration of<br />
Conformity (under “Documents”).<br />
Information important to the weights<br />
and measures officer may include the<br />
type approval certificate or a test report.<br />
The test certificate and manufacturer<br />
information about the load cell or<br />
weigh cell are required.<br />
Filling out the Verification<br />
of Compatibility:<br />
§ The Guide to Verification, complete<br />
with Excel file, documents and information,<br />
is available from <strong>Sartorius</strong> in the<br />
Internet at:<br />
http://www.sartorius.com/<br />
leitfaden_eichen/<br />
104 Midrics 1/2<br />
$ If no Internet access is available:<br />
Order the Guide to Verification of<br />
Weighing Instruments on CD-ROM<br />
from <strong>Sartorius</strong> at the following address:<br />
<strong>Sartorius</strong> AG<br />
Hotline Dept.<br />
Weender Landstrasse 94–108<br />
37075 Goettingen, Germany<br />
Phone: +49(0)551.308.4440<br />
Fax: +49.(0)551.308.4449<br />
www.sartorius.com<br />
§ Select the desired language version<br />
by clicking on the title of the document.<br />
Select your display and operator<br />
terminal model at the top of the page.<br />
Using the Program<br />
ReadMe File<br />
Read this file before you select your<br />
display and operator terminal series.<br />
The ReadMe file contains important<br />
information about using the Excel file<br />
and offers important tips on how to<br />
fill out the documents.<br />
Documents<br />
Once you select a display and operator<br />
terminal model, links to all required<br />
documents are shown on the left-hand<br />
side of the screen.<br />
Getting Started<br />
§ Click on “Start the Excel Program”<br />
(depending on your settings, the<br />
“Download file” dialog might open;<br />
select “Open”).<br />
> The Excel file is automatically opened<br />
with the Excel program. You need to<br />
have an MS-Excel installation on your<br />
computer. A dialog box for selecting<br />
macros is opened.<br />
§ Click on the “Activate macros” button.<br />
> Note: This window might not open,<br />
depending on the settings in your computer<br />
system.<br />
§ Input is required in all the “Data” fields<br />
(highlighted in yellow).<br />
> An example of a completed form is<br />
stored in the “Documents” folder with<br />
explanations of the fields that are marked<br />
in yellow. Once the technical specifications<br />
provided by the manufacturer have<br />
been entered correctly, the program<br />
calculates all values automatically.<br />
$ The fields should be filled out by an<br />
expert.<br />
On the last page, the green or red fields<br />
show whether the components (display<br />
and operator terminal + load cell) are<br />
compatible: Red = incompatible;<br />
Green = compatible.<br />
Note: Any manufacturer of weighing<br />
equipment who configures a weighing<br />
instrument from individual components<br />
(display and operator terminal + load<br />
cell(s)) is responsible for validity of the<br />
specifications in the corresponding<br />
documentation.<br />
§ Once all data has been entered correctly<br />
(all fields on the last page are green),<br />
print out both pages. The file can then<br />
be archived (for example, saved on your<br />
computer) under a name of your choice.<br />
§ Double-check the information and sign<br />
the data sheet.<br />
Legal Notices<br />
Copyright<br />
This documentation may not be duplicated<br />
or transmitted for any purpose<br />
whatsoever, whether in whole or in part,<br />
without the express written permission<br />
of <strong>Sartorius</strong> AG. All rights defined under<br />
copyright law are reserved by <strong>Sartorius</strong><br />
AG.<br />
The program is intended for use by the<br />
purchaser only. Transfer to third parties,<br />
whether free of charge or in return for<br />
payment, is not permitted. The software<br />
may not be changed, reverse engineered,<br />
or modified through assimilation.<br />
The Excel program used here was<br />
developed by the “German Association<br />
of Metrology and Verification” (Arbeitsgemeinschaft<br />
für Mess und Eichwesen<br />
(AGME)). It is also available as freeware<br />
on the Internet. The program is<br />
copyrighted and may not be modified.<br />
Users shall be liable for the improper<br />
use of said software.
Appendix: General Password<br />
After selecting the menu item „Setup“<br />
a request to enter the access password<br />
„Code“ will be shown on the display for<br />
2 seconds.<br />
The place for the first character of the<br />
password flashes.<br />
Press k several times, ); Enter password<br />
– Enter the numbers with k key<br />
Press k several times,); and save with the T key.<br />
k key (numbers in ascending<br />
Press k several times, ); Order: 0 ... 9) or key p<br />
(numbers in descending order<br />
Press k several times, ); (9 ... Press 1) as often as necessary until<br />
the required character appears in the<br />
display<br />
Press k several times, );<br />
If the password is longer than<br />
7 characters<br />
Press k several times, ); the first character will be displaced to<br />
the right and out of the display<br />
Press k several times, );<br />
Press k several times, ); The password set is shown in the<br />
display<br />
)<br />
(<br />
Confirm the password<br />
Exit from the menu level<br />
press and hold the ) key Save settings and exit menu<br />
General Password:<br />
40414243<br />
Service Password:<br />
202122<br />
Midrics 1/2<br />
105
106 Midrics 1/2
Midrics 1/2<br />
107
<strong>Sartorius</strong> Weighing Technology GmbH<br />
Weender Landstrasse 94–108<br />
37075 Goettingen, Germany<br />
Phone +49.551.308.0<br />
Fax +49.551.308.3289<br />
www.sartorius-mechatronics.com<br />
Copyright by <strong>Sartorius</strong>,<br />
Goettingen, Germany.<br />
All rights reserved. No part<br />
of this publication may<br />
be reprinted or translated in<br />
any form or by any means<br />
without the prior written permission of<br />
<strong>Sartorius</strong>.<br />
The status of the information, specifications<br />
and illustrations<br />
in this manual is indicated<br />
by the date given below.<br />
<strong>Sartorius</strong> reserves the<br />
right to make changes to<br />
the technology, features, specifications<br />
and design of<br />
the equipment without notice.<br />
Status:<br />
February 2013,<br />
<strong>Sartorius</strong> Weighing Technology GmbH,<br />
Goettingen, Germany<br />
Printed in Germany on paper that has<br />
been bleached without any use of<br />
chlorine<br />
RS · KT<br />
Publication No.: WMI6001-e13025