Online Registration via WebAdvisor: - MCPHS.edu
Online Registration via WebAdvisor: - MCPHS.edu
Online Registration via WebAdvisor: - MCPHS.edu

Create successful ePaper yourself
Turn your PDF publications into a flip-book with our unique Google optimized e-Paper software.
<strong>Online</strong> <strong>Registration</strong> <strong>via</strong> <strong>WebAdvisor</strong>:<br />
Students have the ability to make class changes during the Add/Drop and preregistration period <strong>via</strong><br />
<strong>WebAdvisor</strong> by following the simple steps below.<br />
Step 1: Log in<br />
From https://my.mcphs.<strong>edu</strong><br />
Click on “<strong>WebAdvisor</strong>,” which can be found under the QUICK LINKS menu.<br />
o Click on “Students”<br />
o Click on “Log In”<br />
o Enter your user name and password (same as for <strong>MCPHS</strong> email)<br />
If you are having trouble with your login ID or password, contact the <strong>MCPHS</strong><br />
Helpdesk at helpdesk@mcphs.<strong>edu</strong> or 617.732.2170.<br />
Step 2: Review Your Class Sch<strong>edu</strong>le<br />
Review your class sch<strong>edu</strong>le before making sch<strong>edu</strong>le adjustments. Be sure to make note of offering<br />
times to avoid conflicts when registering.<br />
Click on “My Class Sch<strong>edu</strong>le”<br />
o Select the appropriate term<br />
o Click “submit”<br />
o Review it, print it, or make note of the classes and times.<br />
Having it available will be helpful during the registration process.<br />
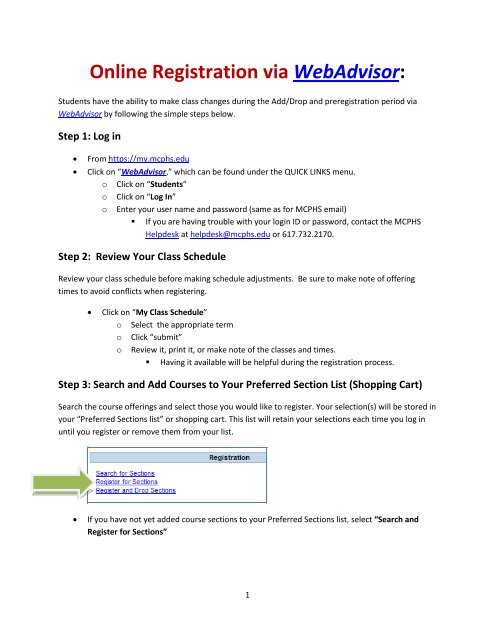
Step 3: Search and Add Courses to Your Preferred Section List (Shopping Cart)<br />
Search the course offerings and select those you would like to register. Your selection(s) will be stored in<br />
your “Preferred Sections list” or shopping cart. This list will retain your selections each time you log in<br />
until you register or remove them from your list.<br />
If you have not yet added course sections to your Preferred Sections list, select “Search and<br />
Register for Sections”<br />
1
“Search and register for sections” allows you to make your search as specific as needed<br />
o Select the term (required)<br />
o Select the location ( recommended)<br />
Use ONL for online electives<br />
o You may select additional criteria to narrow your search<br />
A.<br />
B.<br />
C.<br />
2
Once you have entered search criteria, click ‘Submit.’<br />
o Review the course sections that were returned by your search<br />
o Pay close attention to prerequisites and restriction information<br />
You can view the prerequisites<br />
for the course by clicking on the<br />
hyperlink for the course section<br />
To add the course to your Preferred Sections list check the box next to the course section<br />
Courses with seats available will<br />
say “open” in the status column<br />
Once you have chosen the elective(s) you’re interested in registering for click “Submit”<br />
o A confirmation screen with the sections you have selected will be displayed<br />
You are not registered yet! Keep Going<br />
Step 4: Registering for Courses from Your Preferred Sections List<br />
When you are eligible to register, you can log into <strong>WebAdvisor</strong> and submit your registration.<br />
You’ll now see your Preferred Sections list. Depending on your particular registration<br />
you should select the action next to the sections in your list and click Submit at the<br />
bottom of the page.<br />
3<br />
Important course restrictions are<br />
displayed below the course<br />
meeting information in a red font<br />
You can see how many seats are open<br />
and how many seats are allocated.
The recommended<br />
registration method<br />
is to select the action<br />
next to the course.<br />
If you want a course<br />
to remain in your<br />
Preferred Sections<br />
list, leave the action<br />
blank.<br />
If you’re just dropping<br />
a course, mark the<br />
box next to it and click<br />
Submit.<br />
IMPORTANT: If you are adding and<br />
dropping a course at the same time set<br />
choice box to “all”. This will save your seat<br />
if something does not work with your<br />
registration<br />
After you submit your registration you’ll get a registration confirmation screen<br />
o Pay close attention to the Status, as registration errors can also be displayed here<br />
4<br />
If you want to register or remove all<br />
of the courses in your Preferred<br />
Sections list you can select Register<br />
or remove and then click Submit at<br />
the bottom of the page.<br />
CAUTION: this is not recommended<br />
<strong>Registration</strong> Hint: Every time you<br />
log into your Preferred Sections list<br />
the Available Seat information will<br />
be up to date.
You’re almost done, but keep going…<br />
Step 5: Review Your Class Sch<strong>edu</strong>le<br />
Review your class sch<strong>edu</strong>le to make sure the course (s) you have registered for are correct. Review the<br />
credits, meeting time, faculty, etc. and make sure they are what you intended.<br />
Return to the Student Menu<br />
Under the Academic Profile heading select “My Class Sch<strong>edu</strong>le”<br />
Select the term from the drop down box<br />
Click Submit<br />
Step 6: Review Your Program Evaluation<br />
To ensure the course(s) you’ve registered fulfill your program requirements please review your<br />
Program Evaluation.<br />
Click on “Students Menu” at the top of the screen<br />
Select “Program Evaluation” from under the Academic Profile heading<br />
Select the check box next to your academic program<br />
Click Submit<br />
Please Note: Please remember PHARMD Professional Electives can only be taken in year 5<br />
spring. Your Program Evaluation report will not display under your professional requirement<br />
block until the elective registration period has ended.<br />
Adding and Dropping Courses on <strong>WebAdvisor</strong>:<br />
Please be mindful of your program requirements when adding and dropping courses. You<br />
should review your program evaluation before dropping or adding courses. If you have<br />
questions or concerns about your program requirements or your progress, please contact an<br />
advisor at the Academic Resource Center.<br />
Once you’re certain of your program requirements you can continue to add/drop courses:<br />
Login to <strong>WebAdvisor</strong><br />
Click on the students menu<br />
Under the <strong>Registration</strong> heading select “Register and Drop Sections”<br />
5
You will see a summary of sections on your preferred sections list as well as electives you are<br />
currently registered for.<br />
To drop a course section click on the “drop” box for the section you would like to drop<br />
Click submit<br />
You will get confirmation of the course that has been dropped as well as the remaining courses<br />
you are registered for<br />
Adding and Dropping Courses at the Same Time:<br />
IMPORTANT: If you are adding and dropping a course, but want to be sure you’re added into the new<br />
course before dropping make sure that the “If my choice…” box is set to ALL (default setting)<br />
Please see below:<br />
6
Select “Register”<br />
next to the course<br />
you want to ADD<br />
Click the Drop box<br />
for the section you<br />
want to Drop<br />
IMPORTANT: If you are adding and<br />
dropping a course at the same time<br />
set choice box to “all”. This will save<br />
your seat if something does not<br />
work with your registration<br />
7