Online Registration for Web Advisor
Online Registration for Web Advisor
Online Registration for Web Advisor

Create successful ePaper yourself
Turn your PDF publications into a flip-book with our unique Google optimized e-Paper software.
4. After submitting that search<br />
criteria, look through the<br />
following list of classes on Section<br />
Selection Results and select<br />
which courses you would like to<br />
register <strong>for</strong> by clicking in the box<br />
next to the course so that a check<br />
mark appears. By clicking on<br />
“Submit” and you will be taken to<br />
the Register and Drop Sections<br />
page.<br />
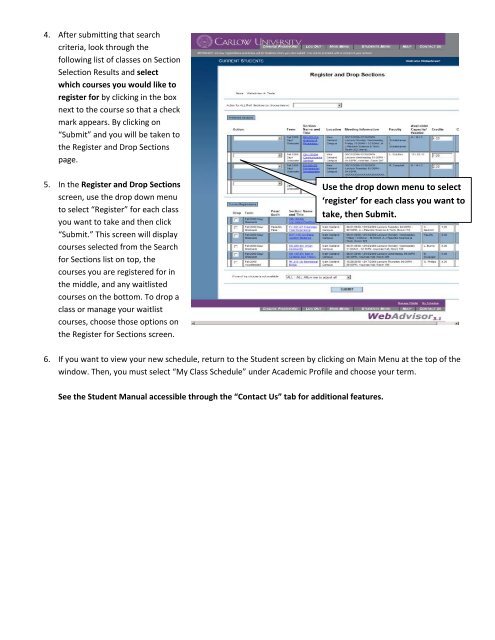
5. In the Register and Drop Sections<br />
screen, use the drop down menu<br />
to select “Register” <strong>for</strong> each class<br />
you want to take and then click<br />
“Submit.” This screen will display<br />
courses selected from the Search<br />
<strong>for</strong> Sections list on top, the<br />
courses you are registered <strong>for</strong> in<br />
the middle, and any waitlisted<br />
courses on the bottom. To drop a<br />
class or manage your waitlist<br />
courses, choose those options on<br />
the Register <strong>for</strong> Sections screen.<br />
6. If you want to view your new schedule, return to the Student screen by clicking on Main Menu at the top of the<br />
window. Then, you must select “My Class Schedule” under Academic Profile and choose your term.<br />
See the Student Manual accessible through the “Contact Us” tab <strong>for</strong> additional features.<br />
Use the drop down menu to select<br />
‘register’ <strong>for</strong> each class you want to<br />
take, then Submit.