Online Registration for Web Advisor
Online Registration for Web Advisor
Online Registration for Web Advisor

Create successful ePaper yourself
Turn your PDF publications into a flip-book with our unique Google optimized e-Paper software.
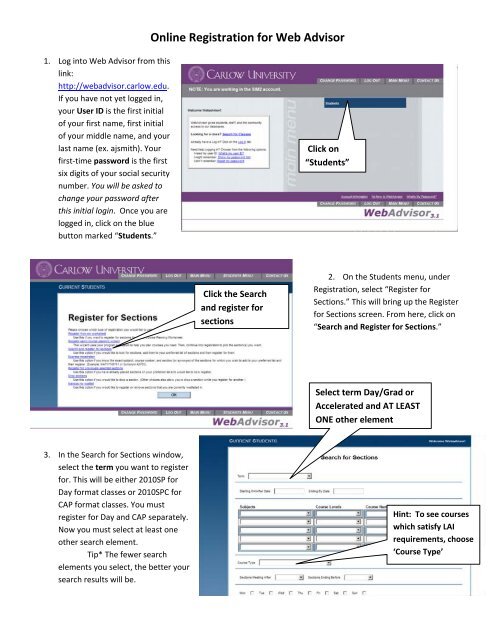
1. Log into <strong>Web</strong> <strong>Advisor</strong> from this<br />
link:<br />
http://webadvisor.carlow.edu.<br />
If you have not yet logged in,<br />
your User ID is the first initial<br />
of your first name, first initial<br />
of your middle name, and your<br />
last name (ex. ajsmith). Your<br />
first‐time password is the first<br />
six digits of your social security<br />
number. You will be asked to<br />
change your password after<br />
this initial login. Once you are<br />
logged in, click on the blue<br />
button marked “Students.”<br />
3. In the Search <strong>for</strong> Sections window,<br />
select the term you want to register<br />
<strong>for</strong>. This will be either 2010SP <strong>for</strong><br />
Day <strong>for</strong>mat classes or 2010SPC <strong>for</strong><br />
CAP <strong>for</strong>mat classes. You must<br />
register <strong>for</strong> Day and CAP separately.<br />
Now you must select at least one<br />
other search element.<br />
Tip* The fewer search<br />
elements you select, the better your<br />
search results will be.<br />
<strong>Online</strong> <strong>Registration</strong> <strong>for</strong> <strong>Web</strong> <strong>Advisor</strong><br />
Click the Search<br />
and register <strong>for</strong><br />
sections<br />
Click on<br />
“Students”<br />
2. On the Students menu, under<br />
<strong>Registration</strong>, select “Register <strong>for</strong><br />
Sections.” This will bring up the Register<br />
<strong>for</strong> Sections screen. From here, click on<br />
“Search and Register <strong>for</strong> Sections.”<br />
Select term Day/Grad or<br />
Accelerated and AT LEAST<br />
ONE other element<br />
Hint: To see courses<br />
which satisfy LAI<br />
requirements, choose<br />
‘Course Type’
4. After submitting that search<br />
criteria, look through the<br />
following list of classes on Section<br />
Selection Results and select<br />
which courses you would like to<br />
register <strong>for</strong> by clicking in the box<br />
next to the course so that a check<br />
mark appears. By clicking on<br />
“Submit” and you will be taken to<br />
the Register and Drop Sections<br />
page.<br />
5. In the Register and Drop Sections<br />
screen, use the drop down menu<br />
to select “Register” <strong>for</strong> each class<br />
you want to take and then click<br />
“Submit.” This screen will display<br />
courses selected from the Search<br />
<strong>for</strong> Sections list on top, the<br />
courses you are registered <strong>for</strong> in<br />
the middle, and any waitlisted<br />
courses on the bottom. To drop a<br />
class or manage your waitlist<br />
courses, choose those options on<br />
the Register <strong>for</strong> Sections screen.<br />
6. If you want to view your new schedule, return to the Student screen by clicking on Main Menu at the top of the<br />
window. Then, you must select “My Class Schedule” under Academic Profile and choose your term.<br />
See the Student Manual accessible through the “Contact Us” tab <strong>for</strong> additional features.<br />
Use the drop down menu to select<br />
‘register’ <strong>for</strong> each class you want to<br />
take, then Submit.