WebAdvisor Registration Instructions - Texas Woman's University
WebAdvisor Registration Instructions - Texas Woman's University
WebAdvisor Registration Instructions - Texas Woman's University

Create successful ePaper yourself
Turn your PDF publications into a flip-book with our unique Google optimized e-Paper software.
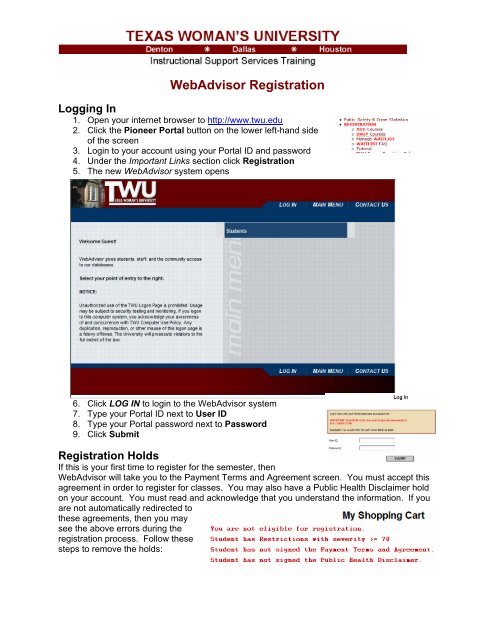
<strong>WebAdvisor</strong> <strong>Registration</strong><br />
Logging In<br />
1. Open your internet browser to http://www.twu.edu<br />
2. Click the Pioneer Portal button on the lower left-hand side<br />
of the screen<br />
3. Login to your account using your Portal ID and password<br />
4. Under the Important Links section click <strong>Registration</strong><br />
5. The new <strong>WebAdvisor</strong> system opens<br />
6. Click LOG IN to login to the <strong>WebAdvisor</strong> system<br />
7. Type your Portal ID next to User ID<br />
8. Type your Portal password next to Password<br />
9. Click Submit<br />
<strong>Registration</strong> Holds<br />
If this is your first time to register for the semester, then<br />
<strong>WebAdvisor</strong> will take you to the Payment Terms and Agreement screen. You must accept this<br />
agreement in order to register for classes. You may also have a Public Health Disclaimer hold<br />
on your account. You must read and acknowledge that you understand the information. If you<br />
are not automatically redirected to<br />
these agreements, then you may<br />
see the above errors during the<br />
registration process. Follow these<br />
steps to remove the holds:
1. Login to <strong>WebAdvisor</strong> using the above instructions<br />
2. Click the Students button on the right<br />
3. Under the Communication section click Payment<br />
Terms and Agreement<br />
4. Read the terms<br />
5. Check the box next to the agreed terms<br />
6. Click Submit<br />
7. Next click Public Health Disclaimer<br />
8. Read the information<br />
9. Check the box acknowledging that you have<br />
read and understand the information<br />
10. Click Submit<br />
Any additional holds must be cleared by the corresponding department. Please read any error<br />
messages carefully to prevent confusion or delay in removing your holds.<br />
The Express <strong>Registration</strong> Tool<br />
NOTE: you MUST know either the class code (i.e. 42765) or the exact subject, class, and<br />
section number (i.e. MATH 1113 01) of the desired class in order to use this tool.<br />
1. Login to <strong>WebAdvisor</strong> using the above instructions<br />
2. Click the Students button on the right<br />
3. Under the <strong>Registration</strong> section click Register for<br />
Classes<br />
4. At the Register for Sections page click the Express<br />
registration link.<br />
5. At the Express <strong>Registration</strong> page fill in the required class information<br />
Enter the class code<br />
- OR -<br />
Select a Subject from the drop down, enter a class number, and enter a<br />
section number<br />
6. Select a Term from the drop down list<br />
7. Repeat steps 5 & 6 for all desired classes<br />
8. Click Submit to add these classes to your Shopping Cart<br />
9. At the Shopping Cart screen confirm your<br />
class selections by choosing Register from<br />
the Action drop down menu for each class<br />
10. Click Submit<br />
11. If registration is successful then the<br />
<strong>Registration</strong> Results page will display all of<br />
your classes.<br />
If you see any errors after clicking Submit, then please see the above instructions regarding<br />
<strong>Registration</strong> Holds
The Search and Register for Sections Tool<br />
1. Login to <strong>WebAdvisor</strong> using the above instructions<br />
2. Click the Students button on the right<br />
3. Under the <strong>Registration</strong> section click Register for Classes<br />
4. At the Register for Sections page click the Search and register for sections link<br />
5. On the Register for Classes screen select at least 3 search criteria for all desired classes<br />
a. You MUST select either Term or Starting and Ending Dates<br />
b. For best results choose Subject and Class Level<br />
c. Enter additional search criteria if desired<br />
6. At the Section Selection Results page check the Add box<br />
to the left of the desired classes<br />
7. Click Submit to add these classes to your Shopping Cart<br />
8. At the Shopping Cart screen confirm your<br />
class selections by choosing Register from<br />
the Action drop down menu for each class<br />
9. Click Submit<br />
10. If registration is successful then the<br />
<strong>Registration</strong> Results page will display all of<br />
your classes.<br />
If you see any errors after clicking Submit, then please see the above instructions regarding<br />
<strong>Registration</strong> Holds<br />
Verify <strong>Registration</strong><br />
1. Login to <strong>WebAdvisor</strong> using the above instructions<br />
2. Click the Students button on the right<br />
3. Under the Academic Profile section click My Class<br />
Schedule<br />
4. Choose the desired academic term from the drop<br />
down menu<br />
5. Click Submit<br />
6. Your schedule for the selected term will now be displayed<br />
Instructional Support Services<br />
<strong>Texas</strong> Woman’s <strong>University</strong><br />
https://portal.twu.edu/iss-training/<br />
4/4/2007 REV 1 Copyright/All Rights Reserved