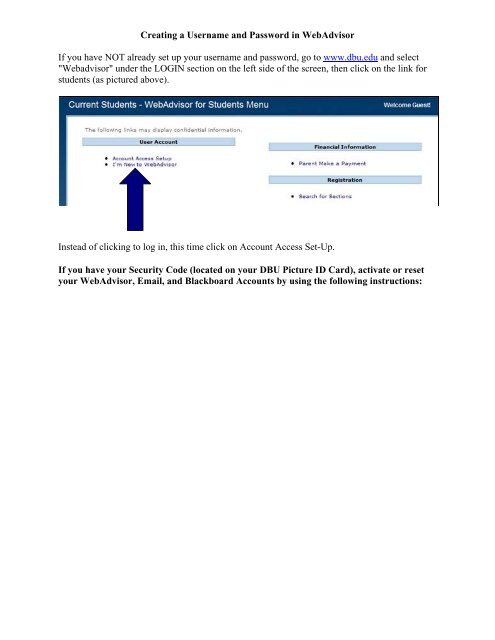
Creating a Username and Password in WebAdvisor If you have NOT ...
Creating a Username and Password in WebAdvisor If you have NOT ...
Creating a Username and Password in WebAdvisor If you have NOT ...

Create successful ePaper yourself
Turn your PDF publications into a flip-book with our unique Google optimized e-Paper software.
<strong>Creat<strong>in</strong>g</strong> a <strong>Username</strong> <strong>and</strong> <strong>Password</strong> <strong>in</strong> <strong>WebAdvisor</strong><br />
<strong>If</strong> <strong>you</strong> <strong>have</strong> <strong>NOT</strong> already set up <strong>you</strong>r username <strong>and</strong> password, go to www.dbu.edu <strong>and</strong> select<br />
"Webadvisor" under the LOGIN section on the left side of the screen, then click on the l<strong>in</strong>k for<br />
students (as pictured above).<br />
Instead of click<strong>in</strong>g to log <strong>in</strong>, this time click on Account Access Set-Up.<br />
<strong>If</strong> <strong>you</strong> <strong>have</strong> <strong>you</strong>r Security Code (located on <strong>you</strong>r DBU Picture ID Card), activate or reset<br />
<strong>you</strong>r <strong>WebAdvisor</strong>, Email, <strong>and</strong> Blackboard Accounts by us<strong>in</strong>g the follow<strong>in</strong>g <strong>in</strong>structions:
1. Enter <strong>you</strong>r Last Name.<br />
2. Enter <strong>you</strong>r DBU ID Security Code.<br />
3. Enter <strong>you</strong>r DBU ID #.<br />
4. Click once on the SUBMIT button.<br />
5. Select <strong>you</strong>r Date of Birth from the dropdown list of dates.<br />
6. Click once on the "Submit" button.<br />
7. Use the dropdown arrow on the next screen to select <strong>you</strong>r home address.
8. Click once on the "Submit" button.<br />
9. Use the dropdown menu to select <strong>you</strong>r major.<br />
10. Click on the "Submit" button one time.<br />
11. Use the dropdown box to enter <strong>you</strong>r zip code.<br />
12. Click on the "Submit" button once.<br />
13. Confirm <strong>you</strong>r ID Questions by click<strong>in</strong>g the "Submit" button.<br />
14. Fill out the <strong>in</strong>formation <strong>in</strong> all fields to reset <strong>you</strong>r password.<br />
15. Enter <strong>you</strong>r new password. The new password must be 6 to 9 digits <strong>in</strong> length <strong>and</strong> <strong>in</strong>clude at<br />
least 2 numbers (it must <strong>have</strong> both alpha <strong>and</strong> numeric characters).
16. Confirm the Access Policy by select<strong>in</strong>g the box <strong>and</strong> then click<strong>in</strong>g on the "Submit" button.<br />
17. You <strong>have</strong> now set-up <strong>you</strong>r password.<br />
<strong>If</strong> <strong>you</strong> do not <strong>have</strong> <strong>you</strong>r Security Code, use the follow<strong>in</strong>g <strong>in</strong>structions:<br />
1. Log <strong>in</strong>to <strong>WebAdvisor</strong>.
2. Click on Security Code on the Student Menu.<br />
3. <strong>WebAdvisor</strong> will display <strong>you</strong>r Security Code <strong>and</strong> <strong>you</strong>r Student ID Number.