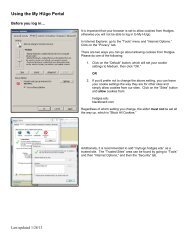
Online Registration Instructions / Using WebAdvisor - My HUgo ...
Online Registration Instructions / Using WebAdvisor - My HUgo ...
Online Registration Instructions / Using WebAdvisor - My HUgo ...

You also want an ePaper? Increase the reach of your titles
YUMPU automatically turns print PDFs into web optimized ePapers that Google loves.
Who uses online registration?<br />
Students who are currently enrolled in graduate and undergraduate programs register online.<br />
How To Register <strong>Online</strong><br />
What if my account is on Hold?<br />
If you see that you have a Notification regarding a hold when logging into <strong>My</strong><strong>HUgo</strong>, please contact the appropriate office to get the<br />
hold removed before registering online.<br />
What if I have trouble registering?<br />
If you have any other problems, the Registrar’s Office will be available to help during office hours. Email your question to<br />
registrar@hodges.edu.<br />
Before you begin:<br />
You need your course recommendations before you can register. Get your course recommendations from your faculty advisor or<br />
stop by the Registrar’s Office. To see how your course recommendations will fit into your program, you can view your Academic<br />
Evaluation. If you will be graduating at the end of the coming semester, follow the instructions for completing an Intent to Graduate<br />
Application.<br />
<strong>Registration</strong> <strong>Instructions</strong><br />
A. Log into <strong>My</strong> <strong>HUgo</strong>.<br />
B. Click on the <strong>WebAdvisor</strong> folder. Select <strong>Registration</strong>. Click on Steps for <strong>Registration</strong> and follow the steps on that page.<br />
Step 1: Update your personal information.<br />
• New government reporting regulations require all students to update their race and ethnicity information. Please<br />
complete this Race/Ethnicity Update Form before you register.<br />
• Verify that the information listed in your Student Profile is accurate. Address and employer information can be<br />
changed/updated here.<br />
• If your employer has changed please fill out a Student Employer Update Request Form.<br />
• Major - complete a Change of Major Request Form if you would like to change your major. These requests take a<br />
week or two to process.<br />
Step 2: Make financial arrangements.<br />
• All Students:<br />
Please note: Payment for courses and fees is due the first week of classes.<br />
Please review For Your Financial Information.<br />
• Financial Aid Students:<br />
Check <strong>My</strong> Documents to see how many credits your financial aid package will cover. Book vouchers can only be<br />
used at the Hodges University Virtual bookstore.<br />
IMPORTANT! You need to contact Financial Aid if your number of credit hours or classes change. They may need to<br />
request more funds to cover your charges. If registered for under 6 credit hours, Financial Aid will not cover full<br />
tuition. Registering for less than 6 credits may disqualify you for student loans. Dropping below full-time (12 credits<br />
at the undergraduate level) may disqualify you for grants or scholarships.<br />
Your FAFSA must be completed before registration<br />
By registering online, I am giving my consent to participate in electronic transactions of financial information<br />
provided or made available to student loan borrowers, and for all notices provided and authorizations to Federal<br />
Student Aid recipients.<br />
• Cash Students:<br />
You must contact the Business Office at your campus to make financial arrangements. If alternate payment<br />
arrangements are not made with the Business Office, you must pay ALL tuition and fees not covered by financial<br />
aid by the deadline. If you fail to do so, your courses will be dropped for non-payment.
Step 3: Register for classes.<br />
By registering for courses electronically, I agree that I have received course recommendations from my advisor<br />
and I accept responsibility for ensuring that all courses for which I register are appropriate to my degree program.<br />
I am responsible for the accuracy of all information I submit online to the University including the <strong>Online</strong> Class<br />
Certification Form. I agree to notify the Registrar's Office promptly in writing of any withdrawal, or other change<br />
after online registration that affects my enrollment status in any class. I understand that if I register for more<br />
credit hours than what my Financial Aid will cover, I may have a cash balance.<br />
Search and Register for Sections<br />
• Choose Term.<br />
• Choose Subject(s) for the course(s) you are registering for.<br />
• You can enter other criteria, such as course number, day of the week, etc., to limit your search.<br />
• Click Submit.<br />
• Courses meeting the criteria you chose will appear. Select your preferred section(s) by clicking the box in<br />
the first column and click submit.<br />
• Choose to Register or Remove from list for each preferred section and click submit.<br />
• Information regarding your request will be listed. The courses that you are currently registered for will<br />
also be listed.<br />
• Click OK.<br />
Register from my Student Educational Plan<br />
• Your program and catalog will be listed.<br />
• If the program is correct, click Submit. If it is not correct, click No and choose your current active<br />
program from the programs you are enrolled in.<br />
• Planned courses on your Student Educational Plan will be listed. Check the box next to the courses for<br />
the upcoming term. If you have conflicts or questions regarding the courses that have been planned for<br />
you to take, please contact your advisor.<br />
• Click Submit.<br />
• Courses sections offered for the chosen courses will appear. Select your preferred section(s) by clicking<br />
the box in the first column and click submit.<br />
• Choose to Register or Remove from list for each preferred section and click submit.<br />
• Information regarding your request will be listed. The courses that you are currently registered for will<br />
also be listed.<br />
• Click OK.<br />
Register for Previously Selected Sections - Use this option if you have already placed sections on your<br />
preferred list and would like to now register.<br />
Step 4: Verify your registration and view charges.<br />
Select <strong>My</strong> Class Schedule. Choose the term and click submit.<br />
Select <strong>My</strong> Account Summary by Term to see the charges that have been applied to your account.<br />
Step 5: Purchase books.<br />
• If you are purchasing books using financial aid, check, or credit card, you may do so at our new Hodges<br />
University Virtual Bookstore (estore.hodges.edu).<br />
• If you choose to purchase books from an outside source, please see the current Booklist on our website.<br />
CONGRATULATIONS!! YOU HAVE SUCCESSFULLY REGISTERED!!
Students will now be able to do other things online, in addition to registering. See below for instructions on how to complete tasks, such as<br />
changing your schedule, checking grades, and requesting a transcript.<br />
To View Your Student Ed Plan<br />
• Log into <strong>My</strong> <strong>HUgo</strong>.<br />
• Click on Academic Profile in the <strong>WebAdvisor</strong> folder. The<br />
Academic Profile Choices will open up.<br />
• Click on <strong>My</strong> Educational Plan.<br />
• Check box next to your program and choose a Format<br />
Option for the Whole Plan or Planned Courses Only.<br />
• Click Submit and plan will display.<br />
To View Your Academic Evaluation<br />
• Log into <strong>My</strong> <strong>HUgo</strong>.<br />
• Click on Academic Profile in the <strong>WebAdvisor</strong> folder. The<br />
Academic Profile Choices will open up.<br />
• Click on Academic Evaluation.<br />
• Check box next to your program.<br />
• Click Submit and profile will come up.<br />
• You can also look at what-if scenarios by choosing a<br />
different program than the one you are enrolled in. This will<br />
not change your major. Majors can only be changed with a<br />
Change of Major form from the Registrar’s Office.<br />
To Get Grades<br />
• Log into <strong>My</strong> <strong>HUgo</strong>.<br />
• Click on Academic Profile in the <strong>WebAdvisor</strong> folder. The<br />
Academic Profile choices will open up.<br />
• Click on Grades.<br />
• Choose Term and Click Submit. The grades will appear.<br />
• Click OK when done.<br />
To Request a Transcript<br />
• Log into <strong>My</strong> <strong>HUgo</strong>.<br />
• Click on Academic Profile in the <strong>WebAdvisor</strong> folder. The<br />
Academic Profile choices will open up.<br />
• Click on Transcript Request.<br />
• Complete the fields on the screen. Make sure that you<br />
choose the correct transcript type. Students who have<br />
completed work at the Associate and/or Bachelor’s level<br />
should choose Undergraduate. Students who have<br />
completed work at the Master’s level should choose<br />
Graduate. Students who have done both and need both<br />
transcripts will need to complete a request at both levels.<br />
Make sure that you enter the correct address information;<br />
the transcript will be mailed to the exact address that you<br />
type in. When you are done entering the information, click<br />
Submit. The request will be sent. Transcripts will be<br />
processed within 5 working days.<br />
• Click OK when done.<br />
To Request an Enrollment Verification<br />
• Log into <strong>My</strong> <strong>HUgo</strong>.<br />
• Click on the National Student Clearinghouse box (located on<br />
the right side of your screen).<br />
• You will be automatically logged into your National Student<br />
Clearinghouse account.<br />
• Here you can obtain an instant Enrollment Certificate for<br />
your current enrollment or for all enrollments.<br />
• Your Student Loan Deferment Notifications are also<br />
available for you to view from this screen.<br />
To Complete a Change of Major Form<br />
• Log into <strong>My</strong> <strong>HUgo</strong>.<br />
• Click on Academic Profile in the <strong>WebAdvisor</strong> folder. The<br />
Academic Profile choices will open up.<br />
• Click on <strong>My</strong> Profile.<br />
• Click on Change of Major Form<br />
• Complete the required information.<br />
• Submit the Form.<br />
To View Academic History (Unofficial Transcript)<br />
• Log into <strong>My</strong> <strong>HUgo</strong>.<br />
• Click on Academic Profile in the <strong>WebAdvisor</strong> folder. The<br />
Academic Profile choices will open up.<br />
• Click on Academic History.<br />
• Choose Transcript Type and click Submit. Make sure that<br />
you choose the correct transcript type. Students who have<br />
completed work at the Associate and/or Bachelor’s level<br />
should choose Undergraduate. Students who have<br />
completed work at the Master’s level should choose<br />
Graduate. Students who have done both will need to look at<br />
the information separately for each level.<br />
• Click OK when done.<br />
To Complete Intent to Graduate Application<br />
• Log into <strong>My</strong> <strong>HUgo</strong>.<br />
• Click on Academic Profile in the <strong>WebAdvisor</strong> folder. The<br />
Academic Profile choices will open up.<br />
• Click on Intent to Graduate Application.<br />
• Choose the program that you are going to graduate from.<br />
Click Submit.<br />
• Complete the information on the screen. Make sure that<br />
your name appears exactly how you would like it to appear<br />
on your diploma. Delete Mr. or Ms., if necessary. Add your<br />
middle name if you would like it to be on your diploma.<br />
• Click Submit when done.<br />
To View Your Course Attendance<br />
• Log into <strong>My</strong><strong>HUgo</strong>.<br />
• Click on Academic Profile in the <strong>WebAdvisor</strong> folder. The<br />
Academic Profile will open up.<br />
• Click on Attendance.<br />
• Click one of your current courses.<br />
• Your attendance will display by date at the bottom of the<br />
screen.<br />
• Click on Back to select a different course or click OK to<br />
return to the main menu.