

EMS Guide - LVAD - MyLVAD
EMS Guide - LVAD - MyLVAD
EMS Guide - LVAD - MyLVAD

You also want an ePaper? Increase the reach of your titles
YUMPU automatically turns print PDFs into web optimized ePapers that Google loves.
ORANGE ORANGE ORANGE ORANGE ORANGE<br />
ORANGE ORANGE ORANGE ORANGE<br />
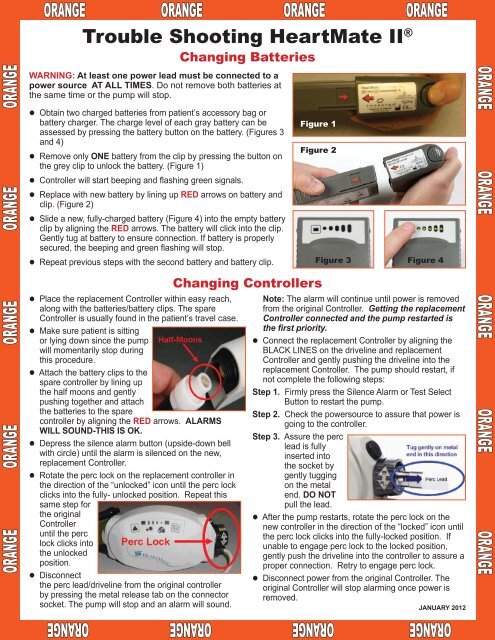
Trouble Shooting HeartMate II ®<br />
Changing Batteries<br />
WARNING: At least one power lead must be connected to a<br />
power source AT ALL TIMES. Do not remove both batteries at<br />
the same time or the pump will stop.<br />
l Obtain two charged batteries from patient’s accessory bag or<br />
battery charger. The charge level of each gray battery can be<br />
assessed by pressing the battery button on the battery. (Figures 3<br />
Figure 1<br />
and 4)<br />
l Remove only ONE battery from the clip by pressing the button on<br />
the grey clip to unlock the battery. (Figure 1)<br />
l Controller will start beeping and flashing green signals.<br />
l Replace with new battery by lining up RED arrows on battery and<br />
clip. (Figure 2)<br />
l Slide a new, fully-charged battery (Figure 4) into the empty battery<br />
clip by aligning the RED arrows. The battery will click into the clip.<br />
Gently tug at battery to ensure connection. If battery is properly<br />
secured, the beeping and green flashing will stop.<br />
Figure 2<br />
l Repeat previous steps with the second battery and battery clip. Figure 3 Figure 4<br />
Changing Controllers<br />
l Place the replacement Controller within easy reach, Note: The alarm will continue until power is removed<br />
along with the batteries/battery clips. The spare<br />
from the original Controller. Getting the replacement<br />
Controller is usually found in the patient’s travel case. Controller connected and the pump restarted is<br />
l Make sure patient is sitting<br />
the first priority.<br />
or lying down since the pump<br />
l Connect the replacement Controller by aligning the<br />
will momentarily stop during<br />
BLACK LINES on the driveline and replacement<br />
this procedure.<br />
Controller and gently pushing the driveline into the<br />
l Attach the battery clips to the<br />
spare controller by lining up<br />
replacement Controller. The pump should restart, if<br />
not complete the following steps:<br />
the half moons and gently<br />
Step 1. Firmly press the Silence Alarm or Test Select<br />
pushing together and attach<br />
Button to restart the pump.<br />
the batteries to the spare<br />
controller by aligning the RED arrows. ALARMS<br />
WILL SOUND-THIS IS OK.<br />
l Depress the silence alarm button (upside-down bell<br />
with circle) until the alarm is silenced on the new,<br />
replacement Controller.<br />
Step 2. Check the powersource to assure that power is<br />
going to the controller.<br />
Step 3. Assure the perc<br />
lead is fully<br />
inserted into<br />
the socket by<br />
l Rotate the perc lock on the replacement controller in<br />
gently tugging<br />
the direction of the “unlocked” icon until the perc lock<br />
on the metal<br />
clicks into the fully- unlocked position. Repeat this<br />
end. DO NOT<br />
same step for<br />
pull the lead.<br />
the original<br />
Controller<br />
until the perc<br />
lock clicks into<br />
the unlocked<br />
position.<br />
l After the pump restarts, rotate the perc lock on the<br />
new controller in the direction of the “locked” icon until<br />
the perc lock clicks into the fully-locked position. If<br />
unable to engage perc lock to the locked position,<br />
gently push the driveline into the controller to assure a<br />
proper connection. Retry to engage perc lock.<br />
l Disconnect<br />
l Disconnect power from the original Controller. The<br />
the perc lead/driveline from the original controller original Controller will stop alarming once power is<br />
by pressing the metal release tab on the connector removed.<br />
socket. The pump will stop and an alarm will sound.<br />
JANUARY 2012<br />
This guide does not supersede manufacturer instructions. Copy with permission only. March 2011<br />
ORANGE ORANGE ORANGE ORANGE<br />
ORANGE ORANGE ORANGE ORANGE ORANGE